COMPETENCE B59412-4 Elektro-Stekeovn for innbygging Bruksanvisning
Kjære kunde! Les nøye gjennom denne bruksanvisningen og oppbevar den for senere referanse. Gi denne bruksanvisningen videre til eventuelle senere eiere av apparatet. 1 3 2 2 Følgende symboler brukes i teksten: Sikkerhetsanvisninger Advarsel! Anvisninger som angår din personlige sikkerhet. OBS! Anvisninger som skal føre til at du unngår skader på apparatet.
Innhold Bruksanvisning ............................................. 5 Sikkerhetsanvisninger . . . . . . . . . . . . . . . . . . . . . . . . . . . . . . . . . . . . . . . . . . . 5 Beskrivelse av apparatet. . . . . . . . . . . . . . . . . . . . . . . . . . . . . . . . . . . . . . . . . Totalbilde . . . . . . . . . . . . . . . . . . . . . . . . . . . . . . . . . . . . . . . . . . . . . . . . . . . . . . Betjeningspanel . . . . . . . . . . . . . . . . . . . . . . . . . . . . . . . . . . . . . . . . . . .
Rengjøring og pleie . . . . . . . . . . . . . . . . . . . . . . . . . . . . . . . . . . . . . . . . . . . . . Apparatets utside. . . . . . . . . . . . . . . . . . . . . . . . . . . . . . . . . . . . . . . . . . . . . . . . Stekeovnsrommet . . . . . . . . . . . . . . . . . . . . . . . . . . . . . . . . . . . . . . . . . . . . . . . Tilbehør . . . . . . . . . . . . . . . . . . . . . . . . . . . . . . . . . . . . . . . . . . . . . . . . . . . . . . . . Fettfilter . . . . . . . . . . . . . . . . . . . . . . . .
Bruksanvisning 1 Sikkerhetsanvisninger 5 Dette apparatet er i samsvar med følgende EU-direktiver: – 73/23/EEC av 19.02.1973 Lavspenningsdirektiv – 89/336/EEC av 03.05.1989 EMC-direktiv inklusive endringsdirektiv 92/31/EEC – 93/68/EEC av 22.07.93 CE-merkedirektiv Elektrisk sikkerhet • Apparatet må kun tilkoples av en autorisert fagperson. • Ved forstyrrelser eller skader på apparatet: Skru sikringene ut eller slå dem av. • Reparasjoner på apparatet må kun utføres av fagpersoner.
Slik unngår du skader på apparatet • Ikke bruk aluminiumsfolie langs veggene i apparatet, og ikke plasser stekebrett, kokekar el.l. direkte på bunnen, ellers kan stekeovnens emalje bli skadet på grunn av den ekstra varmeutviklingen. • Fruktsaft som drypper fra stekebrettet setter flekker som ikke lar seg fjerne. Bruk et dypt stekebrett for fuktige kaker. • Ikke belast døren når den er åpen. • Du må aldri helle vann direkte inn i den varme stekeovnen. Det kan oppstå skader og misfarginger på emaljen.
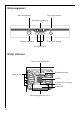
Beskrivelse av apparatet Totalbilde Betjeningspanel Dørhåndtak Glassdør 7
Betjeningspanel Drifts-kontrollampe Drifts-kontrollampe Temperatur-/tidsdisplay Temperatur-/tidsvalg Stekeovnsfunksjoner Funksjonsknapper Utstyr stekeovn Overvarme og grillelement Stekeovnsbelysning Benyttet riller Fettfilter Varmeelement i bakvegg Ventilator Undervarme Innskyvningsgitter, kan tas ut 8
Tilbehør stekeovn Rist For servise, kakeformer, steker og grillstykker. Stekebrett For kaker og småkaker. Fettpanne Til baking og steking og som oppsamlingskar for fett. Teleskopskinner Trippel ovnsstige 2 innskyvningsgittere med 3 teleskopskinner.
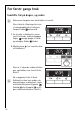
Før første gangs bruk Innstillle tid på dagen, og endre 3 Stekeovnen fungerer bare når klokken er innstilt. Etter elektrisk tilkopling eller etter et strømbrudd blinker funksjonslampen Klokke automatisk. 1. For å endre et klokkeslett som er innstilt allerede, trykk på knappen Velger mange ganger til funksjonslampen Klokke blinker. 2. Med bryteren elt klokkeslett. / innstilles aktu- Etter ca. 5 sekunder slukker blinkingen, og klokken viser innstilt klokkeslett 3 10 Nå er apparatet klart til bruk.
Første gangs Rengjøring 1 3 Før du bruker stekeovnen for første gang, bør du rengjøre den. OBS: Ikke bruk skarpe, skurende rengjøringsmidler! Overflaten kan bli skadet. Bruk vanlige vaskemidler til metallfronten. 1. Åpne stekeovnsdøren. Belysningen i stekeovnen er slått på. 2. Ta ut alt tilbehøret og vask det med varmt vann med oppvaskmiddel. 3. Vask stekeovnen også med varmt vann med oppvaskmiddel. Tørk godt. 4. Tørk av apparatets front med en fuktig klut. 5.
Betjening av stekeovnen 3 Stekeovnen er utstyrt med forsenkbare brytere for stekeovnsfunksjoner og temperaturvalg. For bruk skal du trykke på den aktuelle bryteren. Bryteren kommer da ut.
Slå på stekeovnen Drei stekeovnsfunksjonsbryteren til ønsket funksjon. Driftskontrollampen lyser. Temperaturdisplayet viser forslagstemperaturen for valgte stekeovnsfunksjon. Stekeovnen starter oppvarmingen. Når innstilt temperatur er nådd, høres et lydsignal. Endre stekeovnstemperatur Med bryteren / endres temperaturen opp eller ned. Innstillingen skjer i trinn på 5 °C. Slå av stekeovnen Drei stekeovnsfunksjonsbryteren i av-posisjon for å slå av stekeovnen.
3 3 Kjølevifte Kjøleviften slår seg på automatisk for å holde apparatets overflate kald. Etter at stekeovnen er slått av, fortsetter viften å gå for å kjøle av apparatet. Deretter slår den seg av av seg selv. Oppvarmingsdisplay Oppvarmingsdisplayet Når stekeovnsfunksjonen er slått på viser strekene, som langsomt lyser opp etter hverandre, hvor varm stekeovnen er blitt.
Hurtigoppvarming 1 3 Når du har valgt en stekeovnsfunksjon, kan den tomme stekeovnen forvarmes på relativt kort tid med tilleggsfunksjonen Hurtigoppvarming . OBS: Legg maten som skal tilberedes inn i stekeovnen først når Hurtigoppvarming er avsluttet og stekeovnen arbeider med ønsket funksjon. 1. Still inn ønsket stekeovnsfunksjon (f.eks. Over-/undervarme ). Endre ev. temperaturforslaget. 2. Trykk på knappen Hurtigoppvarming . Streken ved siden av symbolet lyser.
Stekeovnfunksjoner For stekeovnen står følgende funksjoner til disposisjon: Stekeovnsfunksjon 16 Anvendelse Varmeelement/ ventilator Profi-Varmluft Til steking av kaker på opptil tre riller samtidig. Still stekeovnstemperaturene 20-40 °C lavere enn ved over-/undervarme. Overvarme, undervarme, bakveggens varmeelement, ventilator Over-/ undervarme Til baking og steking på ett nivå. Overvarme, undervarme Varmluftsgrill Til steking av større steker eller fjærkre i panne.
Sette inn rist, stekeplate og fettpanne Sette inn stekeplate eller fettpanne: Plasser stekeplaten eller fettpannen på teleskopskinnene på den innsettingsrillen du ønsker, slik at begge hullene griper ned i holdeboltene fremst på teleskopskinnene. 3 Sette inn rist: Sett inn risten slik at føringsstavene peker nedover. Plasser risten på teleskopsinene på den innsettingsrillen du ønsker. Den forhøyede rammen rundt hele kanten på risten er en ekstra sikkerhet for at serviset ikke skal skli av.
Sett inn/ta ut fettfilteret Sett fettfilteret kun inn ved steking for å beskytte varmeenheten i bakveggen mot fettsprut. Sett inn fettfilter Ta tak i fettfilteret i grepet og sett inn begge håndtakene ovenfra og nedover i åpningen og inntil bakeovnbakveggen (ventilasjonsåpningen). Ta ut fettfilteret Grip fettfilteret i grepet og heng det ut oppover.
Klokkefunksjoner Temperatur-/tidsdisplay Funksjonslamper-klokke Knapp Velger Skifte display Koketid For innstilling av hvor lenge stekeovnen skal være i drift. Stopptid For innstilling av når stekeovnen skal slå seg av igjen. Signalur For innstilling av en kort tidsperiode. Ved utgått tid høres et lydsignal. Denne funksjonen har ingen innvirkning på driften av stekeovnen. Klokke For justering, endring eller avlesning av klokkeslettet.
3 3 20 Anmerkninger til klokkefunksjonene • Når du har valgt en klokkefunksjon, blinker den tilhørende funksjonslampen i ca. 5 sekunder. I løpet av denne tiden kan du stille inn eller endre de ønskede tidene med bryteren / . • Når du har stilt inn ønsket tid, blinker funksjonslampen en gang til i ca. 5 sekunder. Deretter lyser funksjonslampen. Den innstilte tiden begynner å løpe i bakgrunnen. • Når klokkefunksjonene Koketid og Stopptid er ute, må bryteren stekeovnsfunksjoner stilles på ”0”.
Signalur 1. Trykk på knappen Velger mange ganger til funksjonslampen Signalur blinker. 2. Still inn ønsket signalur med bryteren / (maks 99.00minutter). Funksjonslampen Signalur lyser. Når 90% av innstilt tid er ute, høres et lydsignal. Når den innstilte tiden er ute, blinker funksjonslampen og ”0.00“. Det høres et lydsignal. Slå av blinke- og lydsignal: Trykk på en tilfeldig knapp.
Koketid 1. Velg stekeovnsfunksjon og temperatur. 2. Trykk på knappen Velger mange ganger til funksjonslampen Koketid blinker. 3. Still inn ønsket tilberedningstid med bryteren / (maks 09.59timer). Funksjonslampen Koketid lyser og stekeovnen er straks på. Når den innstilte tiden er ute, blinker funksjonslampen og ”0.00“. Det høres et lydsignal i 2 minutter. Stekeovnen slår seg av. Slå av blinke- og lydsignal: Drei bryteren stekeovnsfunksjoner på ”0”.
Stopptid 1. Velg stekeovnsfunksjon og temperatur. 2. Trykk på knappen Velger mange ganger til funksjonslampen Stopptid blinker. 3. Still inn ønsket stopptid med bryteren / . Funksjonslampen Stopptid og stekeovnen er straks på. lyser Når den innstilte tiden er ute, blinker funksjonslampen og ”0.00“. Det høres et lydsignal i 2 minutter. Stekeovnen slår seg av. Slå av blinke- og lydsignal: Drei bryteren stekeovnsfunksjoner på ”0”.
3 Koketid og Stopptid samtidig Koketid og Stopptid kan brukes samtidig når stekeovnen skal slås på og av automatisk på et senere tidspunkt . 1. Velg stekeovnsfunksjon og temperatur. 2. Med funksjonen Koketid stilles den tiden inn, som retten trenger for tilberedningen, her 1 time. 3. Med funksjonen Stopptid stilles den tiden inn, når retten skal være ferdig, her kl. 14:05. Funksjonslampene Koketid og Stopptid lyser, og i displayet vises temperaturen, her 200°C.
Flere funksjoner Slå av lyset i displayet 2 3 Ved å slå av tidsdisplayet kan du spare energi. Slå av lyset i tidsdisplayet 1. Drei bryteren / mot høyre og hold den der. 2. Trykk samtidig på knappen Velger til displayet blir mørkt. Så snart apparatet tas i bruk igjen, slår displayet seg på igjen automatisk. Neste gang du slår av apparatet, slukker klokkedisplayet igjen. For at klokkeslettet skal vises hele tiden igjen, slår du på igjen tidsdisplayet. Slå på tidsdisplayet 1.
Stekeovnens barnesikring 3 Stekeovnen er utstyrt med barnesikring. Så snart barnesikringen er aktivert, kan ikke stekeovnen tas i bruk. For å kunne aktivere barnesikringen, må det ikke være valgt noen stekeovnsfunksjon. Aktivere barnesikringen 1. Drei bryteren / mot venstre og hold den der. 2. Trykk i tillegg på knappen Velger til ”SAFE“ kommer til syne i displayet. Nå er barnesikringen aktivert. Deaktivere barnesikringen 1. Drei bryteren / mot venstre og hold den der. 2.
Stekeovnens sikkerhetsbryter 3 Hvis stekeovnen ikke slås av innen en viss tid eller temperaturen ikke endres, slår den seg av automatisk. I temperaturdisplayet blinker den temperaturen som sist ble innstilt. Stekeovnen slår seg av ved en stekeovnstemperatur på: 30 - 120°C 120 - 200°C 200 - 250°C 250 - max°C 3 etter etter etter etter 12,5 timer 8,5 timer 5,5 timer 3,0 timer Ta ovnen i bruk etter at sikkerhetsbryteren ble aktivert Slå stekeovnen helt av. Deretter kan den tas i bruk igjen.
Mekanisk dørsperre Ved levering av apparatet er dørsperren ikke aktivert. Aktivere dørsperren Trekk knappen forover inntil den griper i lås. Åpne stekeovnsdøren: 1. Trykk døren godt igjen. 2. Trykk knappen og hold den trykt. 3. Åpne døren. Lukke stekeovnsdøren Lukk døren uten å trykke på knappen. 3 28 Deaktivere dørsperren Trykk knappen inn mot panelet. Selv om apparatet slås av, oppheves ikke den mekaniske dørsperren.
Anvendelse, tabeller og tips Steking av kaker Stekeovnsfunksjon: Profi-Varmluft eller Over-/undervarme Kakeformer • For Over-/undervarme er belagte former og former av mørkt metall godt egnet. • For Profi-Varmluft er også lyse metallformer godt egnet. Innsettingsriller • Steking av kaker er mulig på ett nivå med Over-/undervarme . • Med Profi-Varmluft kan du steke på opptil tre stekebrett samtidig: 1 stekebrett: f.eks. innsettingsrille 3 1 kakeform: f.eks. innsettingsrille 1 2 stekebrett: f.eks.
3 30 Generelle opplysninger • Sett inn brettet med den skrå kanten pekende forover! • Med Over-/undervarme eller Profi-Varmluft kan du også steke to former ved siden av hverandre samtidig på risten. Steketiden blir da litt lenger. Ved tilberedning av dypfryste retter kan stekebrettene slå seg under stekingen. Dette kommer av den store temperaturforskjellen mellom den dypfryste maten og stekeovnstemperaturen. Når brettet er avkjølt igjen, går det tilbake til opprinnelig fasong.
2 Om tabellen for steking av kaker I tabellene finner du et utvalg av retter med nødvendige temperaturangivelser, tilberedningstider og innsettingsriller. • Temperaturene og tilberedningstidene er veiledende verdier, fordi resultatet er avhengig av deigens sammensetning, mengden og tilberedningsformen. • Vi anbefaler at du stiller inn den laveste temperaturverdien den første gangen, og først ved behov, f.eks.
Steketabell Steking på én innsettingsrille Type matrett Stekeovnsfunksjon Innsettingsrille Temperatur °C Tid Timer: Min.
Type matrett Smør-/sukkerkake Stekeovnsfunksjon Innsettingsrille Temperatur °C Tid Timer: Min. 190-2101) 0:15-0:30 Over-/ undervarme 3 Fruktkaker (på gjærdeig/røredeig)2) Profi-Varmluft 3 150 0:35-0:50 Fruktkaker (på gjærdeig/røredeig)2) Over-/ undervarme 3 170 0:35-0:50 Profi-Varmluft 3 160-170 Fruktkake på mørdeig 1) 0:40-1:20 Langpannekaker med ømfintlig fyll (f.eks.
Steking av kaker på flere innsettingsriller ProfiVarmluft Type bakst ProfiVarmluft Innsettingsrille nedenfra Temperatur ºC Tid Timer: Min.
Tipps ved bakingen Bakeresultat Mulig årsak Løsning Kaken er for lys på un- Gal innsettingshøyde dersiden Skyv kaken lengre inn Kaken faller sammen (blir klebrig, spunset, vannstriper) For høy baketemperatur Sett baketemperaturen litt lavere For kort baketid Gjør baketiden lengre Baketiden kan ikke forkortes med en høyere baketid For mye væske i deigen Bruk mindre væske Observer omrøringstidene, spesielt ved bruk av kjøkkenmaskiner For lav baketemperatur Sett baketemperaturen høyere For lang b
Tabell Omelettetter og overbakte Rett Stekeovnsfunksjon Temperatur °C Tid Time: Min.
Tabell dypfrysingsferdigretter Matrett Stekeovnsfunksjon Innsettingsrille Temperatur °C Tid etter informa- etter inforsjon fra promasjon fra dusenten produsenten Over-/ undervarme 3 Varmluftsgrill 3 Baguetter Over-/ undervarme 3 etter informa- etter inforsjon fra promasjon fra dusenten produsenten Fruktkaker Over-/ undervarme 3 etter informa- etter inforsjon fra promasjon fra dusenten produsenten Dypfyst pizza Pommes frites1) (300-600 g) 200-220 etter informasjon fra produsenten 1) Beme
Steking Stekeovnsfunksjon: Over-/undervarme eller Varmluftsgrill Sett inn fettfilter ved tilberedning av kjøtt og fisk! Stekeutstyr • Alle varmebestandige kar er egnet for steking (følg produsentens anvisninger for bruk!). • Store steker kan du steke direkte i oppsamlingspannen eller på risten med oppsamlingspannen under. • Vi anbefaler å steke alle magre kjøttsorter i stekegryte med lokk. På denne måten blir kjøttet saftigere.
Steketabell Kjøttype Mengde Stekeovnsfunksjoner Innsettings -rille Temperatur °C Tid Time: Min.
Kjøttype Mengde Stekeovnsfunksjoner Innsettings -rille Temperatur °C Tid Time: Min.
Flatgrill 1 3 Stekeovnsfunksjon: Grill eller Grill med stor flate maksimal temperaturinnstilling med OBS: Ha alltid stekeovnsdøren lukket når du griller. Forvarm alltid den tomme stekeovnen i fem minutter med grillfunksjonen! • Sett risten inn på anbefalt innsettingsrille ved grilling. • Sett alltid oppsamlingskaret inn på 1. innsettingsrille nedenfra. • Grilltidene er veiledende. • Grillen egner seg særlig godt for flate kjøtt- eller fiskestykker. Grilltabell Grilletid Grillmat Innsettingsrille 1.
Opptining Stekeovnsfunksjon: Tining (uten temperaturinnstilling) • Plasser matvarer som er pakket ut, på en tallerken på risten. • Ikke bruk noen slags tallerken eller fat til å dekke til, fordi de forlenger opptiningstiden betraktelig. • For å tine opp settes risten inn i 1. høyde nedenfra. Opptiningstabell Opptingstid Min. Etteropp-tiningstid min.
Tørking Stekeovnsfunksjon: Profi-Varmluft • Bruk ristene belagt med matpapir eller bakepapir. • Du oppnår et bedre resultat hvis du slår ovnen av etter halv tørketid, åpner døren og helst lar den avkjøle over natten. • Deretter tørkes matvarene ferdig.
Hermetisering Stekeovnsfunksjon: Undervarme • Bruk kun glass som er like store og som er vanlige i handelen til hermetisering. • Glass med twist-off- eller bajonettlukking eller metallbokser er ikke egnet. • Bruk den 1. innsettingsrillen nedenfra til hermetisering. • Bruk brettet til hermetisering. På brettet er det plass til opptil seks glass med hhv. 1 liter innhold. • Glassene bør være like fulle og godt tillukket. • Plasser glassene på brettet på en slik måte at de ikke berører hverandre. • Hell ca.
Hermetiseringstabell De angitte hermetiseringstidene er veiledende. Temperatur i°C Hermetisering til perling begynner i min. Koke videre ved 100°C i min.
Rengjøring og pleie 1 Advarsel: Apparatet må være avslått og avkjølt når du rengjør det. Advarsel: Det er av sikkerhetsgrunner ikke tillatt å rengjøre apparatet med dampstrålerenser eller høyttrykksspyler! OBS: Ikke bruk skuremidler, skarpe rengjøringsmidler eller slipende gjenstander. Apparatets utside • Tørk av apparatets frontside med en myk klut dyppet i varmt såpevann. • Bruk vanlige rengjøringsmidler på metallfrontene.
Pyrolytisk rengjøring 1 1 3 3 3 Advarsel: Stekeovnen blir svært varm under denne prosessen. Hold små barn borte. Advarsel! Før du utfører pyrolyserensingen må alle løse deler, også opphengsgitteret, fjernes fra stekeovnen. Hvis du bruker ovnsstiger som er å få kjøpt som ekstra tilbehør, må disse tas ut før pyrolysen. Hvis det fortsatt vises innsatte innskyvningsgittere og vognsstiger i tidsdisplayet C1.
Ovnsstiger For å rengjøre sideveggene kan ovnsstigene på venstre og høyre side i stekeovnen tas ut. Ta ut ovnsstigen Trekk først stigen ut av stekeovnsveggen i fremkant (1) og sving det deretter bakover (2). 3 Sette inn ovnsstigen Viktig! De avrundete endene på styrestengene må vende forover! Ved montering henges stigen først på i bakkant (1) og deretter stikkes det inn og trykkes på plass i forkant (2).
Teleskopskinner For å rengjøre sideveggene kan innskyvningsgitrene på venstre og høyre side i stekeovnen tas ut. Ta ut innskyvningsgitteret Trekk først gitteret ut av stekeovnsveggen i fremkant og sving det deretter bakover. 1 Sette inn innskyvningsgitteret Pass på at holdeboltene for teleskopskinnene peker forover når du setter inn innskyvningsgitteret! Ved montering henges gitteret først på i bakkant og deretter stikkes det inn og trykkes på plass i forkant.
Rengjøre ovnsstigen 1 1 1 1 Ovnsstigene vaskes i varmt oppvaskvann. OBS: Glideskinnene er ikke egnet for vask i oppvaskmaskinen. Forsiktig: Ikke bruk aggressive eller skurende rengjøringsmidler, stekeovnsspray, stålull eller harde gjenstander, som kniv eller rengjøringsskrape. Dette ødelegger belegget. OBS: Teleskopskinnene må aldri settes inn med fett.
Stekeovnsbelysning 1 3 Advarsel! Risiko for strømoverslag! Før stekeovnlampen skiftes: – Slå av stekeovnen! – Henholdsvis skru ut eller slå av sikringene i sikringsskapet. Legg en klut i bunnen av stekeovnen som beskyttelse for stekeovnlampen og glassdekselet. Skifte stekeovnlampe på sidevegg / Rengjøre glassdekselet 1. Ta av glassdekselet ved å dreie mot venstre og rengjør glasset. 2. Hvis nødvendig: Skift stekeovnlampe 40 W, 230 V, 300 °C varmebestandig. 3. Monter glassdekselet på igjen.
Stekeovnsdøren For lettere å komme til for å rengjøre inni stekeovnen, kan stekeovnsdøren hektes av apparatet. Hekte av stekeovnsdøren 1. Åpne stekeovnsdøren helt. 2. Vippklemmefestet (A) helt opp på begge dørhengslene. 3. Lukk stekeovnsdøren igjen til første holderstilling (ca. 45°). 3 4. Grip stekeovnsdøren på sidene med begge hendene og trekk den på skrått oppover fra stekeovnen (Forsiktig: Tung!).
Hekte på igjen stekeovnsdøren 1. Grip tak øverst i sidene på stekeovnsdøren med begge hendene og hold den i en vinkel på ca. 45°. Sett sporene på undersiden av stekeovnsdøren ned i hengslene på stekeovnen. La døren gli helt nedover til den stopper. 2. Åpne stekeovnsdøren helt. 3. Vipp klemmefestet(A) på begge dørhengslene tilbake til opprinnelig posisjon. 4. Lukk stekeovnsdøren.
Glasset i stekeovnsdøren 1 Stekeovnsdøren er utstyrt med fire parallelle glassplater. De innerste glassplatene kan tas ut for rengjøring. OBS! Hvis du bruker kraft, særlig på frontglassets kanter, kan glasset knuse. Ta ut dørglassene 1. Åpne stekeovnsdøren helt. 2. klemmefestet (A) helt opp på begge dørhengslene. 3. Lukk stekeovnsdøren igjen til første holderstilling (ca.
4. Grip tak øverst på begge sider av dørdekselet og press innover for å løsne klips låsen. Trekk så dørdekselet opp og av. 5. Grip tak i et dørglass om gangen, trekk det oppover og ut av føringskantene. Rengjøre dørglassene Rengjør dørglassene grundig med vann og oppvaskmiddel. Tørk godt 3 Sette inn dørglassene 1. Sett dørglassene et etter et på skrått ned i dørprofilen nederst i døren og senk dem på plass. Sett inn de to minste glassene først, så den store.
2. Ta tak i sidene på dørdekselet (B), legg det inn mot innsiden av dørkanten og sett dørdekselet (B) ned øverst på døren. 3 På den åpne siden av dør dekselet (B) befinner det seg en føringsskinne (C). Denne må skyves inn mellom den ytre dørskiven og føringsvinkelen (D). Klips låsen (E) må klikke på plass.
3. Åpne stekeovnsdøren helt. 4. Vipp klemmefestet (A) på begge dørhengslene tilbake til opprinnelig posisjon. 5. Lukk stekeovnsdøren.
Hva må gjøres hvis … Problem Stekeovnen blir ikke varm Mulig årsak Løsning Stekeovnen er ikke slått på Slå på stekeovnen Klokken er ikke stilt inn Still inn klokken Du har ikke foretatt de nødvendige innstillingene Kontroller innstillingene Stekeovnens sikkerhetsbry- Se Sikkerhetsbryter ter er blitt aktivert Sikringen i husets installa- Kontroller sikringene Hvis sjon (sikringsskapet) er gått sikringene går flere ganger, bør du ta kontakt med en autorisert elektroinstallatør Stekeovnsbelysningen slår
1 3 3 Hvis du ikke får rettet på problemet med løsningstipsene over, ta kontakt med din forhandler eller med kundeservice. Advarsel!Reparasjoner på apparatet må kun utføres av fagpersoner. Ukyndig utførte reparasjoner kan føre til alvorlig fare for den som bruker apparatet. Feil som er oppstått på grunn av feil bruk av apparatet kan ikke rettes kostnadsfritt av kundetekniker eller forhandler, selv om dette skjer innenfor reklamasjonstiden.
Avfallsbehandling 2 2 Emballasjemateriale Emballasjematerialene er miljøvennlige og kan resirkuleres. Kunststoffene er merket med f.eks . >PE<, >PS< osv. Sørg for å kaste emballasjematerialene ifølge merkingen i den kommunale avfallshåndteringens oppsamlingsbeholdere. Kassert apparat W 1 Symbolet på produktet eller på emballasjen viser at dette produktet ikke må behandles som husholdningsavfall. Det skal derimot bringes til et mottak for resirkulering av elektrisk og elektronisk utstyr.
Service Ved tekniske forstyrrelser, kontroller først om du selv kan løse problemet ved hjelp av bruksanvisningen (kapittelet „Hva må gjøres, hvis...“) Hvis du ikke kunne løse problemet, kan du ta kontakt med kundetjenesten eller en av våre servicepartnere. For å kunne hjelp deg raskt, trenger vi følgende opplysninger: – Modellbetegnelse – Produktnummer (PNC) – Serienummer (S-nr.
www.electrolux.com www.aeg-electrolux.