B 89090-4 Built-in oven Einbau-Backofen Four à encastrer Forno da incasso Operating Instructions Gebrauchsanweisung Notice d’utilisation Istruzioni per l’uso e l’installazione
ENGLISH Important Safety Information These warnings are provided in the interest of safety. You MUST read them carefully before installing or using the appliance. Installation Child Safety • It is mandatory that all operations required for the installation are carried out by a qualified or competent person, in accordance with existing rules and regulations. • • • It is dangerous to alter the specification in any way.
Contents For the User For the Installer Important Safety Information Description of the Oven The Oven Electronic Control The Oven Safety Devices When the oven is first installed Before the first use of the oven Using the oven Cooking Functions Programming the Oven Safety and Energy Saving Functions The "Recipe Selection" Function Hints and Tips Cooking tables Cleaning the Oven Something not working Service and Spare Parts 2 3 4 4 5 6 7 9 9 12 13 14 15 17 22 22 Installation Technical data Electrical conn
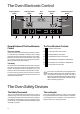
The Oven Electronic Control Cooking Duration Symbol CookingFunctions display Time display Temperature display EndOfCookingTime Symbol Minute Minder Symbol Clock Symbol Thermometer Symbol 1 2 3 4 5 6 7 GeneralFeaturesofTheOvenElectronic Control The Oven Electronic Controls 1. ON / OFF Touch control The touch controls 2. Cooking Functions Touch Control 3. Recipe Selection Touch Control 4. Fast Heat Up Function Touch Control 5. DecreasingTouchControl(TimeorTemperature) 6.
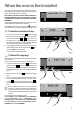
When the oven is first installed When the oven is first connected to the electrical supply, or when supply is restored after a long power failure, the upper section of the display shows this message: WELCOMETO*KRONOS-3*BASIC*DANSK* DEUTSCH* ENGLISH*ESPANOL*FRANCAIS*≈ÀÀ«Õ… ¡*ITALIANO * NEDERLANDS * NORSK * PORTUGUES * SVENSKA * ÐÓÑÑÊÈÉ This message lists all the languages which can be chosen to operate with the Oven Electronic Control (Fig. 1). Fig.
Before the first use of the oven Remove all packaging, both inside and outside the oven, before using it. The oven will work only if the time of day has been set. Toswitchtheovenonandoff The oven must be switched on before setting any cooking function or programme. When control is touched, the oven light will switch on. The oven symbol and the message "LIGHT" appear on the display (Fig. 5). To switch off the oven, you can touch control at any time.
Using the Oven Shelf Positions The oven shelves can be placed at different heights to obtain better cooking results. The levels are shown in Fig. 8. Always cook with the oven door closed. • • • • Always use oven gloves to remove and replace food in the oven. Always ensure that you are using oven proof baking trays, oven dishes, etc. Do not place baking trays, cake tins or aluminium foil directly on the base of the oven.
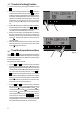
To select a Cooking Function 1. Switch on the oven by touching the "ON/OFF" control . 2. Touch the "Cooking Functions" control to select the is touched, required oven function. Each time control a different cooking symbol appears in the lower section of the display and the description of the cooking function appears as a message in the upper section. The pre-set temperature for each function is shown in the lower section, and symbol " " flashes on the right hand (Fig. 11). 3.
Cooking Functions The following list displays in sequence all the available cooking functions. 1 2 3 4 5 FAN COOKING - This setting allows you to roast or roast and bake simultaneously using any shelf, without flavour transference. Pre-set temperature: 175°C. PIZZA - The bottom element provides direct heat to the base of pizzas, quiches or pies, while the fan ensures air is circulated to cook the pizza toppings or pie fillings. Pre-settemperature: 175°C.
programme the Oven to switch To off 1. Switch the oven on, place food in the oven, select a cooking function and adjust the cooking temperature, if required. 2. Touch the "Time Function" control . The symbol 3. 4. 5. 6. flashes near the "Cooking Duration" symbol . The time display shows "0.00" at the left hand and the current time of day at the right hand (Fig. 15). Symbol will flash for 5 seconds. Within this time, touch control to select the required time. Maximum time is 23 hours 59 minutes.
Safety and Energy Saving Functions SafetyCut-OffFunction The oven will switch off automatically if any change of setting is made, according to the table below (Fig. 19). If temperature setting is: the oven will switch off: 250°C after 3 hours from 200 up to 245°C after 5 1/2 hours from 120 up to 195°C after 8 1/2 hours less than 120°C after 12 hours Fig. 19 ChildSafetyFunction To avoid children switching on the oven, it is possible to lock the oven controls. 1.
Residual Heat Function When a Cooking Duration time is set, the heating elements of the oven will automatically go off a few minutes before the end of the programmed time, and the oven will use the residual heat to finish your dishes without energy consumption. All current settings will be displayed until the Cooking Duration time is over. This function will not operate when the Cooking Duration time is less than 15 minutes.
The "Recipe Selection" Function Some recipes have been stored into the Oven Electronic Control memory to allow you to cook ten different dishes using pre-set cooking functions, temperatures and cooking times. The available recipes are listed at the bottom of this page. To choose a recipe: 1. Touch the ON/OFF control to switch on the oven; 2. Touch the "Recipe Selection Function" control : the upper section of the display will show the name of the recipe, and symbol will come on near the "Cooking .
Hints and Tips Always cook with the oven door closed. The oven is supplied with an exclusive system which produces a natural circulation of air and the constant recycling of steam. This system makes it possible to cook in a steamy environment and keep the dishes soft inside and crusty outside. Moreover, the cooking time and energy consumption are reduced to a minimum. During cooking steam may be produced which can be released when opening the oven door. This is absolutely normal.
Cooking Tables Cooking times do not include pre-heating time. A short oven pre-heating (about 10 minutes) is necessary before any cooking. Conventional and fan cooking Weight (gr.) Conventional Cooking 1000 500 500 250 1000 1200 1000 1500 1500 1500 1500 2000 1200 1200 1000 4000 1500 3000 1200 1500 800 1200 1500 Fan Cooking Cooking time TYPEOFDISH Level temp.
Cooking times do not include pre-heating time. A short oven pre-heating (about 10 minutes) is necessary before any cooking.
Cleaning the Oven Before cleaning always allow the cooling fan to cool the oven down before switching off at the electricity supply. This appliance cannot be cleaned with steam or with a steam cleaning machine. The oven should be kept clean at all times. A build-up of fats or other foodstuffs could result in a fire, especially in the grill pan. Cleaning materials Before using any cleaning materials on your oven, check that they are suitable and that their use is recommended by the manufacturer.
Cleaning the oven door The following instructions explain how to disassemble the oven door as it is supplied by the Manufacturer. If your oven door has been reversed, please note that the references to the right or left side have to be switched. A B Figure 28. With the right hand, hold the aluminium perforated grid (“A”) while with the left hand pull off the support “B” of the inner glasses. Push the support towards the right to release it and then lift it up. Fig. 28 A C Figure 29.
Figure 32. Tightly hold with both hands the second inner glass “E” and remove it from its original position also by sliding it upwards. E After removing the inner glass, clean the oven door and the glasses. We recommend to clean the oven door using only a wet sponge and dry it after cleaning with a soft cloth. Never use steel wool, acids or abrasive products as they can damage the surface. After cleaning, place the two inner glasses back in their original positions.
Oven Shelves and Shelf Supports Tocleantheovenshelves,soakinwarmsoapywaterandremove stubborn marks with a well wetted soap impregnated pad. Rinse well and dry with a soft cloth. The shelf supports can be removed for easy cleaning. Proceed as follows: 1) remove the front screw while keeping the shelf support in position with the other hand (Fig. 35); 2) disengage the rear hook and take off the shelf support (Fig.
GreaseFilter When cooking meat, the grease filter must be fitted over the oven fan by clipping it over the vents in the back panel. This will prevent a built-up of fat on the fan impellor. Do not use abrasive materials to clean the seal. The grease filter is dishwasher proof. When cooking is completed and the oven has cooled down, remove the filter by pushing the protruding tongue on the filter upward (see Fig. 38). Wash the filter after use using warm soapy water. Fit the grease filter only when roasting.
Something not working If the appliance is not working correctly, please carry out the following checks, before contacting your local Service Centre. SYMPTOM The oven does not come on. SOLUTION Touch the OVEN ON button, then select a cooking function. Check the fuse and ensure the socket switch or the switch from the mains supply to the oven are ON. The oven light does not come on. Switch on the oven using touch control .
Installation The oven must be installed according to the instructions supplied. This oven must be installed by qualified personnel.
Building In Please ensure that when the oven is installed it is easily accessible for the engineer in the event of a breakdown. Building In The surround or cabinet into which the oven will be built must comply with these specifications: ● the dimensions must be as shown in the relevant diagrams; ● the materials must withstand a temperature increase of at least 60°C above ambient; ● proper arrangements must be made of a continuous supply of air to the oven to prevent the oven overheating.