B9931-5 User manual Built-in Electric Oven
Contents Thank you for choosing one of our high-quality products. To ensure optimal and regular performance of your appliance please read this instruction manual carefully. It will enable you to navigate all processes perfectly and most efficiently. To refer to this manual any time you need to, we recommend you to keep it in a safe place. And please pass it to any future owner of the appliance. We wish you much joy with your new appliance.
Safety information 3 SAFETY INFORMATION Before the installation and use, read this manual carefully: • For your personal safety and the safety of your property • For the respect of the environment • For the correct operation of the appliance. Always keep these instructions with the appliance also if you move or sell it. The manufacturer is not responsible if incorrect installation or use results in damage.
Safety information • Built in ovens and built in cooking surfaces are attached with special connection system. To prevent damage to the appliance, only use an appliance with the appliances from the same manufacturer. Electrical connection • The appliance must be earthed. • Make sure that the electrical data on the rating plate agree with your domestic power supply. • Information on the voltage is on the rating plate. • Always use a correctly installed shockproof socket.
Safety information 5 • For your personal safety and the safety of your property, only clean the appliance with water and a soap. Do not use flammable products or products that can cause corrosion. • Do not clean the appliance with steam cleaners, high-pressure cleaners, sharp objects, abrasive cleaning agents, abrasive sponges and stain removers • If you use an oven spray, follow the instructions from the manufacturer. • Do not clean the glass door with abrasive cleaning agents or metal scraper.
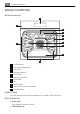
Product description PRODUCT DESCRIPTION General overview 2 1 3 4 5 5 6 4 11 7 3 8 2 1 9 10 1 2 3 4 5 6 7 8 9 10 11 Control panel Electronic programmer Smell filter Heating element Oven lamp Meat probe socket Oven lamp Fan Bottom heat Oven shelf runners, removable Shelf positions Inside of door You will find the shelf position number on the inside of the oven door. Oven accessories • Oven shelf For cookware, cake tins, roasts.
Before first use 7 For cakes and biscuits. • Deep roasting pan To bake and roast or as pan to collect fat. • Meat probe To measure how far the meat is cooked. • Synchronised shelf runners Retaining clips with connection clamp. To remove the telescopic shelf runners more easily. BEFORE FIRST USE WARNING! Refer to "Safety information" chapter. Initial Cleaning • Remove all parts from the appliance. • Clean the appliance before first use. Refer to chapter "Care and Cleaning". Setting the language 1.
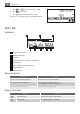
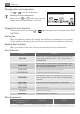
Daily use 1. Use or to set the correct time. to confirm. 2. Use The appliance is now ready to use. Refer to “Clock functions” to change the time. TIME OF DAY DAILY USE Indicators 1 2 3 XXXXX XXXX 8 1 2 3 4 5 6 7 8 7 6 5 4 Symbol status bar Menu status bar Text line Clock functions. Period of operation Shelf levels Time. Meat core temperature Heat indicator Temperature Menu status bar Indication Function A bar in the status bar flashes. The position in a menu is shown.
Daily use 9 Oven buttons Button Function DOWN, UP OPTION Description To set the oven function. To move up and down in the menu. To open the Options menu. To close the Options menu (push and hold the button). OK To confirm or open the submenu. ON/OFF To switch the appliance on or off. RAPID HEAT UP SELECTION PLUS, MINUS To switch the rapid heat up function on or off. To select oven function, clock function and MEATPROBE. To set values (e.g. temperature, time, weight, degree of cooking).
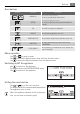
Daily use Changing the oven temperature Use or to set the temperature. Showing the oven temperature and at the same time the When you use display shows the temperature in the oven. CONVENTIONAL Stopping the oven function To stop an oven function touch FUNCTIONS . or again and again until the display shows OVEN Cooling fan When the appliance operates, the cooling fan switches on automatically. If you switch off the appliance, the cooling fan continues to operate until the appliance cools down.
Daily use Meat programmes with weight input Application Weight PORK Roast pork, shoulder of pork 1.0 - 3.0 kg BEEF Roast beef, pot roast 1.0 - 3.0 kg VEAL Roast veal 1.0 - 3.0 kg GAME Venison, rabbit 1.0 - 3.0 kg Meat programmes with weight input Application 11 Weight TOP SIDE BEEF • • • TOP SIDE BEEF RARE TOP SIDE BEEF MED. TOP SIDE BEEF WELL - BEEF SCAN • • • BEEF SCAN RARE BEEF SCAN MED.
Daily use Inserting the oven shelf and deep roasting pan together Put the oven shelf on the deep roasting pan. Put the oven shelf and the deep roasting pan on the telescopic runners. Hook the holes on the edges onto the retaining pins on the telescopic runners. Synchronised shelf runners Install the synchronised shelf runners to remove the telescopic shelf runners more easily. CAUTION! To attach the retaining clips, the support brackets for the connection clamp must point to the rear. 1.
Daily use 13 5. To remove the synchronised shelf runners, do the above steps in the opposite sequence. Meatprobe Meat probe measures the core temperature of the meat. When the meat is at the set temperature, the oven switches off automatically.
Daily use WARNING! The meat probe is hot! There is the risk of burns! Be careful when you remove the point of the meat probe and the meat probe. 9. Switch off appliance. For the meat programmes with the meat probe, refer to the automatic programmes. Changing the core temperature 1. Use again and again until the display shows MEATPROBE . 2. Use or to change the core temperature. The core temperature is displayed from 30°C.
Daily use 15 1. Switch on the appliance and install the meat probe. VEAL The display shows MEATPROBE and flashes. 2. Use or to set the MEATPROBE programme. When the MEATPROBE programme is completed, you can hear an acoustic signal. Use any button to switch off the acoustic signal. 3. Remove the meat probe. WARNING! The meat probe is very hot. There is a risk of burns when you remove the meat probe. Options menu OPTIONS MENU RECIPE MENU MEMORY MENU CLEANING MENU SETTINGS MENU 1.
Daily use RECIPE MENU BAKING RECIPES ROASTING RECIPES WHITE BREAD FISH STEAKS OTHER RECIPES Refer to the booklet “Tables, Tips and Recipes” for more data on the oven functions, oven programmes and automatic recipes. Setting a recipe 1. 2. 3. 4. 5. Use to open the Options menu. to open RECIPE MENU . Use or to set the recipe category. Use to open, for example ROASTING RECIPES menu. Use or to set the recipe.
Daily use 4. Use to set the menu option STORE MEMORY . The display shows the first free memory position. 17 STORE MEMORY 5. Use to set the memory position MEMORY 1 The first letter in the text line flashes. 6. Use or to set the correct letter. or to move the cursor to the 7. Use right or to the left. The subsequent letter flashes. You can change the letter. 8. Do these steps again for the full name of your “personal recipe“. There are 18 fields for names of personal recipes.
Daily use MENU HEAT+HOLD OFF DESCRIPTION The function is switched off. EXTRA TIME MENU EXTRA TIME ON The function is switched on after the clock function DURATION or END is completed. Touch if you want to set 10 minutes extra or to finish cooking. EXTRA TIME OFF The function is switched off. RAPID HEAT UP MENU RAPID HEAT UP ON The function is switched on with the applicable oven functions. RAPID HEAT UP OFF The function is not switched on with the applicable oven functions.
Daily use 19 The display shows SAVED for some seconds and goes back to the OVEN FUNCTIONS menu. More hints for SETTINGS MENU You can change different base settings permanently. MENU DESCRIPTION SMELL FILTER • The energy consumption is higher when the SMELL FILTER is activated. • If you deactivate the smell filter, it activates itself after 100 hours of baking or roasting, in order to self-clean. • The SMELL FILTER also activates itself during pyrolytic cleaning.
Daily use If the appliance is at the set temperature, the heat indicator bars are on. You can hear an acoustic signal. The display stops to show . The appliance continues to heat in the set oven function and oven temperature. 4. Put the food in the appliance. If you generally prefer to put food into a pre-heated oven, you can switch on RAPID HEAT UP function permanently (refer to SETTINGS MENU ). Then you can switch off RAP.
Daily use 21 CHILD LOCK WARNING! Switch on CHILD LOCK when there are children. CHILD LOCK makes sure that children do not accidentally switch on the appliance. Switching on the child lock 1. If necessary, switch on the appliance. Do not set an oven function. at the same time until the display shows CHILD LOCK . 2. Use and The CHILD LOCK is on. Switching off the child lock 1. If necessary, switch on the appliance. 2. Use and at the same time until the display stops to show CHILD LOCK .
Care and cleaning Door lock The door lock is deactivated when the appliance comes from the factory. Activating the door lock: Pull the door lock forward until it locks in place. Deactivating the door lock: Push the door lock back into the panel. Opening the appliance door: 1. Push and hold the door lock. 2. Open the door. Do not push the door lock when closing the appliance door! Switching off the appliance does not cancel the mechanical door lock.
Care and cleaning 23 Folding down the heating element 1. Remove the shelf support rails. 2. Hold the heating element with the two hands at the front 3. Pull it forwards against the spring pressure and out along the support on both sides. 4. The heating element folds down. The oven ceiling is ready to clean. Installing the heating element 1. Install the heating element in opposite sequence. Install the heating element correctly on the two sides above the support on the inner wall of the oven. 2.
Care and cleaning Do not clean the telescopic runners in the dishwasher. Do not lubricate the telescopic runners. Oven lamp WARNING! There is a danger of electrical shock! Before you change the oven lamp: • Switch off the oven. • Remove the fuses in the fuse box or switch off the circuit breaker. Put a cloth on the bottom of the oven for protection of the oven light and glass cover. Replacing the oven lamp 1. You can find the lamp glass cover at the back of the cavity.
Care and cleaning 2. Lift up clamping levers (A) on the two door hinges fully. 25 A A 3. Close the oven door until the first position (angle approximately 45°). 4. Hold of the oven door with one hand on each side and pull it away from the oven at an upwards angle. 5. Now you can remove the inner glass panels and clean them. To install the door follow the procedure in reverse. 45° CAUTION! Be careful with the glass, it can break.
What to do if… 3. Hold the door glass panels on their top edge one by one and pull them upwards out of the guide 4. Clean the door glass panels. To install panels follow the procedure in reverse. Insert the smaller panel first, then the larger. WHAT TO DO IF… WARNING! Refer to "Safety information" chapter. Problem Possible cause Solution The oven does not heat up The appliance is switched off Switch on the appliance The oven does not heat up The clock is not set Set the clock.
Environment concerns Product number (PNC) Serial number (S.N.) 27 ......................................... ......................................... ENVIRONMENT CONCERNS The symbol on the product or on its packaging indicates that this product may not be treated as household waste. Instead it should be taken to the appropriate collection point for the recycling of electrical and electronic equipment.
892941830 - B- 052010 www.aeg-electrolux.