CaFamosa Kaffee-Espresso-Vollautomat Fully Automatic Espresso-Maker Macchina per espresso completamente automatica Volautomatische koffie- en espressomachine Täysin automaattinen espressokahviasema Gebrauchsanweisung Operating instructions Istruzioni per l’uso Gebruiksaanwijzing Käyttöohje
1 B C A D E O G F H L M J N K P A B J K C D L M E F N O G H P 2 2 3
4 5 6 7 8 9/A 9/B 10 11/A 11/B 12 13 3
14 4 15/A 15/B 16/A 16/B 17 18/A 18/B 19/A 19/B 20 21 22 23
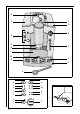
g g Features (Figure 1) A Fresh Water Tank, Lid B Filler Opening for Ground Coffee with Lid C Cup Rack D Bean Container with Lid (inside: grinding texture adjustment) E Selector Dial for Steam and Hot Water F Swivelling Nozzle for Steam and Hot Water G Height Adjustable Outlet H Spouts J Drip Grille K Drip Catcher L Spent Coffee Drawer with Spent Coffee Container M Float N Rating Plate (on the underside of the appliance) O Controls and Indicators (see Figure 2) P Measuring Spoon Controls (Figure 2) A Pow
g Table of Contents Safety Instructions 1. Before Using for the First Time 1.1. Setting Up the Appliance 1.2. Cable Compartment (Figure 3) 1.3. Adjusting the Water Hardness 1.4. Adjusting the Safety Cut-Out 2. Prior to Making Coffee 2.1. Filling the Water Tank (Figure 4) 2.2. Filling the Bean Container (Figure 5) 2.3. Adjusting the Grinding Texture (Figure 6) 2.4. Switching On the Appliance (Figure 7) 2.5. “Flushing“ the Appliance (Figure 8) 3. Making Coffee 3.1.
g Do not open or repair the appliance. Improper repairs can give rise to significant hazards for the user. Repairs to electrical appliances are only to be performed by qualified service engineers. In the case that repair becomes necessary, including the replacement of the mains lead, please contact • the dealer from whom you purchased the appliance, or • an AEG customer service centre.
g The individual water hardness settings (degrees German hardness, ° dH) are indicated as follows: The “Descale“ indicator flashes ( ), in addition the following indicators illuminate ( ) for setting 1 (1°-7° dH): “1 Strong Cup“ for setting 2 (8°-15° dH): “1 Strong Cup“ and “Ground Coffee“ for setting 3 (16°-23° dH): “1 Strong Cup“, “Ground Coffee“ and “Spent Coffee“ for setting 4 (24°-30° dH): “1 Strong Cup“, “Ground Coffee“, “Spent Coffee“ and “Clean“ for setting 0: no further indicators illuminate.
g 2.2. Filling the Bean Container (Figure 5) Open the lid of the bean container (Figure 1/D) and fill the container with roasted coffee beans (do not use frozen and caramelised beans). Ensure that no foreign bodies enter the bean container. Close the lid. Tip: You can use both espresso and filter coffee beans! Try out different sorts of beans to find the ones that taste the best to you! 2.3.
g To adjust the height, use the thumb and index finger to grip the ribbing on the side of the outlet and move it up or down (Figure 9/A). Important: There is a risk of burns! 3.4. One Cup of Extra Strong Coffee from Beans (Figure 11/B) The appliance is ready for use when the “1 Normal Cup“ indicator (Figure 2/D) illuminates. Place an empty cup centrally under the spouts. Now press the “1 Cup“ button (Figure 2/E) until the “1 Normal Cup“ and “1 Strong Cup“ indicators flash.
g 0 Now press the “1 Cup“ button for one cup or the “2 Cups“ button for two cups. Note: If the “Ground Coffee“ button is pressed inadvertently, you can cancel this setting by pressing the “1 Cup“ button again. The appliance then performs a normal flush. 4. Frothing Milk (for Cappuccino) (Figure 15, 16) Hot steam can be used both for frothing milk for cappuccino and for heating liquids. Note: For one cup of cappuccino, fill a large cup up to 2/3 full with espresso and then add the frothed milk.
g 6. Switching Off the Appliance By pressing the On/Off switch (Figure 2/B), you can switch off the appliance. The power indicator (Figure 2/A) goes out. 7. Emptying the Water Tank, Drip Catcher and Spent Coffee Container (Figure 4, 17, 18) 0 0 0 0 0 Note: You should perform the following tasks daily! Remove the water tank (Figure 4) and pour away the remaining water. Use fresh water each day.
g 0 0 0 0 0 0 0 26 If the “Clean“ indicator (Figure 2/L) illuminates, you should run the cleaning program as described below. Cleaning can also be carried out as described below before the indicator illuminates. You can continue to use your appliance and run the cleaning program later.
g 0 Empty the spent coffee container and the drip catcher, and refit them. The “Spent Coffee“ indicator (Figure 1/O) goes out. All 4 green indicators flash, the “Descale“ indicator (Figure 1/M) illuminates. 0 Place a sufficiently large container under the swivelling nozzle (Figure 23). 0 Start the descaling program by turning the selector dial (Figure 1/E) anticlockwise to the stop (Figure 16/A). The “Descale“ indicator (Figure 2/M) flashes. Descaler is now pumped through the system at short intervals.
g • the temperature of the coffee is too low? – Prewarm cups with steam or hot water! – Caution: Sugar and milk lower the temperature of the coffee! • coffee brewing is interrupted after grinding? – Fill the bean container as the brewing unit has detected that too few beans have been ground, as a result the cycle has been interrupted. • all green indicators are flashing simultaneously? – See Section 4. (After drawing off steam)! – See Section 2.4. (Only when using the appliance for the first time).
g 11. Protecting the Environment Do not simply throw packaging material away. • Please keep the box and the foam packaging! They can be reused in the case of the need for service to protect the appliance during transport. If used: • deposit plastic bags made of polythene (PE) at a collection point for recycling. • The packing pieces made of foam polystyrene (PS) are CFC-free. Please inquire with your local authority about your local recycling centre. Used coffee is ideally suited to composting. 12.
AEG Kundendienst in Europa Deutschland Europa Österreich, 4010 Linz, 0732 / 770101 - 30 Belgique/België, 1502 Lembeek, 02/363.04.44 Czech Republic, Hanusova ul.
AEG Hausgeräte GmbH Postfach 1036 D-90327 Nürnberg http://www.aeg.hausgeraete.