DD 8795 User manual Cooker Hood
Contents Safety warnings ................................................................................ 3 Description of the Appliance ........................................................... 5 Extraction version ............................................................................... 5 Recirculation Version ......................................................................... 5 Control Panel ....................................................................................
Safety warnings • When used as an extractor unit, the hood must be fitted with a hose having preferably the same diameter as the outlet hole. Attention: The hose is not supplied and must be purchased separately.
• The hood must be regularly cleaned on both the inside and outside (AT LEAST ONCE A MONTH, it is in any event necessary to proceed in accordance with the maintenance instructions provided in this manual).. • Failure to follow the instructions as concerns hood and filter cleaning will lead to the risk of fires. • Do not use or leave the hood without the lamp correctly mounted because of the possible risk of electric shocks.
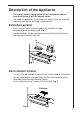
Description of the Appliance • The cooker hood is designed to extract unpleasant odours from the kitchen, it will not extract steam. • The hood is supplied as an extractor unit and can also be used with a recirculation version by fitting a charcoal filter. Extraction version • In this version fumes are extracted to the outside via a duct connected to the coupling ring A. Fig. 1. • In order to obtain the best performance the ducting should have a diameter equal to the outlet hole. A Fig.
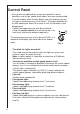
Control Panel • Best results are obtained by using a low speed for normal conditions and a high speed when odours are more concentrated. Turn the hood on a few minutes before you start cooking, you will then get an under pressure in the kitchen. The hood should be left on after cooking for about 15 minutes or until all the odours have disappeared. • Cooker hood operation can also be controlled using the remote control (the remote control is an L2 accessory and may be ordered separately).
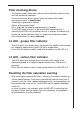
Filter checking device The cooker hood is fitted with a device which indicates when the filter must be cleaned or replaced. Usually the device, which signals when the carbon filter needs maintenance work, is deactivated. To activate it, proceed as follows: Switch off the cooker hood. Press and hold the knob for approximately 5 seconds.
Maintenance and Care • Before performing any maintenance operation, isolate the hood from the electrical supply by switching off at the connector and removing the connector fuse. Or if the appliance has been connected through a plug and socket, then the plug must be removed from the socket. Cleaning the hood • Clean the outside of the hood using a damp cloth and a mild detergent. • Never use corrosive, abrasive or flammable cleaning products. • Never insert pointed objects in the motor’s protective grid.
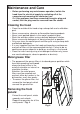
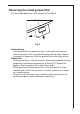
Removing the metal grease filter Pull the handle downards, then extract the filter.Fig. 5. Handle Fig. 5 Hand washing Soak grease filters for about one hour in hot water with a greaseloosening cleaner, then rinse off thoroughly with hot water. Repeat the process if necessary. Refit the grease filters when they are dry. Dishwasher Place grease filters in the dishwasher. Select most powerful washing programme and highest temperature, at least 65°C. Repeat the process.
Charcoal filter • The charcoal filter should only be used if you want to use the hood in the recirculation function. • To do this you will need an original charcoal filter (available from your local Service Centre). • Cleaning/replacing the charcoal filter Unlike other charcoal filters, the LONGLIFE charcoal filter can be cleaned and reactivated. With normal use the filter should be cleaned every second month (when using the hood 2,5 hours per day,on avarage).
Warning • Failure to observe the instructions on cleaning the unit and changing the filters will cause a fire hazard. You are therefore strongly recommended to follow these instructions. • The manufacturer declines all responsibility for any damage to the motor or any fire damage linked to inappropriate maintenance or failure to observe the above safety recommendations. Changing the light bulb • • • • • Disconnect the cooker hood from the mains supply.
Something Not Working If your appliance fails to work properly please carry out the following checks. Symptom Solution The cooker hood will not start... Check that: The hood is connected to the electricity supply. Check that a fan speed has been selected The cooker hood is not working Check that: The fan speed is set high enough for the task. The grease filters are clean. The kitchen is adequately vented to allow the entry of fresh air.
Technical Specifications Dimensions (in cm): Height Width Depth Maximum absorbed power (W): Motor (W): Lighting (W): Length of the cable (cm): Electrical connection (V): 80 89,8 33,5 235 175 3x20 150 230 Mounting accessories included 1 allen spanner (for TORX screws).
Wall unit mounting - Fig. 8-9-10-11 Make sure that the cooker hood is disconnected from the power supply before carrying out the installation. • Place the three rubber strips on the back of the cooker hood. Where necessary mount the two spacers provided on the drill holes for definitive fixing. The spacers are useful when the wall which is to house the cooker hood is not perfectly vertical (for example: where it is partially covered with wall tiles).
• Mark the wall with a centre line, this will aid mounting procedure (1), position the template so that the mid line printed on the template matches with the centre line previously marked, the lower side of the template corresponds to the lower side of the hood once mounted (2). • Drill two holes Ø 8mm and fix the support bracket with two wall plugs and screws (3). • Remove the front panels (see paragraph “Removing the front panels”).
• Fix the sides of the 11 cooker hood by fastening the pins (10a) to the sides of the fastening screws (10b). • Block the sides 10a sliding the two tabs outwards (11). • Make electrical connection (12), but 10b leave the hood Fig. 10 disconnected from the home mains circuit. • In the case that it is decided to use the cooker hood in the mains circuit, then place one of the two flanges provided in the exit hole (13 – Extraction).
LI2VAD Ed.