
User Guide

7
WARTUNG
Vor jeder Reinigungsarbeit immer den
Netzstecker aus der Steckdose ziehen.
RegelmŠ§ige Reinigung
Benutzen Sie nie MetallgegenstŠnde um das GerŠt
zu reinigen, da es beschŠdigt werden kšnnte.
Den Innenraum mit lauwarmem Wasser und Natron
und die lackierten Teile mit einem Poliermittel
reinigen.
Gut nachwaschen und sorgfŠltig trocknen.
Den Kondensator und den Motorkompressor mit
einer BŸrste oder einem Staubsauger reinigen. Dies
begŸnstigt den guten Betrieb mit folglicher
Stromersparnis.
Stillstandszeiten
Bei lŠngerem Stillstand des GerŠtes, mŸssen Sie
folgenderma§en vorgehen:
den Stecker aus der Steckdose ziehen;
alle Lebensmittel herausnehmen;
GerŠt abtauen, Innenraum und Zubehšrteile
reinigen; die TŸren offen lassen, um im Innern eine
gute Luftzirkulation zu gewŠhrleisten und somit
Geruchsbildung zu vermeiden.
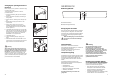
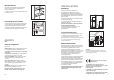
Innenbeleuchtung
Die Innenbeleuchtungslampe im KŸhlabteil ist durch
folgende Arbeitsschritte zugŠnglich:
¥ Lšsen Sie die Befestigungsschraube der
Lampenabdeckung.
¥ Heben Sie den beweglichen Teil ab, indem Sie
wie in der Abbildung gezeigt darauf drŸcken.
Sollte sich die Beleuchtung beim …ffnen der TŸre
nicht einschalten, ist zu ŸberprŸfen, ob die
GlŸhbirne fest eingeschraubt ist; wenn die Stšrung
dennoch bestehen bleibt, die defekte GlŸhbirne
durch eine neue Birne gleicher Leistung ersetzen.
Die maximale Leistung ist am Leuchtkšrper
angegeben.
D613
Achtung
Dieses GerŠt enthŠlt im KŠltekreislauf Kohlen-
wasserstoff. Aus diesem Grund darf die Wartung
und das NachfŸllen aussschlie§lich von
autorisiertem Fachpersonal durchgefŸhrt werden.
INSTALLATION
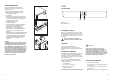
Location
The appliance should be installed well away from
sources of heat such as radiators, boilers, direct
sunlight etc.
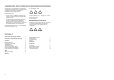
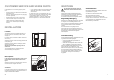
For safety reasons, minimum ventilation must be as
shown in Fig.
Appliance positioned under overhanging kitchen wall
units (see Fig. A).
Appliance positioned without overhanging kitchen
wall units (see Fig. B).
Attention: keep ventilation openings clear of
obstruction.
Two adjustable feet at the cabinet base allow
accurate levelling of the appliance.
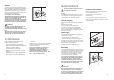
Rear spacers
In the bag with the documentation, there are two
spacers which must be fitted as shown in the
figure.
Slacken the screws and insert the spacer under the
screw head, then re-tighten the screws.
38
CUSTOMER SERVICE AND SPARE PARTS
If the appliance is not functioning properly, check
that:
¥ the plug is firmly in the wall socket and the mains
power switch is on;
¥ there is an electricity supply (find out by plugging
in another appliance);
¥ the thermostat knob is in the correct position.
¥ If there are water drops on the bottom of the
cabinet, check that the defrost water drain
opening is not obstructed (see ÒDefrostingÓ
section).
¥ If your appliance is still not working properly after
making the above checks, contact the nearest
service centre.
To obtain fast service, it is essential that when you
apply for it you specify the model and serial number
of your appliance which can be found on the
guarantee certificate or on the rating plate located
inside the appliance, on the bottom left-hand side.
100 mm10 mm
10 mm
A
B
NP007
PR153
ATTENTION!
It must be possible to disconnect the appliance from
the mains power supply; the plug must therefore be
easily accessible after installation.