user manual Dishwasher ESF65710
electrolux Electrolux. Thinking of you. Share more of our thinking at www.electrolux.
electrolux 3 • Dishwasher detergents can cause chemical burns to eyes, mouth and throat. Could endanger life! Comply with the safety instructions of the dishwasher detergent manufacturer. • Water in the dishwasher is not for drinking purposes. Detergent residue may still be present in your machine. • Ensure that the door of the dishwasher is always closed when it is not being loaded or unloaded. In this way you will avoid anybody tripping over the open door and hurting themselves.
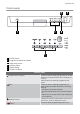
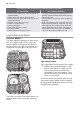
electrolux Product description 1 2 3 4 5 Upper basket Water hardness dial Salt container Detergent dispenser Rinse aid dispenser 6 7 8 9 10 Rating plate Filters Lower spray arm Upper spray arm Worktop
electrolux 5 Control panel D E 6 1 2 3 4 5 6 On/Off button Programme selection buttons Delay start button Indicator lights Digital display Function buttons Indicator lights Programme in progress Comes on when a washing programme is set and remains on for all the duration of the washing programme. Goes off when the washing programme has ended. End Comes on when a washing programme has ended.
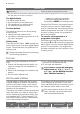
electrolux Indicator lights Rinse aid 1) Comes on when the rinse aid has run out. 1) The salt and rinse aid indicator lights are never on while a washing programme is running even if filling with salt and/or rinse aid is necessary. The digital display The digital display shows: • the countdown for the delay start, • if the appliance is in setting mode, • if a washing programme is set.
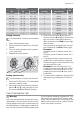
electrolux 7 Water hardness Adjusting the water hardness setting Use of salt °dH °TH mmol/l manually electronically 43 - 50 76 - 90 7,6 - 9,0 2 level 9 yes 37 - 42 65 - 75 6,5 - 7,5 2 level 8 yes 29 - 36 51 - 64 5,1 - 6,4 2 level 7 yes 23 - 28 40 - 50 4,0 - 5,0 2 level 6 yes 19 - 22 33 - 39 3,3 - 3,9 2 level 5 yes 15 - 18 26 - 32 2,6 - 3,2 1 level 4 yes 11 - 14 19 - 25 1,9 - 2,5 1 level 3 yes 4 - 10 7 - 18 0,7 - 1,8 1 level 2 yes <4 <7 < 0,7 1 leve
electrolux To fill: 1. Open the door, remove the lower basket and unscrew the cap of the salt container by turning it anticlockwise. 2. Pour 1 litre of water into the container (this is necessary only before filling with salt for the first time) . 3. Using the funnel provided, pour in the salt until the container is full. 4. Replace the cap making sure that there is no trace of salt on the screw thread or on the gasket. 5. Replace the cap tightly turning it clockwise until it stops with a click.
electrolux 9 of the 6 position selector (position 1 minimum dosage, position 6 maximum dosage). The dose is factory set in position 4. Increase the dose if there are drops of water or lime spots on the dishes after washing. Reduce it if there are sticky whitish streaks on the dishes or a bluish film on glassware or knife blades. The dispenser holds about 110 ml of rinse aid, which is sufficient for between 16 and 40 washing cycles, depending upon the dosage setting. 3.
electrolux For washing in the dishwasher the following cutlery and dishes are not suitable: are of limited suitability: • Cutlery with wooden, horn, china or mother-of- • Only wash stoneware in the dishwasher if it is pearls handles. specially marked as being dishwasher-safe by • Plastic items that are not heat resistant. the manufacturer. • Older cutlery with glued parts that are not tem- • Glazed patterns may fade if machine washed perature resistant. frequently. • Bonded cutlery items or dishes.
electrolux 11 If the handles protrude from the bottom of the basket, obstructing the lower spray arm, load the cutlery with the handles facing upwards. Mix spoons with other cutlery to prevent them from sticking together. To make loading of the cutlery basket easier, lower the cutlery basket handle. The cutlery basket is in two parts which can be separated to give greater loading flexibility. To separate the two parts, slide them horizontally in opposite directions and pull them apart.
electrolux Glasses with long stems can be placed upside down in the cup racks. For taller items the cup racks can be folded upwards. Soft spikes Soft spikes impede glassware to move during the washing cycle or when the upper basket is moved. Caution! Before closing the door, make sure that the spray arms can rotate freely. Adjusting the height of the upper basket If washing very large plates you can load them in the lower basket after moving the upper basket to the higher position.
electrolux 13 1. Pull out the basket until it stops. 2. Carefully lift both sides upwards and then allow the mechanism to drop back down slowly, keeping hold of it. Never lift or lower the basket on one side only When the basket is in the higher position cups cannot be placed on the cup racks. After loading your machine always close the door, as an open door can be a hazard.
electrolux 4. Close the lid and press until it locks in place. Detergent tablets from different manufacturers dissolve at different rates. For this reason, some detergent tablets do not attain their full cleaning power during short washing programmes. Therefore, please use long washing programmes when using detergent tablets, to ensure the complete removal of detergent residuals.
electrolux 15 comes on, indicating that the rinse aid dispenser has been activated. 5. To memorize the operation, switch off the dishwasher by pressing the On/Off button. 6. To deactivate the rinse aid dispenser again, follow the above instructions until the End indicator light goes off. If you decide to revert back to the use of individual detergents we advise that you: 1. Deactivate the Multi-tab function. 2. Fill up the salt container and the rinse aid dispenser again. 3.
electrolux Interrupt a washing programme in progress • Open the dishwasher door; the programme will stop. Close the door; the programme will start from the point at which it was interrupted. • Press the On/Off, all lights will go off. Press the On/Off button again; the programme will start from the point at which it was interrupted.
electrolux 17 Programme Degree of soil Any. Type of load Programme description Partial load (to be 1 cold rinse (to avoid food scraps from completed later in sticking). the day). This programme does not require the use of detergent. Rinse 1) During the Auto washing programme the level of soiling on the dishes is determined by how cloudy the water is.
electrolux use abrasive products, scouring pads or solvent (acetone, trichloroethylene etc...). Internal cleaning Ensure that the seals around the door, the detergent and rinse aid dispensers are cleaned regularly with a damp cloth. We recommend every 3 months you run the wash programme for heavy soiled dishes using detergent but without dishes. 7. Put the flat filter back in the base of the washing compartment and ensure that it fits perfectly. 8.
electrolux 19 Fault codes and malfunction Possible cause and solution • continuous flashing of the light of the running programme • 1 flash of the End indicator light The dishwasher does not fill with water • The water tap is blocked or furred with limescale. Clean the water tap. • The water tap is turned off. Turn the water tap on. • The filter (where present) in the water inlet hose is blocked. Clean the filter. • The water inlet hose has not been correctly laid or it is kinked or squashed.
electrolux The wash results are not satisfactory The dishes are not clean • The wrong programme has been selected. • The dishes are arranged in such a way as to stop water reaching all parts of a surface. The baskets must not be overloaded. • The spray arms do not rotate freely due to incorrect arrangement of the load. • The filters in the base of the washing compartment are dirty or incorrectly positioned. • Too little or no detergent has been used.
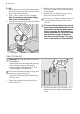
electrolux 21 Arrangement upper basket Arrangement cutlery basket Arrangement lower basket Installation Warning! Any electrical and/or plumbing work required to install this appliance should be carried out by a qualified electrician and/or plumber or competent person. Fitting under a counter (kitchen worktop or sink) Remove all packaging before positioning the machine. If possible, position the machine next to a water tap and a drain.
electrolux Proceed as follows: • Remove the machine’s worktop by unscrewing the two rear retaining screws (1), pull the worktop from the back of the machine (2) and slide out the front slots, lifting the worktop (3). Insert the machine after adjusting the levelling with the adjustable feet. When inserting the machine, ensure that the water inlet and drain hoses are not kinked or squashed. During all operations that involve accessibility to internal components the dishwasher has to be unplugged.
electrolux 23 1. To the sink outlet spigot, securing it to the underside of the work surface. This will prevent waste water from the sink running into the machine. 2. To a stand pipe provided with venthole, minimum internal diameter 4 cm. max 400 cm max 85 cm let must be no smaller than the diameter of the hose provided. When connecting the drain hose to an under sink trap spigot, the entire plastic membrane (A) must be removed.
electrolux collection point for the recycling of electrical and electronic equipment. By ensuring this product is disposed of correctly, you will help prevent potential negative consequences for the environment and human health, which could otherwise be caused by inappropriate waste handling of this product. For more detailed information about recycling of this product, please contact your local council, your household waste disposal service or the shop where you purchased the product.
electrolux 25
electrolux
electrolux 27
www.electrolux.