Co n g é l a t e u r / G e f r i e r / F r e e z e r / V r i e s GEBRAUCHSANWEISUNG NOTICE D’UTILISATION INSTRUCTION BOOK GEBRUIKSAANWIJZING DE FR EUC2901 GB 818 21 19--03/5 NL
Safety instructions GB Carefully read these instructions to learn how the appliance works and how to care for it. Keep the instruction booklet. It will come in handy if you later sell the cabinet or give it to somebody else. These warnings are provided in the interests of your safety. Ensure that you understand them all before installing or using the appliance. Your safety is of paramount importance. If you are unsure about any of the meanings or warnings contact the Customer Care Department.
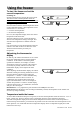
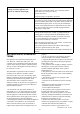
Description of the Appliance GB Model EUC2901 2 1. 2. 3. 4. 2 1 3 3 Freezing tray + accumulator Freezershelf with flap Freezer basket Ventilation grill 3 3 3 4 Control Panel -- 18 ACTION FREEZE A B C C D E A. Freezer power switch Switches the freezer on and off. Green indicator lamp Lights when the freezer is operating. D. FAST FREEZE button Used to switch the Fast Freeze feature on and off. Yellow indicator lamp Lights when Fast Freeze is operating. B.
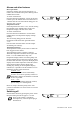
Using the freezer GB To start the freezer and set the correct temperature Switching on: Switch on the freezer by pressing the power switch. The alarm sounds if the temperature inside the freezer reaches room temperature. Turn off the alarm by pressing the switch-off button. Setting the temperature Press the buttons until the desired temperature blinks on the temperature display. (The temperature can be set between -15°C and -24°C.) "+" increases the temperature. "-" decreases the temperature.
Alarms and other features Door open alarm If the door remains open for more than about 1,5 minute, the red indicator lamp starts flashing and an audible alarm sounds. To switch off the alarm: Press the alarm shut-off button. As long as the door remains open, the audible alarm will sound anew at 1-minute intervals. The red indicator lamp goes out when the door is closed. Temperature alarm If the temperature rises above -12°C, the red warning lamp flashes and an audible alarm sounds.
Freezing Press the fast freeze button approx. 24 hours prior to placing the food in the freezer. You need not press the fast-freeze button when freezing smaller quantities of food during any 24-hour period. Fast freeze is automatically switched off apporox 50 hours after the button has been pressed. Fast freeze can be discontinued by pressing the fast freeze button once again. The yellow fast freeze lamp remains lit as long as the fast freeze button is engaged.
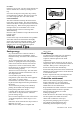
Ice cubes Fill the ice tray to max. 3/4 since water expands as it freezes. Release the ice cubes by twisting the ice tray. If ice cubes are kept for a long time, they will dry out and the taste is affected. Thus, throw away old ice cubes and prepare new ones when needed. Cold accumulator The cold accumulator will keep the food cold for longer after a power failure. The cold accumulator will be most effective when placed at the front of the fast-freezing tray.
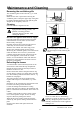
Maintenance and Cleaning GB Removing the ventilation grille The ventilation grille can be removed, e.g. to wash the grille. Make sure the door is open when removing the ventilation grille. Unsnap the upper edge of the grille by pulling outward/downward. Then pull the grille straight out to completely remove it. Cleaning Clean the cabinet at regular intervals.
To change the light bulb The light is switched on automatically when the door is opened. Before replacing the light bulb, disconnect the power plug from the outlet. Press the spring together and pull the grille downward at the same time. Use a bulb of the same type, E14 socket, maximum rating of 25 W. When the appliance is not in use Disconnect the appliance from electricity supply. Empty all foods and clean the appliance, leaving the doors ajar to prevent unpleasant smells.
The cabinet does not operate at all. Cooling or interior light does not operate. No indicator lamps light. The cabinet is not switched on. Power does not reach the cabinet. (Try connecting another electrical device to the power outlet.) The fuse has blown. The power plug is not properly connected. Power failure Do not unnecessarily open the cabinet, except when the power cut seems to be long, in which case the food products should be moved to another cabinet that works.
excludes any compensation for damage outside the appliance for which the consumer wishes to assert his rights. In the event of legally admitted liability, compensation will not exceed the purchase price paid for the appliance. covered by the guarantee. 10. Appliances that are easy to transport may be delivered or sent to the consumer services department. Home repairs are only anticipated for bulky appliances or built-in appliances. 11.
Installation GB Mains Cable Do not remove the power cord by pulling on its lead, particulary when the product is being pulled out of its niche. · Damage to the cord may cause a short-circuit, fire and/or electric shock. · In the event of damage to the appliance's main cable, only an authorised service company recommended by the manufacturer or a similarly qualified person may adjust it in order to avoid shock hazard for the user.
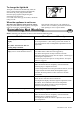
Installing the cabinet When two appliances are placed beside each other, the distances enclosed in the plastic wrapping should be glued between the appliances. As shown in the illustration. To obtain the best performance from the cabinet, ensure : · the cabinet is placed in a dry, cool place and is not exposed to direct sunlight. · the cabinet is not placed close to a source of heat, e.g. a cooker or dishwasher. · the cabinet is level. The cabinet should not lean against any wall.
Door Reversal 1. Close the cabinet and remove the plug from the electrical socket. 1 2. Remove the ventilation grille. There is a part on the grille that can be removed. Remove and reposition it on the other side. 2 3 3. Put the cabinet on a wooden board when it is laid down. Later, when raising the cabinet, it will be easier to grip under the cabinet thanks to the board. 4. On the upper part of the cabinet. Put the hinge pin on the other side. 4 5. On the lower part of the cabinet. a.
aáÉ=bäÉÅíêçäìñJdêìééÉ=áëí=ÇÉê=ïÉäíïÉáí=Öê∏≈íÉ=eÉêëíÉääÉê=îçå=Ö~ëJ=ìåÇ=ëíêçãÄÉíêáÉÄÉåÉå=dÉê®íÉå=ÑΩê=ÇáÉ=hΩÅÜÉI=òìã oÉáåáÖÉå=ìåÇ=ÑΩê=cçêëí=ìåÇ=d~êíÉåK=gÉÇÉë=g~Üê=îÉêâ~ìÑí=ÇáÉ=bäÉÅíêçäìñJdêìééÉ=áå=ΩÄÉê=NRM=i®åÇÉêå=ÇÉê=bêÇÉ=ΩÄÉê=RR jáääáçåÉå=mêçÇìâíÉ=EhΩÜäëÅÜê®åâÉI=eÉêÇÉI=t~ëÅÜã~ëÅÜáåÉåI=pí~ìÄë~ìÖÉêI=jçíçêë®ÖÉå=ìåÇ=o~ëÉåã®ÜÉêF=ãáí=ÉáåÉã tÉêí=îçå=êìåÇ=NQ=jêÇK=rpaK iÉ=dêçìéÉ=bäÉÅíêçäìñ=Éëí=äÉ=éêÉãáÉê=Ñ~ÄêáÅ~åí=ãçåÇá~ä=ÇD~éé~êÉáäë=ÇçãÉëíáèìÉëI=ÇDÉåíêÉíáÉå=Éí=éçìê=äDÉñí¨êáÉìêK mäìë=ÇÉ=RR=ãáääáçåë=ÇÉ=éêçÇìáíë=Çì=dê