FAVORIT 44080 i User manual Dishwasher
Dear Customer Thank you for choosing one of our high quality products. With this appliance you will experience the perfect combination of functional design and cutting edge technology. Convince yourself that our appliances are engineered to deliver the best per formance and control indeed we are setting the highest standards of excel lence. In addition to this you find environmental and energy saving aspects as an inte gral part of our products.
Contents 3 Contents Operating Instructions 4 Safety 4 Diagram of Appliance 5 Control Panel 6 Prior to Using for the First Time Setting the Water Softener Adding dishwasher Salt Filling Up with Rinse Aid In daily use Loading cutlery and dishes Adjusting the Height of the Upper Basket Adding Detergent Using 3 in 1 detergents Selecting the dishwashing cycle (Cycle Table) Starting a Dishwashing Cycle Setting the Delay Timer Switching Off the dishwasher Care and cleaning 7 8 10 11 13 13 16 16 17 19 21
Operating Instructions Operating Instructions 1 Safety Prior to using for the first time • Follow the ”Instructions for installation and connection”. Correct Use • The dishwasher is only intended for washing domestic dishes. • Additions or modifications to the dishwasher are not permitted. • Use only special salt, detergent and rinse aid suitable for domestic dishwash ers. • Do not put any solvents in the dishwasher. This could cause an explosion. Child Safety • Keep packaging away from children.
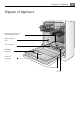
Diagram of Appliance Diagram of Appliance Upper basket spray arm and lower spray arm Water softener unit.
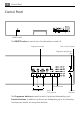
Control Panel Control Panel ON/OFF button The ON/OFF button is used to turn the dishwasher on and off. End of cycle indicator Programme buttons Programme progress dis play 1 2 3 Function buttons Set delay timer Select 3 in1 function Control indicators The Programme buttons are used to select the desired dishwashing cycle.
Prior to Using for the First Time Function button 1 Sets the water softener Function button 2 not programmed Function button 3 not programmed 7 Programme progress display: The current stage of the programme is always shown in the programme progress display. The control indicators have the following meanings: 1) Refill with dishwasher salt 1) Refill with rinse aid 1) These control indicators are never illuminated while a dishwashing cycle is running.
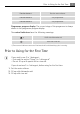
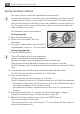
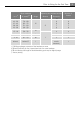
Prior to Using for the First Time Setting the Water Softener The water softener must be set manually and electronically: 3 To avoid scale deposits on the dishes and in the dishwasher, the dishes must be washed with soft water, i.e. water with a low lime content. The water softener must be set according to the table to the water hardness in the area where you live. Your local water company will be able to give you information about the water hardness in your area. The dishwasher must be switched off.
Prior to Using for the First Time Water hardness in °d1) in mmol/l2) Adjusting the hardness setting Range Manual Electronic Number of flashes 103) 9 8 7 6 10 9 8 7 6 51 70 43 50 37 42 29 36 23 28 9,0 12,5 7,6 8,9 6,5 7,5 5,1 6,4 4,0 5,0 IV 19 22 15 18 3,3 3,9 2,6 3,2 III 5* 4 5 4 11 14 1,9 2,5 II 3 3 4 10 0,7 1,8 I/II 2 2 below 4 below 0.
Prior to Using for the First Time Adding dishwasher Salt 1. 2. 3. 4. 3 3 To decalcify the water softener, it must be filled up with dishwasher salt. Use only special salt suitable for domestic dishwashers. If you do not use 3 in1 detergent, fill up with dishwasher salt: – Before using the dishwasher for the first time. – When the control indicator for dishwasher salt is illuminated on the control panel. Open the door and remove the lower basket.
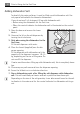
Prior to Using for the First Time 11 Filling Up with Rinse Aid Rinse aid causes the rinse water to flow easily from the crockery leaving gleam ing dishes and glassware. If you do not use 3in1 detergent, fill up with rinse aid: – Before using the dishwasher for the first time. – When the control indicator for rinse aid is illuminated on the control panel. Use only special rinse aid for dishwashers. 1. Open the door. The rinse aid compartment is located on the inside of the dishwasher door. 2.
Prior to Using for the First Time 1. Open the dishwasher door. 2. Press the release button on the rinse aid compartment. 3. Open the cover. 4. Set the dosage level. 5. Press the lid shut until it clicks into place. 6. If rinse aid has leaked out, wipe it away with a cloth. Activating rinse aid inflow when 3in1 function is selected 3 3 If the 3in1 function is not selected, the rinse aid inflow is always activated.
In daily use 13 In daily use Loading cutlery and dishes 1 Sponges, cleaning cloths and any other objects that can absorb water must not be washed in the dishwasher. Plastic and Teflon coated dishes and pans tend to retain water droplets. These dishes and pans therefore do not dry as well as those made of china and stainless steel.
In daily use Loading cutlery 1 Warning: Sharp knives and other items of cutlery with sharp edges must be laid in the cutlery rack or in the upper basket to avoid the risk of injury. To ensure that all items of cutlery in the cutlery basket can be reached by the water, you should: 1.Place the grid insert on the cutlery 2.Place forks and spoons in the cutlery basket basket's grid insert with their han dles pointing downwards.
In daily use To make it easier to load larger dishes, the two plate racks on the right in the lower basket can be folded down. Cups, Glasses, Coffee Service Load smaller, fragile crockery and long, sharp cutlery in the upper basket. • Arrange items of crockery on and under the folding cup racks so that they are offset from each other and water can reach all items. • The cup racks can be folded up out of the way for tall crockery items. • Lay or hang wine and brandy glasses in the slots in the cup racks.
In daily use Adjusting the Height of the Upper Basket Maximum height of dishes in the 3 Upper basket Lower basket with upper basket raised 22 cm 30 cm with upper basket lowered 24 cm 29 cm The height of the baskets can also be adjusted when they are loaded. Raising / Lowering the upper basket 1. Pull out the upper basket completely. 2. Holding the upper basket by the handle, raise it as far as it will go and then lower it vertically.
In daily use 3 17 2. Place the detergent in the detergent dis penser. The markings indicate the dosing levels for powder detergents: “20/30” cor responds to approx. 20/30 ml of detergent. Follow the manufacturer’s instructions with regard to dosing and storage. 3. Close the lid and press until it locks into place. In the case of very heavily soiled dishes, fill the adjoining compartment (1) with addi tional detergent. This detergent comes into use during the pre wash cycle.
3 3 In daily use If you want to use 3 in 1 detergents, check whether these detergents are suita ble for your water hardness. (Follow manufacturer’s instructions!) If your water hardness is higher than that recommended by the manufacturer but you would nevertheless like to use 3 in 1 detergent, proceed as follows: • With the 3 in 1 function selected, set the water softener one hardness setting lower than when rinsing without 3 in 1 detergent.
In daily use 19 Selecting the dishwashing cycle (Cycle Table) • ECO 50°5) Dinner service and cookware, tempera normally soiled ture sensitive crockery Water (litres) • • • • • • 9 12 24 • 0,8 • 90 110 22 24 heavily soiled, dried on food remains, in particular protein and starch • 14 16 Dinner service and cookware 1,00 1,50 Energy (kWh) INTENSIV CARE 70°4) 1,80 2,00 • 0,95 1,05 just used, lightly to nor mally soiled Length (minutes) Dishes, excluding sau
In daily use Selecting a programme When your dishes look like this, select: an intensive programme. a normal or energy saving programme. a short programme (e.g. 30 minute pro gramme).
In daily use 21 Starting a Dishwashing Cycle 1. 2. 3. 4. 5. Check that the spray arms can turn freely. Turn the water tap on fully. Close the door. Press the ON/OFF button. Select the desired cycle. The programme display lights up. The selected cycle will begin after approxi mately 3 seconds. Interrupting or Cancelling a dishwashing cycle 1 3 Interrupt a dishwashing cycle that is in progress if it is absolutely necessary.
In daily use The dishwashing cycle will start automatically following a countdown of the hours set. To change the time delay: As long as the cycle has not yet started, you can still change the setting by pressing the DELAY TIMER button. Cancelling the delay timer: Press the DELAY TIMER button repeatedly until none of the three time displays is lit. The selected dishwashing cycle will begin immediately.
Care and cleaning 23 Care and cleaning 1 Do not use furniture care products or aggressive cleaners. • When necessary, clean the dishwasher’s controls with a soft cloth. • Occasionally check the internal dispensers, door seal and water inlet filter (if fitted) for dirt and clean them, if necessary. Cleaning the filters 3 The filters must be regularly checked and cleaned. Dirty filters will spoil the wash re sults, and may lead to malfunction of your dishwasher. 1.
1 Care and cleaning 5. Remove the flat filter (3) from the base of the washing compartment and clean both surfaces thoroughly. 6. Re insert the flat filter. 7. Place the fine filter in the micro filter and fit the two together. 8. Insert the filter system in place and lock it by turning the handle clockwise as far as it will go. Ensure that the flat filter does not pro trude above the base of the washing com partment. Under no circumstances may the dishwasher be used without its filters.
What to do if… 25 What to do if… Remedying small malfunctions Before you call the Customer Care Department, please check whether – you cannot remedy the fault yourself with the help of the following fault ta ble or – whether it is caused by faulty, electrical connections and/or faulty water con nections. In these cases the engineer must make you liable for the costs of the Customer Service intervention even during the warranty period.
What to do if… Malfunction The programme indicator for the selected dishwashing cycle is flashing, the indicator for the end of the dishwashing cycle is flashing in sequence 2 short light signals one after another. the indicator for the end of the dishwashing cycle is flashing in sequence 3 short light signals one after another. Possible cause The sink spigot connection is blocked. Clean the sink spigot out let. Water drain hose has not been correctly positioned. Check hose installation.
What to do if… 27 If the dishwashing results are not satisfactory The dishes are still dirty. • The wrong dishwashing cycle was selected. • The dishes were loaded is such a way that the dishwashing water did not reach all items. The baskets for the dishes must not be overloaded. The spray arms must be free to turn. • Filters in the floor of the dishwasher are not clean or incorrectly inserted. • Good quality detergent was not used, or too little was used.
Disposal Disposal 2 Packaging material The packaging materials are environmentally friendly and can be recycled. The plastic components are identified by markings, e.g. >PE<, >PS<, etc. Please dis pose of the packaging materials in the appropriate container at your local waste disposal facilities. 2 Old appliance W 1 The symbol on the product or on its packaging indicates that this product may not be treated as household waste.
Notes for Test Institutes 29 Notes for Test Institutes Testing in accordance with EN 60704 must be carried out with the appliance fully loaded and using the test cycle (see “Cycle Table”). Tests in accordance with EN 50242 must be carried out when the salt dis penser in the water softener and the rinse aid dispenser have been filled with salt and rinse aid respectively, and using the test cycle (see “Cycle Table”).
Installation and connection instructions 30 Installation and connection instructions 1 Safety Information for the Installation • Only transport the dishwasher in an upright position, otherwise salt water may run out. • Before using the dishwasher for the first time, check for any damage caused in transport. Do not under any circumstances connect an appliance that is dam aged. In the case of damage, please contact your supplier.
Installing the Dishwasher Installing the Dishwasher • The dishwasher must be installed on a firm floor and adjusted to ensure that it is stable and level in all directions. • To compensate for unevenness in the floor and to match the height of the ap pliance to that of surrounding units, extend the threaded feet using a screw driver. • Adjust the rear foot of the appliance using a cordless screwdriver from the front of the appliance (see installation template).
Connecting the dishwasher 32 Connecting the inlet hose 1 3 1 The water inlet hose must not be kinked, crushed or entangled when it is being connected. Connect the threaded hose fitting (ISO 228 1:2000) on the water inlet hose to a tap with an external thread (¾ inch). The inlet hose is fitted with either a plastic or a metal nut: – Only tighten the nut hand tight. Then do a visual check for water tightness. (Make sure that the tap is not drip ping.
Connecting the dishwasher Water drainage 1 Drain hose The drain hose must not be kinked, crushed or entangled. Connecting the drain hose: – Maximum permitted height: 1 metre. – Minimum required height: 40 cm above the bottom edge of the appliance. Extension hoses • Extension hoses are available from your lo cal Service Force Centre. To ensure that the function of the appliance is not impeded, the internal diameter of extension hoses must be 19 mm.
Connecting the dishwasher 34 Electrical Connection 1 Any electrical work required to install this appliance should be carried out by a qualified electrician or competent person. WARNING This appliance must be earthed. The manufacturer declines any responsibility should these safety meas ures not be observed. Before switching on make sure the electricity supply voltage is the same as that indicated on the appliance rating plate. To isolate the dishwasher from the mains, remove the mains plug.
Guarantee/Customer Service Guarantee/Customer Service Great Britain Standard guarantee conditions We, AEG, undertake that if within 12 months of the date of the purchase this AEG appliance or any part there of is proved to be defective by reason only of faulty workmanship or materials, we will, at our discretion repair or replace the same FREE OF CHARGE for labour, materials or carriage on condition that: • The appliance has been correctly installed and used only on the electricity or gas supply state
Guarantee/Customer Service 36 European Guarantee This appliance is guaranteed by Electrolux in each of the countries listed at the back of this user manual, for the period specified in the appliance guarantee or otherwise by law.
Guarantee/Customer Service p t b Nederland +31 17 24 68 300 Vennootsweg 1, 2404 CG Alphen aan den Rijn Norge +47 81 5 30 222 Risløkkvn. 2 , 0508 Oslo Österreich +43 18 66 400 Herziggasse 9, 1230 Wien Polska +48 22 43 47 300 ul. Kolejowa 5/7, Warsaw Portugal +35 12 14 40 39 39 Quinta da Fonte Edificio Gonçalves Zarco Q 35 2774 518 Paço de Arcos Romania +40 21 451 20 30 Str.
Guarantee/Customer Service 38
Service and Spare Parts 39 Service and Spare Parts If the event of your appliance requiring service, or if you wish to purchase spare parts, please contact Service Force by telephoning: 0870 5 929 929 Your telephone call will be automatically routed to the Service Force Centre cov ering your post code area. For the address of your local Service Force Centre and further information about Service Force, please visit the website at www. serviceforce.co.
117 995 29/0-00-200706-00 Subject to change without notice www.electrolux.com www.aeg-electrolux.co.