FAVORIT 50672 User manual Dishwasher
Dear Customer Thank you for choosing one of our high quality products. With this appliance you will experience the perfect combination of functional design and cutting edge technology. Convince yourself that our appliances are engineered to deliver the best per formance and control indeed we are setting the highest standards of excel lence. In addition to this you find environmental and energy saving aspects as an inte gral part of our products.
Contents 3 Contents Operating Instructions 4 Safety 4 Diagram of appliance 5 Control panel 6 Prior to using for the first time Setting the water softener Adding special salt Filling up with rinse aid In daily use Loading cutlery and dishes Adjusting the height of the upper basket Adding detergent Using 3in1 detergents Selecting the dishwashing cycle (Cycle Table) Starting a dishwashing cycle Setting the Delay Timer Switching off the dishwasher Care and cleaning 8 8 10 11 14 14 17 18 20 22 24 24 2
Operating Instructions Operating Instructions 1 Safety Prior to using for the first time • Follow the ”Instructions for installation and connection”. Correct use • The dishwasher is only intended for washing domestic dishes. • Additions or modifications to the dishwasher are not permitted. • Use only special salt, detergent and rinse aid suitable for domestic dishwash ers. • Do not put any solvents in the dishwasher. This could cause an explosion. Child safety • Keep packaging away from children.
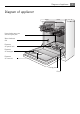
Diagram of appliance Diagram of appliance Upper basket spray arm and floor spray arm Water hardness dial Dispenser for special salt Dispenser for detergent Dispenser for rinse aid Rating plate Filters 5
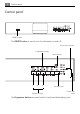
Control panel Control panel ON/OFF button The ON/OFF button is used to turn the dishwasher on and off. End of cycle indicator Programme buttons Multi display 1 2 3 Function buttons Set delay timer Control indi cators The Programme buttons are used to select the desired dishwashing cycle.
Control panel 7 Function buttons: In addition to the pre set dishwashing cycle, the following functions can also be set using these buttons: Function button 1 Sets the water softener Function button 2 Activates/deactivates rinse aid inflow when 3in1 on Function button 3 not programmed Buttons Multitab Activates/deactivates the 3in1 function The rinse aid inflow is only affected, if the 3in1 function is selected. The multi display can indicate: – the start time that has been set.
Prior to using for the first time Prior to using for the first time 3 If you wish to use 3 in 1 detergent: – First read the section “Using 3in1 detergents”. – Do not fill up with special salt or rinse aid. If you do not use 3in1 detergent, before using for the first time 1. Set the water softener 2. Fill up with special salt for water softeners 3.
Prior to using for the first time 3 9 Setting electronically: 1. Press the ON/OFF button. 2. 3. 4. 5. If the only LED indicator illuminated is one that belongs to a programme button, this means that this dishwashing cycle has been activated. The dishwashing cy cle must be deselected: Press function buttons 2 and 3 simultaneously for approx. 2 seconds. The LED indicators of all the programme buttons that can be selected light up. Press function buttons 2 and 3 simultaneously and keep them pressed.
Prior to using for the first time Adding special salt 1. 2. 3. 4. 3 3 To decalcify the water softener, it must be filled up with special salt. Use only special salt suitable for domestic dishwashers. If you do not use 3 in1 detergent, fill up with special salt: – Before using the dishwasher for the first time. – When the control indicator for special salt is illuminated on the control panel. Open the door and remove the lower basket.
Prior to using for the first time 11 Filling up with rinse aid With rinse aid the rinsing water drains away better and so you get smear free, gleaming dishes and clear glasses. If you do not use 3in1 detergent, fill up with rinse aid: – Before using the dishwasher for the first time. – When the control indicator for rinse aid is illuminated on the control panel. Use only special rinse aid for dishwashers and no other liquid detergents. 1. Open the door.
Prior to using for the first time Setting the amount of rinse aid required 3 1. 2. 3. 4. 5. 6. Only change the amount dispensed, if smears, milky spots (reduce the amount) or dried on water spots (increase the amount) can be seen on glasses and dishes. (See section “If dishwashing results are not satisfactory”.) The dosage can be set from 1 6. The dosage is pre set to “4” in the factory. Open the dishwasher door. Press the release button on the rinse aid compartment. Open the cover.
Prior to using for the first time 13 Activating rinse aid inflow when 3in1 function is selected 3 3 If the 3in1 function is not selected, the rinse aid inflow is always activated. If the 3in1 function is selected due to the use of 3in1 detergent, the rinse aid in flow is deactivated. If the dishes then do not dry sufficiently, you should re acti vate the rinse aid inflow (see also section “Using 3in1 detergents”). 1. Press the ON/OFF button.
In daily use In daily use Loading cutlery and dishes 1 Sponges, cleaning cloths and any other objects that can absorb water must not be washed in the dishwasher. Plastic and Teflon coated dishes and pans tend to retain water droplets. These dishes and pans therefore do not dry as well as those made of china and stainless steel.
In daily use 15 Loading cutlery 1 Warning: Sharp knives and other items of cutlery with sharp edges must be laid in the cutlery rack or in the upper basket to avoid the risk of injury. To ensure that all items of cutlery in the cutlery basket can be reached by the water, you should: 1.Place the grid insert on the cutlery 2.Place forks and spoons in the cutlery basket basket's grid insert with their han dles pointing downwards.
In daily use To make it easier to load larger dishes, the two plate rests on the right in the lower basket can be folded down. Cups, Glasses, Coffee Service Load smaller, fragile crockery and long, sharp cutlery in the upper basket. • Arrange items of crockery on and under the folding cup racks so that they are offset from each other and water can reach all items. • The cup racks can be folded up out of the way for tall crockery items.
In daily use Adjusting the height of the upper basket Maximum height of dishes in the 3 Upper basket Lower basket with upper basket raised 22 cm 30 cm with upper basket lowered 24 cm 29 cm The height of the baskets can also be adjusted when they are loaded. Raising / Lowering the upper basket 1. Pull out the upper basket completely. 2. Holding the upper basket by the handle, raise it as far as it will go and then lower it vertically.
In daily use Adding detergent 1 3 Detergents remove the dirt from dishes and cutlery. The detergent must be added before the cycle starts. Only use detergent intended for domestic dishwashers. The detergent compartment is located on the inside of the door. 1. If the lid is closed: Press the release button. The lid will spring open. 2. Place the detergent in the detergent dis penser. The markings indicate the dosing levels for powder detergents: “20/30” cor responds to approx.
In daily use 19 Concentrated detergents 2 Today’s detergents for dishwashers are almost exclusively low alkaline concen trated detergents with natural enzymes in tablet or powder form. Using 50°C dishwashing cycles in conjunction with these concentrated deter gents reduces pollution and is good for your dishes, as these dishwashing cycles are specially matched to the dirt dissolving properties of the enzymes in con centrated detergents.
In daily use Using 3in1 detergents 3 These products are detergents with a combined cleaning, rinsing and salt func tion. When the 3in1 function is activated, – the addition of special salt and rinse aid from the respective dispenser is pre vented. – If the salt and rinse aid dispensers are empty, this is not indicated. – The dishwashing cycles can be up to 30 minutes longer. If you want to use 3in1 detergents, check whether these detergents are suitable for your water hardness.
In daily use 21 Activation/deactivation of the 3 in 1 function Press simultaneously the two buttons positioned over the writing Multitab, un til the "Multitab function "indicator light illuminates. This means that the func tion is active. To deactivate the function press the same buttons again until the indicator light corresponding to the "Multitab" symbol turns off.
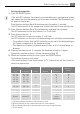
In daily use Selecting the dishwashing cycle (Cycle Table) Dinner service and cookware, tempera normally soiled ture sensitive crockery Dessert dishes and coffee service, deli lightly soiled cate glassware 5) ECO 50° Water (litres) • • • • • • • • • • 9 22 24 0,8 1,80 2,00 120 130 11 22 • 1,1 1,6 • 30 13 15 heavily soiled, dried on food remains, in particular protein and starch • 14 Dinner service and cookware Energy (kWh) INTENSIV CARE 70°4) 0,95
In daily use Selecting a programme When your dishes look like this, select: an intensive programme. a normal or energy saving programme. a short programme (e.g. 30 minute pro gramme).
In daily use Starting a dishwashing cycle 1. 2. 3. 4. 5. Check that the spray arms can turn freely. Turn the water tap on fully. Close the door. Press the ON/OFF button. Select the desired cycle. The programme display lights up. The selected cycle will begin after approxi mately 3 seconds. Interrupting or aborting a dishwashing cycle 1 3 Only interrupt a dishwashing cycle that is in progress if it is absolutely necessary.
In daily use 25 Cancelling the delay timer: Press the Delay Timer button repeatedly until the Multi display goes out. The se lected dishwashing cycle will begin immediately. To change a dishwashing cycle As long as the cycle has not yet started, you can still change the dishwashing cycle. First abort the dishwashing cycle, then re set the time delay, lastly select the new dishwashing cycle.
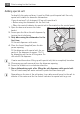
Care and cleaning Care and cleaning 1 Do not use furniture care products or aggressive cleaners. • When necessary, clean the dishwasher’s controls with a soft cloth and clean warm water. • Occasionally check the internal dispensers, door seal and water inlet filter (if fitted) for dirt and clean them, if necessary. Cleaning the filters 3 The filters must be regularly checked and cleaned. Dirty filters will spoil the wash re sults. 1. Open the door and remove the lower basket. 2.
Care and cleaning 1 5. Remove the flat filter (3) from the base of the washing compartment and clean both surfaces thoroughly. 6. Re insert the flat filter. 7. Place the fine filter in the micro filter and fit the two together. 8. Insert the filter system in place and lock it by turning the handle clockwise as far as it will go. Ensure that the flat filter does not pro trude above the base of the washing com partment. Under no circumstances may the dishwasher be used without its filters.
What to do if… What to do if… Remedying small malfunctions Before you call the Customer Care Department, please check whether – you cannot remedy the fault yourself with the help of the following fault ta ble or – whether it is caused by faulty, electrical connections and/or faulty water con nections. In these cases the engineer must make you liable for the costs of the Customer Service intervention even during the warranty period.
What to do if… Malfunction Possible cause The programme indicator for the The sink outlet is blocked. selected dishwashing cycle is flashing, the indicator for the end of the Water drain hose has not been dishwashing cycle is flashing in correctly positioned. rhythm 2 short light signals one after another. 29 Remedy Clean out sink outlet. Check hose installation.
What to do if… If the dishwashing results are not satisfactory The dishes are still dirty. • The wrong dishwashing cycle was selected. • The dishes were loaded is such a way that the dishwashing water did not reach all items. The baskets for the dishes must not be overloaded. • Filters in the floor of the dishwasher are not clean or incorrectly inserted. • Good quality detergent was not used, or too little was used.
Disposal 31 Disposal 2 Packaging material The packaging materials are environmentally friendly and can be recycled. The plastic components are identified by markings, e.g. >PE<, >PS<, etc. Please dis pose of the packaging materials in the appropriate container at the community waste disposal facilities. 2 Old appliance W 1 The symbol on the product or on its packaging indicates that this product may not be treated as household waste.
Notes for Test Institutes Notes for Test Institutes Testing in accordance with EN 60704 must be carried out with the appliance fully loaded and using the test cycle (see “Cycle Table”). Tests in accordance with EN 50242 must be carried out when the salt dis penser in the water softener and the rinse aid dispenser have been filled with salt and rinse aid respectively, and using the test cycle (see “Cycle Table”).
Installation and connection instructions 33 Installation and connection instructions 1 Safety information for the installation • Only transport the dishwasher in an upright position, otherwise salt water may run out. • Before using the dishwasher for the first time, check for any damage caused in transport. Do not under any circumstances connect an appliance that is dam aged. In the case of damage, please contact your supplier.
Connecting the dishwasher If the appliance is built in under a kitchen work surface, the worktop supplied with the dishwasher can be removed in the fol lowing way: 1. Unscrew the screws from the elbows at the rear (1). 2. Push the appliance’s worktop backwards about 1 cm (2). 3. Lift the worktop at the front (3) and re move it. 1 If the dishwasher is later used as a free standing appliance, the work surface supplied with it must be re mounted.
Connecting the dishwasher 35 Connecting the inlet hose 1 3 1 The water inlet hose must not be kinked, crushed or entangled when it is being connected. Connect the threaded hose fitting (ISO 228 1:2000) on the water inlet hose to a tap with an external thread (¾ inch). The inlet hose is fitted with either a plastic or a metal nut: – Only tighten the nut hand tight. Then do a visual check for water tightness. (Make sure that the tap is not drip ping.
Connecting the dishwasher Extension hoses • Extension hoses are available from your dealer or from our Customer Care Depart ment. To ensure that the function of the appliance is not impeded, the internal di ameter of extension hoses must be 19 mm. • Extension hoses must not be laid more than a maximum distance of 4 metres horizontally; the maximum permitted height for the connection for the drain hose is then 85 cm.
Guarantee/Customer Service 37 Guarantee/Customer Service European Guarantee This appliance is guaranteed by Electrolux in each of the countries listed at the back of this user manual, for the period specified in the appliance guarantee or otherwise by law.
Guarantee/Customer Service p t b Magyarország +36 1 252 1773 H 1142 Budapest XIV, Erzsébet királyné útja 87 Nederland +31 17 24 68 300 Vennootsweg 1, 2404 CG Alphen aan den Rijn Norge +47 81 5 30 222 Risløkkvn. 2 , 0508 Oslo Österreich +43 18 66 400 Herziggasse 9, 1230 Wien Polska +48 22 43 47 300 ul. Kolejowa 5/7, Warszawa Portugal +35 12 14 40 39 39 Quinta da Fonte Edificio Gonçalves Zarco Q 35 2774 518 Paço de Arcos Romania +40 21 451 20 30 Str.
Service 39 Service In the event of technical faults, please first check whether you can remedy the problem yourself with the help of the operating instructions (section “What to do if…”). If you were not able to remedy the problem yourself, please contact the Cus tomer Care Department or one of our service partners. In order to be able to assist you quickly, we require the following information: – Model description – Product number (PNC) – Serial number (S No.
117 985 53/0-00-270407-01 Subject to change without notice www.electrolux.