FAVORIT 78005 VI NL AFWASMACHINE DE GESCHIRRSPÜLER GEBRUIKSAANWIJZING BENUTZERINFORMATION 2 25
VOOR PERFECTE RESULTATEN Bedankt dat u voor dit AEG product heeft gekozen. Dit apparaat is ontworpen om vele jaren uitstekend te presteren, met innovatieve technologieën die het leven gemakkelijker helpen maken – functies die gewone apparaten wellicht niet hebben. Neem een paar minuten de tijd om het door te lezen zodat u er optimaal van kunt profiteren.
Inhoud 3 INHOUD 4 8 9 11 11 13 13 14 15 16 17 19 20 23 24 Veiligheidsinformatie Beschrijving van het product Bedieningspaneel Bediening van het apparaat De waterontharder instellen Gebruik van zout voor de vaatwasser Gebruik van afwasmiddel en glansmiddel De Multitabfunctie De vaatwasser inruimen Wasprogramma's Een afwasprogramma selecteren en starten Onderhoud en reiniging Problemen oplossen Technische gegevens Milieubescherming In deze gebruiksaanwijzing worden de volgende symbolen gebruikt: Belangrij
Veiligheidsinformatie VEILIGHEIDSINFORMATIE Lees deze handleiding zorgvuldig alvorens het apparaat te installeren of te gebruiken: • Voor uw veiligheid en de veiligheid van uw eigendommen. • Om het milieu te helpen. • voor de correcte werking van het apparaat. Houd deze instructies altijd in de buurt van het apparaat, ook als u verhuist of het apparaat aan iemand anders geeft. De fabrikant is niet verantwoordelijk voor schade veroorzaakt door een foutieve installatie.
Veiligheidsinformatie 5 • Gebruik alleen gespecificeerde producten voor afwasmachines (afwasmiddel, zout, glansspoelmiddel). • Zout dat niet gespecificeerd is voor afwasmachines, veroorzaakt schade aan de waterontharder. • Vul het apparaat met zout voordat u een afwasprogramma start. Zout dat in het apparaat is achtergebleven, kan roest veroorzaken of een gat in de onderkant van het apparaat maken. • Vul het glansmiddeldoseerbakje nooit met andere middelen dan glansspoelmiddel (bijv.
Veiligheidsinformatie Voorzorgsmaatregelen bij vorst • Installeer het apparaat niet op een plek waar de temperatuur onder de 0°C komt. • De fabrikant is niet aansprakelijk voor enige schade door bevriezing. Wateraansluiting • Gebruik nieuwe slangen om het apparaat aan te sluiten op de watertoevoer. Gebruik geen gebruikte slangen. • Sluit het apparaat niet op nieuwe leidingen aan of op leidingen die lang niet zijn gebruikt. Laat het water enkele minuten stromen en sluit dan de toevoerslang pas aan.
Veiligheidsinformatie 7 • Vervang of verander het netsnoer niet zelf. Neem contact op met het servicecentrum. • Zorg ervoor dat de stroomsnoeren en kabel niet knakken of beschadigd raken achter het apparaat. • Zorg ervoor dat het netsnoer na installatie bereikbaar is. • Trek niet aan het netsnoer om het apparaat los te koppelen. Trek altijd aan de stekker. Service-afdeling • Alleen een erkende persoon mag dit apparaat repareren. Neem contact op met het servicecentrum.
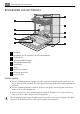
Beschrijving van het product BESCHRIJVING VAN HET PRODUCT 10 1 9 2 3 4 5 1 2 3 4 5 6 7 8 9 10 8 7 6 Bovenrek Aanpassen van de instelling van de waterhardheid Zoutreservoir Afwasmiddeldoseerbakje Glansmiddeldoseerbakje Typeplaatje Filters Onderste sproeiarm Bovenste sproeiarm Top sproeiarm Visueel signaal • Als het afwasprogramma is gestart, schijnt er een rood visueel signaal op de vloer, onder de deur van het apparaat. Dit rode signaal blijft aan totdat het afwasprogramma is voltooid.
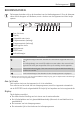
Bedieningspaneel 9 BEDIENINGSPANEEL De knoppen bevinden zich op de bovenkant van het bedieningspaneel. Als u de afwasmachine met de knoppen wilt bedienen, moet u de deur van het apparaat een klein beetje openen. 1 1 2 3 4 5 6 7 8 9 2 3 4 5 6 7 8 9 Aan-/uit-toets Display Uitgestelde start-toets Programmatoets (omlaag) Programmatoets (omhoog) Extra hygiëne-toets Multitabtoets RESET-toets Indicatielampjes Indicatielampjes Zoutindicatielampje.
Bedieningspaneel • • • • Het einde van een afwasprogramma (op de display verschijnt een nul) Het aftellen van de uitgestelde start De alarmcodes Het in- of uitschakelen van de geluidssignalen Uitgestelde start-toets Druk herhaaldelijk op deze toets om de start van het afwasprogramma 1 tot 24 uur uit te stellen. Programmakeuzetoetsen Druk herhaaldelijk op één van deze toetsen om een afwasprogramma in te stellen.
Bediening van het apparaat 11 • Het afwasprogramma is voltooid. • Het niveau van de waterontharder is elektronisch gewijzigd. • Het apparaat ondervindt een storing. Fabrieksinstelling: aan. De geluidssignalen uitschakelen 1. Schakel het apparaat in. 2. Zorg dat het apparaat in de instelmodus staat. 3. Druk tegelijkertijd op toets (4) en (5) en houd de toetsen ingedrukt totdat de indicatielampjes van toets (3), (4) en (5) knipperen. 4. Laat toets (4) en (5) los. 5.
De waterontharder instellen Neem contact op met uw plaatselijke waterinstantie voor informatie over de hardheid van het water in uw omgeving.
Gebruik van zout voor de vaatwasser 13 • Klinken er geluidssignalen. • Wordt de instelling van de waterontharder op de display weergegeven (bijvooren hoort u vijf geluidssignalen = niveau 5). beeld: 6. Druk herhaaldelijk op toets (3) om de instelling te wijzigen. 7. Schakel het apparaat uit om te bevestigen. Wanneer u de waterontharder elektronisch instelt op niveau 1, blijft het indicatielampje voor zout uit. GEBRUIK VAN ZOUT VOOR DE VAATWASSER Het zoutreservoir vullen: 1.
De Multitabfunctie Gebruik van afwasmiddel Gebruik niet meer dan de juiste hoeveelheid afwasmiddel om het milieu te beschermen. Volg het advies van de afwasmiddelfabrikant op de verpakking. Het afwasmiddeldoseerbakje vullen: 1. Druk op de vrijgaveknop 2 om het deksel te openen 7 van het afwasmiddelbakje. 2. Doe het afwasmiddeltablet in het afwasmiddeldoseerbakje 1 . 3.
De vaatwasser inruimen 15 De multitabfunctie schakelt de indicatielampjes voor zout en glansmiddel uit. De programmaduur kan toenemen als u de multitabfunctie gebruikt. Schakel de multitabfunctie in of uit, voordat u een afwasprogramma start. U kunt de functie niet inschakelen of uitschakelen als er een afwasprogramma bezig is. De multitabfunctie inschakelen • Druk op de multitabtoets. Het multitabindicatielampje gaat branden. De functie is ingeschakeld.
Wasprogramma's WASPROGRAMMA'S Programma 1 Soort vuil Type lading Programmabeschrijving Extra hygiëne-functie Alles Serviesgoed, bestek en pannen Voorspoelen Wassen 45°C of 70°C Spoelgangen Drogen Ja, met effect. 2 Sterk vervuild Serviesgoed, bestek en pannen Voorspoelen Wassen 70 °C Spoelgangen Drogen Ja, zonder effect. 3 Normaal bevuild Serviesgoed en bestek Voorspoelen Wassen 50 °C Spoelgangen Drogen Ja, zonder effect.
Een afwasprogramma selecteren en starten 17 4) Dit is het standaard programma voor testinstituten. Met dit programma hebt u de meest efficiënte wateren energieconsumptie voor normaal bevuild serviesgoed en bestek. Raadpleeg de apart bijgeleverde documentatie voor testgegevens. 5) Met dit programma kunt u een lading met gecombineerde bevuiling afwassen. Erg zwaar bevuild serviesgoed in de onderste mand en normaal bevuild serviesgoed in de bovenste mand.
Een afwasprogramma selecteren en starten • Het nummer van het afwasprogramma knippert in de display. 4. Stel zo nodig de extra hygiëne-functie in. 5. Sluit de deur van de afwasmachine, het aftellen start automatisch. Het afwasprogramma starten met uitgestelde start 1. 2. 3. 4. Schakel het apparaat in. Zorg dat het apparaat in de instelmodus staat. Stel het afwasprogramma in, en stel zo nodig de functie voor extra hygiëne in.
Onderhoud en reiniging 19 Controleer of er afwasmiddel in het afwasmiddeldoseerbakje aanwezig is voordat u een nieuw afwasprogramma start. Einde van het afwasprogramma Wanneer het afwasprogramma is voltooid, hoort u met tussenpozen een geluidssignaal. 1. Open de deur van het apparaat. • Het eindindicatielampje staat aan. • Op de display verschijnt een nul. 2. Schakel het apparaat uit. 3. Laat de deur van het apparaat een paar minuten op een kier staan, voor betere droogresultaten.
Problemen oplossen 2. Filter (A) heeft twee delen. Haal de twee delen uit elkaar om het filter te demonteren. 3. Maak de onderdelen schoon onder stromend water. 4. Plaats de twee delen van filter (A) tegen elkaar en druk ze samen. Zorg ervoor dat ze goed worden gemonteerd. 5. Verwijder filter (B). 6. Maak filter (B) schoon onder stromend water. 7. Zet filter (B) op de oorspronkelijke plaats terug. Zorg ervoor dat het filter goed wordt gemonteerd in de twee geleiders (C). 8.
Problemen oplossen 21 WAARSCHUWING! Schakel het apparaat uit voordat u de controles uitvoert. Storing Het apparaat wordt niet gevuld met water. Mogelijke oorzaak Mogelijke oplossing De waterkraan is verstopt of aangezet met kalkaanslag. Maak de waterkraan schoon. De waterdruk is te laag. Neem contact op met de waterleidingsmaatschappij. De waterkraan is dicht. Draai de waterkraan open. Het filter in de wateraanvoers- Maak het filter schoon. lang is verstopt. Het apparaat pompt geen water weg.
Problemen oplossen – Productnummer (PNC) .......................................... – Serienummer (S.N.) .............................................. De afwas- en droogresultaten zijn niet bevredigend Probleem De borden zijn niet schoon. Mogelijke oorzaak Het afwasprogramma is niet geschikt voor het type lading en de mate van vervuiling. Mogelijke oplossing Zorg ervoor dat het afwasprogramma geschikt is voor het type lading en de mate van vervuiling.
Technische gegevens Probleem Mogelijke oorzaak De multitabfunctie is ingeschakeld (deze functie schakelt het glansmiddeldoseerbakje automatisch uit). 23 Mogelijke oplossing Schakel het glansmiddeldoseerbakje in. Het glansmiddeldoseerbakje inschakelen 1. Schakel het apparaat in. 2. Zorg dat het apparaat in de instelmodus staat. 3. Druk tegelijkertijd op toets (4) en (5) en houd de toetsen ingedrukt totdat de indicatielampjes van toets (3), (4) en (5) knipperen. 4. Laat toets (4) en (5) los. 5.
Milieubescherming MILIEUBESCHERMING Het symbool op het product of op de verpakking wijst erop dat dit product niet als huishoudafval mag worden behandeld, maar moet worden afgegeven bij een verzamelpunt waar elektrische en elektronische apparatuur wordt gerecycled. Als u ervoor zorgt dat dit product op de juiste manier wordt verwijderd, voorkomt u mogelijke negatieve gevolgen voor mens en milieu die zich zouden kunnen voordoen in geval van verkeerde afvalverwerking.
FÜR PERFEKTE ERGEBNISSE Danke, dass Sie sich für dieses AEG Produkt entschieden haben. Wir haben es geschaffen, damit Sie viele Jahre von seiner ausgezeichneten Leistung und den innovativen Technologien, die Ihnen das Leben erleichtern, profitieren können. Es ist mit Funktionen ausgestattet, die in gewöhnlichen Geräten nicht vorhanden sind. Nehmen Sie sich ein paar Minuten Zeit zum Lesen, um seine Vorzüge kennen zu lernen.
Inhalt INHALT 27 31 31 34 34 36 36 37 38 39 41 42 44 47 47 Sicherheitshinweise Gerätebeschreibung Bedienblende Gebrauch des Gerätes Einstellen des Wasserenthärters Gebrauch von Salz für Geschirrspüler Verwendung von Reinigungsmittel und Klarspüler Funktion "Multitab" Laden von Besteck und Geschirr Spülprogramme Auswählen und Starten eines Spülprogramms Reinigung und Pflege Was tun, wenn … Technische Daten Umwelttipps In dieser Benutzerinformation werden folgende Symbole verwendet: Wichtige Hinweise z
Sicherheitshinweise 27 SICHERHEITSHINWEISE Lesen Sie vor der Montage und Anwendung sorgfältig dieses Handbuch: • Für Ihre Sicherheit und die Sicherheit Ihres Eigentums. • Zum Schutz der Umwelt. • Zur korrekten Bedienung des Geräts. Bewahren Sie diese Bedienungsanleitung in der Nähe des Geräts auf, auch wenn Sie dieses an einem anderen Ort aufstellen oder es an eine andere Person weitergeben. Der Hersteller ist nicht dafür verantwortlich, wenn eine inkorrekte Montage und Verwendung Schäden verursacht.
Sicherheitshinweise • Verwenden Sie für Geschirrspüler ausschließlich dafür vorgesehene Produkte (Reinigungsmittel, Salz, Klarspülmittel). • Die Verwendung von Salzarten, die nicht für Geschirrspüler vorgesehen sind, kann zur Beschädigung des Wasserenthärters führen. • Füllen Sie das Gerät mit Salz, bevor Sie ein Spülprogramm starten. Salzrückstände im Gerät können Korrosion oder ein Loch im Boden des Geräts verursachen.
Sicherheitshinweise 29 • Stellen Sie sicher, dass das Gerät unter und an angrenzenden sicheren Konstruktionen montiert ist. Frostschutzmaßnahmen • Stellen Sie das Gerät nicht an einem Ort auf, an dem die Temperatur unter 0 °C absinken kann. • Der Hersteller haftet nicht für Frostschäden. Wasseranschluss • Verwenden Sie zum Anschluss des Geräts an die Wasserversorgung neue Schläuche. Benutzen Sie keine gebrauchten Schläuche. • Schließen Sie das Gerät nicht an neue oder lange nicht mehr benutzte Rohre an.
Sicherheitshinweise Elektrischer Anschluss • Das Gerät muss geerdet sein. • Stellen Sie sicher, dass die elektrischen Daten auf dem Typenschild den Daten Ihrer Stromversorgung entsprechen. • Schließen Sie das Gerät nur an eine sachgemäß installierte Schutzkontaktsteckdose an. • Verwenden Sie keine Mehrfachsteckdosen oder Verlängerungskabel. Es besteht Brandgefahr. • Ersetzen oder wechseln Sie nicht selbst das Netzkabel. Wenden Sie sich hierzu an den Kundendienst.
Gerätebeschreibung 31 GERÄTEBESCHREIBUNG 10 1 9 2 3 4 5 1 2 3 4 5 6 7 8 9 10 8 7 6 Oberkorb Wasserhärtestufen-Wähler Salzbehälter Reinigungsmittelbehälter Klarspülmittel-Dosierer Typenschild Filter Unterer Sprüharm Mittlerer Sprüharm Oberer Sprüharm Optisches Signal • Nach dem Start des Spülprogramms leuchtet auf dem Boden unter der Gerätetür ein rotes Signal. Dieses rote Signal bleibt bis zum Ende des Spülprogramms eingeschaltet.
Bedienblende 1 1 2 3 4 5 6 7 8 9 2 3 4 5 6 7 8 9 Ein-/Aus-Taste Display Taste Zeitvorwahl Taste Programm (nach unten) Taste Programm (nach oben) Taste Extra-Hygiene Taste Multitab Taste RESET Anzeigen Anzeigen Salzanzeige Leuchtet auf, wenn der Salzbehälter aufgefüllt werden muss. 1) Die Salzanzeige kann nach dem Nachfüllen von Salz noch einige Stunden leuchten. Dies hat jedoch keine unerwünschte Auswirkung auf den Gerätebetrieb.
Bedienblende 33 Taste Zeitvorwahl Drücken Sie mehrmals diese Taste, um den Start des Spülprogramms um 1 bis 24 Stunden zu verzögern. Programmwahltasten Drücken Sie eine dieser Tasten wiederholt, um ein Spülprogramm einzustellen. Mit jedem Tastendruck zeigt das Display die Zahl an, die dem Spülprogramm entspricht. Siehe hierzu „Spülprogramme“. Taste Extra-Hygiene Diese Funktion sorgt für hygienischere Ergebnisse. Während der Spülphase wird die Temperatur für 10 bis 14 Minuten auf 70 °C gehalten.
Gebrauch des Gerätes • Im Fall einer Fehlfunktion des Geräts. Werkseitige Einstellung: Eingeschaltet. Deaktivieren der Signaltöne 1. Schalten Sie das Gerät ein. 2. Stellen Sie sicher, dass sich das Gerät im Einstellmodus befindet. 3. Halten Sie die Tasten (4) und (5) gleichzeitig gedrückt, bis die Kontrolllampen der Tasten (3), (4) und (5) blinken. 4. Lassen Sie die Tasten (4) und (5) los. 5. Drücken Sie die Taste (5). • Die Kontrolllampen der Tasten (3) und (4) erlöschen.
Einstellen des Wasserenthärters 35 Wasserhärteeinstellung Wasserhärte Deutscher Wasserhärtegrad (dH °) Französischer Wasserhärtegrad (°TH) mmol/l Clarke-Werte manuell elektronisch 51 - 70 91 - 125 9,1 - 12,5 64 - 88 2 1) 10 43 - 50 76 - 90 7,6 - 9,0 53 - 63 2 1) 9 37 - 42 65 - 75 6,5 - 7,5 46 - 52 2 1) 8 29 - 36 51 - 64 5,1 - 6,4 36 - 45 2 1) 7 23 - 28 40 - 50 4,0 - 5,0 28 - 35 2 1) 6 19 - 22 33 - 39 3,3 - 3,9 23 - 27 2 1) 5 1) 15 - 18 26 - 32 2,6 - 3,2 18 -
Gebrauch von Salz für Geschirrspüler • Das Display zeigt die Einstellung des Wasserenthärters an (zum Beispiel: es ertönen fünf Signaltöne = Stufe 5). 6. Drücken Sie zur Einstellungsänderung wiederholt die Taste (3). 7. Schalten Sie das Gerät zur Bestätigung aus. und Wenn der Wasserenthärter elektronisch auf Stufe 1 eingestellt ist, leuchtet die Salzkontrolllampe bei leerem Salzbehälter nicht auf. GEBRAUCH VON SALZ FÜR GESCHIRRSPÜLER So füllen Sie den Salzbehälter: 1.
Funktion "Multitab" 37 Gebrauch von Reinigungsmitteln Um die Umwelt zu schützen, verwenden Sie nicht mehr als die korrekte Reinigermenge. Beachten Sie die Empfehlungen des Reinigungsmittelsherstellers auf der Reinigerverpackung. So füllen Sie den Reinigungsmittelbehälter: 1. Drücken Sie zum Öffnen des Deckels 2 die Freigabetaste 7 des Reinigungsmittelbehälters. 2. Füllen Sie das Reinigungsmittel in den Behälter. 1 . 3.
Laden von Besteck und Geschirr Diese Tabletten enthalten das Reinigungsmittel, Klarspülmittel und Geschirrspülsalz. Einige Tabletten-Sorten können auch andere Zusätze enthalten. Stellen Sie sicher, dass diese Tabletten für die Wasserhärte in Ihrem Bereich geeignet sind (beachten Sie die Anleitungen auf der Verpackung des Produkts). Die Funktion Multitab deaktiviert die Zufuhr von Klarspülmittel und Salz. Die Funktion Multitab deaktiviert die Kontrolllampen für Salz und Klarspülmittel.
Spülprogramme 39 • Achten Sie beim Einordnen des Spülguts darauf, dass das Wasser die Oberflächen aller Geschirrteile erreicht. • Ordnen Sie leichte Gegenstände in den Oberkorb ein. Achten Sie darauf, dass diese nicht verrutschen können. • Auf Kunststoffgegenständen und Geschirr mit Antihaftbeschichtung sammeln sich oftmals Wassertropfen.
Spülprogramme Programm 8 Verschmutzungsgrad Spülgut Programmbeschreibung Verwenden Sie dieses Programm zum schnellen Abspülen des Geschirrs. Damit wird vermieden, dass sich Essensreste am Geschirr festsetzen und schlechte Gerüche aus dem Gerät entweichen. Verwenden Sie für dieses Programm kein Reinigungsmittel. Spülgang Funktion Extra-Hygiene Ja, ohne Auswirkung 1) Das Gerät erkennt den Verschmutzungsgrad und die Anzahl der Geschirrteile in den Körben.
Auswählen und Starten eines Spülprogramms Programm Programmdauer (in Minuten) Energie (kWh) 41 Wasser (in Litern) 7 65 - 75 0,8 - 0,9 11 - 12 8 14 0,1 4 Druck und Temperatur des Wassers, die Schwankungen in der Stromversorgung und die Geschirrmenge können diese Werte verändern. AUSWÄHLEN UND STARTEN EINES SPÜLPROGRAMMS Starten des Spülprogramms ohne Zeitvorwahl 1. Schalten Sie das Gerät ein. 2. Stellen Sie sicher, dass sich das Gerät im Einstellmodus befindet. 3. Wählen Sie ein Spülprogramm.
Reinigung und Pflege Wenn die Gerätetür geschlossen ist und der Countdown bereits gestartet ist 1. Öffnen Sie die Tür des Geräts. 2. Drücken Sie die Taste Zeitvorwahl wiederholt, bis das Display die Zahl des gewünschten Spülprogramms anzeigt. • Die Zahl blinkt einige Sekunden und dann zeigt das Display die Dauer des Spülprogramms an. 3. Schließen Sie die Tür des Gerätes; das Spülprogramm startet automatisch. Unterbrechung eines Spülprogramms • Öffnen Sie die Tür des Gerätes. – Das Spülprogramm stoppt.
Reinigung und Pflege 43 Obwohl die Filter wartungsarm sind, müssen sie in regelmäßigen Abständen überprüft und, falls nötig, gereinigt werden. 1. Drehen Sie den Filter (A) gegen den Uhrzeigersinn, um ihn zu entfernen und ziehen Sie ihn aus dem Filter (B). B A 2. Filter (A) besteht aus zwei Teilen. Ziehen Sie diese auseinander, um sie zu zerlegen. 3. Reinigen Sie die einzelnen Teile unter fließendem Wasser. 4. Setzen Sie die beiden Teile des Filters (A) ineinander und drücken Sie diese zusammen.
Was tun, wenn … Benutzen Sie keine Scheuermittel, Metallschwämmchen oder Lösungsmittel (Azeton usw.). WAS TUN, WENN … Das Gerät startet nicht oder stoppt während des Betriebs. Versuchen Sie zuerst eine Lösung für das Problem zu finden (beachten Sie die Tabelle). Ist dies nicht möglich, wenden Sie sich an den Kundendienst. Bei manchen Fehlfunktionen zeigt das Display einen Alarmcode an: - Es läuft kein Wasser in den Geschirrspüler. • - Das Gerät pumpt nicht ab.
Was tun, wenn … Störung Mögliche Ursachen 45 Mögliche Abhilfe Der Netzstecker steckt nicht richtig in der Steckdose. Stecken Sie den Netzstecker richtig in die Steckdose. Die Sicherung im Sicherungskasten ist durchgebrannt. Wechseln Sie die Sicherung aus. Die Zeitvorwahl ist eingestellt. • Brechen Sie die Zeitvorwahl ab. • Nach Ablauf der Zeitvorwahl startet das Spülprogramm automatisch. Schalten Sie das Gerät wieder ein, nachdem Sie es überprüft haben.
Was tun, wenn … Problem Schlieren, Streifen, weißliche Flecken oder blauschimmernder Belag auf Gläsern und Geschirr. Mögliche Ursache Inkorrekte Härtegradeinstellung des Wasserenthärters. Stellen Sie den Wasserenthärter auf den korrekten Härtegrad ein. Die Verschlusskappe des Salzbehälters ist nicht richtig geschlossen. Stellen Sie sicher, dass der Salzbehälter richtig geschlossen ist. Die Klarspülmitteldosierung ist zu hoch. Klarspülmitteldosierung verringern.
Technische Daten 47 TECHNISCHE DATEN Abmessungen Breite 596 mm Höhe 818 - 898 mm Tiefe 550 mm Min. 0,5 bar (0,05 MPa) Max. 8 bar (0,8 MPa) Wasserversorgung 1) Kalt- oder Warmwasser maximal 60 °C Fassungsvermögen Gedecke Wasserdruck 12 1) Den Zulaufschlauch an einen Wasserhahn mit einem 3/4"-Außengewinde anschließen. Das Typenschild am inneren Rand der Gerätetür zeigt die elektrischen Anschlussdaten. Wenn Sie Heißwasser mithilfe umweltfreundlicher, alternativer Energiequellen (z. B.
www.aeg-electrolux.