FAVORIT ActiveAA Afwasautomaat Informatie voor de gebruiker
Geachte klant, Lees deze gebruiksaanwijzing a.u.b. zorgvuldig door en bewaar het boekje zodat u nog eens iets kunt nalezen. Geeft u deze gebruikersinformatie a.u.b. aan de eventuele volgende eigenaar van het apparaat door. 1 3 2 2 De volgende symbolen worden in de tekst gebruikt: Veiligheidsaanwijzingen Waarschuwing! Aanwijzingen die voor uw eigen veiligheid dienen. Let op! Aanwijzingen die ter voorkoming van schade aan het apparaat dienen.
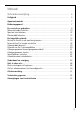
Inhoud Gebruiksaanwijzing ........................................ 5 Veiligheid . . . . . . . . . . . . . . . . . . . . . . . . . . . . . . . . . . . . . . . . . . . . . . . . . . . . . . 5 Apparaataanzicht . . . . . . . . . . . . . . . . . . . . . . . . . . . . . . . . . . . . . . . . . . . . . . . 7 Bedieningspaneel . . . . . . . . . . . . . . . . . . . . . . . . . . . . . . . . . . . . . . . . . . . . . . . 7 De eerste keer gebruiken . . . . . . . . . . . . . . . . . . . . . . . . . . . . . . .
Opstel- en aansluitaanwijzing . . . . . . . . . . . . . . . . . . . . . . . . . . . . 35 Veiligheidsaanwijzingen voor de installatie . . . . . . . . . . . . . . . . . . . . . . . . 35 Opstellen van de afwasautomaat . . . . . . . . . . . . . . . . . . . . . . . . . . . . . . . . . 36 Aansluiten van de afwasautomaat . . . . . . . . . . . . . . . . . . . . . . . . . . . . . . . . 38 Garantievoorwaarden . . . . . . . . . . . . . . . . . . . . . . . . . . . . . . . . . . . . . . 42 Adres service-afdeling .
Gebruiksaanwijzing 1 Veiligheid Voor de eerste keer gebruiken • Volg de ”Opstel- en aansluitaanwijzing” op. Gebruik volgens de voorschriften • De afwasautomaat is alleen bestemd voor het afwassen van huishoudservies. • Constructieve wijzigingen of veranderingen aan de afwasautomaat zijn niet toegestaan. • Alleen speciaal zout, afwasmiddel en glansmiddel gebruiken dat voor afwasautomaten voor huishoudelijk gebruik bestemd is. • Geen oplosmiddelen in de afwasautomaat doseren.
Algemene veiligheid • Reparaties aan de afwasautomaat mogen alleen door vakmensen worden uitgevoerd. • Als de afwasautomaat niet gebruikt wordt, het apparaat uitschakelen en de waterkraan dichtdraaien. • De stekker nooit aan het snoer uit het stopcontact trekken, maar altijd aan de stekker. • Let erop dat de machinedeur, behalve bij vullen en leeghalen, altijd dicht is. Zo voorkomt u dat iemand over de open deur struikelt en zich bezeert. • Ga nooit op de geopende deur staan of zitten.
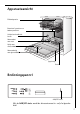
Apparaataanzicht Plafondsproeier Bovenkorf-sproeiarm en bodemsproeiarm Schakelaar hardheidsbereik Voorraadvat voor zout Vakje voor afwasmiddel Voorraadvakje voor glansmiddel Typeplaatje Zeven Bedieningspaneel AAN/UIT-toets Met de AAN/UIT-toets wordt de afwasautomaat in- en/of uitgeschakeld.
Starttijdkeuze instellen Functietoetsen 1 2 Indicatie programma-einde Indicatie van het programmaverloop Functietoets 3 Programmatoetsen Controlelampjes Met de programmatoetsen wordt het gewenste afwasprogramma gekozen.
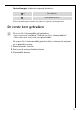
Controlelampjes hebben de volgende betekenis: 1) Zout bijvullen 1) Glansmiddel bijvullen 1) Deze controlelampjes branden niet tijdens het lopende afwasprogramma. De eerste keer gebruiken 3 Als u een 3in1-afwasmiddel wilt gebruiken: – Lees a.u.b. eerst hoofdstuk ”Gebruik van 3in1- afwasmiddelen”. – Niet vullen met zout, noch met glansmiddel. Als u geen 3in1-vaatwasmiddel gebruikt, dient u alvorens de vaatwasser in gebruikte nemen: 1. Waterontharder instellen 2. Zout voor de waterontharder doseren 3.
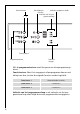
Waterontharder instellen 3 De wateronderharder moet mechanisch en elektronisch worden ingesteld. Om kalkafzettingen op servies en in de afwasautomaat te voorkomen, moet het servies met zacht d.w.z. kalkarm water worden afgewassen. De waterontharder moet volgens de tabel op de waterhardheid binnen uw woongebied worden ingesteld. Informatie over de plaatselijke waterhardheid kunt u bij het betreffende waterleidingbedrijf verkrijgen. De afwasautomaat moet uitgeschakeld zijn.
5. Als de hardheidsgraad goed is ingesteld, drukt u op de toets AAN/UIT. De hardheidsgraad wordt dan opgeslagen. Wanneer de waterontharder elektronisch op “1” wordt ingesteld, dan wordt daarmee de controle-indicatie voor speciaalzout uitgeschakeld.
Speciaal zout doseren 3 3 12 Om de waterontharder te ontkalken dient speciaal zout gedoseerd te worden. Alleen zout dat voor afwasautomaten voor huishoudelijk gebruik bestemd is gebruiken. Als u geen 3in1-afwasmiddel gebruikt, doseer dan zout: – Als u de afwasautomaat voor de eerste keer gebruikt. – Als op het bedieningspaneel het controlelampje voor zout brandt. 1. Deur openen, onderste korf uitnemen 2. Afsluitdop van het voorraadvat van het zout linksom opendraaien. 3.
Glansmiddel doseren Omdat het glansmiddel het spoelwater beter laat aflopen krijgt u vlekvrij, glanzend servies en heldere glazen. Als u geen 3in1-afwasmiddel gebruikt, doseer dan glansmiddel: – Als u voor de eerste keer de afwasautomaat gebruikt. – Als op het bedieningspaneel het controlelampje voor glansmiddel brandt. Gebruik alleen speciaal glansmiddel voor afwasautomaten en geen andere vloeibare reinigingsmiddelen. 1. De deur openen.
Glansmiddeldosering instellen 3 14 De dosering alleen dan veranderen als op glazen en servies vegen, melkachtige vlekken (dosering lager instellen) of opgedroogde waterdruppels (dosering hoger instellen) te zien zijn (zie hoofdstuk “Als het afwasresultaat niet bevredigend is“). De dosering kan van 1-6 worden ingesteld. Door de fabriek is de dosering op “4“ ingesteld. 1. De deur van de afwasautomaat openen. 2. Ontgrendelingsknop van het glansmiddelvak indrukken. 3. Deksel openklappen. 4.
Het dagelijks gebruik Bestek en servies in de machine plaatsen 1 Sponzen, huishouddoeken en alle voorwerpen die water opnemen mogen niet in de afwasautomaat worden gereinigd. Servies voorzien van een kunststof- en/of teflonlaag houdt waterdruppels sterk vast. Daarom droogt dit type servies iets minder goed dan porselein en edelstaal.
Bestek in de machine plaatsen 1 Waarschuwing: Messen met een scherpe punt en scherpkantig bestek dienen door de kans op verwondingen in de bovenste korf geplaatst te worden. Opdat alle bestekdelen in de bestekkorf door water worden omspoeld, moet u: 1.Roosterinzet op de bestekkorf 2.Vorken en lepels met de greep insteken naar onderen in de roosterinzet van de bestekkorf plaatsen. Voor grotere bestekdelen zoals bijv. een garde, kan een helft van het bestekrooster weggelaten worden.
Om groter vaatwerk makkelijker te kunnen inruimen, kunnen de beide rechte bordenrekken van de onderste korf worden ingeklapt. Kopjes, glazen Klein, teer servies of lange, puntige bestekdelen in de bovenste korf plaatsen. • Serviesdelen op en onder het opklapbare kopjesrek om en om plaatsen zodat het water de diverse delen kan bereiken. • Voor hoge serviesdelen kunnen de kopjesrekken omhoog worden geklapt. • Wijn- of cognacglazen in de kopjesrekken hangen of hiertegen laten steunen.
Bovenste korf in hoogte verstellen maximale hoogte van het servies in 3 bovenste korf onderste korf bij hoger geplaatste bovenste korf 22 cm 30 cm bij lager geplaatste bovenste korf 24 cm 29 cm In hoogte verstellen is ook bij beladen korven mogelijk. Hoger/lager plaatsen van de bovenste korf 1. De bovenste korf geheel uittrekken. 2. De bovenste korf zo ver mogelijk optillen en loodrecht laten zakken. De bovenste korf klikt in de onderste of bovenste positie vast.
Afwasmiddel doseren 1 Afwasmiddelen lossen de vervuilingen van servies en bestek op. Het afwasmiddel moet vóór de start van het programma worden gedoseerd. Gebruik alleen afwasmiddel voor huishoud-afwasautomaten. Het vakje voor het afwasmiddel bevindt zich op de binnenzijde van de deur. 1. Als het deksel gesloten is: Ontgrendelingsknop indrukken. Deksel springt open. 2. Afwasmiddel in het vakje voor afwasmiddel doseren.
Compacte afwasmiddelen 2 Afwasmiddelen voor afwasautomaten zijn vandaag de dag bijna uitsluitend compacte afwasmiddelen, in tablet- of poedervorm, met een laag alkalisch gehalte en natuurlijke enzymen. 50 °C-afwasprogramma’s in combinatie met deze compacte afwasmiddelen ontlasten het milieu en sparen uw servies, omdat deze afwasprogramma’s speciaal op de vuiloplossende eigenschappen van de enzymen in compacte afwasmiddelen zijn afgestemd.
Als u 4in1-producten gebruikt Bij gebruik van "4 in 1" vaatwasmiddelen die ook een een anti-glascorrosiemiddel naar een "3 in 1" formule bevatten, dezelfde aanwijzing opvolgen als gegeven voor "3 in 1" vaatwasmiddelen. - • • • 15 Water (liter) • • - - - - 18 - 20 13 - 15 1,2 - 1,4 0,95 - 1,05 90 - 100 23 - 25 • 1,75 - 1,95 • 110 - 120 • 4 (koud)3) Energie (kWh) Gebruikt servies dat in de afwasautomaat wordt Alle soorten seropgespaard en pas later vies moet worden afgewassen.
Programmakeuze Wanneer uw vaatwerk er zo uitziet, kiest u een intensief programma. een normaal of energiebesparend programma. een kort programma (bijvoorbeeld 30 min. programma).
Afwasprogramma starten 1. Controleer of de sproeiarmen vrij kunnen draaien. 2. De kraan helemaal opendraaien. 3. Sluit de deur. 4. De toets AAN/UIT indrukken. 5. Kies het gewenste programma. De programma-indicatie brandt. Na ongeveer 3 seconden begint het gekozen programma. Afwasprogramma onderbreken of afbreken Onderbreek een lopend afwasprogramma alleen als het absoluut noodzakelijk is.
3. Programma kiezen. De LED-indicatie van het gekozen programma en de indicatie naast het aantal uren branden. Na het verstrijken van de ingestelde uren start het programma automatisch. Starttijdkeuze wijzigen: Als het afwasprogramma nog niet is gestart kunt u door het indrukken van de toets starttijdkeuze de instelling alsnog wijzigen: Starttijdkeuze wissen: Druk de toets Starttijdkeuze net zo vaak in tot er geen enkele van de drie urenindicaties meer brandt. Het gekozen programma begint nu onmiddellijk.
Onderhoud en reiniging 1 Geen meubelreinigingsmiddel of agressieve reinigingsmiddelen gebruiken. • De bedieningselementen van de afwasautomaat met een zachte doek en warm, schoon water reinigen. • De vakjes voor reinigingsmiddel, deurafdichting en watertoevoerslang (indien aanwezig) af en toe op vervuiling controleren en eventueel reinigen. Reiniging van de zeven 3 De zeven moeten regelmatig worden gecontroleerd en gereinigd. Vervuilde zeven beïnvloeden het afwasresultaat. 1.
5. Platte zeef (3) uit de bodem van de afwasautomaat nemen en aan beide zijden grondig reinigen. 6. Platte zeef weer plaatsen. 7. Fijne zeef in de microfilter plaatsen en in elkaar drukken. 8. Zeefsysteem inzetten en vergrendelen door de greep zover mogelijk rechtsom te draaien. Opletten dat de platte zeef niet buiten de kuipbodem uitsteekt. 1 Zonder zeven mag de afwasautomaat onder geen enkele voorwaarde worden gebruikt.
3. Gereinigde bovenkorf-sproeiarm weer plaatsen door deze schuin op het verbindingsstuk aan te brengen: de beide delen goed samendrukken, tot deze hoorbaar vastklikken. Bodem-sproeiarm 1. Bodem-sproeiarm voor het verwijderen uit de vergrendeling omhoog trekken. 2. Sproeikoppen van de sproeiarmen reinigen. 3. Bodem-sproeiarm aan het verbindingsstuk bevestigen en vast omlaag drukken, tot het hoorbaar vastklikt.
Wat te doen als... Kleine storingen zelf oplossen Wanneer tijdens het bedrijf op het bedieningspaneel de indicaties knipperen of branden die in de volgende tabel zijn beschreven, raadpleeg dan de tabel om de fout op te lossen. Nadat de fout die in een ritme van 1 of 2 korte knippersignalen wordt weergegeven in de indicatie voor het programma-einde is opgelost, drukt u op de toets van het reeds gestarte programma. Het programma gaat verder. Bij andere foutmeldingen: – Afwasprogramma annuleren.
Storing Mogelijke oorzaak De programma-indicatie van De sifon is verstopt. het gekozen programma knippert, de indicatie voor het einde van het programmma knip- Waterafvoerslang ligt niet pert in het ritme van 2 kor- goed. te, opeenvolgende lichtsignalen. De indicatie voor het einde van het programmma knip- De beveiliging tegen wapert in het ritme van 3 kor- teroverlast is in werking gete, opeenvolgende treden. lichtsignalen. De stekker zit niet in het stopcontact. Het programma start niet.
Als het afwasresultaat niet bevredigend is Het servies wordt niet schoon. • Onjuiste keuze van het afwasprogramma. • Het servies was zo geplaatst dat het water niet alle delen heeft bereikt. De korven mogen niet overbeladen worden. • De zeven in de kuipbodem zijn niet schoon of op onjuiste wijze geplaatst. • Er is geen merkproduct afwasmiddel gebruikt of er is te weinig gedoseerd.
Afvalverwerking 2 2 Verpakkingsmateriaal De verpakkingsmaterialen zijn niet schadelijk voor het milieu en herbruikbaar. De kunststoffen hebben de volgende aanduidingen, bijv. >PE<, >PS<, enz. Verwijder de verpakkingsmaterialen in overeenstemming met de aanduiding bij de gemeentelijke inzamelplaatsen in de daarvoor bestemde containers. Oud apparaat verwijderen W 1 Het symbool op het product of op de verpakking wijst erop dat dit product niet als huishoudafval mag worden behandeld.
Technische gegevens Capaciteit: 12 standaardcouverts inclusief dienbestek Toegestane waterdruk: 1-10 bar (=10-100 N/cm2 = 0,1-1,0 MPa) Elektrische aansluiting: 230 V, 10 A, zie ook het typeplaatje aan de rechterbinnenzijde van de deur van de afwasautomaat Totale vermogen 2250 W Afwasautomaat: vrijstaande apparaten 5 32 Afmetingen: 850 x 598 x 598 (H x B x D in mm) Max. gewicht: 54 kg Dit apparaat is in overeenstemming met de volgende EG-richtlijnen: – 73/23/EEG van 19.02.
Aanwijzingen voor testinstituten De test volgens EN 60704 moet bij een volle belading met het testprogramma (zie programmatabel) worden uitgevoerd. De testen volgens EN 50242 moeten met een volledig gevuld zoutvakje van de waterontharder, met een volledig gevuld vakje voor glansmiddel en met het testprogramma (zie programmatabel) worden uitgevoerd. Volle belading: Halve belading: 12 standaardcouverts 6 standaardcouverts incl dienbeincl.
Onderste korf met bestekkorf *) Bestekkorf *) Eventueel de aan de linkerkant beschikbare kopjesrekken evenals de eventueel beschikbare bierglashouder verwijderen.
Opstel- en aansluitaanwijzing 1 Veiligheidsaanwijzingen voor de installatie • De afwasautomaat alleen staand transporteren omdat anders zout water uit de machine kan lopen. • Voor de ingebruikname de afwasautomaat op transportschade controleren. Een beschadigd apparaat in geen geval aansluiten. Neem in geval van schade contact op met uw leverancier.
Opstellen van de afwasautomaat • De afwasautomaat dient op een vaste vloer opgesteld te worden, stabiel en horizontaal te staan en in alle richtingen uitgelijnd te worden. • Om oneffenheden in de vloer te compenseren en de apparaathoogte t.o.v. andere meubels aan te passen, kunnen de schroefvoeten met een schroevendraaier worden uitgedraaid. • Afvoerslang, toevoerslang en aansluitsnoer moeten binnen de sokkeluitsparing achter vrij beweeglijk liggen opdat ze niet afgeklemd of platgedrukt worden.
Vrijstaande apparaten 1 Wanneer de afwasautomaat direct naast een fornuis wordt geplaatst, moet tussen het fornuis en de afwasautomaat een warmte-isolerende, onbrandbare plaat (aan de zijde van het fornuis bekleed met aluminiumfolie) vlak tegen de bovenzijde van het werkblad (diepte 57,5 cm) worden aangebracht. Bij inbouw van het apparaat onder een keukenwerkblad kan het originele bovenblad van de afwasautomaat op de volgende manier worden verwijderd: 1.
Aansluiten van de afwasautomaat Wateraansluiting • De afwasautomaat kan zowel aan koud water als aan warm water tot max. 60 °C aangesloten worden. • De afwasautomaat mag niet aan open warmwaterapparatuur of een geiser worden aangesloten. Toegestane waterdruk Laagste toegestane waterdruk: 1 bar (=10 N/cm2 =100 kPa) Bij een waterdruk van minder dan 1 bar verzoeken wij u contact met uw installateur op te nemen.
Waterafvoer 1 Afvoerslang De afvoerslang mag niet geknikt, platgedrukt of ineengestrengeld zijn. Aansluiting van de afvoerslang: – maximaal toegestane hoogte: 1 meter. – minimaal vereiste hoogte: 40 cm boven de onderzijde van het apparaat. Verlengslangen • Verlengslangen zijn via de vakhandel of onze klantenservice te verkrijgen. De binnendiameter van de verlengslang moet 19 mm zijn, opdat de functie van het apparaat niet wordt verstoord.
Waterafvoer in gootsteen (alleen mogelijk bij vrijstaande apparaten) Wanneer u de afvoerslang in een gootsteen wilt hangen, dient u hiervoor een slanghouder te gebruiken. Deze slanghouder is verkrijgbaar bij de service-afdeling onder onderdeelnummer ET 646 069 190. 1. Zet de slanghouder op de afvoerslang. 2. De afvoerslang beveiligen, zodat deze niet van de gootsteenrand kan glijden. Een koord door de opening van de slanghouder trekken en aan de wand of aan de waterkraan bevestigen.
Aansluittechniek De toevoer- en afvoerslangen evenals het aansluitsnoer moeten rechts en/of links van de afwasautomaat aangesloten worden omdat daar aan de achterkant van het apparaat geen plaats voor is.
Garantievoorwaarden Nederland Onze producten worden met de grootst mogelijke zorgvuldigheid geproduceerd. Desondanks kan het voorkomen dat er een defect optreedt. Onze servicedienst zal dit op verzoek herstellen, zowel binnen als buiten de garantietermijn. De levensduur van het product wordt daardoor niet negatief beïnvloed. Onderstaande garantievoorwaarden zijn gestoeld op de EU Richtlijn 99/44/EG en het Burgerlijk Wetboek. De daaruit voortvloeiende rechten blijven onverlet.
producten dient de gebruiker zich te vergewissen van de bepalingen in Nederland. Noodzakelijke of gewenste aanpassingen vallen niet onder de garantie, en kunnen niet altijd worden aangebracht. Ook na afloop van de garantietermijn staat onze servicedienst u ter beschikking. Adres Servicedienst: Electrolux Service Vennootsweg 1 2404 CG ALPHEN AAN DEN RIJN Reparatievoorwaarden Onze reparatievoorwaarden zijn conform de afspraak tussen de Consumentenbond en Vlehan*. Art.
België WAARBORGVOORWAARDEN Onze toestellen worden met de grootst mogelijke zorgvuldigheid geproduceerd. Desondanks kan het voorkomen dat er een defect optreedt. Onze klantendienst zal dit op verzoek herstellen, zowel binnen als buiten de waarborgtermijn. De levensduur van het toestel wordt daardoor niet negatief beïnvloed. Onderstaande waarborgvoorwaarden zijn gestoeld op de EU Richtlijn 99/44/EG en het Burgerlijk Wetboek. De daaruit voortvloeiende rechten blijven onverlet.
Ook na afloop van de waarborgtermijn staat onze klantendienst u ter beschikking. Adres Klantendienst: ELECTROLUX HOME PRODUCTS BELGIUM Bergensesteenweg, 719 1502 LEMBEEK Tel.: 02.363.04.
Adres service-afdeling Nederland AEG fabrieksservice Postbus 120 2400 AC Alphen aan den Rijn Service-informatielijn (voor bezoek servicetechnicus en onderdelen) tel. 0172-468 300 Consumentenbelangen (voor algemene, product- of gebruiksinformatie) tel. 0172-468 172 www.aeg.nl België Electrolux Home Products Belgium ELECTROLUX SERVICE Bergensesteenweg 719 1502 Lembeek E-mail: consumer.services@electrolux.be Consumer services Telefon 02/363.04.44 Telefax 02/363.04.00 02/363.04.
Service Controleer bij technische storingen eerst of u met behulp van de gebruiksaanwijzing (hoofdstuk „Wat te moet doen als…“) het probleem zelf kunt oplossen. Wanneer u het probleem niet kunt oplossen, neemt u contact op met onze service-afdeling. Om u snel te kunnen helpen, hebben wij de volgende gegevens nodig: – Modelaanduiding – Productnummer (PNC) – Serienummer (S-No.
From the Electrolux Group. The world´s No.1 choice. De Electrolux Groep is de grootste producent ter wereld van aangedreven apparaten voor gebruik in de keuken, reinigingswerkzaamheden en voor gebruik buitenshuis. In meer dan 150 landen over de hele wereld worden ieder jaar meer dan 55 miljoen Electrolux producten (zoals koelkasten, fornuizen, wasautomaten, stofzuigers, kettingzagen en grasmaaiers) verkocht ter waarde van circa USD 14 miljard. AEG Hausgeräte GmbH Postfach 1036 D-90327 Nürnberg http://www.