FM 4500 GR-A Gebruiksaanwijzing Grill
Geachte mevrouw, heer Hartelijk dank voor het kiezen van een van onze kwaliteitsproducten. U heeft een goede keuze gemaakt. Zo kunt u dankzij de combinatie van functioneel design en hoogwaardige technologie rekenen op optimale prestaties en bedieningsgemak. En onze zorg voor het milieu, komt o.a. tot uitdrukking in het energiebesparend functioneren van dit apparaat. Om er zeker van te zijn dat uw apparaat optimaal en onberispelijk presteert, dient u deze gebruiksaanwijzing aandachtig door te lezen.
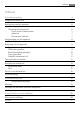
Inhoud 3 Inhoud Gebruiksaanwijzing 4 Veiligheidsvoorschriften 4 Beschrijving van het apparaat Uitrusting grill Uitrusting bedieningsveld Touch-control-sensorvelden Indicaties Restwarmte-indicatie Voorbereiding van het apparaat De grill gebruiken Bediening van het apparaat Apparaat in- en uitschakelen Grillniveau instellen Kinderbeveiliging gebruiken Timer gebruiken Schakelt automatisch uit Tips voor koken en braden 6 6 6 7 7 7 8 8 9 9 9 10 11 12 13 Reiniging en onderhoud Keramische plaat Grill Wat i
Gebruiksaanwijzing Gebruiksaanwijzing 1 Veiligheidsvoorschriften Neem deze aanwijzingen in acht, omdat anders bij eventuele schade het recht op garantie vervalt.
Veiligheidsvoorschriften 5 Veiligheid tijdens het gebruik • Verwijder stickers en folies van het glaskeramiek. • Wanneer u onoplettend bent tijdens het werken met het apparaat, bestaat er risico op verbranding. • Snoeren van elektrische apparatuur mogen niet op het hete oppervlak van het apparaat terechtkomen. • Oververhitte vetten en oliën vatten zeer snel vlam Let op! Brandgevaar! • Vuur met een deksel doven, nooit met water blussen.
Beschrijving van het apparaat Beschrijving van het apparaat Uitrusting grill Grillrooster Verwarmingselement Grillinzet met lavastenen Beschermingsstekker Ventilator Frontline-lijst Aansluitcontact Bedieningsveld Uitrusting bedieningsveld Controlelampje Kinderbeveiliging Indicatiegrillniveau Indicatie timer Controlelampje grill Timer - tijdkeuze Kinderbeveiliging Timer Controlelampje Aan/Uit Keuze grillniveau Grill Aan/uit
Beschrijving van het apparaat 7 Touch-control-sensorvelden Het apparaat wordt bediend door middel van touch-control-sensorvelden. Functies worden door het aanraken van de sensorvelden gestuurd en door indicaties en akoestische signalen bevestigd. De sensorvelden moeten van bovenaf worden aangeraakt, zonder andere sensorvelden te bedekken.
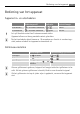
Voorbereiding van het apparaat Voorbereiding van het apparaat De grill gebruiken 1 3 z De grill mag alleen met geplaatst grillinzet worden gebruikt. 1. Grillinzet met lavastenen in de grill plaatsen. De lavastenen nemen het bij het grillen vrijkomende vet op. 2. Grillrooster met beide handen vasthouden en schuin naar achteren brengen tot aan de fixering (A). 3. Grillrooster laten zakken en de stekker in het aansluitcontact steken (B).
Bediening van het apparaat 9 Bediening van het apparaat Apparaat in- en uitschakelen Inschakelen Uitschakelen z 3 Bedieningsveld Indicatie 2 seconden aanraken / 1 seconde aanraken / geen Controlelampje brandt gaat uit Let op! Aansluitcontact heeft stroomvoerende delen. Apparaat alleen met droog aansluitcontact gebruiken. Na het inschakelen dient binnen ca. 10 seconden een functie te worden ingesteld, anders schakelt het apparaat automatisch uit.
Bediening van het apparaat Kinderbeveiliging gebruiken De kinderbeveiliging voorkomt ongewenst gebruik van het apparaat. Kinderbeveiliging inschakelen Stap Bedieningsveld Indicatie/signaal 1. Apparaat inschakelen (geen kookstand instellen) 2. Aanraken Apparaat wordt uitgeschakeld. De kinderbeveiliging is ingeschakeld. Kinderbeveiliging uitschakelen Stap Bedieningsveld Indicatie/signaal 1. Apparaat inschakelen 2. Aanraken 0 brandt. Apparaat wordt uitgeschakeld.
Bediening van het apparaat 11 Timer gebruiken Er zijn twee functies mogelijk: Functie Kookwekker bovenste controlelamp Automatische uitschakeling onderste controlelamp 3 Voorwaarde 1x aanraken 2x aanraken Resultaat na verloop van tijd akoestisch signaal 0 brandt akoestisch signaal 0 brandt Grill wordt uitgeschakeld Beide functies kunnen gelijktijdig worden gebruikt. Daarbij wordt in het display de kortste van beide tijden weergegeven.
Bediening van het apparaat Tijd veranderen Stap 1. Bedieningsveld op drukken Indicatie Controlelampje knippert sneller Resterende tijd wordt weergegeven 2. op of drukken 01 t/m 99 minuten Na een paar seconden gaat het controlelampje langzamer knipperen. De tijd is ingesteld. De tijd telt terug. Resterende tijd weergeven Stap 1. Bedieningsveld op drukken Indicatie Controlelampje knippert sneller Resterende tijd wordt weergegeven Na een paar seconden gaat het controlelampje langzamer knipperen.
Tips voor koken en braden 13 Tips voor koken en braden 3 Aanwijzing met betrekking tot acrylamide Volgens de laatste wetenschappelijke inzichten kan een intensieve bruining van levensmiddelen, met name bij zetmeelhoudende producten, een gevaar voor de gezondheid door acrylamide veroorzaken. Om die reden adviseren wij levensmiddelen zoveel mogelijk bij lage temperaturen te bereiden en de gerechten niet te veel te bruinen.
Reiniging en onderhoud Reiniging en onderhoud 1 1 1 Voorzichtig! Tijdens het reinigen moet het apparaat zijn uitgeschakeld. Apparaat laten afkoelen totdat alle delen zonder gevaar kunnen worden aangeraakt. Let op! Scherpe en schurende reinigingsmiddelen beschadigen het apparaat. Met water en afwasmiddel reinigen. Let op! Resten van reinigingsmiddelen beschadigen het apparaat. Resten met water en afwasmiddel verwijderen. Keramische plaat z Let op! Aansluitcontact heeft stroomvoerende delen.
Reiniging en onderhoud 15 Grill Grillrooster en grillinzet Grillrooster en grillinzet na elk gebruik reinigen. Voor de reiniging van het grillrooster kan het verwarmingselement worden verwijderd. Let op! De stekker van het verwarmingselement mag niet in water worden ondergedompeld. 1 Opening Centreerstift 1. 2. 3. 4. 3 1. 3 2. Verwarmingselement afnemen Grillrooster uit het apparaat nemen Schroeven aan de onderkant van het grillrooster losdraaien. Plaat afnemen. Verwarmingselement verwijderen.
Wat is er aan de hand als … Wat is er aan de hand als … Storing Mogelijke oorzaak Oplossing Het apparaat kan niet worden ingeschakeld of functioneert niet Sinds het inschakelen van het apparaat zijn meer dan 10 seconden verstreken Apparaat opnieuw inschakelen.
Afvalverwerking 17 Afvalverwerking 2 Verpakkingsmateriaal De verpakkingsmaterialen zijn niet schadelijk voor het milieu en herbruikbaar. De kunststoffen hebben de volgende aanduidingen, bijv. >PE<, >PS<, enz. Verwijder de verpakkingsmaterialen in overeenstemming met de aanduiding bij de gemeentelijke inzamelplaatsen in de daarvoor bestemde containers. 2 Oud apparaat verwijderen W Het symbool op het product of op de verpakking wijst erop dat dit product niet als huishoudafval mag worden behandeld.
Montageaanwijzing Montageaanwijzing 1 z z Veiligheidsaanwijzingen Let op! Lees deze informatie! De in het land van gebruik geldende wetgeving, verordeningen, richtlijnen en normen dienen te worden nageleefd (veiligheidsvoorschriften, vakkundige recycling volgens de voorschriften, enz.). De montage mag slechts door een gekwalificeerd technicus worden uitgevoerd. De minimumafstanden tot andere apparaten en meubelen dienen in acht te worden genomen.
Montage Montage 19
Montage
Montage van meerdere Frontline-kookplaten 21 Montage van meerdere Frontline-kookplaten 3 Extra meegeleverd: verstevigingsbalk(en), hittebestendige siliconenkit, rubber blok, schraapmesje Alleen hittebestendige speciale siliconenkit gebruiken.
Montage van meerdere Frontline-kookplaten 5. Het eerste apparaat in de opening plaatsen. Verstevigingsbalk in de opening leggen en half onder het apparaat schuiven. 6. Siliconenkit op de hoeken aanbrengen, daar waar de apparatuur elkaar raakt. Siliconenkit op het einde van de verstevigingsbalk aanbrengen. 7. Op een goede positionering van de kookplaat in de groef van de verstevigingsbalk letten.
Montage van meerdere Frontline-kookplaten 23 8. Frontline-lijsten op de apparaten plaatsen. De juiste positionering van de Frontline-lijsten (naast elkaar) controleren. 9. 10. 11. 12. Schroeven van de bevestigingsbeugels/schroefklemmen vastdraaien. Laagje siliconenkit in de kieren tussen de apparaten spuiten. Siliconenkit met een klein beetje sop bevochtigen. Het rubber blok stevig tegen het glaskeramiek drukken en langzaam langs de kier trekken. 13. 14. 15. 16.
Montage van meerdere Frontline-kookplaten Overzicht van alle apparaatbreedtes 180 mm Afzuigunit 360 mm Glaskeramische kookplaat met 2 straalwarmte-kookzones Glaskeramische kookplaat met 2 inductiekookzones Gaskookplaat met 2 branders Grill Grill/Friteuse Wok 580 mm Glaskeramische kookplaat met 4 straalwarmte-kookzones Gaskookplaat met 4 branders 720 mm Glaskeramische kookplaat met 4 straalwarmte-kookzones Glaskeramische kookplaat met 4 inductiekookzones Gaskookplaat met 4 branders
Typeplaatje 941 177 721 AEG-ELECTROLUX 2,0 kW 220 - 240 V 50 Hz 59 GED 23 KO FM4500GR-A
Garantie/Adres service-afdeling Garantie/Adres service-afdeling Nederland 1. 2. 3. 4. 5. 6. 7. 8. 9. 10. 11. 12. 13. 14. 15. 16. Onze producten worden met de grootst mogelijke zorgvuldigheid geproduceerd. Desondanks kan het voorkomen dat er een defect optreedt. Onze servicedienst zal dit op verzoek herstellen, zowel binnen als buiten de garantietermijn. De levensduur van het product wordt daardoor niet negatief beïnvloed.
Garantie/Adres service-afdeling 27 Deze garantievoorwaarden gelden voor in Nederland gekochte en/of in gebruik zijnde producten. Indien een product naar het buitenland wordt gebracht dient de gebruiker na te gaan of het product voldoet aan de technische voorwaarden ( o.a. spanning, frequentie, installatievoorschriften, gassoort, klimaatomstandigheden) in het betreffende land. Voor in het buitenland aangeschafte producten dient de gebruiker zich te vergewissen van de bepalingen in Nederland.
Adres service-afdeling Adres service-afdeling Nederland AEG fabrieksservice Postbus 120 2400 AC Alphen aan den Rijn Service-informatielijn (voor bezoek servicetechnicus en onderdelen) tel. 0172-468 300 Consumentenbelangen (voor algemene, product- of gebruiksinformatie) tel. 0172-468 172 www.aeg.
Adres service-afdeling 29 Europese Garantie Dit apparaat wordt door Electrolux in elk van de achter in deze handleiding genoemde landen gedurende de in het bij het apparaat behorende garantiebewijs genoemde periode of anderszins bij de wet gegarandeerd. Als u van een van deze landen verhuist naar een ander van de hieronder genoemde landen, verhuist de garantie op het apparaat met u mee.
Adres service-afdeling www.electrolux.com p t b Albania +35 5 4 261 450 Rr. Pjeter Bogdani Nr. 7 Tirane Belgique/België/Belgien +32 2 363 04 44 Bergensesteenweg 719, 1502 Lembeek Èeská republika +420 2 61 12 61 12 Budìjovická 3, Praha 4, 140 21 Danmark +45 70 11 74 00 Sjællandsgade 2, 7000 Fredericia Deutschland +49 180 32 26 622 Muggenhofer Str. 135, 90429 Nürnberg Eesti +37 2 66 50 030 Mustamäe tee 24, 10621 Tallinn España +34 902 11 63 88 Carretera M-300, Km.
Service 31 Service Controleer bij technische storingen eerst of u met behulp van de gebruiksaanwijzing (hoofdstuk ”Wat u moet doen als…“) het probleem zelf kunt oplossen. Wanneer u het probleem niet kunt oplossen, neemt u contact op met onze klantenservice of met een van onze servicepartners. Om u snel te kunnen helpen, hebben wij de volgende gegevens nodig: – Modelaanduiding – Productnummer (PNC) – Serienummer (S-No.
www.electrolux.com 374 475 704-M-071107-01 Wijzigingen voorbehouden www.aeg-electrolux.nl www.aeg-electrolux.