KOOKPLAAT HOB TABLE DE CUISSON KOCHFELD GEBRUIKSAANWIJZING USER MANUAL NOTICE D'UTILISATION BENUTZERINFORMATION d de oa NL EN FR DE nl ow D HK764070FB 2 17 31 47 m fro e .b re or nb de an .
nl ow D 2 d de oa VOOR PERFECTE RESULTATEN fro m Bedankt dat u voor dit AEG product heeft gekozen. Dit apparaat is ontworpen om vele jaren uitstekend te presteren, met innovatieve technologieën die het leven gemakkelijker helpen maken – functies die gewone apparaten wellicht niet hebben. Neem een paar minuten de tijd om het door te lezen zodat u er optimaal van kunt profiteren.
nl ow D Inhoud 3 d de oa INHOUD fro Veiligheidsinformatie Montage-instructies Beschrijving van het product Bedieningsinstructies Nuttige aanwijzingen en tips Onderhoud en reiniging Problemen oplossen Milieubescherming m e .b re or nb de an .v w w w 4 5 7 9 13 14 15 16 In deze gebruiksaanwijzing worden de volgende symbolen gebruikt: Belangrijke informatie over uw persoonlijke veiligheid en informatie over het voorkomen van schade aan het apparaat.
Veiligheidsinformatie nl ow D 4 d de oa VEILIGHEIDSINFORMATIE fro m Lees voor uw eigen veiligheid en correcte werking van het apparaat eerst deze handleiding aandachtig door, alvorens het apparaat te installeren en te gebruiken. Bewaar deze instructies altijd bij het apparaat, ook wanneer u het verplaatst of verkoopt. Gebruikers moeten volledig op de hoogte zijn van de bediening en veiligheidsfuncties van het apparaat. or nb de an .v w w w Veiligheid van kinderen en kwetsbare mensen e .
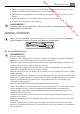
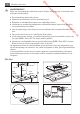
nl ow D Montage-instructies 5 d de oa m fro • Pannen van gietijzer, aluminium of met beschadigde bodems kunnen krassen veroorzaken in het glaskeramiek. Verplaats ze niet over het oppervlak. • Laat pannen niet droogkoken om beschadiging van de pan en het glaskeramiek te voorkomen. • Gebruik de kookzones niet met lege pannen of zonder pannen erop. • Leg geen aluminiumfolie op het apparaat. or nb de an .
nl ow D 6 Montage-instructies d de oa m fro WAARSCHUWING! Risico van verwonding door elektrische stroom. Volg de instructies voor de elektrische aansluitingen nauwkeurig op. De netaansluiting staat onder stroom. Schakel de stroomtoevoer naar de netaansluiting uit. Garandeer de schokbescherming door een vakkundige inbouw. Loszittende en onvakkundig aangebrachte stekkerverbindingen kunnen oververhitting van de aansluiting veroorzaken.
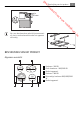
nl ow D Beschrijving van het product 7 d de oa m fro min. 28 mm Algemeen overzicht 1 2 145 mm mm 120/175/210 mm 6 265 5 1 2 3 4 5 Kookzone 1200 W Ovale braadzone 1400/2200 W Bedieningspaneel Kookzone 1800 W Drievoudige kookzone 800/1600/2300 W 6 Bedieningspaneel 170 mm 180 mm 4 3 e .b BESCHRIJVING VAN HET PRODUCT re or nb de an .v w w w Als u een beschermdoos gebruikt (extra accessoire), dan is een beschermmat onder het apparaat niet nodig.
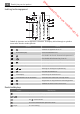
nl ow D 8 Beschrijving van het product d de oa Indeling bedieningspaneel 11 12 fro 10 m 9 8 w or nb de an .v w w 1 7 2 3 6 e .b re 5 4 Gebruik de tiptoetsen om het apparaat te bedienen. De displays, indicatielampjes en geluiden tonen welke functies worden gebruikt. tiptoets functie Schakelt het apparaat in en uit. 1 Kookstanddisplay 2 Geeft de kookstand weer. 3 Het schakelt de functie Automatisch opwarmen in. 4 Het schakelt de buitenste ring in en uit.
nl ow D 9 d de oa Display Beschrijving OptiHeat Control (3 staps restwarmte-indicatie): door gaan met koken / warmhouden / restwarmte. / m fro / Bedieningsinstructies w w De functie vergrendeling/kinderbeveiliging werkt. or nb de an .v w De functie Automatische uitschakelen is in werking getreden. OptiHeat Control (3 staps restwarmte-indicatie) WAARSCHUWING! / / Verbrandingsgevaar door restwarmte! re e .b OptiHeat Control geeft het niveau van de restwarmte aan.
nl ow D 10 Bedieningsinstructies m fro Raak de bedieningsstrip aan bij de gewenste kookstand. Stel deze indien gewenst hoger of lager in. Laat niet los voordat de juiste kookstand is bereikt. d de oa De kookstand e .b re or nb de an .v w w w In- en uitschakelen van de buitenste ringen Het verwarmingsvlak kan worden aangepast aan de grootte van het kookgerei. aan om de buitenste ring in te schakelen.
nl ow D Timer met aftelfunctie 11 d de oa Timer Bedieningsinstructies fro m Gebruik de timer met aftelfunctie om in te stellen hoe lang de kookzone wordt gebruikt voor slechts deze ene keer. Stel de timer met aftelfunctie in nadat de kookzone is geselecteerd. U kunt de kookstand vóór of na het instellen van de timer selecteren. • Voor het afstellen van de kookzone:raak meerdere malen aan tot het lampje van de gewenste kookzone brandt. or nb de an .
Bedieningsinstructies nl ow D 12 d de oa • Raak voor het uitschakelen van deze functie ingesteld, wordt weergegeven. aan. De kookstand die u eerder hebt m fro Slot e .b re or nb de an .v w w w Wanneer de kookzones in gebruik zijn, kunt u het bedieningspaneel vergrendelen, maar niet . Hiermee wordt voorkomen dat de kookstand per ongeluk wordt veranderd. Stel eerst de kookstand in. Raak om deze functie te starten aan. Het symbool verschijnt gedurende vier seconden. De timer blijft aan.
nl ow D Nuttige aanwijzingen en tips 13 d de oa NUTTIGE AANWIJZINGEN EN TIPS fro m Kookgerei or nb de an .v w w w • De bodem van het kookgerei moet zo dik en vlak mogelijk zijn. • Kookgerei gemaakt van geëmailleerd staal of met aluminium of kopperen bodems, kunnen tot verkleuringen leiden van de glazen keramische kookplaat. Energie besparen Öko Timer (Eco-timer) Om energie te besparen schakelt het verwarmingselement van de kookzone eerder uit dan het signaal van de timer met aftelfunctie klinkt.
Onderhoud en reiniging d de oa Gebruik om: Tijdsinstelling Tips m fro Temperatuurinstelling nl ow D 14 Lichtjes braden: kalfsoester, cordon bleu zoals van kalfsvlees, koteletten, rissoles, wors- nodig tjes, lever, roux, eieren, pannenkoeken, donuts Halverwege de bereidingstijd omdraaien. 12-13 Door-en-door gebraden, opgebakken aardappelen, lendenbiefstukken, steaks Halverwege de bereidingstijd omdraaien.
nl ow D Problemen oplossen 15 d de oa PROBLEMEN OPLOSSEN fro Probleem Mogelijke oorzaak en oplossing m • Schakel het apparaat opnieuw in en stel de kookstand binnen 10 seconden in. • U hebt twee of meer sensorvelden tegelijk aangeraakt. Raak slechts één sensorveld tegelijk aan. • De kinderbeveiliging of toetsblokkering Stop+Go is actief. Zie het hoofdstuk Gebruiksaanwijzing. • Er bevindt zich water of vetspatten op het bedieningspaneel. Reinig het bedieningspaneel.
Milieubescherming nl ow D 16 d de oa rekening gebracht, zelfs tijdens de garantieperiode. De instructies over de klantenservice en de garantiebepalingen vindt u in het garantieboekje. m fro w w MILIEUBESCHERMING Verpakkingsmateriaal De verpakkingsmaterialen zijn milieuvriendelijk en herbruikbaar De kunststof onderdelen zijn gemarkeerd, bijv.: >PE<,>PS<, enz. Gooi het verpakkingsmateriaal weg in de juiste afvalcontainer bij uw plaatselijke afvalverwerkingsdienst. e .b re or nb de an .
nl ow D d de oa FOR PERFECT RESULTS 17 fro m Thank you for choosing this AEG product. We have created it to give you impeccable performance for many years, with innovative technologies that help make life simpler – features you might not find on ordinary appliances. Please spend a few minutes reading to get the very best from it. e .b re or nb de an .
Contents nl ow D 18 d de oa CONTENTS fro Safety information Installation instructions Product description Operating instructions Helpful hints and tips Care and cleaning What to do if… Environment concerns m e .b re or nb de an .v w w w 19 20 22 23 27 28 29 30 The following symbols are used in this user manual: Important information concerning your personal safety and information on how to avoid damaging the appliance.
nl ow D 19 d de oa SAFETY INFORMATION Safety information fro m For your safety and correct operation of the appliance, read this manual carefully before the installation and use. Always keep these instructions with the appliance also if you move or sell it. The users must fully know the operation and safety functions of the appliance. or nb de an .v w w w Children and vulnerable people safety e .
Installation instructions nl ow D 20 d de oa • Do not put the aluminium foil on the appliance. m fro WARNING! If there is a crack on the surface, disconnect power supply to prevent the electrical shock. or nb de an .v w w w INSTALLATION INSTRUCTIONS Before the installation, note down the serial number (Ser. Nr.) from the rating plate.The rating plate of the appliance is on its lower casing. e .
nl ow D Installation instructions 21 d de oa m fro • Use a strain relief clamp on cable. • Use the correct mains cable of type H05BB-F Tmax 90°C (or higher) for a single phase or two phase connection. • Replace the damaged mains cable with a special cable (type H05BB-F Tmax 90°C; or higher). Speak your local Service Centre. The appliance must have the electrical installation which lets you disconnect the appliance from the mains at all poles with a contact opening width of minimum 3 mm.
nl ow D 22 Product description d de oa m fro If you use a protection box (the additional accessory), the protective floor directly below the appliance is not necessary. or nb de an .v w w w PRODUCT DESCRIPTION 1 2 145 265 mm mm 120/175/210 1 2 3 4 5 6 170 mm 180 mm 6 e .
nl ow D d de oa sensor field 23 function It shows the heat setting. fro Heat setting display 2 Operating instructions It activates the Automatic Heat Up function. 4 It activates and deactivates the outer ring. 5 It activates and deactivates the outer rings . m 3 To set the heat setting. It increases or decreases the time. / 7 or nb de an .v w w w Control bar 6 Timer display It shows the time in minutes.
nl ow D 24 Operating instructions d de oa Automatic Switch Off m fro The function deactivates the appliance automatically if: • All cooking zones are deactivated ( ). • You do not set the heat setting after you activate the appliance. • You spill something or put something on the control panel for more than 10 seconds, (a pan, a cloth, etc.). The sound operates some time and the appliance deactivates. Remove the object or clean the control panel.
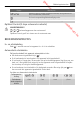
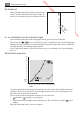
nl ow D Operating instructions 25 d de oa Automatic Heat Up fro 14 13 m 12 w w 11 10 or nb de an .v w 9 8 7 6 5 re 4 MIN. e .b 3 2 1 0 1 2 TEM. 3 4 5 6 7 8 9 10 11 12 13 14 You can get a necessary heat setting in a shorter time if you activate the Automatic Heat Up function. This function sets the highest heat setting for some time (see the illustration), and then decreases to the necessary heat setting. To start the Automatic Heat Up function for a cooking zone: 1.
Operating instructions CountUp Timer ( The count up timer) d de oa • To stop the sound: touch nl ow D 26 fro m Use the CountUp Timer to monitor how long the cooking zone operates. • To set the cooking zone (if more than 1 cooking zone operate):touch again and again until the indicator of a necessary cooking zone comes on. • To activate the CountUp Timer:touch of the timer comes on. When the indicator of the cooking zone starts to flash slow, the time counts up.
nl ow D Helpful hints and tips 27 d de oa m fro • Deactivate the appliance with . To override the child safety device for only one cooking time • Activate the appliance with . The symbol comes on. • Touch for 4 seconds. Set the heat setting in 10 seconds. You can operate the appliance. • When you deactivate the appliance with , the child safety device operates again. Deactivation of the sounds or nb de an .v w w w OffSound Control (Deactivation and activation of the sounds) comes e .
nl ow D 28 Care and cleaning Use to: d de oa Heat setting Time Hints fro as necessary Put a lid on a cookware. 1-3 Hollandaise sauce, melt: butter, chocolate, gelatine 5-25 min Mix from time to time. 1-3 Solidify: fluffy omelettes, baked eggs 10-40 min Cook with a lid on. 3-5 Simmer rice and milkbased dishes, heat- 25-50 ing up ready-cooked meals min Add the minimum two times as much liquid as rice, mix milk dishes at some point of the procedure through.
nl ow D What to do if… 29 d de oa m fro To remove the dirt: 1. – Remove immediately:melted plastic, plastic foil, and food with sugar. If not, the dirt can cause damage to the appliance. Use a special scraper for the glass . Put the scraper on the glass surface at an acute angle and move the blade on the surface . – Remove after the appliance is sufficiently cool:limescale rings , water rings, fat stains, shiny metallic discolorations. Use a special cleaning agent for glass ceramic or stainless steel.
nl ow D 30 Environment concerns Possible cause and remedy There is an error in the appliance. Disconnect the appliance from the electrical supply for some time. Disconnect the fuse from the electrical system of the house. comes on again, speak to the service centre. Connect again. If m fro and number comes on. d de oa Problem w w ENVIRONMENT CONCERNS The symbol on the product or on its packaging indicates that this product may not be treated as household waste.
nl ow D d de oa POUR DES RÉSULTATS PARFAITS 31 fro m Merci d'avoir choisi ce produit AEG. Nous l'avons créé pour vous offrir la meilleure performance pour une longue durée, avec des technologies innovantes qui vous simplifient la vie - autant de caractéristiques que vous ne trouverez pas sûrement pas sur d'autres appareils. Veuillez prendre quelques instants pour lire cette notice afin d'utiliser au mieux votre appareil. e .b re or nb de an .
Sommaire nl ow D 32 d de oa SOMMAIRE fro Consignes de sécurité Instructions d'installation Description de l'appareil Notice d'utilisation Conseils utiles Entretien et nettoyage En cas d'anomalie de fonctionnement 46 En matière de protection de l'environnement m e .b re or nb de an .v w w w 33 34 37 38 42 44 44 Les symboles suivants sont utilisés dans ce manuel: Informations importantes pour votre sécurité et pour éviter d’abîmer l’appareil.
nl ow D 33 d de oa CONSIGNES DE SÉCURITÉ Consignes de sécurité fro m Pour votre sécurité et pour garantir une utilisation correcte de l'appareil, lisez attentivement cette notice d'utilisation, ainsi que ses conseils et avertissements, avant d'installer et d'utiliser l'appareil pour la première fois. Conservez cette notice d'utilisation avec l'appareil, même si vous veniez à le déplacer ou à le vendre.
Instructions d'installation nl ow D 34 d de oa contact avec les surfaces brûlantes de l'appareil ou les récipients brûlants. Contrôlez que les câbles ne soient pas enchevêtrés. m fro Pour éviter d'endommager l'appareil AVERTISSEMENT Si votre table de cuisson est endommagée (éclat, fêlure,...), débranchez votre appareil pour éviter tout risque d'électrocution. INSTRUCTIONS D'INSTALLATION Avant l'installation, notez le numéro de série (Ser. Nr.) figurant sur la plaque signalétique.
nl ow D 35 d de oa Les consignes de sécurité Instructions d'installation m fro AVERTISSEMENT Lisez-les attentivement ! Vérifiez que l'appareil n'a pas été endommagé pendant le transport. Ne branchez jamais un appareil endommagé. Si celui-ci est endommagé, contactez votre magasin vendeur. Les opérations d'installation, de branchement et de réparation sont du ressort exclusif d'un professionnel qualifié qualifié et selon les normes et règles en vigueur. Utilisez exclusivement des pièces d'origine.
nl ow D 36 Instructions d'installation d de oa m fro Dans le cas d'une installation fixe, le raccordement au réseau doit être effectué par l'intermédiaire d'un interrupteur à coupure omnipolaire ayant une distance d'ouverture des contacts d'au moins 3 mm. Les dispositifs d'isolement comprennent : des coupe-circuits, des fusibles (les fusibles à visser doivent être retirés du support), un disjoncteur différentiel et des contacteurs. w = 600mm 490+1mm 680+1mm = min. 25 mm min. 20 mm min.
nl ow D Description de l'appareil d de oa DESCRIPTION DE L'APPAREIL fro m Vue d'ensemble 2 mm mm 180 mm mm 5 4 3 Description du bandeau de commande 10 9 8 7 11 12 1 2 3 6 5 4 Les touches sensitives permettent de commander l'appareil. Les voyants et les signaux sonores confirment l'activation des fonctions sélectionnées. touche sensitive 2 fonction Elle met en fonctionnement ou à l'arrêt l'appareil. 1 Indicateur du niveau de cuisson Il affiche le niveau de cuisson.
nl ow D 38 Notice d'utilisation d de oa touche sensitive Il augmente ou diminue de la durée. fro / 7 fonction Il règle la zone de cuisson. m 8 Affichage du minuteur Il affiche la durée en minutes. 10 Voyants du minuteur des zones de cuisson Il affiche la zone à laquelle se réfère la durée sélectionnée. or nb de an .v w w w 9 11 Il verrouille/déverrouille le bandeau de commande. 12 Il active ou désactive la fonction STOP+GO.
nl ow D Notice d'utilisation 39 d de oa m fro pendant un court instant, et la table de cuisson se met à l'arrêt. Enlevez l'objet ou nettoyez le bandeau de commande. • La zone de cuisson n'est pas mise à l'arrêt ou le niveau de cuisson n'est pas modifié. Après un certain temps, s'affiche et la table de cuisson se met à l'arrêt. Voir tableau. - 6 heures - - 5 heures 4 heures 1,5 heure Sur le bandeau de commande, appuyez sur le niveau de cuisson souhaité.
nl ow D 40 Notice d'utilisation d de oa Démarrage automatique fro 14 13 m 12 w w 11 10 or nb de an .v w 9 8 7 6 5 re 4 MIN. e .b 3 2 1 0 1 2 TEM. 3 4 5 6 7 8 9 10 11 12 13 14 On peut obtenir plus rapidement la température de cuisson choisie en activant la fonction de démarrage automatique. Cette fonction active la température la plus élevée pendant un certain temps (voir le diagramme) puis redescend à la température sélectionnée.
nl ow D Notice d'utilisation 41 d de oa m • Pour arrêter le signal sonore : appuyez sur w CountUp Timer (minuteur progressif) fro Lorsque le décompte du temps est terminé, le signal sonore retentit et 00 clignote. La zone de cuisson se met à l'arrêt. e .b re or nb de an .v w w Utiliser la fonction CountUp Timer pour vérifier la durée de fonctionnement de la zone de cuisson sélectionnée.
Conseils utiles d de oa Sécurité enfants nl ow D 42 m fro Ce dispositif permet d'éviter une utilisation involontaire de l'appareil. Pour activer le dispositif de sécurité enfants : • Activez l'appareil avec . Ne sélectionnez aucun niveau de cuisson. • Appuyez sur pendant 4 secondes. Le symbole s'allume. • Désactivez l'appareil avec . Pour désactiver le dispositif de sécurité enfants • Activez l'appareil avec . Ne sélectionnez aucun niveau de cuisson. Appuyez sur pendant 4 secondes.
nl ow D Conseils utiles 43 d de oa Économie d'énergie m fro • Si possible, couvrez toujours les récipients de cuisson avec un couvercle pendant la cuisson. • Déposez toujours le récipient sur la zone de cuisson avant de mettre celle-ci en fonctionnement. • Mettez à l'arrêt les zones de cuisson avant la fin du temps de cuisson pour utiliser la chaleur résiduelle. • Veillez à ce que le fond du plat de cuisson corresponde à la dimension du foyer de cuisson. or nb de an .
nl ow D 44 Entretien et nettoyage Durée Conseils fro Faire bouillir de grandes quantités d'eau, cuire des pâtes, griller la viande (goulasch, bœuf braisé), cuisson des frites. m 14 Utilisation : d de oa Niveau de cuisson Nettoyez l'appareil après chaque utilisation. Utilisez toujours des récipients de cuisson dont le fond est propre. AVERTISSEMENT Les objets coupants et les produits de nettoyage abrasifs peuvent endommager l'appareil.
nl ow D En cas d'anomalie de fonctionnement d de oa Problème 45 Cause possible et solution Vous avez recouvert une ou plusieurs zones sensitives. Retirez l'objet des touches sensitives. L'appareil s'arrête. Vous avez posé un objet sur le sensitive. Le voyant de chaleur résiduelle ne s'allume pas. La zone de cuisson n'est pas chaude car elle n'a été activée que pendant un court laps de temps. Si la zone de cuisson est censée être chaude, faites appel à votre service après-vente.
nl ow D 46 En matière de protection de l'environnement d de oa EN MATIÈRE DE PROTECTION DE L'ENVIRONNEMENT fro m Le symbole sur le produit ou son emballage indique que ce produit ne peut être traité comme déchet ménager. Il doit être remis au point de collecte dédié à cet effet (collecte et recyclage du matériel électrique et électronique).
nl ow D d de oa FÜR PERFEKTE ERGEBNISSE 47 fro m Danke, dass Sie sich für dieses AEG Produkt entschieden haben. Wir haben es geschaffen, damit Sie viele Jahre von seiner ausgezeichneten Leistung und den innovativen Technologien, die Ihnen das Leben erleichtern, profitieren können. Es ist mit Funktionen ausgestattet, die in gewöhnlichen Geräten nicht vorhanden sind. Nehmen Sie sich ein paar Minuten Zeit zum Lesen, um seine Vorzüge kennen zu lernen. e .b re or nb de an .
Inhalt nl ow D 48 d de oa INHALT fro Sicherheitshinweise Montageanleitung Gerätebeschreibung Gebrauchsanweisung Praktische Tipps und Hinweise Reinigung und Pflege Was tun, wenn … Umwelttipps m e .b re or nb de an .
nl ow D 49 d de oa SICHERHEITSHINWEISE Sicherheitshinweise fro m Lesen Sie zu Ihrer Sicherheit und für die optimale Geräteanwendung vor Installation und dem Gebrauch des Geräts die vorliegende Bedienungsanleitung aufmerksam durch. Bewahren Sie diese Bedienungsanleitung zusammen mit dem Gerät auf, auch wenn Sie umziehen oder das Gerät verkaufen. Jeder, der dieses Gerät benutzt, muss mit der Bedienung und den Sicherheitsmerkmalen gut vertraut sein. or nb de an .
nl ow D 50 Montageanleitung d de oa Vermeiden von Schäden am Gerät m fro • Wenn Kochgeschirr oder andere Gegenstände auf die Glaskeramik fallen, kann die Oberfläche beschädigt werden. • Kochgeschirr aus Gusseisen oder Aluminiumguss oder mit beschädigten Böden kann die Glaskeramikoberfläche verkratzen. Schieben Sie sie nicht auf der Oberfläche hin und her. • Vermeiden Sie das Leerkochen von Kochgeschirr, um Schäden am Kochgeschirr und der Glaskeramik zu verhindern.
nl ow D 51 d de oa Sicherheitshinweise Montageanleitung m fro WARNUNG! Lesen Sie unbedingt die folgenden Hinweise. Vergewissern Sie sich, dass das Gerät beim Transport nicht beschädigt wurde. Schließen Sie ein beschädigtes Gerät nicht an. Wenden Sie sich bei Bedarf an den Lieferanten. Das Gerät darf nur von einem Servicetechniker einer autorisierten Kundendienststelle aufgestellt, angeschlossen oder repariert werden. Verwenden Sie nur Originalersatzteile.
nl ow D 52 Montageanleitung d de oa fro Es sind geeignete Sicherheitseinrichtungen erforderlich: Überlastschalter, Sicherungen (Schraubsicherungen müssen aus dem Halter entfernt werden können), Fehlerstromschutzschalter und Schütze. m Montage or nb de an .v w w w min. 50mm min. 500mm R 5mm min. 50mm e .b 490+1mm re = 600mm 680+1mm = min. 25 mm min. 20 mm min.
nl ow D Gerätebeschreibung d de oa GERÄTEBESCHREIBUNG fro m Allgemeine Übersicht 2 mm mm 5 4 3 Bedienfeldanordnung 10 9 8 7 11 12 1 2 3 6 5 4 Bedienen Sie das Gerät über die Sensorfelder. Die Anzeigen, Kontrolllampen und akustischen Signale informieren Sie über die aktiven Funktionen. Sensorfeld 2 Funktion Ein- und Ausschalten des Geräts. 1 Kochstufenanzeige Zeigt die Kochstufe an. 3 Aktiviert die Ankochautomatik. 4 Ein- und Ausschalten des äußeren Kreises.
nl ow D 54 Gebrauchsanweisung d de oa Sensorfeld Funktion Auswahl der Kochzone. fro 8 Timer-Anzeige Anzeige der Zeit in Minuten. 10 Kochzonen-Anzeigen des Timers Zeigt an, für welche Kochzone der Timer eingestellt wurde. m 9 Verriegelung/Entriegelung des Bedienfelds. 12 Ein- und Ausschalten der Funktion STOP+GO. Anzeige der Kochstufen Beschreibung Die Kochzone ist ausgeschaltet. Die Kochzone ist eingeschaltet. - Die Funktion ist eingeschaltet. Die Ankochautomatik ist eingeschaltet.
nl ow D Gebrauchsanweisung 55 d de oa • Eine Kochzone wurde nicht ausgeschaltet bzw. die Kochstufe wurde nicht geändert. Nach einiger Zeit leuchtet auf und das Gerät schaltet sich aus. Siehe Tabelle. - - - 5 Stunden 4 Stunden - Kochstufe einstellen e .b re Berühren Sie auf dem Bedienfeld die gewünschte Kochstufe. Erhöhen oder reduzieren Sie die Kochstufe bei Bedarf. Nehmen Sie den Finger erst von der Skala, wenn die richtige Kochstufe eingestellt ist. 1,5 Stunden or nb de an .
Gebrauchsanweisung nl ow D 56 d de oa m fro Bei Verwendung der Ankochautomatik lässt sich die erforderliche Kochstufeneinstellung in kürzerer Zeit erzielen. Bei Verwendung dieser Funktion wird eine gewisse Zeit lang die höchste Kochstufe (siehe Abbildung) eingestellt und anschließend auf die erforderliche Stufe zurückgeschaltet. So aktivieren Sie die Ankochautomatik für eine Kochzone: 1. Berühren Sie ( erscheint auf dem Display). 2. Berühren Sie dann gleich danach die gewünschte Kochstufe.
nl ow D 57 d de oa Kurzzeit-Wecker Gebrauchsanweisung m fro Wenn die Kochzonen nicht in Betrieb sind, können Sie den Timer als Kurzzeitwecker verwenden. Berühren Sie . Berühren Sie das Symbol oder des Timers, um die Dauer einzustellen. Nach Ablauf der eingestellten Zeit ertönt ein Signalton und 00 blinkt. • So stellen Sie den Signalton ab: Berühren Sie or nb de an .v w w w STOP+GO e .b re Mit der Funktion werden alle eingeschalteten Kochzonen auf die niedrigste Kochstufe ( ) geschaltet.
Praktische Tipps und Hinweise nl ow D 58 d de oa OffSound Control (Aktivierung und Deaktivierung des Signaltons) Deaktivieren des Signaltons fro m Schalten Sie das Gerät aus. Berühren Sie 3 Sekunden lang. Die Anzeigen leuchten auf und erlöschen. Berühren Sie 3 Sekunden lang. leuchtet und der Signalton ist aktiviert. Berühren Sie , leuchtet auf, der Signalton ist deaktiviert.
nl ow D Verwendung: d de oa Kochstufe Reinigung und Pflege Dauer 59 Tipps fro Sauce Hollandaise; zerlassen: Butter, Schokolade, Gelatine 5-25 Min. Gelegentlich umrühren. 1-3 Stocken: Luftiges Omelette, gebackene Eier 10-40 Min. Mit Deckel garen. 3-5 Köcheln von Reis und Milchgerichten, Erhitzen von Fertiggerichten 25-50 Min. Mindestens doppelte Menge Flüssigkeit zum Reis geben, Milchgerichte zwischendurch umrühren. 5-7 Dünsten von Gemüse, Fisch, Fleisch 20-45 Min.
Was tun, wenn … nl ow D 60 d de oa m fro So entfernen Sie Verschmutzungen: 1. – Sofort entfernen:geschmolzener Kunststoff, Plastikfolie, zuckerhaltige Lebensmittel. Andernfalls können die Verschmutzungen das Gerät beschädigen. Verwenden Sie einen speziellen Reinigungsschaber für Glas. Den Reinigungsschaber schräg zur Glasfläche ansetzen und über die Oberfläche bewegen.
nl ow D 61 d de oa Problem Umwelttipps Mögliche Ursache und Abhilfe Die Abschaltautomatik hat ausgelöst. Schalten Sie das Gerät aus und wieder ein. und eine Zahl leuchten auf. Im Gerät ist ein Fehler aufgetreten. Trennen Sie das Gerät eine Zeit lang vom Netz. Schalten Sie die Sicherung im Sicherungskasten der Hausinstallation aus. Schalten Sie die Sicherung wieder ein. Schließen Sie das Gerät wieder an erneut aufleuchtet, benachdie Stromversorgung an. Wenn richtigen Sie den Kundendienst.
nl ow D 62 d de oa m fro e .b re or nb de an .
nl ow D 63 d de oa m fro e .b re or nb de an .
nl ow D www.aeg-electrolux.com/shop 892934493-A-452010 d de oa m fro e .b re or nb de an .