
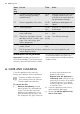
Extra Information
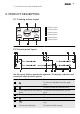

Problem Possible cause Remedy
comes on.
The Automatic Switch
Off operates.
Deactivate the appliance
and activate it again.
comes on.
The Child Safety Device
or the Lock function op-
erates.
Refer to the chapter “Dai-
ly Use”.
and a number come
on.
There is an error in the
appliance.
Disconnect the appliance
from the electrical supply
for some time. Discon-
nect the fuse from the
electrical system of the
house. Connect it again.
If
comes on again,
speak to the service cen-
ter.
If you tried the above solutions and can-
not repair the problem, speak to your
dealer or the customer service. Give the
data from the rating plate, three digit
letter code for the glass ceramic (it is in
the corner of the glass surface) and an
error message that comes on.
Make sure, you operated the appliance
correctly. If not the servicing by a cus-
tomer service technician or dealer will
not be free of charge, also during the
warranty period. The instructions about
the customer service and conditions of
guarantee are in the guarantee booklet.
8. INSTALLATION INSTRUCTIONS
WARNING!
Refer to "Safety information"
chapter.
Before the installation
Before the installation of the appliance,
record the information below from the
rating plate. The rating plate is on the
bottom of the appliance casing.
• Model ...........................
• PNC .............................
• Serial number ....................
8.1 Built-in appliances
• Only use the built-in appliances after
you assemble the appliance into cor-
rect built-in units and work surfaces
that align to the standards.
8.2 Connection cable
• Use the correct mains cable of type
H05BB-F Tmax 90°C (or higher) for a
single phase or two phase connection.
• Replace the damaged mains cable
with a special cable (type H05BB-F
Tmax 90°C or higher). Speak to your
local Service Centre.
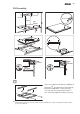
8.3 To attach the seal.
• Clean the worktop in the area of the
cut out section.
• Bond the seal stripe supplied on the
lower edge of the appliance along the
outer edge of the glass ceramic. Do
not extend it. Let stay the cut ends in
the middle of one side. When, you cut
it to length (add some mm), push the
two ends together.
28
www.aeg.com