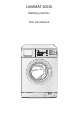
LAVAMAT 60610 Washing machine User information
Dear customer, Please read this User Information carefully and keep it to refer to at a later date. Pass this User Information on to any subsequent owner of the appliance. 1 3 2 2 The following symbols are used in the text: Safety instructions Warning: Notes that concern your personal safety. Attention: Notes that show how to avoid damage to the appliance.
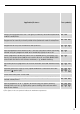
Contents Operating Instructions . . . . . . . . . . . . . . . . . . . . . . . . . . . . . . . . . . . . . 5 Safety . . . . . . . . . . . . . . . . . . . . . . . . . . . . . . . . . . . . . . . . . . . . . . . . . . . . . . . . . 5 Description of the appliance . . . . . . . . . . . . . . . . . . . . . . . . . . . . . . . . . . . . 7 Control panel . . . . . . . . . . . . . . . . . . . . . . . . . . . . . . . . . . . . . . . . . . . . . . . . . . 7 Programme overview . . . . . . . . . . . . . . . . . .
Installation and connection instructions. . . . . . . . . . . . . . . . . 25 Safety information for the installation. . . . . . . . . . . . . . . . . . . . . . . . . . . . 25 Installing the appliance . . . . . . . . . . . . . . . . . . . . . . . . . . . . . . . . . . . . . . . . . Transporting the appliance . . . . . . . . . . . . . . . . . . . . . . . . . . . . . . . . . . . . . . . . Removing the transit packaging . . . . . . . . . . . . . . . . . . . . . . . . . . . . . . . . . . . Where to install . .
Operating Instructions 1 Safety Prior to using for the first time • Follow the ”Instructions for installation and connection”. • If the appliance is delivered in the winter months when there are minus temperatures: Store the washing machine at room temperature for 24 hours before using for the first time. Correct use • The washing machine is only designed for the washing of normal domestic laundry at home. • Additions or modifications to the washing machine are not permitted.
General safety • Repairs to the washing machine must only be carried out by qualified service engineers. • Never use the washing machine if the mains cable is damaged; or if the control panel, work top or plinth area is damaged such that the inside of the appliance is freely accessible. • Switch off the washing machine before cleaning, maintenance and servicing.
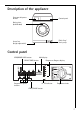
Description of the appliance Detergent dispenser drawer Control panel Rating plate (behind door) Plinth flap/ Drain pump Screw feet (height adjustable) Control panel SPIN/RINSE HOLD button Multidisplay Programme Progress display DELAY TIMER button Programme option buttons DOOR indicator Programme knob START/PAUSE button 7
Programme overview 1000 800 600 n (RINSE HIOLD) • • • • • • •3) • •4) • • • • • • • •4) • • • • 1kg • • • • • • • • (DELICATES) 40, 30 3kg • • • • • • • / / (WOOL/SILK/HANDWASH) 40, 30, (COLD) 2kg • • • • 3kg • • • • 6kg • • • 3kg • • • Programme max.
Application/features: Energy-saving programme at 60 °C for lightly to normally soiled whites/coloureds made of cotton/linen. Care symbols1) MO Programme for normally to heavily soiled whites/coloureds made of cotton/linen. JMO Programme for easy-care mixed fibres and synthetics. IKN Special programme which washes at 40 °C for easy-care fabrics which after being washed using this programme need to be ironed only lightly or not at all.
Before the first wash 1. Open the detergent drawer. 2. Pour approx. 1 litre of water through the detergent drawer into the washing machine. This closes the water container when the next programme is started and the economy valve can function properly. 3. In order to remove any residues from the drum and water container which may have been left during manufacturing, perform the first wash cycle without any washing in the machine. Programme: (COTTONS/LINEN) 60, press (QUICK WASH), add approx.
Running a washing cycle Opening the door/Loading the washing 1. To open the door: gently pull the handle on the door. When the machine is switched on, the lights (DOOR) and (START/PAUSE) indicate whether the door can be opened: light (DOOR) light (START/PAUSE) lit green flashes red or is off lit green lit red lit red or is off flashes red or lit red Can the door be opened? yes yes, after pressing the (START/PAUSE) button no, water level too high or temperature too high 2.
1. Pull the detergent dispenser drawer out as far as the stop. 2. Add the detergent/additives. 3. Push the drawer in fully.
Changing the spin speed/Selecting rinse hold 3 The washing machine suggests the maximum permitted speed that is suitable for the selected programme. You can reduce this speed: Press the SPIN/ (RINSE HOLD) button repeatedly, until the desired indicator lights up. The speed for the final spin can still be altered during the programme. To do this: 1. Press the button (START/PAUSE). 2. Change the speed. 3. Press the button (START/PAUSE) again.
PREWASH Hot pre-wash before the main wash that follows automatically; with intermediate spin for (COTTONS/LINEN) and (EASY-CARES), without intermediate spin for (DELICATES). STAIN For heavily soiled or stained washing. In-wash stain treatments are washed in at the optimum time as the programme progresses. Can only be used for washing temperatures of above 40°C as stain removers are not effective at lower temperatures.
Programme progress 3 • The programme progress display shows the programme step that is currently being carried out. – (Prewash) – (Main wash) – (Rinse) – (Extra Rinse) – (Spin) – (End) • The multi-display shows the estimated time remaining (in hours and minutes) until the end of the programme. The remaining programme time may increase or briefly remain constant during the wash programme as the programme adjusts to various conditions while washing (e. g.
4. When you have finished washing, pull out the detergent drawer a little to let it to dry out. Keep the door very slightly open so that the washing machine can air. (RINSE HOLD) has been selected: If Following a rinse hold (END) will be lit on the programme progress display. The water must first be drained off: – Either turn the programme knob to (OFF), then to (DRAIN) and press the button (START/PAUSE) (the water will be drained without spinning), – turn the programme knob to (OFF) and then to (SPIN).
Cleaning and maintenance Important! Do not use furniture care products or aggressive cleaners to clean the appliance. Wipe control panel and body with a damp cloth. Detergent dispenser drawer The detergent dispenser drawer should be cleaned regularly. 1. Remove the detergent dispenser drawer by pulling it firmly. 2. Remove the conditioner insert from the middle compartment. 3. Clean all parts with water. 4. Put the conditioner insert in as far as it will go, so that it is firmly in place. 5.
What to do if... Remedying small malfunctions If during use of the appliance one of the following error codes is shown in the multi-display: – E10 (Problems with water inflow), – E20 (Problems with water outflow), – E40 (door open), please have a look at the following table. When the fault is remedied, press the button (START/PAUSE). In the event of other errors (E and a number or letter): Switch the appliance off and then on again. Re-set the programme. Press the button (START/PAUSE).
Problem Possible cause Remedy The transit bar has not been Remove the transit bar. removed. The washing machine The screw feet are not corvibrates when operating rectly adjusted. or is not stable. There is very little washing in the drum (e.g., just one bathrobe). Adjust the feet as described in the installation and connection instructions. Operation is not affected by this. Screw connection on the in- Screw the inlet hose on let hose is leaking. tightly. Drain hose is leaking.
Problem Possible cause Door locked. The door cannot be opened when the wash- There has been a power cut. ing machine is switched (All indicators are off.) For safety reasons, the door on. remains locked for approx. 4 to 10 minutes. Washing is heavily creased. Possibly too much washing was loaded. Remedy Wait until indicator (DOOR) is lit green. The programme will continue when the power cut is over.
Carrying out an emergency drain 1 Warning! Before emergency draining, switch off the washing machine and remove the mains plug from the socket. Warning! The water that comes out of the emergency drain hose may be hot. There is a risk of scalding. Let the water cool before performing an emergency drain. 1. Open the plinth flap and remove it. 2. Take out the emergency drain hose. 3. Place a shallow container underneath it.
Drain pump 1 The drain pump is maintenance-free. It is only necessary to open the pump cover if there is a malfunction and water is no longer being pumped out, e. g. if the pump wheel is blocked. Please make sure before loading the washing that there are no foreign bodies in the pockets or caught between the washing. Paperclips, nails, etc. that may have got into the washing machine with the washing remain in the pump housing (foreign body trap that protects the pump wheel).
Disposal 2 2 Packaging material The packaging materials are environmentally friendly and can be recycled. The plastic components are identified by markings, e.g. >PE<, >PS<, etc. Please dispose of the packaging materials in the appropriate container at the community waste disposal facilities. Old appliance W 1 The symbol on the product or on its packaging indicates that this product may not be treated as household waste.
Technical data 5 This appliance conforms with the following EU Directives: – 73/23/EEC dated 19.02.1973 Low Voltage Directive – 89/336/EEC dated 03.05.1989 EMC Directive inclusive of Amending Directive 92/31/EEC – 93/68/EEC dated 22.07.1993 CE Marking Directive Height x Width x Depth 850 x 598 x 603 mm Depth when door is open 980 mm Height adjustment approx. +10/-5mm Load (depending on programme) Max.
Installation and connection instructions 1 Safety information for the installation • This washing machine cannot be built-in. • Before using for the first time, check the appliance for damage sustained while it was being transported. Do not under any circumstances connect an appliance that is damaged. In the case of damage, please contact your supplier. • Before using for the first time, all parts of the transit packaging must be removed.
Installing the appliance Transporting the appliance 1 Warning! The washing machine is very heavy. Risk of injury. Be careful when lifting. • Do not lay the appliance on its front nor on its right side (as seen from the front). Electrical components may get wet. • Never transport the appliance without its transit packaging. Only remove the transit packaging when the appliance is in its place of installation. Transporting the appliance without its transit packaging can lead to damage to the appliance.
3. Remove both plastic caps sideways. 3 Special spanner A and sealing caps B (2 off) and C (1 off) are supplied with the appliance. 4. Remove screw D with its compression spring using special spanner A. 5. Turn sealing cap C upside down as shown in the illustration. 6. Seal hole using sealing cap C. 7. Unscrew and remove two screws E using special spanner A. 8. Unscrew and remove four screws F using special spanner A. 9. Remove transit bar G. 10. Screw in the four screws F again. 11.
• The surface on which the appliance is to be installed must be clean and dry and free from coverings that move, so that the appliance does not slide. • If the location in which the appliance is to be installed is fitted with small-format tiles, put a rubber mat (available in the shops) under the appliance. If the appliance is to stand on a plinth: In order for the appliance to be secure on the plinth, fixing plates*) must be mounted, into which the appliance is inserted.
Electrical connection Details about the voltage, type of supply and the fuses required are to be found on the rating plate. The rating plate is next to the doorway. Connecting to the water supply Important! • This appliance must not be connected to the hot water system. • When connecting it, use only new hose kits. • Only connect the appliance to the drinking water supply. Rain water or water for industrial use may only be used if it fulfils the requirements of DIN1986 and DIN1988.
Water inflow 3 A 1.50 m long pressure hose is supplied with the appliance. If a longer water inlet hose is required, only original hoses are to be used. The Customer Care Department stocks hose kits of different lengths. Sealing rings are either inserted in the plastic nuts of the threaded hose fitting or are included as spare parts . Do not use any other seals. Important! All threaded hose fittings must only be tightened by hand. 1. Connect the hose with the right-angle connector to the machine.
Water drainage The maximum permitted difference between the height of the surface on which the appliance is installed and the water outlet is 1 metre. Only original hoses may be used to extend hoses. (A maximum of 3 m laid on the floor and then 80 cm vertically). The Customer Care Department stocks outlet hoses of different lengths. Draining water into a sink outlet Secure the outlet/sink outlet joint with a hose band clip (available from your dealer).
Guarantee/Customer Service Weitere Kundendienststellen im Ausland In diesen Ländern gelten die Garantiebedingungen der örtlichen Partner. Diese können dort eingesehen werden. Further after-sales service agencies overseas In these countries our AEG-Electrolux agents’ own guarantee conditions are applicable. Please obtain further details direct. Autres agences étrangères assurant le service après-vente Dans ces pays, les conditions de garantie des concessionnaires de la région sont valables.
Australia The Andi-Co Group 1 Stamford Road Oakleigh VIC 3166 Tel.: (03) 9569 1255 Fax: (03) 9569 1450 www.andico.com.au Korea (South) Core Incorp. 3/F Chewoo Bldg. 200 Nonhyun-Dong Kangnam-Ku 135-010 Seoul Telefon 82 2 549 89 61 Namibia AEG NAMIBIA (PTY) LIMITED-Jeppe Street Northern Industrial Area Windhoek Tel.: (061) 21-6082/4 Fax: (061) 217838 Bahrain/Arabian Gulf A.A. Zayani & Sons P.O. Box 9 32 Bahrain Tel.: 17311124 Croatia Electrolux D.O.O. Suplova 7 10000 Zagreb Tel.
Japan Electrolux Japan Ltd. Domestic Appliances Department Maruzen Showa Warehouse Building Tookai 4-5-12, Ota-ku 143-006 Tokyo Tel.: 0120-13-7117 Fax: 03-3790-5257 Singapore Group Pte Ltd. 833 Bukit Timah Road Unit no. 01-11 Royalville 279887 Singapore Tel.: 0065 64638484 Fax: 0065 64638488 Slovenia Electrolux Slovenia D.O.O. Traska Ul. 132 1000 Ljubljana Tel.: 61 1234 137 Fax: 61 1234 238 Thailand Olympia Thai Tower, 444 Rachadapiser Road Samsennok- Huaykwang 10320 Bangkok Thailand Tel.
Service In the event of technical faults, please first check whether you can remedy the problem yourself with the help of the operating instructions (section “What to do if…”). If you were not able to remedy the problem yourself, please contact the Customer Care Department or one of our service partners. In order to be able to assist you quickly, we require the following information: – Model description – Product number (PNC) – Serial number (S No.
From the Electrolux Group. The world´s No.1 choice. The Electrolux Group is the world´s largest producer of powered appliances for kitchen, cleaning and outdoor use. More than 55 million Electrolux Group products (such as refrigerators, cookers, washing machines, vacuum cleaners, chain saws and lawn mowers) are sold each year to a value of approx. USD 14 billion in more than 150 countries around the world. AEG Hausgeräte GmbH Postfach 1036 D-90327 Nürnberg http://www.aeg-electrolux.