MCC4061E GB DE FR NL ES PT MICROWAVE OVEN MIKROWELLENGERÄT FOUR À MICRO-ONDES MAGNETRONOVEN HORNO MICROONDAS FORNO A MICRO-ONDAS USER MANUAL BENUTZERHANDBUCH GUIDE DE L’UTILISATEUR GEBRUIKSAANWIJZING MANUAL DE USUARIO MANUAL DO UTILIZADO 2 41 83 127 169 210
Contents FOR PERFECT RESULTS Thank you for choosing this AEG product. We have created it to give you impeccable performance for many years, with innovative technologies that help make life simpler – features you might not find on ordinary appliances. Please spend a few minutes reading to get the very best from it. ACCESSORIES AND CONSUMABLES In the AEG webshop, you’ll find everything you need to keep all your AEG appliances looking spotless and working perfectly.
Important safety instructions 3 IMPORTANT SAFETY INSTRUCTIONS Important safety instructions: Read carefully and keep for future reference To avoid the danger of fire The microwave oven should not be left unattended during operation. Power levels that are too high or cooking times that are too long may overheat foods resulting in a fire. The electrical outlet must be readily accessible so that the unit can be unplugged easily in an emergency.
Important safety instructions Never adjust, repair or modify the oven yourself. It is hazardous for anyone other than a competent person to carry out any service or repair operation which involves the removal of a cover which gives protection against exposure to microwave energy. Do not operate the oven with the door open or alter the door safety latches in any way. Do not operate the oven if there is an object between the door seals and sealing surfaces.
Important safety instructions 5 Pierce the skin of such foods as potatoes, sausages and fruit before cooking, or they may explode. To avoid the possibility of burns Use pot holders or oven gloves when removing food from the oven to prevent burns. Always open containers, popcorn makers, oven cooking bags, etc., away from the face and hands to avoid steam burns.
Important safety instructions Use only the turntable designed for this oven. Do not place anything on the outer cabinet during operation. Do not use plastic containers for microwaving if the oven is still hot from using the GRILL mode, CONVECTION mode, DUAL mode, AUTO COOK and AUTO COOK FROM FROZEN, because they may melt. Plastic containers must not be used during above modes unless the container manufacturer says they are suitable.
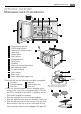
Appliance overview 7 APPLIANCE OVERVIEW Microwave oven & accessories 1 2 4 3 1 5 11 6 10 1 2 3 4 5 6 7 8 9 10 11 12 13 14 15 9 1 Fixing points (4 points) Grill heating element Convection heating element Oven lamp Control panel Shelf runners Waveguide cover Oven cavity Coupling Door seals and sealing surfaces Door opening handle Air-vent openings Outer cabinet Power cord Power supply cord support clip 8 1 7 12 14 15 Check to make sure the following accessories are supplied: 16 Turntable 1
Appliance overview & Before first use IMPORTANT: • Always operate the oven with the turntable and support fitted correctly. This promotes thorough even cooking. A badly fitted turntable may rattle, may not rotate properly and damage the oven. • The turntable rotates clockwise or counter clockwise. The rotary direction may change each time you start the oven. This does not affect cooking performance.
Before first use 9 NOTE: If you do nothing for 3 minutes, the power will go off automatically. Nothing will appear on the display at this time. To restore power, open the door. 4. Heat the oven without food (see page 17 - 18). COOKING HINTS: The oven has an ‘Information Display System’ which offers you step by step instructions to easily guide you through each feature, and enable you to gain information in your desired language. The oven has an INFORMATION button for getting instructions for each button.
Microwave cooking advice MICROWAVE COOKING ADVICE Microwave cooking To cook/defrost food in a microwave oven, the microwave energy must be able to pass through the container to penetrate the food. Therefore it is important to choose suitable cookware. Round/oval dishes are preferable to square/oblong ones as the food in the corners tends to overcook. It is important to turn, rearrange or stir food to ensure even heating.
Microwave cooking advice 11 Microwave safe cookware Cookware Microwave safe Aluminium foil / foil containers Browning dishes China and ceramics / / Glassware e.g. Pyrex ® Metal Plastic / polystyrene e.g. fast food containers Cling film Freezer / roasting bags Paper - plates cups and kitchen paper Straw and wooden containers Recycled paper and newspaper Comments Small pieces of aluminium foil can be used to shield food from overheating.
Microwave operation MICROWAVE OPERATION Microwave cooking Your oven can be programmed for up to 90 minutes. The input unit of cooking time varies from 10 seconds to five minutes. It depends on the total length of cooking time as shown in the table. Cooking time 0-5 minutes 5-10 minutes 10-30 minutes 30-90 minutes Increasing unit 10 seconds 30 seconds 1 minute 5 minutes Manual defrosting For manual defrosting (without operating the Auto defrost feature), use 270 W.
Microwave operation 13 Example: To heat soup for 2 minutes and 30 seconds on 630 W microwave power. 1. Rotate the COOKING MODE dial to the microwave setting. 2. Enter desired cooking time by rotating the TIMER/WEIGHT knob clockwise. 3. Press the MICROWAVE POWER LEVEL button twice for 630 W microwave power. x2 4. Press the START/QUICK button once to start cooking x1 5. Check the display: Important: If the power level is not selected, HIGH/900 W is automatically set. NOTES: 1.
Microwave operation START/QUICK function The START/QUICK button allows you to operate the two following functions: a. 30 seconds cooking You can cook on your desired cooking mode for 30 seconds without entering the cooking time. Example: To cook for 30 seconds on 630 W microwave power. 1. Select the cooking mode by rotating the COOKING MODE dial to (Microwave). 2. Change the power by pressing the MICROWAVE POWER LEVEL button. x2 3. Press the START/QUICK button once to begin cooking. x1 4.
Microwave operation 15 Less or More buttons The LESS ( ) and MORE ( ) buttons allow you to decrease or increase programmed setting times easily, (for a less well or more well cooked result), when cooking in progress. a) Choosing Autocook with Less/More: Press the LESS ( ) and MORE ( ) button after entering weight and before pressing the START/QUICK button. (See cooking for menus that use Less and More.
Microwave operation To check settings while the oven is operating You can check the power level and the actual oven temperatures ie: when preheating. TO CHECK THE POWER LEVEL: To check the microwave power level during cooking press the MICROWAVE POWER LEVEL button. The oven continues to count down, although the display shows the power level. As long as your finger is pressing the button, the power level will be displayed.
Microwave operation 17 Grill cooking The grill heating element at the top of the oven cavity has one power setting only. Example: To cook cheese on toast for 5 minutes (place toast on the high rack.) 1. Rotate the COOKING MODE dial to the GRILL setting. 2. Enter the desired cooking time by rotating the TIMER/WEIGHT knob clockwise. 3. Press the START/QUICK button to start cooking. x1 4. Check the display: Important: 1. The high or the low rack is recommended for grilling. 2.
Microwave operation 2. Enter the required heating time. (20 min.) 3. Start cooking by pressing the START/QUICK button. x1 The oven will count down. When the oven has finished cooking, open the door to cool the oven cavity. WARNING: The oven door, outer cabinet & oven cavity will become hot. Take care to avoid burns when cooling the oven down after operation. Convection cooking Your oven can be used as a conventional oven using the convection facility and 10 pre-set oven temperatures.
Microwave operation 19 5. Use the TIMER/WEIGHT knob to input the cooking time (20 mins). 6. Press the START/QUICK button. x1 7. Check the display: Notes: 1. When the oven is preheating, the turntable should be in the oven. 2. After preheating, if you want to cook at a different temperature press the CONVECTION button until the desired setting appears on the display. In the example above, to change the temperature you would press the CONVECTION button after entering the cooking time. 3.
Microwave operation NOTES: 1. After cooking the oven will automatically cool and the display may show “NOW COOLING”. 2. To change the convection temperature, press the CONVECTION button until the desired temperature appears on the display. 3. You may detect smoke or a burning smell when using convection for the first time. This is normal and is not a sign that the oven is out of order. (Please see Heating Without Food on pages 17 - 18).
Microwave operation 21 4. Press CONVECTION button four times (200 °C). x4 5. Press the START/QUICK button. x1 6. Check the display: Example 2: To cook for 20 minutes on DUAL 2 using 90 W microwave power and GRILL. 1. Select the cooking mode by rotating the cooking mode dial to . 2. Enter the desired cooking time (20 minutes). 3. Press the MICROWAVE POWER LEVEL button twice (90 W). x2 4. Press the START/QUICK button. x1 5.
Microwave operation Cooking charts Baking using the glass tray with the convection function Menu Time Quiche Preheat 1) 20’00 2) 12’00 Preheat 60’00 Preheat 35’00 Preheat 40’00 Preheat 54’00 Preheat 12’00 Preheat 15’00 Preheat 25’00 Preheat 35’00 Banana Loaf Cake Apricot & Pecan Loaf Cherry & Almond Cake Cheese Cake Frozen Pizza Garlic Baguette Frozen Lasagne Small Pastries (from dough) (e.g.
Recipes for glass tray RECIPES FOR GLASS TRAY & CONVECTION Banana loaf Preheat the oven. 1. Grease and line loaf tin. 2. Cream butter and sugar together. 3. Add egg and coffee essence and beat again. 4. Peel and mash bananas and add to the mix, beat well. 5. Mix in the flour, bicarbonate of soda baking powder and milk until smooth. 6. Place in tin and smooth the surface. 7. Place loaf tin in glass tray, lower position. 60 min. 180 ˚C 8. Stand for 5 mins in tin before turning onto a cooling rack.
Recipes for glass tray Cherry almond cake 1. Grease and line the springform. 2. Cream the margarine and sugar until light and fluffy. 3. Beat in the eggs one at a time. 4. Fold in the flour and baking powder, stir in the cherries, ground almonds, almond essence and milk. 5. Spoon in the mixture and smooth the surface. 6. Place tin in glass tray, lower position. 40 min.
Recipes for glass tray RECIPES FOR GLASS TRAY & GRILL Onion soup 1. Slice the onions, place in a bowl with the stock, salt and pepper, cook for 8 min. 900 W 2. Put the soup in to 4 soup bowls. 3. Cut the toast into cubes and put on top of the soup and place the cheese on the toast. 4. Place soup bowls in the glass tray, lower position and cook 71/2 min. 270 W / GRILL 20 g 250 g 500 ml 2 80 g butter onions stock salt & pepper slices of toast emmental cheese Gratin 1. Grease a gratin dish. 2.
Recipes for glass tray & Automatic operation Grilled sardines/mackeral 1. Mix all ingredients for marinade and spread on the fish, chill for one hour. 2. Place on the rack in the glass tray, lower position. Cook Sardines: 1. 5 min. 90 W / GRILL, turn over 2. 3 min. 90 W / GRILL Cook Mackeral: 1. 6 min. 90 W / GRILL, turn over 2. 6 min.
Automatic operation 27 4. To start cooking press START/QUICK button. x1 When action is required (e.g. to turn food over) the oven stops and the audible signals sound, the display shows the necessary action. To continue cooking, press the START/QUICK button. The final temperature will vary according to the initial temperature. Check food is piping hot after cooking. If necessary, you can extend the cooking time and change the power level. Example: To cook 300 g of Rice using AUTO COOK (AC-1). 1.
Programme charts 1.FRENCH FRIED POTATOES 8.CHICKEN LEGS 14.RICE 20.STEAK & CHOPS 29.CHICKEN PAN WITH VEGETABLES PROGRAMME CHARTS 2.FROZEN VEGETABLES 9.GRATIN 15.BOILED POTATOES 21.CHICKEN LEGS Auto cook chart Menu No. 3.FRESH VEGETABLES ENCH FRIED OTATOES AC-1 Rice 8.CHICKEN LEGS OZEN GETABLES 9.GRATIN ESH GETABLES 10.FROZEN GRATIN 10.FROZEN GRATIN Weight (increasing unit) / Utensils JACKET POTATOES 15.BOILED AND LEGS 1.FRENCH FRIED21.CHICKEN 8.CHICKEN LEGS30.MINCE 14.
1.FRENCH FRIED POTATOES 8.CHICKEN LEGS 14.RICE 20.STEAK & CHOPS 29.CHICKEN PAN WITH VEGETABLES Programme charts 29 Auto cook from frozen chart 2.FROZEN VEGETABLES 9.GRATIN 15.BOILED POTATOES Menu No. 3.FRESH VEGETABLES 10.FROZEN GRATIN ACF-1 Cook Frozen Ready Meals (Stirrable) 4.FISH FILLET+ SAUCE GRATINATED FISH 5.GRILL SKEWER 11.FROZEN READY MEALS 1.FRENCH FRIED 12.BEVERAGES POTATOES ACF-2 Cook Frozen Vegetables 6.ROAST PORK 1.FRENCH FRIED POTATOES 7.GRILLED CHICKEN 2.
.GRATIN 15.BOILED POTATOES 30 0.FROZEN GRATIN JACKET POTATOES 21.CHICKEN LEGS 30.MINCE AND ONION Programme charts 22.POULTRY Auto defrost chart Menu No. 1.FROZEN READY MEALS CHICKEN LEGS 2.BEVERAGES GRATIN 3.SOUP HICKEN LEGS .FROZEN CASSEROLES GRATIN RATIN AD-1 Defrost Steaks, Chops .FROZEN FROZEN GRATIN .BEVERAGES express cook FROZEN READY MEALS 20.STEAK 24.CAKE & CHOPS 29.CHICKEN PAN WITH VEGETABLES 15.BOILED 18.CAKE POTATOES 21.CHICKEN 25.BREAD LEGS 30.MINCE AND ONION 20.
Programme charts 31 NOTE: 1. Steaks, Chops and Chicken legs should be frozen in one layer. 2. Minced meat should be frozen in the thin shape. 3. After turning over, shield the defrosted portions with small, flat pieces of aluminium foil. 4. The poultry should be processed immediately after defrosting. 5. Gateaux topped and coated with cream are very sensitive to microwave energy.
Programme charts Recipes for auto cook AC-5 Carrot cake 1. Grease the dish. 2. Cream the egg yolks and sugar with a hand mixer. 3. Add the carrots, lemon juice and almonds. 4. Combine the flour and the baking powder, add to the rest and mix well. 5. Beat the egg white until stiff and carefully fold it in. Put the mixture in the baking tin, place it on the low rack and bake using AUTO COOK AC-5 6. Allow to cool in the tin for 5 minutes after baking.
Programme charts 33 Apple tart with calvados 1. Mix the flour with the baking powder. Add the sugar, vanilla sugar, salt, the egg, bitter almond oil and butter and knead to a paste with the kneading hook of a hand mixer. 2. Cover the pastry dough and leave in a cool place for about 30 minutes. 3. Grease the dish. Roll out the pastry dough between two sheets of foil and place it in the tin. Form an edge to the pastry dough approx. 3 cm high. 4. Distribute the hazel nuts over the pastry shell. 5.
Care & cleaning CARE & CLEANING CAUTION: DO NOT USE COMMERCIAL OVEN CLEANERS, STEAM CLEANERS, ABRASIVE, HARSH CLEANERS, ANY THAT CONTAIN SODIUM HYDROXIDE OR SCOURING PADS ON ANY PART OF YOUR MICROWAVE OVEN. WARNING! After GRILL, DUAL, CONVECTION, AUTO COOK, AUTO COOK FROM FROZEN modes, the oven cavity, door, oven cabinet and accessories will become very hot. Before cleaning, make sure they are completely cool. CLEAN THE OVEN AT REGULAR INTERVALS AND REMOVE ANY FOOD DEPOSITS.
Reduced power level 35 REDUCED POWER LEVEL Important: 1. If you cook the food over the standard time with only 900 W, the power of the oven will lower automatically to avoid overheating. (The microwave power level will be reduced.) Cooking mode 2. Standard time Microwave 900 W cooking 20 min. Grill cooking 15 min. Dual 1 Micro - 40 min. Dual 2 Micro - 15 min. (900 W microwave power) Grill - 15 min. Dual 2 Micro - 40 min.
What to do if . . . & Specifications WHAT TO DO IF . . . Problem The microwave appliance is not working properly ? Check if . . . • The fuses in the fuse box are working. • There has not been a power outage. • If the fuses continue to blow, please contact an authorised AEG service agent. The microwave mode is not • The door is properly closed. working ? • The door seals and their surfaces are clean. • The START/QUICK-button has been pressed.
Installation 37 INSTALLATION The microwave can be fitted in position A, B or C: Position Niche size W D H Chimney Gap between (mm) cupboard & ceiling A B C 560 x 550 x 450 560 x 500 x 450 560 x 550 x 460 20 20 20 50 50 Not applicable Measurements in (mm) Chimney Position A Position B Cable clip Position A 450 mm Cable clip min. 20 mm Chimney D Conventional oven Conventional oven Position C 450 mm Position B Position C 460 mm 65 mm 20 mm 5 mm 1.
Installation Connecting the appliance to the power supply • The electrical outlet should be readily accessible so that the unit can be unplugged easily in an emergency. Or it should be possible to isolate the oven from the supply by incorporating a switch in the fixed wiring in accordance with the wiring rules. • The socket should not be positioned behind the cupboard. • The best position is above the cupboard, see (A).
Environmental information 39 ENVIRONMENTAL INFORMATION Ecologically responsible disposal of packaging materials and old appliances Packaging materials AEG microwave ovens require effective packaging to protect them during transportation. Only the minimum packaging necessary is used. Packaging materials (e.g. foil or styrofoam) can place children at risk. Danger of suffocation. Keep packaging material away from children. All packaging materials used are environment friendly and can be recycled.
European guarantee EUROPEAN GUARANTEE • • • • • • If you should move to another country within Europe then your guarantee moves with you to your new home subject to the following qualifications: The guarantee starts from the date you first purchased your product. The guarantee is for the same period and to the same extent for labour and parts as exists in the new country of use for this brand or range of products. This guarantee relates to you and cannot be transferred to another user.
Inhalt 41 FÜR PERFEKTE ERGEBNISSE Danke, dass Sie sich für dieses AEG Produkt entschieden haben. Wir haben es geschaffen, damit Sie viele Jahre von seiner ausgezeichneten Leistung und den innovativen Technologien, die Ihnen das Leben erleichtern, profitieren können. Es ist mit Funktionen ausgestattet, die in gewöhnlichen Geräten nicht vorhanden sind. Nehmen Sie sich ein paar Minuten Zeit zum Lesen, um seine Vorzüge kennen zu lernen.
Wichtige Sicherheitshinweise WICHTIGE SICHERHEITSHINWEISE WICHTIG FÜR IHRE SICHERHEIT: LESEN SIE DIE FOLGENDEN HINWEISE AUFMERKSAM DURCH, UND BEWAHREN SIE DIE BEDIENUNGSANLEITUNG AUF Zur Vermeidung von Feuer Mikrowellengeräte sollten während des Betriebs nicht unbeaufsichtigt gelassen werden. Zu hohe Leistungsstufen oder zu lange Garzeiten können das Gargut überhitzen und Feuer verursachen. Die Steckdose muss ständig zugänglich sein, so daß der Netzstecker im Notfall einfach abgezogen werden kann.
Wichtige Sicherheitshinweise 43 b) Die Scharniere und Türsicherheitsverriegelungen dürfen nicht gebrochen oder lose sein. c) Die Türdichtungen und Dichtungsoberflächen dürfen nicht beschädigt sein. d) Im Garraum und an der Tür dürfen keine Dellen oder andere Beschädigungen vorhanden sein. e) Das Netzkabel und der Netzstecker dürfen nicht beschädigt sein. Nehmen Sie unter keinen Umständen Reparaturen oder Änderungen an Ihrem Mikrowellengerät selb st vor.
Wichtige Sicherheitshinweise Beim Erhitzen von Flüssigkeiten in Mikrowellengeräten beim Entnehmen des Behälters vorsichtig sein, da es zu einem verspätetem Aufwallen durch Siedeverzug kommen kann. Um Verbrennungen durch plötzliches Überkochen (Siedeverzug) zu vermeiden: 1. Die Flüssigkeiten vor dem Kochen/Erhitzen umrühren. 2. Es wird empfohlen, während des Erhitzens einen Glasstab oder ähnlichen Gegenstand in den Behälter zu stecken. 3.
Wichtige Sicherheitshinweise 45 Kinder sind zu beaufsichtigen und sollten nicht mit dem Gerät spielen. Nicht an die Gerätetür lehnen oder an der Tür hängend schwingen. Das Mikrowellengerät ist kein Spielzeug! Kinder sollten mit allen wichtigen Sicherheitshinweisen vertraut gemacht werden: z.B. Verwendung von Topflappen und vorsichtiges Abnehmen von Deckeln. Beachten Sie besonders Verpackungen, die Lebensmittel knusprig machen (z.B. selbstbräunende Materialien), indem sie besonders heiß werden.
Geräteüberblick GERÄTEÜBERBLICK Mikrowellengerät & Zubehör 1 2 4 3 1 5 11 6 10 1 9 8 7 1 12 Befestigungspunkte (4 Stellen) Grill-Heizelement Heißluft-Heizelement 14 Garraumlampe Bedienfeld Laufschienen 15 Spritzschutz für den Hohlleiter 13 Garraum Antriebswelle Türdichtungen und Dichtungsoberflächen Türgriff Lüftungsöffnungen 16 Außenseite Netzanschlusskabel 17 Netzkabel-Träger Antriebswelle Überprüfen, ob die Zubehörteile vorhanden sind: 16 Drehteller 19 Hoher Rost 17 Drehteller-Träger
Geräteüberblick & Vor der ersten Inbetriebnahme 47 WICHTIG: • Das Gerät nur betreiben, wenn der Drehteller und der Drehteller-Träger korrekt installiert worden sind. Dies fördert ein gleichmäßiges Garergebnis. Ein schlecht installierter Drehteller kann klappern, sich nicht richtig drehen und dadurch das Gerät beschädigen. • Der Drehteller dreht sich sowohl im als auch gegen den Uhrzeigersinn. Die Drehrichtung kann sich bei jedem erneuten Starten des Geräts ändern.
Vor der ersten Inbetriebnahme HINWEIS: Falls Sie 3 Minuten nach einer die Energie geht automatisch aus. Die Anzeige zeigt dabei noch nichts an. Öffnen Sie die Tür, um das Gerät wieder in Betrieb zu nehmen. 4. Heizen Sie den Grill des Gerätes ohne Speisen auf (siehe Seite 56 - 57). HINWEISE ZUM GAREN: Das Gerät verfügt über ein "Informations-anzeigesystem", das Ihnen schrittweise Anleitungen für die verschiedenen Funktionen in einer gewünschten Sprache gibt.
Hinweis für das Kochen mit Mikrowellen 49 HINWEIS FÜR DAS KOCHEN MIT MIKROWELLEN Kochen mit Mikrowellen Um Speisen in einem Mikrowellenherd zu kochen/aufzutauen, muss die Mikrowellenenergie den Behälter durchdringen können, um in die Speisen einzudringen. Es ist daher wichtig geeignetes Kochgeschirr zu wählen. Runde/ovale Schüsseln sind besser geeignet als quadratische oder rechteckige, da die Speisen in den Ecken leicht überkocht werden.
Hinweis für das Kochen mit Mikrowellen Mikrowellensicheres Kochgeschirr Kochgeschirr Alufolie / Behälter aus Alufolie Mikrowell -ensicher / Anbratschüsseln Porzellan & Keramik Glaswaren, z. B. Pyrex ® Metall / Kunststoff / Styropor, z. B.
Bedienung des Mikrowellengeräts 51 BEDIENUNG DES MIKROWELLENGERÄTS Garen mit der Mikrowelle Ihr Gerät lässt sich bis zu 90 Minuten programmieren (90.00).
Bedienung des Mikrowellengeräts Beispiel: So wärmen Sie Suppe für 2 Minuten und 30 Sekunden bei 630 W Mikrowellenleistung auf. 1. Drehen Sie den Drehknopf für die Wahl der BETRIEBSART in die Mikrowellen-Einstellung. 2. Drehen Sie den ZEIT/GEWICHTS-Knopf nach rechts, um die Garzeit einzustellen. 3. Drücken Sie die MIKROWELLEN-LEISTUNGSSTUFEN-Taste, bis die gewünschte Leistungsstufe erreicht ist. x2 4. Drücken Sie die START/QUICK-Taste, um mit dem Erhitzungsvorgang zu starten. x1 5.
Bedienung des Mikrowellengeräts 53 START/QUICK funktion Mit der START/QUICK-Taste können Sie die folgenden beiden Funktionen ausführen: a) 30 Sekunden kochen Sie können die gewünschte Betriebsart 30 Sekunden lang direkt einschalten, ohne die Garzeit einzugeben. Beispiel: So garen Sie für 30 Sekunden bei 630 W Mikrowellenleistung. 1. Drehen Sie den Drehknopf für die Wahl der BETRIEBSART in die Mikrowellen-Einstellung . 2.
Bedienung des Mikrowellengeräts Kürzer/Länger-Taste Mit den KÜRZER ( ) und LÄNGER ( ) -Tasten können Sie die programmierten Zeiteinstellungen problemlos verkürzen oder verlängern (um die Speisen mehr oder weniger durchzugaren). a) Ändern der vorprogrammierten Zeiteinstellung: Drücken Sie die KÜRZER ( ) und LÄNGER ( )-Tasten nach Eingabe des Gewichts und vor dem Drücken der START/QUICK-Taste. (Für Menüs mit KÜRZER und LÄNGER, sehen Sie Seiten 68.
Bedienung des Mikrowellengeräts 55 Überprüfeb der einstellung während des betriebs Sie können die Leistungsstufe und die Gerätetemperatur überprüfen z.B. beim Vorheizen. ÜBERPRÜFEN DER LEISTUNGSSTUFE: Um während des Garvorgangs die Mikrowellenleistung zu überprüfen, drücken Sie die MIKROWELLEN-LEISTUNGSSTUFEN-Taste. Solange Sie die Taste mit dem Finger drücken, wird die Leistungsstufe angezeigt.
Bedienung des Mikrowellengeräts Grillbetrieb Die Leistung des oben an der Garraumdecke befindlichen Grillheizelements ist nicht regulierbar. Beispiel: So backen Sie Käsetoast in 5 Minuten (legen Sie das Toast auf den hohen Rost). 1. Stellen Sie den Drehknopf für die Wahl der BETRIEBSART in die Einstellung GRILL. 2. Geben Sie durch Drehen des ZEIT/GEWICHTS-Knopfes im Uhrzeigersinn die gewünschte Garzeit ein. 3. Drücken Sie die START/QUICK-Taste, um den Garvorgang zu starten. x1 4.
Bedienung des Mikrowellengeräts 57 2. Geben Sie die gewünschte Heizzeit ein. (20 Min). 3. Drücken Sie die START/QUICK-Taste, um den Garvorgang zu starten. x1 Das Gerät zählt nun die Zeit zurück. Nach dem Aufheizen die Gerätetür öffnen und den Garraum auskühlen lassen. WARNUNG: Die Gerätetür, die Außenflächen und der Garraum werden heiß. Achten Sie darauf, dass Sie sich keine Verbrennungen zuziehen, während das Gerät abkühlt.
Bedienung des Mikrowellengeräts 5. Mit dem ZEIT/GEWICHTS-Knopf die Garzeit (20 Min.) eingeben. 6. Die START/QUICK-Taste drücken. x1 7. Überprüfen Sie das Display: HINWEISE: 1. Wenn das Gerät vorgeheizt wird, den Drehteller im Gerät lassen. 2. Wenn Sie nach dem Vorheizen bei unterschiedlichen Temperaturen garen wollen, drücken Sie die HEISSLUFT-Taste, bis die gewünschte Einstellung auf dem Display angezeigt wird.
Bedienung des Mikrowellengeräts 59 HINWEISE: 1. Nach dem Garen kühlt das Gerät automatisch ab und auf dem Display erscheint “KÜHLUNG”. 2. Um die Heißlufttemperatur zu ändern, die HEISSLUFT-Taste drücken, bis die gewünschte Temperatur auf dem Display angezeigt wird. 3. Bei der ersten Benutzung Heißluft kann es zu Rauch- und Geruchsentwicklung kommen. Das ist normal und kein Anzeichen dafür, dass das Gerät funktionsuntüchtig ist. (Siehe Seite 56 - 57 ‘Heizen ohne Speisen’.
Bedienung des Mikrowellengeräts 4.Die HEISSLUFT-Taste viermal drücken (200 °C). x4 5.Die START/QUICK-Taste drücken. x1 6.Überprüfen Sie das Display: Beispiel 2: So garen Sie für 20 Minuten im KOMBIBETRIEB 2 mit 90 W Mikrowellenleistung und GRILL. 1. Stellen Sie den Drehknopf für die Wahl der BETRIEBSART in die Einstellung KOMBI 2. 2. Die gewünschte Garzeit eingeben (20 Minuten). 3. Drücken Sie die MIKROWELLEN-LEISTUNGSSTUFEN-Taste zweimal (90 W). x2 4. Die START/QUICK-Taste drücken. x1 5.
Bedienung des Mikrowellengeräts 61 Gartabellen BACKEN MIT DEM GLASTABLETT UND HEISSLUFT Menu Zeit Betriebsartt Quiche Vorheizen 1) 20’00 2) 12’00 Bananenbrot Vorheizen 60’00 Aprikosen-Pecan-brot Vorheizen 35’00 Kirsch-Mandel-Kuchen Vorheizen 40’00 Käsekuchen Vorheizen 54’00 Tiefkühlpizza Vorheizen 12’00 Knoblauchbrot Vorheizen 15’00 Tiefkühl-Lasagne Vorheizen 25’00 Kleine Blätterteigteile Vorheizen (aus Teig) (z.B.
Rezepte für Glastablett REZEPTE FÜR GLASTABLETT & HEIßLUFT Bananenbrot Den Ofen vorheizen. 1. Die Kastenform einfetten und mit Backpapier auslegen. 2. Butter und Zucker schaumig schlagen. 3. Ei und Kaffeeessenz hinzufügen und wieder verrühren. 4. Bananen abschälen und zerdrücken, zur Mischung hinzufügen, gut rühren. 5. Mehl, Natron, Backpulver und Milch hinzufügen und rühren, bis der Teig glatt ist. 6. Den Teig in die Kastenform füllen und die Oberfläche glätten. 7.
Rezepte für Glastablett Kirsch-Mandel-Kuchen 1. Die Springform einfetten und mit Backpapier auslegen. 2. Margarine und Zucker rühren, bis sie leicht und schaumig sind. 3. Die Eier nacheinander einrühren. 4. Mehl und Backpulver unterheben, Kirschen, gemahlene Mandeln, Mandelessenz und Milch einrühren. 5. Die Teigmischung in die Kuchenform geben und die Oberfläche glätten. 6. Die Kuchenform auf das Glastablett stellen, unterer Einschub. 40 Min.
Rezepte für Glastablett REZEPTE FÜR GLASTABLETT & GRILL Zwiebelsuppe 1. Die Zwiebeln schneiden, mit der Brühe in eine Schüssel geben, Salz und Pfeffer hinzufügen, 8 Min. 900 W 2. Die Suppe auf 4 Suppentassen verteilen. 3. Toast würfeln und auf die Suppe geben, Käse über die Toaststückchen verteilen. 4. Die Suppentassen auf das Glastablett stellen, unterer Einschub, garen. 71/2 Min. 270 W / GRILL 20 g 250 g 500 ml 2 80 g Butter Zwiebeln Brühe Salz & Pfeffer Scheiben Toast Emmentaler Gratin 1.
Rezepte für Glastablett & Automatik-Betrieb Gegrillte Sardinen/Makrelen 1. Alle Zutaten zu einer Marinade vermischen, auf den Fisch streichen, eine Stunde kaltstellen. 2. Auf dem Rost auf das Glastablett stellen, unterer Einschub. Sardinen garen: 1. 5 Min. 90 W / GRILL wenden 2. 3 Min. 90 W / GRILL Makrelen garen: 1. 6 Min. 90 W / GRILL, wenden 2. 6 Min.
Automatik-Betrieb 4. Um den Garvorgang zu starten, die START/QUICK-Taste drücken. x1 Wenn ein Bedienungsschritt erforderlich ist (z.B. zum Wenden der Speisen), stoppt das Gerät und das akustische Signal ertönt. Im Anzeigefeld sehen Sie die notwendige Aktion. Um den Garvorgang fortzusetzen, START/QUICK-Taste. Die Temperatur am Ende der Garzeit hängt von der Ausgangstemperatur ab. Vergewissern Sie sich, daß die Speisen nach dem Garen ausreichend gegart sind.
Programmtabellen 1.FRENCH FRIED POTATOES 8.CHICKEN LEGS 14.RICE 20.STEAK & CHOPS PROGRAMMTABELLEN Tabelle: Auto-Garen 2.FROZEN VEGETABLES 9.GRATIN MENÜ Nr. AC-1 Reis 10.FROZEN GRATIN 14.RICE 9.GRATIN 15.BOILED POTATOES 11.FROZEN READY MEALS 21.CHICKEN LEGS Reis 10.FROZEN GRATIN 11.FROZEN READY MEALS Kochendes Wasser 12.BEVERAGES 10.FROZEN express menu2 GRATIN 14.RICE 1.FRENCH FRIED CASSEROLES 8.CHICKEN LEGS19.PASTA RILLED POTATOES HICKEN 11.FROZEN cook READY MEALS express 26.
Programmtabellen 1.FRENCH FRIED POTATOES 8.CHICKEN LEGS 14.RICE 20.STEAK & CHOPS 29.CHICKEN PAN WITH VEGETABLES Tabelle: Auto-Garen von TK 2.FROZEN VEGETABLES 9.GRATIN MENÜ Nr. 3.FRESH VEGETABLES 10.FROZEN GRATIN 4.FISH FILLET+ SAUCE 11.FROZEN READY MEALS 5.GRILL SKEWER 1.FRENCH FRIED POTATOES 12.BEVERAGES ACF-2 Garen Tiefkühl-Gemüse 8.CHICKEN LEGS 17.PIQUANTE CAKES 8.CHICKEN LEGS 3.FRESH VEGETABLES CASSEROLES 14.RICE 10.FROZEN GRATIN 19.PASTA 2.FROZEN VEGETABLES 9.GRATIN 4.
RATIN 15.BOILED POTATOES 21.CHICKEN LEGS 30.MINCE AND ONION Programmtabellen ROZEN GRATIN Tabelle: Auto-Auftauen JACKET POTATOES 22.POULTRY MENÜ Nr. 23.MINCED MEAT MENGE (Gewichtseinheit) / GESCHIRR ROZEN EADY MEALS 16.JAM HICKEN LEGS EVERAGES 14.RICE 17.PIQUANTE CAKES 20.STEAK 24.CAKE & CHOPS 29.CHICKEN PAN WITH VEGETABLES RATIN OUP 15.BOILED 18.CAKE POTATOES 21.CHICKEN LEGS 25.BREAD 30.MINCE AND ONION HICKEN LEGS 14.RICE 20.STEAK & CHOPS FROZEN ASSEROLES GRATIN JACKET 19.
Programmtabellen HINWEIS: 1. Steaks, Koteletts und Hähnchenschenkel sollten nebeneinander (einlagig) eingefroren werden. 2. Hackfleisch sollte flach eingefroren werden. 3. Nach dem Wenden die aufgetauten Portionen mit dünnen Aluminiumstreifen abdecken. 4. Das Geflügel und das Hackfleisch sollten sofort nach dem Auftauen weiterverarbeitet werden. 5. Torte, die aus Sahne/Creme hergestellt oder damit verziert wurde, reagiert sehr empfindlich auf Mikrowellen-Energie.
Programmtabellen 71 Rezepte für Auto-Garen AC-5 Möhrenkuchen 1. Die Backform einfetten. 2. Eigelb und Zucker mit einem Handrührgerät vermischen. 3. Die Mohrrüben, Zitronensaft und Mandeln hinzugeben. 4. Mehl und Backpulver verrühren, zur restlichen Mischung zugeben und gut unterrühren. 5. Eiweiß steif schlagen und vorsichtig unterheben. Mischung in die Backform geben, auf dem unteren Rost platzieren und mit AUTO-GAREN AC-5 backen. 6. Nach dem Backen 5 Minuten lang in der Backform abkühlen lassen.
Programmtabellen Apfel-Tarte mit Calvados 1. Mehl und Backpulver mischen. Zucker, Vanillezucker, Salz, Ei, Bittermandelöl und Butter hinzugeben und mit dem Knethaken eines Handrührgeräts zu einem Teig verrühren. 2. Den Mürbteig abdecken und ca. 30 Minuten an einen kalten Ort stellen. 3. Die Backform einfetten. Den Mürbteig zwischen 2 Lagen Folie ausrollen und in die Backform geben. Einen ca. 3 cm hohen Rand hochziehen. 4. Haselnüsse über den Mürbteig verstreuen. 5.
Reinigung & Pflege 73 REINIGUNG & PFLEGE VORSICHT: ZUR REINIGUNG DÜRFEN KEINESFALLS OFENREINIGER, DAMPFREINIGER, SCHEUERMITTEL, SCHARFE REINIGUNGSMITTEL, NATRIUMHYDROXID ENTHALTENDE REINIGUNGSMITTEL ODER SCHEUERSCHWÄMME VERWENDET WERDEN. DIES GILT FÜR ALLE TEILE DES GERÄTS. WARNUNG! Nach dem GRILL-, HEISSLUFT-, KOMBI-, AUTO-GAREN und AUTO-GAREN VON TK werden der Garraum, die Tür, die Außenflächen und Zubehörteile sehr heiß. Vor dem Reinigen vollständig abkühlen lassen.
Reduzierte Leistungsstufe REDUZIERTE LEISTUNGSSTUFE WICHTIG: 1. Wenn Sie die Speisen in der Standardgarzeit in nur einer Betriebsart garen 900 W, wird die Leistung des Gerätes automatisch reduziert, um eine Überhitzung zu vermeiden. (Die Mikrowellenleistung wird vermindert und die Grillheizelement werden ein- und ausgeschaltet.) Kochmodus 2.
Was tun, wenn . . . & Technische Daten 75 WAS TUN, WENN . . . Symptom Das Mikrowellengerät nicht arbeitet? Die Mikrowelle nicht arbeitet? Sich der Drehteller nicht dreht? Die Mikrowelle nicht abschaltet? Die Garraumlampe ausfällt? Die Speisen langsamer heiß und gar werden als bisher? Überprüfen / Empfehlung • Der Netzstecker eingesteckt ist. • Die Sicherungen in der Installation in Ordnung sind. • Eventuell der Strom ausgefallen ist.
Aufstellanweisungen AUFSTELLANWEISUNGEN Die Mikrowelle kann in Position A, B oder C gepaßt werden: Position Nischengröße Rauchabzug Abstand zwischen B T H (Minimum) Schrank & Decke A B C 560 x 550 x 450 560 x 500 x 450 560 x 550 x 460 20 20 20 50 50 Nicht zutreffend Rauchabzug Kabelklemme Position B Position A 450 mm Rauchabzug Kabelklemme Position A min. 20 mm Abmessungen in (mm) D Backofen Backofen Position C 450 mm Position B Position C 460 mm 65 mm 20 mm 5 mm 1.
Aufstellanweisungen 77 Netzanschluss • Die Steckdose sollte sich in einer leicht zugänglichen Position befinden, damit der Stecker des Geräts im Notfall leicht herausgezogen werden kann. Andernfalls sollte es möglich sein, das Gerät mithilfe eines Schalters vom Stromkreis zu trennen. Dabei sollten die geltenden Bestimmungen der elektrischen Sicherheitsnormen berücksichtigt werden. • Die Steckdose sollte nicht hinter dem Einbauschrank (A) angebracht sein.
Umweltinformation UMWELTINFORMATION Umweltfreundliche Entsorgung von Verpackung und Altgerät Verpackung Unsere Mikrowellengeräte benötigen für den Transportweg eine wirksame Schutzverpackung. Dabei beschränken wir uns auf das unbedingt Notwendige. Verpackungsteile (z.B. Folien, Styropor) können für Kinder gefährlich sein. Erstickungsgefahr! Verpackungsteile von Kindern fernhalten. Alle verwendeten Verpackungsmaterialien sind umweltverträglich und wiederverwertbar.
Kundendienst 79 Kundendienst Sehr geehrter Kunde, der Werkskundendienst von AEG Hausgeräte ist dezentral organisiert. Damit bieten wir Ihnen überall einen zuverlässigen Service. Unter der für Sie kostengünstigen Rufnummer 0180 322 66 22 (EUR 0.09 / Minute Deutsche Telecom) können Sie im Bedarfsfall einen unserer Spezialisten oder Service-Partner anfordern. Ihre Ersatzteil-Bestellung geben Sie bitte unter der zentralen Rufnummer 0180 5 00 10 76 auf. (EUR 0.
Garantiebedingungen Garantiebedingungen Der Endabnehmer dieses Gerätes (Verbraucher) hat bei einem Kauf dieses Gerätes von einem Unternehmer (Händler) in Deutschland im Rahmen der Vorschriften über den Verbrauchsgüterkauf gesetzliche Rechte, die durch diese Garantie nicht eingeschränkt werden. Diese Garantie räumt dem Verbraucher also zusätzliche Rechte ein.
Garantiebedingungen 81 Kundendienst & Ersatzteile (Belgien) Sollte das Gerät nicht richtig funktionieren, vor dem Anruf beim örtlichen Kundendienstzentrum folgende Punkte überprüfen: Wenn der Ofen nicht einsetzt: • Prüfen, ob das Gerät richtig angeschlossen ist. • Prüfen, ob der Ofenstecker richtig eingesteckt ist. • Gegebenenfalls die Stöpselsicherung durch eine andere der gleichen Stärke austauschen und prüfen, ob der Stecker richtig verkabelt wurde. • Prüfen, ob der Steckdosenschalter bzw.
Garantiebedingungen Garantiebedingungen (Belgien) Unsere Geräte werden mit größter Sorgfalt hergestellt. Trotzdem kann es einmal zu einem Defekt kommen. Unser Kundendienst übernimmt auf Anfrage gerne die Reparatur, und zwar sowohl während des Garantiezeitraums als auch danach. So ist gewährleistet, dass ein Defekt nicht zu einer Verkürzung der Lebensdauer des Geräts führt.
Lors de sa fabrication, cet appareil a été construit selon des normes, directives et/ou décrets pour une utilisation sur le territoire français. Pour la sécurité des biens et des personnes ainsi que pour le respect de l’environnement, vous devez d’abord lire impérativement les préconisations suivantes avant toute utilisation de votre appareil. Pour éviter tout risque de détérioration de l’appareil, transportez-le dans sa position d’utilisation muni de ses cales de transport (selon modèle).
Sommaire POUR DES RÉSULTATS PARFAITS Merci d'avoir choisi ce produit AEG. Nous l'avons créé pour vous offrir des performances irréprochables pour longtemps, avec des technologies innovantes qui vous simplifient la vie autant de caractéristiques que vous ne trouverez pas forcément sur les appareils ordinaires. Veuillez prendre quelques instants pour lire cette notice afin d'utiliser au mieux votre appareil.
Avertissements importants de sécurité 85 AVERTISSEMENTS IMPORTANTS DE SÉCURITÉ AVERTISSEMENTS DE SECURITE IMPORTANTS : LES LIRE ATTENTIVEMENT ET LES CONSERVER SOIGNEUSEMENT POUR CONSULTATIONS ULTERIEURES Pour éviter tout danger d’incendie Vous devez surveiller le four lorsqu’il est en fonctionnement. Un niveau de puissance trop élevé, ou un temps de cuisson trop long, peuvent entraîner une augmentation de la température des aliments conduisant à leur enflammation.
Avertissements importants de sécurité Pour éviter toute blessure AVERTISSEMENT: N’utilisez pas le four s’il est endommagé ou ne fonctionne pas normalement. Vérifiez les points suivants avant tout emploi du four: a) La porte: assurez-vous qu’elle ferme correctement, qu’elle ne présente pas de défaut d’alignement et qu’elle n’est pas voilée. b) Les charnières et les loquets de sécurité: assurez-vous qu’ils ne sont ni endommagés ni desserrés.
Avertissements importants de sécurité 87 Si le cordon d’alimentation de cet appareil est endommagé, faites-le remplacer par un professionnel qualifié. Les interrupteurs de verrouillage de sécurité incorporés empêchent le four à microondes de fonctionner lorsque la porte est ouverte. N’installez pas et n’utilisez pas votre appareil si celui-ci présente une anomalie lors du déballage. Installez ou positionnez ce four uniquement selon les instrctions d’installation contenues dans cette notice.
Avertissements importants de sécurité La température du récipient est trompeuse et ne reflète pas celle des aliments que vous devez vérifier. Tenez-vous éloigné du four au moment où vous ouvrez sa porte de manière à éviter toute brûlure due à la vapeur ou à la chaleur. Coupez en tranches les plats cuisinés farcis après chauffage afin de laisser s’échapper la vapeur et d’éviter les brûlures. Veillez à ce que les enfants ne touchent pas la porte du four pour éviter les brûlures.
Avertissements importants de sécurité 89 Votre appareil est destiné à un usage domestique normal. Ce four a été conçu pour la préparation d'aliments et ne doit être utilisé que pour leur cuisson. Il n’a pas été étudié pour un usage commercial ou scientifique. Pour éviter une anomalie de fonctionnement et pour éviter d’endommager le four Ne jamais faire fonctionner le four sans plateau tournant ou à vide, sauf recommendation du mode d’emploi, voir page 101 - 102. Sinon vous risquez d’endommager le four.
Avertissements importants de sécurité Assurez-vous également que les décors ne sont pas à base d’éléments métalliques. Dans le doute, n’hésitez pas à procéder au test du verre d’eau. • Test du verre d’eau. Ce test très simple vous permet de juger si un récipient est apte à la cuisson par micro-ondes. Placez dans le four le récipient à tester vide et posez à l’intérieur ou à côté de clui-ci un verre rempli d’eau qui absorbera l’énergie microondes.
Vue d’ensemble de l’appareil 91 VUE D'ENSEMBLE DE L'APPAREIL Four micro-ondes et accessoires 1 2 4 3 1 5 11 6 10 1 2 3 4 5 6 7 8 9 10 11 12 13 14 15 1 9 8 1 7 12 Points de fixation (x4) Elément chauffant du gril Convection Elément chauffant 14 Eclairage du four Bandeau de commande Rails de grille 15 Cadre du répartiteur d'ondes Entraînement Couplage Cadre d'ouverture de la porte Poignée d'ouverture de porte Ouvertures de ventilation Enveloppe extérieure Cordon d'alimentation Cordon d'alimen
Vue d’ensemble de l’appareil & Avant la mise en service AVERTISSEMENT: • Veillez toujours à ce que le plateau tournant et le support soient correctement montés afin de permettre une cuisson bien répartie. Un plateau tournant mal posé pourra cogner, ne pas tourner correctement et endommager le four. • Le plateau tournant tourne dans le sens des aiguilles d’une montre et dans le sens inverse des aiguilles d’une montre. Le sens de rotation peut changer chaque fois que l’on met le four en marche.
Avant la mise en service 93 IMPORTANT: Si vous n’utilisez pas le four pendant 3 minutes, l’alimentation électrique est coupée automatiquement. Aucune donnée ne s'affiche. Pour remettre le four sous tension, ouvrez la porte, puis refermez-la. 4. Faites chauffer le four sans aliments (voir page 101 - 102).
Conseils de cuisson aux micro-ondes CONSEILS DE CUISSON AUX MICRO-ONDES Cuisson aux micro-ondes L'énergie à micro-ondes doit donc pouvoir traverser le matériau du récipient pour cuire/décongeler les aliments. Il est par conséquent important de choisir des plats adaptés à la cuisson au four à micro-ondes. Choisissez de préférence des plats ronds/ovales plutôt que des récipients carrés/ou longs, car les aliments placés dans les angles tendent à être trop cuits.
Conseils de cuisson aux micro-ondes 95 Vaisselle pour fours à micro-ondes Plats Film aluminium/ barquettes en aluminium Plats brunisseurs Porcelaine et céramique Plats en verre (p. ex.
Utilisation du four micro-ondes UTILISATION DU FOUR MICRO-ONDES Cuisson aux micro-ondes Vous pouvez choisir le temps de cuisson jusqu'à 90 minutes. L’augmentation du temps de cuisson varie de 10 secondes à cinq minutes. Elle dépend de la durée totale de cuisson indiquée dans le tableau.
Utilisation du four micro-ondes 97 Exemple: Pour réchauffer une soupe pendant 2 minutes et 30 secondes à mipuissance 630 W. 1. Sélectionnez le mode de cuisson en tournant le bouton sur (Micro-ondes). 2. Saisissez le temps de cuisson voulu en tournant le bouton rotatif DUREE/POIDS dans le sens des aiguilles d’une montre. (2 min et 30 s). 3. Modifiez la puissance en appuyant sur la touche NIVEAU DE PUISSANCE. x2 4. Appuyez une fois sur le touche START/QUICK pour démarrer la cuisson. x1 5.
Utilisation du four micro-ondes Ajouter 30 Secondes Le bouton START/QUICK permet d'activer les deux fonctions suivantes: a) Cuisson 30 secondes Vous pouvez faire cuire des aliments dans le mode de votre choix pendant 30 secondes sans définir de temps de cuisson. Exemple: Si vous dé sirez faire cuire des aliments pendant 30 secondes à 630 W en mode micro-ondes. 1. Sélectionnez le mode de cuisson en tournant le bouton MODE CUISSON sur. 2.
Utilisation du four micro-ondes 99 Touches moins / plus Les touches MOINS ( ) et PLUS ( ) vous permettent de diminuer ou d’augmenter facilement les réglages programmés (pour une cuisson plus ou moins avancée) en mode CUISSON ou en cours de cuisson. a) Modification de la durée des programmes automatiques Appuyez sur le Les touches MOINS ( ) et PLUS ( ) avant d’entrer le poids et d’appuyer sur le touche START/QUICK. (Voir tableaux de cuisson pour des menus avec MOINS et PLUS).
Utilisation du four micro-ondes Verification des reglages pendant le fonctionnement du four Vous pouvez vérifier le niveau de puissance, l’heure, la température du four. VERIFICATION DU NIVEAU DE PUISSANCE: Pour vérifier le niveau de puissance du micro-ondes pendant la cuisson, appuyez sur la touche NIVEAU DE PUISSANCE MICRO-ONDES. Le four continue le compte à rebours bien que l’affichage indique le niveau de puissance.
Utilisation du four micro-ondes 101 Cuison au gril L’élément chauffant du gril situé en haut de la cavité du four ne comporte qu’un seul niveau de puissance. Exemple: Pour faire cuire du pain grillé au fromage pendant 5 minutes. Placez le pain sur le trépied haut. 1. Choisissez la fonction GRIL en tournant le bouton MODE CUISSON sur . 2. Entrez le temps de cuisson souhaité en tournant le bouton rotatif DUREE/POIDS dans le sens des aiguilles d’une montre. 3.
Utilisation du four micro-ondes 2. Entrez le temps de chauffage (20 min). 3. Appuyez une fois sur la touche START/QUICK pour démarrer la cuisson. x1 Le four commence à décompter. A la fin du fonctionnement à vide, ouvrez la porte pour laisser refroidir le four. AVERTISSEMENT: La porte du four, les parois extérieures et l’intérieur du four seront chauds. prenez soin d’éviter les risques de brûlures pendant que le four refroidit.
Utilisation du four micro-ondes 103 5. Utilisez le bouton rotatif DUREE/POIDS pour entrer la durée de cuisson (20 min). 6. Appuyez sur la touche START/QUICK. x1 7. Vérifiez l’affichage: REMARQUES: 1. Lors du préchauffage du four, laissez le plateau tournant dans le four. 2. Après le préchauffage, si vous voulez cuire à une température différente, appuyez sur la touche CONVECTION jusqu’à ce que le réglage voulu apparaisse sur l’affichage.
Utilisation du four micro-ondes REMARQUE: 1. Après le fonctionnement du gril, le four refroidit automatiquement et l’affichage est le suivant “REFROIDISSEMENT EN COURS’. 2. Pour modifier la température de convection, appuyez sur la touche CONVECTION jusqu’à ce que la température voulue apparaisse sur l’affichage. 3. Il est possible que de la fumée et des odeurs se dégagent lors de la première utilisation du convection, mais cela ne signifie pas que le four est inutilisable.
Utilisation du four micro-ondes 105 4. Appuyez 4 fois sur la touche CONVECTION (200 °C). x4 5. Appuyez sur la touche START/QUICK. x1 6. Vérifiez l’affichage: Exemple 2: Pour faire cuire pendant 20 minutes à COMB. 2 l’aide de la puissance micro-ondes 90 W et GRIL. 1. Sélectionnez le mode de cuisson en tournant le bouton MODE CUISSON sur . 2. Sélectionnez la durée de cuisson voulue (20 min). 3. Appuyez deux fois sur la touche NIVEAU DE PUISSANCE MICRO-ONDES (90 W). x2 4.
Utilisation du four micro-ondes Tableaux de cuisson Cuisson sur le plateau en verre avec la fonction convection Menu Temps Quiche Pain de bananes Pain de abricots et aux pacanes Gâteau aux cerises et aux amandes Gâteau au fromage blanc Pizza congelée Baguette aillée Lasagnes congelées Petites pâtisseries (sous forme (de pâte comme les croissants) Préchauffage 1) 20’00 2) 12’00 Préchauffage 60’00 Préchauffage 35’00 Préchauffage 40’00 Préchauffage 54’00 Préchauffage 12’00 Préchauffage 15’00 Préchauff
Recettes avec le plateau en verre 107 RECETTES AVEC LE PLATEAU EN VERRE EN MODE CONVECTION Pain de babane Préchauffez le four. 1. Garnissez un étain de pain beurré de papier sulfurisé. 2. Fouettez le beurre et le sucre. 3. Ajoutez l’oeuf et l’essence de café avant de fouetter une nouvelle fois le mélange. 4. Épluchez et écrasez les bananes, ajoutez-les à la pâte et mélangez bien. 5. Ajoutez la farine, le bicarbonate de soude, la levure chimique et le lait pour obtenir un mélange homogène. 6.
Recettes avec le plateau en verre Gâteau aux cerises et aux amandes 1. Garnissez le fond amovible d’un moule beurré de papier sulfurisé. 2. Fouettez la margarine et le sucre pour obtenir un mélange léger et onctueux. 3. Incorporez les oeufs un par un en fouettant. 4. Incorporez la farine et la levure, puis ajoutez les cerises, la poudre d’amande, l’essence d’amande et le lait. 5. Étalez le mélange dans le moule à la cuillère et lissez la surface. 6.
Recettes avec le plateau en verre RECETTES AVEC LE PLATEAU EN VERRE EN MODE GRILL Soupe à l’oignon 1. Coupez les oignons en rondelles, versez-les dans un bol avec le bouillon, le sel et le poivre et faites cuire pendant 8 min. 900 W 2. Versez la soupe dans 4 bols à soupe. 3. Coupez les tranches de pain grillés en dés, versez-les sur la soupe et garnissez-les de fromage. 4. Placez les bols à soupe sur le plateau en verre en position inférieure et faites cuire 71/2 min.
Recettes avec le plateau en verre & Fonctionnement automatique Sardines/maquereaux grillés 1. Mélangez tous les ingrédients de la marinade et recouvrez-en le poisson. Réfrigérez pendant une heure. 2. Placez la grille dans le plateau en verre en position inférieure. Cuisson des sardines : 1. 5 min. 90 W / GRILL retournez 2. 3 min. 90 W / GRILL Cuisson du maquereau : 1. 6 min. 90 W / GRILL, retournez 2. 6 min.
Fonctionnement automatique 111 4. Pour démarrer la cuisson, appuyez sur la touche START/QUICK. S’il est nécessaire par exemple de retourner les aliments, le four s’arrête et les x1 signaux sonores retentissent. La durée de cuisson restante et le symbole approprié clignoteront à l’affichage. Pour continuer la cuisson, appuyez sur la touche START/QUICK. La température finale dépend de la température initiale des aliments. Assurez-vous que la cuisson est effectivement terminée à l’expiration du temps prévu.
Tableaux de programmation 1.FRENCH FRIED POTATOES 8.CHICKEN LEGS 14.RICE 20.STEAK & CHOPS 29.CHICKEN PAN WITH VEGETABLES TABLEAUX DE PROGRAMMATION 2.FROZEN VEGETABLES 9.GRATIN 3.FRESH VEGETABLES 10.FROZEN GRATIN 15.BOILED POTATOES 21.CHICKEN LEGS 30.MINCE AND ONION Tableaux de cuisson automatique Menu No. ENCH FRIED OTATOES OZEN GETABLES ESH GETABLES AC-1 Riz 8.CHICKEN LEGS 9.GRATIN 0,1 - 0,3 kg (100 g) Grand bol et couvercle 23.MINCED MEAT 15.BOILED 30.MINCE AND 21.
1.FRENCH FRIED POTATOES 8.CHICKEN LEGS 14.RICE 20.STEAK & CHOPS 29.CHICKEN PAN WITH VEGETABLES Tableaux de programmation 113 Tableaux de cuisson depuis l’état congelé 2.FROZEN VEGETABLES 9.GRATIN Menu No. 3.FRESH VEGETABLES 10.FROZEN GRATIN ACF-1 Cuisson Plats préparés (Stirrable) 4.FISH FILLET+ SAUCE GRATINATED FISH 5.GRILL SKEWER 6.ROAST PORK express menu1 1.FRENCH FRIED POTATOES express defrost 12.BEVERAGES 17.PIQUANTE CAKES 24.CAKE CASSEROLES 2.FROZEN VEGETABLES express menu2 3.
.CHICKEN LEGS 14.RICE .GRATIN 15.BOILED POTATOES 114 20.STEAK & CHOPS 29.CHICKEN PAN WITH VEGETABLES Tableaux de programmation 21.CHICKEN LEGS 30.MINCE AND ONION Tableaux de décongélation automatique 0.FROZEN GRATIN 1.FROZEN READY MEALS CHICKEN LEGS 2.BEVERAGES GRATIN JACKET POTATOES 14.RICE 17.PIQUANTE CAKES CASSEROLES JACKET 14.RICE POTATOES 19.PASTA .FROZEN 16.JAM RATIN 15.BOILED READY MEALS POTATOES express menu2 .BEVERAGES FROZEN GRATIN express cook .
Tableaux de programmation 115 REMARQUES: 1. Les steaks et côtelettes doivent être congelés en une couche. 2. Congelez la viande hachée en tranches fines. 3. Après avoir retourné, protégez les parties décongelées avec de petits morceaux plats de papier aluminium. 4. La volaille doit être cuite immédiatement aprés décongélation. 5. Les entremets recouverts de crème fouettée sont très sensibles aux micro-ondes.
Tableaux de programmation Recettes pour cuisson automatique AC-5 Gâteau aux carottes 1. Beurrez le plat. 2. Mélangez les jaunes d’oeuf et le sucre au fouet. 3. Ajoutez les carottes, le jus de citron et les amandes. 4. Combinez la farine et la levure, ajoutez les autres ingrédients et mélangez bien. 5. Montez les blancs en neige ferme, puis incorporez-les soigneusement. Versez le mélange dans le plat, placez-le sur la grille inférieure et faites cuire en mode de CUISSON AUTOMATIQUE AC-5. 6.
Tableaux de programmation 117 Tarte aux pommes et au calvados 1. Mélangez la farine et la levure chimique. Ajoutez le sucre, le sucre vanillé, le sel, l’oeuf, l’huile d’amande amère et le beurre. Pétrissez avec un mixer à main. 2. Couvrez la pâte et mettez-la dans un endroit frais pendant 30 minutes environ. 3. Beurrez le plat. Étalez la pâte entre deux feuilles de papier aluminium et mettez-la dans le plat. Confectionnez un rebord d’environ 3 cm tout autour de la pâte. 4.
Entretien et nettoyage ENTRETIEN ET NETTOYAGE Ne procédez au nettoyage qu’après avoir débranché l’appareil. ATTENTION : N’UTILISEZ PAS DE DÉCAPE FOURS VENDUS DANS LE COMMERCE OU DE PRODUITS ABRASIFS OU AGRESSIFS, OU DE PRODUITS QUI CONTIENNENT DE LA SOUDE CAUSTIQUE, OU DE TAMPONS ABRASIFS SUR UNE PARTIE QUELCONQUE DE VOTRE FOUR À MICRO-ONDES.
Niveau de puissance réduit 119 NIVEAU DE PUISSANCE RÉDUIT IMPORTANT: 1. Si vous faites cuire des aliments pendant plus longtemps que la durée normale sans modifier le mode de cuisson, la puissance (900 W) du four diminue automatiquement pour éviter la surchauffe. (La puissance de cuisson micro-ondes diminue et les éléments gril s’allument par intermittence.) Mode de cuisson Durée normale Cuisson micro-ondes 900 W 20 min. Cuisson gril 15 min. Combinée 1 Micro - 40 min. Combinée 2 Micro - 15 min.
En cas d'anomalie de fonctionnement et Caractéristiques techniques EN CAS D'ANOMALIE DE FONCTIONNEMENT Symptôme Vérifiez / conseil Le four micro-ondes ne • Que les fusibles de la boîte à fusibles n’ont pas disjoncté. fonctionne pas correctement? • Qu’il n’y a pas de coupure de courant. • Si les fusibles continuent de disjoncter, faites appel à un électricien qualifié. Le mode micro-ondes ne • Que la porte est bien fermée. fonctionne pas? • Que les joints de la porte et leurs surfaces sont propres.
Installation 121 INSTALLATION Le micro-onde peut être adapté en position A, B ou C : Position Taille du logement Cheminée Jeu entre élément W D H (min) et plafond A B C 560 x 550 x 450 560 x 500 x 450 560 x 550 x 460 20 20 20 50 50 Sans objet Position A Position B Cheminée Collier de câble Position A 450 mm Cheminée Collier de câble min. 20 mm Mesures en mm D Four conventionnel Four conventionnel Position C 450 mm Position B Position C 460 mm 65 mm 20 mm 5 mm 1.
Installation Raccordement électrique • La prise électrique doit être facile d'accès pour que l'appareil puisse être débranché rapidement en cas d'urgence. Sinon, il devrait être possible d’isoler le four électriquement au niveau du secteur en incorporant un sectionneur dans le câblage fixe conformément à la réglementation concernant le câblage. • La prise ne doit pas se trouver derrière le meuble. • La position idéale est au-dessus du placard, voir (A).
Informations environnementales 123 INFORMATIONS ENVIRONNEMENTALES Elimination des matériaux d’emballages et des appareils usagés de façon écologique Matériaux d’emballage Les fours à micro-ondes AEG dépendent d’un emballage efficace pour leur protection pendant le transport. Seul l’emballage minimum nécessaire est utilisé. Les matériaux d’emballage (p. ex. film plastique ou polystyrène expansé) sont un danger pour les enfants. Risque d’asphyxie.
Service après-vente et pièces de rechange (Belgique) Service après-vente et pièces de rechange (Belgique) Si l’appareil ne fonctionne pas correctement, effectuez d’abord les vérifications suivantes avant de contacter le service après-vente local. Si le four ne démarre pas: • Vérifiez si l’appareil est branché correctement. • Vérifiez si la prise est correctement enfoncée.
Déclaration de conditions de garantie (Belgique) 125 Déclaration de conditions de garantie (Belgique) Nos appareils sont produits avec le plus grand soin. Malgré cela, un défaut peut toujours se présenter. Notre service clientèle se chargera de réparer ceci sur demande, pendant ou après la période de garantie. La durée de vie de l’appareil n’en sera pas pour autant amputée.
Service et garantie (France) Service et garantie (France) SERVICE APRÈS VENTE En cas d’anomalie de fonctionnement, reportez-vous à la rubrique ‘En cas d’anomalie de fonctionnement‘. Si malgré toutes les vérifications, une intervention s’avère nécessaire, le vendeur de votre appareil est le premier habilité à intervenir.
Inhoud 127 VOOR PERFECTE RESULTATEN Bedankt dat u voor dit AEG product heeft gekozen. Dit apparaat is ontworpen om vele jaren uitstekend te presteren, met innovatieve technologieën die het leven gemakkelijker helpen maken – functies die gewone apparaten wellicht niet hebben. Neem een paar minuten de tijd om het door te lezen zodat u er optimaal van kunt profiteren.
Belangrijke aanwijzingen m.b.t. de veiligheid BELANGRIJKE AANWIJZINGEN M.B.T. DE VEILIGHEID BELANGRIJK VOOR UW VEILIGHEID: LEES DE VOLGENDE AANWIJZINGEN GOED DOOR EN BEWAAR DEZE GEBRUIKSAANWIJZING. Om brand te voorkomen Magnetronovens mogen tijdens het gebruik niet zonder toezicht worden gelaten. Te hoge vermogens of te lange bereidingstijden kunnen de levensmiddelen oververhitten en brand veroorzaken.
Belangrijke aanwijzingen m.b.t. de veiligheid 129 c) De deurafdichtingen en afsluitvlakken mogen niet beschadigd zijn. d) In de ovenruimte en de deur mogen geen deuken of andere beschadigingen aanwezig zijn. e) Het aansluitsnoer en de stekker mogen niet beschadigd zijn. Voer in geen geval zelf reparaties of wijzigingen aan uw magnetron uit. Reparaties, vooral reparaties waarbij de afdekking van het apparaat moet worden verwijderd, mogen alleen door vakmensen worden uitgevoerd.
Belangrijke aanwijzingen m.b.t. de veiligheid Wees voorzichtig bij het verwarmen van vloeistoffen. Kopjes of bekers met een grote opening gebruiken, opdat luchtbellen kunnen ontsnappen. Wees bij het verwarmen van vloeistoffen in de magnetron voorzichtig als u het kopje of de beker uit de oven neemt; het kan tot kookpuntvertraging komen en de vloeistof kan plotseling hevig overkoken of spatten. Om verbrandingen door plotseling overkoken (kookpuntvertraging) te voorkomen: 1.
Belangrijke aanwijzingen m.b.t. de veiligheid 131 Op kinderen moet toezicht worden gehouden om te voorkomen dat ze met het apparaat spelen. Niet tegen de ovendeur leunen of aan de deur hangen. De magnetron is geen speelgoed! Kinderen moet u vertrouwd maken met alle belangrijke aanwijzingen m.b.t. de veiligheid: bijv. gebruik van pannenlappen en voorzichtig afnemen van deksels. Let vooral op verpakkingen die levensmiddelen knapperig maken (bijv. zelfbruinende gerechten); deze worden bijzonder heet.
Overzicht van het apparaat OVERZICHT VAN HET APPARAAT Magnetronoven & toebehoren 1 2 4 3 1 5 11 6 10 1 9 8 7 1 12 bevestigingspunten (4 plaatsen) grillelement heteluchtelement 14 ovenlamp bedieningspaneel inschuifrichels 15 afdekking van de microgolvengeleider 13 ovenruimte aandrijfas deurafdichtingen en afsluitvlakken deurgreep ventilatie-openingen 16 ommanteling aansluitsnoer 17 snoerdrager Controleer of de volgende onderdelen zijn meegeleverd: aandrijfas 16 draaiplateau 19 hoog roost
Overzicht van het apparaat & Vóór het in gebruik nemen 133 AANWIJZING: • Het apparaat alleen gebruiken als het draaiplateau en het draaimechanisme correct zijn geïnstalleerd. Dit bevordert een gelijkmatig resultaat. Een slecht geïnstalleerd draaiplateau kan klapperen, niet goed draaien en daardoor het apparaat beschadigen. • Het draaiplateau draait zowel linksom als rechtsom. De draairichting kan veranderen als u het apparaat opnieuw start. Dit heeft geen effect op het resultaat.
Vóór het in gebruik nemen AANWIJZING: Als u 3 minuten na een schakelt het apparaat automatisch op de energiespaarstand. Open de deur om het apparaat weer in gebruik te nemen. De indicatie geeft nog niets aan. 4. De oven leeg verwarmen (zie pag. 142 - 143). KOOKTIPS: De oven heeft een "informatie display systeem" dat u in de gewenste taal stap voor stap instructies geeft over de verschillende functies. De oven heeft een toets INFORMATIE om informatie te krijgen over elke toets.
Tips voor het koken in de magnetronoven 135 TIPS VOOR HET KOKEN IN DE MAGNETRONOVEN Koken magnetronoven Om voedsel te bereiden/ontdooien in een magnetronoven moet het servies microgolven doorlaten die in het voedsel doordringen. Daarom is het belangrijk om geschikt servies te gebruiken. Ronde/ovale schalen verdienen de voorkeur boven vierkante/rechthoekige schalen aangezien het voedsel in de hoeken overgaar wordt.
Tips voor het koken in de magnetronoven Magnetronbestendig kookgerei Servies Aluminiumfolie / servies van folie Geschikt voor de magnetron / Bruineringsservies Porselein en keramiek Glas bijv. Pyrex ® Metaal Kunststof/polystyreen bijv.
Werking van de magnetron 137 WERKING VAN DE MAGNETRON Koken magnetronoven Bij handmatig gebruik kunt u een bereidingstijd van max. 90 minuten (90.00) instellen. De tijdseenheid varieert van 10 seconden tot 5 minuten, afhankelijk van de totale bereidingstijd zoals aangegeven in de tabel.
Werking van de magnetron Voorbeeld: Soep verwarmen, 2 minuten en 30 seconden met 630 watt vermogen. 1. Draai knop METHODE op voor magnetron solo. 2. Draai knop TIJD/GEWICHT rechtsom om de gewenste bereidingstijd in te stellen. 3. Druk toets VERMOGENSSTAND in tot de gewenste vermogensstand bereikt is. 2x 4. Druk toets START/QUICK in om het proces te starten. 1x 5. Controleer het display: AANWIJZINGEN: Als u deze toets niet indrukt, werkt het apparaat automatisch met vol vermogen (900 watt).
Werking van de magnetron 139 START/QUICK functie Met toets START/QUICK kunt u de volgende functies bedienen. a. Direct starten U kunt direct 30 seconden lang de gewenste methode inschakelen, zonder een bereidingstijd in te voeren. Voorbeeld: 30 minuten 630 watt magnetronvermogen. 1. Draai knop METHODE op voor magnetron. 2. Druk toets VERMOGENSSTAND 2 maal in om de vermogensstand te veranderen. 2x 3. Druk toets START/QUICK in om het proces te starten. 1x 4. Controleer het display: AANWIJZING: 1.
Werking van de magnetron Toets minder/meer Met de toetsen MINDER ( M ) en MEER ( L ) kunt u de geprogrammeerde tijdsinstellingen zonder problemen verkorten of verlengen (om de levensmiddelen minder of meer gaar te laten worden). a. Wijzigen van de voorgeprogrammeerde tijdsinstelling: Druk toets MINDER ( M ) of MEER ( L ) in na invoeren van het gewicht en voordat u toets START/QUICK indrukt. (Voor menu's met MINDER en MEER zie pag. 154.) Voorbeeld: 0,2 kg friet bakken met DIEPVRIESPRODUCTEN KOKEN. 1.
Werking van de magnetron Tijdens het gebruik de instelling controleren U kunt de vermogensstand en de temperatuur controleren, bijv. bij het voorverwarmen. VERMOGENSSTAND CONTROLEREN: Om tijdens het bereidingsproces de vermogensstand te controleren, drukt u toets VERMOGENSSTAND in.l. Zolang u met uw vinger deze toets aanraakt, wordt de vermogensstand aangegeven. HETELUCHTTEMPERATUUR CONTROLEREN: Om tijdens het bereidingsproces de heteluchttemperatuur te controleren, drukt u toets HETELUCHT in.
Werking van de magnetron Grilleren Het vermogen van het grillelement dat zich in de bovenkant van de ovenruimte bevindt is niet regelbaar. Voorbeeld: toast met kaas 5 minuten grilleren (leg de toast op het hoge rooster). 1. Draai knop METHODE op voor grill. 2. Draai knop TIJD/GEWICHT rechtsom om de gewenste bereidingstijd in te stellen. 3. Druk toets START/QUICK in om het proces te starten. 1x 4. Controleer het display: AANWIJZINGEN 1. Het hoge en het lage rek zijn bedoeld om te grilleren. 2.
Werking van de magnetron 143 2. Voer de gewenste tijd in (20 minuten). 3. Druk toets START/QUICK in om het proces te starten 1x Het apparaat telt nu de tijd terug. Na het opwarmen de ovendeur openen en de ovenruimte laten afkoelen. WAARSCHUWING: Ovendeur, buitenkant en ovenruimte worden heet. Denk erom dat u zich niet verbrandt terwijl het apparaat afkoelt. Hetelucht Met behulp van de heteluchtfunctie en de 10 voorgeprogrammeerde temperatuurstanden kunt u het apparaat als conventionele oven gebruiken.
Werking van de magnetron 5. Voer met knop TIJD/GEWICHT de bereidingstijd (20 minuten) in. 6. Druk toets START/QUICK in. 1x 7. Controleer het display: AANWIJZINGEN: 1. Tijdens het voorverwarmen het draaiplateau in het apparaat laten. 2. Als u na het voorverwarmen met verschillende temperaturen wilt bakken of braden, drukt u toets HETELUCHT in, tot de gewenste instelling op het display wordt aangegeven.
Werking van de magnetron 145 AANWIJZINGEN: 1. Na het bakken of braden koelt het apparaat automatisch af en op het display verschijnt "NU KOELEN". 2. Om de heteluchttemperatuur te wijzigen, toets HETELUCHT indrukken, tot de gewenste temperatuur op het display wordt aangegeven. 3. Als u de oven voor de eerste keer gebruikt, kan wat rook of een brandlucht ontstaan. Dit is normaal en geen teken dat het apparaat niet in orde is. (Zie pag. 142 - 143, "Oven leeg verwarmen").
Werking van de magnetron 4. Druk toets HETELUCHT 4 maal in (200 °C). 4x 5. Druk toets START/QUICK in. 1x 6. Controleer het display: Voorbeeld 2: 20 minuten grilleren met 90 watt magnetronvermogen en grill. 1. Draai knop METHODE op voor COMBI 2 . 2. Voer de gewenste bereidingstijd in (20 minuten). 3. Druk toets VERMOGENSSTAND 2 maal in (90 watt). 2x 4. Druk toets START/QUICK in. 1x 5.
Werking van de magnetron 147 Tabel koken Glasplateau en hetelucht Menu Tijd in minuten Quiche voorverwarmen 1) 20 2) 12 Bananencake voorverwarmen 60 Abrikozenvoorverwarmen pecannotencake 35 Kersen-amandelcake voorverwarmen 40 Kwarktaart voorverwarmen 54 Diepgevroren pizza voorverwarmen 12 Knoflookbrood voorverwarmen 15 Diepgevroren lasagne voorverwarmen 25 Kleine stukken blader- voorverwarmen deeg (bijv.
Recepten voor glasplateau RECEPTEN VOOR GLASPLATEAU EN HETELUCHT Bananencake De oven voorverwarmen. 1. De bakvorm invetten en met bakpapier bekleden. 2. Boter en suiker schuimig roeren. 3. Ei en koffie-extract toevoegen en nogmaals roeren. 4. Bananen pellen en prakken, aan het mengsel toevoegen en goed roeren. 5. Bloem, dubbelkoolzure soda, bakpoeder en melk toevoegen en roeren tot het beslag glad is. 6. In de bakvorm doen en de bovenkant gladstrijken. 7.
Recepten voor glasplateau Kersen-amandelcake 1. De springvorm invetten en met bakpapier bekleden. 2. Margarine en suiker door elkaar roeren tot een schuimige massa. 3. De eieren één voor één erdoor roeren. 4. Bloem en bakpoeder erdoor roeren, kersen, gemalen amandelen, amandelessence en melk erdoor roeren. 5. In de springvorm doen en de bovenkant gladstrijken. 6. Springvorm op het glasplateau zetten, onderste inschuifhoogte.
Recepten voor glasplateau RECEPTEN VOOR GLASPLATEAU EN GRILL Uiensoep 1. De uien snijden, met de bouillon in een schaal doen, zout en peper toevoegen. 8 minuten 900 watt 2. De soep over 4 soepkommen verdelen. 3. Toast in stukjes snijden en bovenop de soep leggen, kaas over de toast verdelen. 4.
Recepten voor glasplateau & Automatische programma’s Gegrilleerde sardines/makreel 1. Alle ingrediënten tot een marinade vermengen, over de vis strijken en een uur op een koele plaats zetten. 2. Op het rooster op het glasplateau zetten, onderste inschuifhoogte. Sardines: 1. 5 minuten 90 watt / grill, omkeren 2. 3 minuten 90 watt / grill Makreel: 1. 6 minuten 90 watt / grill, omkeren 2.
Automatische programma’s 4. Start het proces door toets START/QUICK in te drukken. 1x Als een bedieningshandeling noodzakelijk is (bijv. levensmiddelen omkeren) stopt het apparaat automatisch en er klinkt een akoestisch signaal. Op het display ziet u wat u moet doen. Om het proces voort te zetten toets START/QUICK indrukken. De temperatuur aan het einde van de bereidingstijd hangt af van de uitgangstemperatuur. Controleer of de levensmiddelen gaar genoeg zijn.
Programma’s PROGRAMMA’S 1.FRENCH FRIED POTATOES 8.CHICKEN LEGS 14.RICE 20.STEAK & CHOPS 153 29.CHICKEN PAN WITH VEGETABLES Tabel automatische kookprogramma’s 2.FROZEN VEGETABLES 9.GRATIN Menunummer ENCH FRIED OTATOES OZEN GETABLES ESH GETABLES AC-1 Rijst 8.CHICKEN LEGS 15.BOILED POTATOES 3.FRESH 10.FROZEN VEGETABLES GRATIN 14.RICE 20.STEAK & CHOPS JACKET POTATOES 29.CHICKEN PAN WITH VEGETABLES rijst 100 g 12.BEVERAGES 5.GRILL SKEWER 200 g 22.POULTRY JACKET 300 g POTATOES 2.FROZEN 9.
1.FRENCH FRIED POTATOES Programma’s 8.CHICKEN LEGS 20.STEAK & CHOPS 14.RICE 29.CHICKEN PAN WITH VEGETABLES Tabel diepvriesproducten koken 2.FROZEN VEGETABLES 9.GRATIN Menunummer 15.BOILED POTATOES 21.CHICKEN LEGS 3.FRESH VEGETABLES 10.FROZEN GRATIN 4.FISH FILLET+ SAUCE 11.FROZEN READY MEALS 16.JAM 23.MINCED MEAT 5.GRILL SKEWER 12.BEVERAGES 17.PIQUANTE CAKES 24.CAKE 6.ROAST PORK 13.SOUP 18.CAKE 25.BREAD ACF-1 koken Diepgevroren gerechten (Roerbaar) GRATINATED FISH 1.
& CHOPS RATIN 15.BOILED POTATOES 21.CHICKEN LEGS Programma’s 30.MINCE AND ONION 155 Tabel automatische ontdooiprogramma’s ROZEN GRATIN ROZEN EADY MEALS HICKEN LEGS EVERAGES RATIN OUP LEGS HICKEN FROZEN GRATIN ASSEROLES RATIN JACKET POTATOES 22.POULTRY Menunummer AD-1 ontdooien Befstuk en karbonade 23.MINCED MEAT 16.JAM 20.STEAK & CHOPS 14.RICE 17.PIQUANTE CAKES 15.BOILED POTATOES 21.CHICKEN LEGS 25.BREAD 20.STEAK & CHOPS 18.CAKE 14.
Programma’s AANWIJZING: 1. Biefstukken, karbonades en kippenbouten naast elkaar (in 1 laag) invriezen. 2. Gehakt plat invriezen. 3. Na het omkeren de al ontdooide delen met strookjes aluminiumfolie afdekken. 4. Gevogelte en gehakt direct na het ontdooien verder verwerken. 5. Gebak met room reageert zeer gevoelig op microgolvenenergie. Zodra de room snel vloeibaar wordt, het gebak direct uit de oven nemen en bij kamertemperatuur 10 tot 30 minuten laten staan.
Programma’s 157 Recepten voor automatische kookprogramma’s AC-5 Worteltaart 1. Bakvorm invetten. 2. Eidooiers en suiker met een handmixer vermengen. 3. Wortelen, citroensap en amandelen toevoegen. 4. Bloem en bakpoeder met elkaar vermengen, aan het wortelmengsel toevoegen en goed door elkaar roeren. 5. Eiwitten stijf slaan en voorzichtig door het mengsel roeren. In de bakvorm doen, op het onderste rooster zetten en met AUTOMATISCH KOOKPROGRAMMA AC-5 bakken. 6.
Programma’s Appeltaart met calvados 1. Bloem en bakpoeder vermengen, suiker, vanillesuiker, zout, ei, amandelolie en boter toevoegen en met de kneedhaak van een handmixer tot een deeg roeren. 2. Deeg afdekken en ca. 30 minuten op een koele plek zetten. 3. Bakvorm invetten. Deeg tussen 2 lagen folie uitrollen en in de bakvorm doen. Een rand van ca. 3 cm vormen. 4. Hazelnoten over het deeg strooien. 5. Appels schillen, in vieren snijden, van het klokhuis ontdoen en in plakken snijden.
Reiniging & onderhoud 159 REINIGING & ONDERHOUD VOORZICHTIG: GEBRUIK GEEN OVENREINIGERS, STOOMREINIGERS, SCHUURMIDDELEN, MIDDELEN MET BIJTENDE SODA OF SCHUURSPONSJES OM DE MAGNETRON TE REINIGEN. DIT GELDT VOOR ALLE DELEN VAN HET APPARAAT. WAARSCHUWING! Bij het werken met GRILL, HETELUCHT, COMBI, AUTOMATISCHE KOOKPROGRAMMA'S en DIEPVRIESPRODUCTEN KOKEN worden de ovenruimte, de deur, de ommanteling en toebehoren zeer heet. Vóór het reinigen volledig laten afkoelen.
Verminderd vermogensniveau VERMINDERD VERMOGENSNIVEAU AANWIJZING: 1. Als u de levensmiddelen langer dan de standaardtijd met steeds één en dezelfde methode verwarmt, wordt het vermogen van het apparaat automatisch verlaagd om oververhitting te voorkomen. (Het magnetronvermogen wordt verlaagd of het grillelement gaat uit en aan.) kookmethode 2.
Wat te doen als . . . & Technische gegevens 161 WAT TE DOEN ALS . . . Symptoom De magnetron niet goed functioneert? Mogelijke oorzaken / oplossingen • De zekering in de huisinstallatie in orde is. • De stroom misschien uitgevallen is. • Als de zekeringen in de huisinstallatie meermaals uitschakelen, neem dan contact op met een erkend elektro-installateur. De magnetron niet werkt? • De deur goed gesloten is. • De deurafdichtingen en de afsluitvlakken schoon zijn. • Toets START/QUICK is ingedrukt.
Installatie-aanwijzing INSTALLATIE-AANWIJZING De magnetron kan worden ingebouwd in positie A ,B of C: Positie nismaat B H D rookafvoer afstand tussen (min.) kast en plafond A B C 560 x 550 x 450 560 x 500 x 450 560 x 550 x 460 20 20 20 50 50 Niet van toepassing rookafvoer snoerdrager min. 20 mm Afmetingen in mm rookafvoer snoerdrager positie A positie A 450 mm positie B D conventionele oven conventionele oven positie C 450 mm positie B positie C 460 mm 65 mm 20 mm 5 mm 1.
Installatie-aanwijzing 163 Aansluiting op het stroomnet • Zorg ervoor dat de stekker makkelijk bereikbaar is, zodat hij in geval van nood snel uit het stopcontact kan worden getrokken. Of het moet mogelijk zijn om de stroom naar de oven uit te schakelen door middel van een schakelaar die volgens de bedradingsvoorschriften is opgenomen in de vaste bedrading. • Plaats het stopcontact niet achter de kast. (A) • De beste plek is boven de kast, zie (A).
Milieuinformatie MILIEUINFORMATIE Milieuvriendelijke afvalverwerking van verpakking en oude apparaten Verpakking Onze magnetrons moeten worden vervoerd en hebben daarom een effectieve beschermende verpakking nodig. Daarbij beperken wij ons tot het absoluut noodzakelijke. Delen van de verpakking (bijv. folie, styropor) kunnen gevaarlijk zijn voor kindere. Verstikkingsgevaar! Houd de verpakking uit de buurt van kinderen.
Service 165 Service In het hoofdstuk "Wat te doen als ... zijn enkele storingen beschreven die u zelf kunt opheffen. Lees in geval van storing eerst dit hoofdstuk. Als u daar geen aanwijzingen vindt, neemt u contact op met onze serviceafdeling. Bereid het gesprek altijd goed voor. Zo vergemakkelijkt u de diagnose en de beslissing of bezoek van een servicetechnicus nodig is. Noteer modelnummer en serienummer. Deze nummers vindt u op het typeplaatje van het apparaat. model S-nr. ...........................
Garantievoorwaarden NEDERLAND Garantievoorwaarden NEDERLAND Onze producten worden met de grootst mogelijke zorgvuldigheid geproduceerd. Desondanks kan het voorkomen dat er een defect optreedt. Onze servicedienst zal dit op verzoek herstellen, zowel binnen als buiten de garantietermijn. De levensduur van het product wordt daardoor niet negatief beïnvloed. 9. 10. Onderstaande garantievoorwaarden zijn gestoeld op de EU Richtlijn 99/44/EG en het Burgerlijk Wetboek.
Garantievoorwaarden NEDERLAND 167 Garantievoorwaarden NEDERLAND Reparatievoorwaarden Onze reparatievoorwaarden zijn conform de afspraak tussen de Consumentenbond en Vlehan*. Art. 1 Art. 2 Art. 3 Art. 4 Aan de consument zal na een melding van een storing zo mogelijk direct, doch uiterlijk binnen één werkdag worden medegedeeld op welke dag het bezoek van de technicus zal plaatsvinden. De reparatie zal als regel binnen zeven werkdagen na de melding zijn uitgevoerd.
Waarborgvoorwaarden BELGIË Waarborgvoorwaarden BELGIË Onze toestellen worden met de grootst mogelijke zorgvuldigheid geproduceerd. Desondanks kan het voorkomen dat er een defect optreedt. Onze klantendienst zal dit op verzoek herstellen, zowel binnen als buiten de waarborgtermijn. De levensduur van het toestel wordt daardoor niet negatief beïnvloed. Onderstaande waarborgvoorwaarden zijn gestoeld op de EU Richtlijn 99/44/EG en het Burgerlijk Wetboek. De daaruit voortvloeiende rechten blijven onverlet.
Indice 169 PARA OBTENER RESULTADOS PERFECTOS Gracias por escoger este producto AEG. Este artículo ha sido creado para ofrecer un rendimiento impecable durante muchos años, con innovadoras tecnologías que facilitarán su vida y prestaciones que probablemente no encuentre en electrodomésticos corrientes. Por favor, dedique algunos minutos a la lectura para disfrutar de todas sus ventajas.
Medidas importantes de seguridad MEDIDAS IMPORTANTES DE SEGURIDAD INSTRUCCIONES DE SEGURIDAD IMPORTANTES: LÉALAS ATENTAMENTE Y CONSÉRVELAS PARA CONSULTAS FUTURAS. Para evitar incendios Los hornos de microondas no deben dejarse funcionando sin que haya alguien controlando su cocción. Los niveles de potencia que sean demasiado altos o los tiempos de cocción demasiado largos pueden calentar excesivamente los alimentos y originar incendios.
Medidas importantes de seguridad 171 a) La puerta; asegúrese de que la puerte cierra bien y compruebe que no está ni deformada ni combada. b) Las bisagras y pestillos de seguridad de la puerta; compruebe que no están ni rotos ni flojos. c) Los sellos de la puerta y las superficies de sellado; asegúrese de que no han sufrido daños y están en perfectas condiciones. d) Dentro del horno o en la puerta; asegúrese de que no hay abolladuras.
Medidas importantes de seguridad El calentamiento de bebidas en el microondas puede dar lugar a un retraso en la ebullición, por lo tanto el cuidado tiene que ser tomado al manejar el envase. Para evitar la salida repentina de líquido hirviendo y las posibles quemaduras: 1. Agite el líquido antes de calentarlo/recalentarlo. 2. Es aconsejable introducir una varilla de vidrio o utensilio similar en el líquido mientras calienta. 3.
Medidas importantes de seguridad 173 A los niños se les debe enseñar todas las medidas de seguridad importantes tales como la utilización de guantes o manoplas para no quemarse, retirar con cuidado las envolturas de las comidas y tener un cuidado especial con los alimentos (por ej., los envueltos en materiales autocalentables) diseñados para tostar la comida porque puede que estén demasiado calientes. Otras Notas No intente nunca hacer ninguna modificación en el horno.
Información general sobre el electrodoméstico INFORMACIÓN GENERAL SOBRE EL ELECTRODOMÉSTICO El horno microondas & sus accesorios 1 2 4 3 1 5 11 6 10 1 9 8 Frontal y puntos de fijación (4 puntos) Resistencia grill Calentador de la convección 14 Lámpara del horno Panel de mandos Guías portabandejas 15 Tapa de la guía de ondas Cavidad del horno Soporte giraplatos Cierre puerta y superficie cierre Manilla de apertura de puerta Orificios de ventilación Cubierta externa Cable de alimentación Cl
Información general sobre el electrodoméstico & Antes de usarlo por primera vez 175 NOTAS: • Utilice siempre el horno con el plato giratorio y el soporte colocado correctamente. De este modo se facilita una cocción completa y uniforme. Un plato giratorio mal colocado puede temblar, girar inapropiadamente y causar daños en el horno. • El plato giratorio gira tanto en el sentido de las agujas del reloj como en el contrario. La dirección de rotación puede cambiar cada vez que se enciende el horno.
Antes de usarlo por primera vez NOTA: Si no realiza ninguna operación transcurridos 3 minutos la alimentación se desactivará automáticamente. No aparecerá nada en el visualizador en esta ocasión.Para restablecer la alimentación, abra la puerta. 4. Caliente el horno sin alimentos dentro (Vea la página 184 - 185).
Cocción tecnicas microondas 177 COCCIÓN TECNICAS MICROONDAS Cocción microondas Para cocinar o descongelar alimentos en un horno microondas, la energía microondas debe ser capaz de atravesar el recipiente para penetrar en los alimentos. Por lo tanto es importante elegir recipientes adecuados. Los platos redondos u ovalados son mejores que los cuadrados o alargados, ya que los alimentos situados en las esquinas suelen quedar demasiado hechos.
Cocción tecnicas microondas Utensilios de cocina aptos para microondas Recipientes Adecuados para Comentarios microondas Papel de aluminio / Pueden utilizarse trozos pequeños de papel de aluminio para y recipientes de proteger los alimentos y evitar que se sobrecalienten. Mantenga el papel de aluminio papel de aluminio a al menos 2 cm de las paredes del horno, ya que pueden formarse arcos eléctricos. No se recomiendan los recipientes de papel de aluminio a menos que lo especifique el fabricante, p.
Funcionamiento del microondas 179 FUNCIONAMIENTO DEL MICROONDAS Cocción microondas Con las operaciones manuales podrá programar el horno para un máximo de 90 minutos. La unidad de ingreso de tiempo de cocción puede variar entre 10 segundos y cinco minutos. Depende del tiempo total de cocción, tal como se enseña en la tabla.
Funcionamiento del microondas Ejemplo: Supongamos que se desea calentar sopa durante 2 minutos y 30 segundos empleando una potencia de microondas de 630 W. 1. Gire el mando de MODO DE COCCIÓN hasta la posición para seleccionar el Microondas. 2. Se elige la potencia deseada girando el mando de TIEMPO/PESO. 3. Cambie el nivel de potencia pulse la tecla de NIVEL DE POTENCIA DEL MICROONDAS. x2 4. Se pulsa la tecla de START/QUICK una vez para empezar la cocción. x1 5.
Funcionamiento del microondas 181 Función de cocción rapidá La tecla de START/QUICK permite utilizar las dos funciones siguientes: a) Cocción de 30 segundos Es posible cocinar en el modo de cocción que desee durante 30 segundos sin introducir el tiempo de cocción. Ejemplo: Suponga que quiere realizar la cocción durante 1 minuto con una potencia de microondas de 630 vatios. 1. Ajuste el selector de MODO DE COCCIÓN en la posición (micro). . 2.
Funcionamiento del microondas Teclas de menos/más Las teclas MENOS ( ) y MÁS ( ) permiten aumentar o disminuir fácilmente los tiempos programados (para que el alimento quede más o menos hecho) que se utilizan en las OPERACIONES AUTOMÁTICAS o cuando el horno ya está en funcionamiento. a) Cambio del tiempo preprogramado: Pulse el botón MENOS ( ) y MÁS ( ) después de entrar el peso y antes de pulsar la tecla START/QUICK. (Vea la cocción para los menús que utilizan Menos y Más.
Funcionamiento del microondas 183 Comprobación de ajustes estando el horno en funcionamiento Durante el precalentamiento se puede comprobar el nivel de potencia, la hora y las temperaturas del horno. COMPROBACIÓN DEL NIVEL DE POTENCIA: Si desea comprobar la potencia durante la cocción pulse la tecla de NIVEL DE POTENCIA DEL MICROONDAS. Aunque aparezca la potencia en el display el horno seguirá contado el tiempo. El nivel de potencia aparecerá en el display mientras esté pulsando la tecla.
Funcionamiento del microondas Cocción al grill El elemento calefactor del grill de la cavidad del horno, sólo tiene un ajuste de potencia. Ejemplo: Para hacer una tostada de queso en 5 minutos usando sólo el GRILL: (Ponga la tostada en la rejilla alta). 1. Gire el mando de MODO DE COCCIÓN hasta la posición para seleccionar el GRILL. 2. Se elige la potencia deseada girando el mando de TIEMPO/PESO. 3. Se pulsa la tecla de START/QUICK una vez para empezar la cocción. x1 4. Comprobar el visualizador: 1.
Funcionamiento del microondas 185 2. Asegúrese de que el horno está vacío. Introduzca el tiempo de calentamiento necesario (20 mins.) 3. Pulse la tecla START/QUICK para que se inicie el calentamiento. x1 El tiempo disminuirá en el display. Cuando el horno haya terminado de calentarse, abra la puerta para que se enfríe su interior. ADVERTENCIA: La puerta, la caja exterior y el interior del horno estarán calientes. Tenga cuidado de no quemarse cuando vaya a enfriar el horno.
Funcionamiento del microondas 5. Use el mando de TIEMPO/PESO para introducir el tiempo de cocción (20mins). 6. Pulse la tecla START/QUICK. x1 7. Comprobar el visualizador: NOTAS: 1. Al precalentamiento, se debe dejar el plato giratorio en el horno. 2. Después del precalentamiento, si desea cocinar a una temperatura diferente pulse la tecla de REG. TEMP. CONVECCIÓN hasta que aparezca la temperatura deseada en el display.
Funcionamiento del microondas 187 NOTAS: 1. Después de su funcionamiento el horno se enfriará automáticamente, apareciendo en el display “AHORA ENFRIANDO”. 2. Para cambiar la temperatura de convección pulse la tecla de REG. TEMP. CONVECCIÓN hasta que aparezca la temperatura deseada en el display. 3. Cuando utilice el convección por primera vez puede que note humo u olor a quemado, esto es normal y no indica que el horno esté averiado. Consulte el apartado Calentamiento sin alimentos en la página anterior.
Funcionamiento del microondas 4. Pulse la tecla de CONVECCIÓN cuatro veces (200° C). x4 5. Pulse la tecla START/QUICK. x1 6. Comprobar el visualizador: Ejemplo 2: Cocinar durante 20 minutos en DUAL 2 utilizando una potencia de microondas de 90 W y el GRILL. 1. Gire el mando de MODO DE COCCIÓN hasta la posición para seleccionar el . 2. Introduzca el tiempo de cocción deseado (20 minutos). 3. Pulse dos veces la botón del NIVEL DE POTENCIA (90 W). x2 4. Pulse la tecla START/QUICK. x1 5.
Funcionamiento del microondas 189 Cuadros de cocción HORNEADO EN LA BANDEJA DE VIDRIO CON LA FUNCIÓN DE CONVECCIÓN Menu Tempo Quiche Precalentar 1) 20’00 2) 12’00 Tarta bizcocho de plátano Precalentar 60’00 Bizcocho de albaricoque Precalentar y nueces pecán 35’00 Tarta de cerezas y almendras Precalentar 40’00 Tarta de queso Precalentar 54’00 Pizza congelada Precalentar 12’00 Pan de ajo (baguette) Precalentar 15’00 Lasaña congelada Precalentar 25’00 Dulces pequeños (a partir de la Precalentar masa) (por
Recetas para la bandeja de vidrio RECETAS PARA LA BANDEJA DE VIDRIO Y CONVECCIÓN Bizcocho de plátano Precalentar el horno. 1. Engrasar todo el recipiente del bizcocho. 2. Batir la mantequilla junto con el azúcar. 3. Añadir el huevo y la esencia de café y batir de nuevo. 4. Pelar y machacar los plátanos y añadir a la mezcla; batir bien. 5. Mezclar con la harina, el bicarbonato sódico, la levadura y la leche hasta que quede una mezcla suave. 6. Colocar en el recipiente y alisar la superficie. 7.
Recetas para la bandeja de vidrio Tarta de cerezas y almendras 1. Engrasar todo el molde desmontable. 2. Batir la mantequilla y el azúcar hasta que quede una mezcla ligera y suave. 3. Batir los huevos uno por uno. 4. Mezclar la harina y la levadura, añadir las cerezas, las almendras, la esencia de almendra y la leche removiendo. 5. Echar la mezcla con la cuchara y alisar la superficie. 6. Colocar el recipiente en la bandeja de cristal, en la posición inferior. 40 Min.
Recetas para la bandeja de vidrio RECETAS PARA LA BANDEJA DE VIDRIO Y GRILL Sopa de cebolla 1. Cortar la cebolla en rodajas, colocar en un cuenco con el caldo, la sal y la pimienta, y cocinar durante 8 Min. 900 W 2. Poner la sopa en 4 cuencos. 3. Cortar el pan en dados y poner sobre la sopa; echar el queso por encima del pan. 4. Colocar los cuencos de sopa en la bandeja de cristal, en la posición inferior, y cocinar 71/2 Min.
Recetas para la bandeja de vidrio & Operación automática Sardinas/caballa a la parrilla 1. Mezclar todos los ingredientes del escabeche y repartir por el pescado; enfriar durante una hora. 2. Colocar en la rejilla en la bandeja de cristal, en la posición inferior. Cocinar las sardinas: 1. 5 Min. 90 W / GRILL, y dar la vuelta 2. 3 Min. 90 W / GRILL Cocinar la caballa: 1. 6 Min. 90 W / GRILL, y dar la vuelta 2. 6 Min.
Operación automática 4. Para empezar a cocinar pulse la tecla de START/QUICK. x1 Cuando debe intervenir el usuario (por ejemplo, para darle la vuelta a la comida), el horno se apaga y emite una señal acústica, indicando en la pantalla qué es lo que debe hacer. Pulse la tecla de START/QUICK. La temperatura final dependerá de la temperatura inicial. Compruebe que la comida está hecha y muy caliente. Si hace falta, puede ampliar el tiempo de cocción y cambiar el nivel de la potencia.
Tabla de programas 1.FRENCH FRIED POTATOES 8.CHICKEN LEGS 14.RICE 20.STEAK & CHOPS 195 29.CHICKEN PAN WITH VEGETABLES TABLA DE PROGRAMAS 2.FROZEN VEGETABLES 9.GRATIN 15.BOILED POTATOES 21.CHICKEN LEGS 30.MINCE AND ONION Cuadro de cocción automática MENÚ Nú. CANTIDAD (Unidad de incremento)/UTENSILIOS 0,1 - 0,3 kg (100 g) Bol grande con tapa 3.FRESH VEGETABLES ENCH FRIED OTATOES OZEN GETABLES ESH GETABLES AC-1 Arroz 8.CHICKEN LEGS 9.GRATIN 10.FROZEN GRATIN JACKET POTATOES 29.
Tabla de programas Cuadro de cocción automática desde congelación 1.FRENCH FRIED POTATOES 8.CHICKEN LEGS MENÚ Nú. 2.FROZEN VEGETABLES 9.GRATIN ACF-1 Cocción Comidas congeladas preparadas (Removibles) 20.STEAK & CHOPS 14.RICE CANTIDAD (Unidad de incremento)/UTENSILIOS 15.BOILED POTATOES 21.CHICKEN LEGS 10.FROZEN GRATIN 4.FISH FILLET+ SAUCE 11.FROZEN READY MEALS 16.JAM 23.MINCED MEAT 12.BEVERAGES 17.PIQUANTE CAKES 24.CAKE 5.GRILL SKEWER 1.
RATIN ROZEN RATIN 15.BOILED POTATOES 21.CHICKEN LEGS JACKET POTATOES 23.MINCED MEAT 16.JAM AD-1 Descongelación Bistec y chuletas CANTIDAD (Unidad de incremento)/UTENSILIOS 0,2 - 1,0 kg (100 g) Plato Cacerola (Ver la nota page 198.) 17.PIQUANTE 14.RICE CAKES 24.CAKE 20.STEAK & CHOPS 29.CHICKEN PAN WITH VEGETABLES OUP RATIN 18.CAKE 15.BOILED POTATOES 25.BREAD 21.CHICKEN LEGS 30.MINCE AND ONION ASSEROLES FROZEN HICKEN LEGS GRATIN 19.PASTA JACKET 14.RICE POTATOES 26.MEAT JOINT 22.POULTRY 20.
Tabla de programas IMPORTANTE: 1. Bistecs y chuletas deben congelarse en una sola capa. 2. La carne picada se debe congelar en pequeñas porciones. 3. Después de dar vuelta, proteger las partes descongeladas con trozos pequeños planos de lámina de aluminio. 4. Las aves se deben procesar inmediatamente después de su descongelación. 5. Los pasteles cubiertos y recubiertos de nata son muy sensibles a la potencia del microondas.
Tabla de programas 199 Recetas para cocción automática AC-5 Tarta de zanahorias 1. Untar el molde. 2. Batir, con la batidora de mano, las yemas y el azúcar para obtener una masa cremosa. 3. Añadir las zanahorias, el zumo de limón y las almendras. 4. Mezclar la harina y el polvo de hornear, añadir esta mezcla y remover bien. 5. Batir las claras para obtener una masa consistente e incorporar cuidadosamente. Pasar toda la masa al molde y hornear en la parrilla inferior. COCCIÓN AUTOMÁTICA AC-5. 6.
Tabla de programas Pastel de manzana con Calvados 1. Se mezcla la harina con la levadura en polvo. 200 g Se añade el azúcar, la vainilla azucarada, sal, 1 cuch. el huevo, el aceite de almendras amargas y la 100 g mantequilla y se amasa con el rollo pastelero 1 en una masa. 1 2. Se cubre la masa y se pone a enfriar durante 1 unos 30 minutos. 3-4 3. Se unta previamente el fodo del molde con un poco de mantequilla, se extiende la masa 125 g con el rodillo entre dos capas de papel de 1 cuch.
Limpieza & matenimiento 201 LIMPIEZA & MATENIMIENTO PRECAUCIÓN: NO UTILICE PRODUCTOS COMERCIALES PARA LA LIMPIEZA DE HORNOS, APARATOS DE LIMPIEZA A VAPOR, PRODUCTOS ABRASIVOS, PRODUCTOS FUERTES, NINGÚN PRODUCTO QUE CONTENGA HIDRÓXIDO DE SODIO NI ESTROPAJOS PARA LIMPIAR NINGUNA PARTE DEL HORNO. ADVERTENCIA: TRAS LOS MODOS DE GRILL, DUAL, CONVECCIÓN, COCCIÓN AUTOMÁTICA Y COCCIÓN AUTOMÁTICA DESDE CONGELACIÓN, LA CAVIDAD DEL HORNO, LA PUERTA, EL MUEBLE DEL HORNO Y LOS ACCESORIOS ESTARÁN MUY CALIENTES.
Nivel de potencia reducida NIVEL DE POTENCIA REDUCIDA IMPORTANTE: 1. Sacar la taza del horno y abrir la puerta. Si cocina el alimento pasándose del tiempo normal usando sólo el mismo modo de cocción, la potencia del horno disminuirá automáticamente para evitar un sobrecalentamiento. (El nivel de potencia del microondas se reducirá y las resistencias (grills) se encenderán y apagarán.) Modo de cocción 2. Tiempo normal Cocción con microondas al 900 W 20 min. Cocción con grill 15 min. Comb.
¿Qué hacer si . . . & Especificaciones 203 ¿QUÉ HACER SI . . . Síntoma Comprobaciones / consejos El aparato microondas no funciona correctamente? • Funcionen los fusibles de la caja de fusibles. • No haya habido algún corte de energía. • Si se siguen fundiendo los fusibles, póngase en contacto con un electricista homologado. El modo microondas • La puerta esté bien cerrada. no funciona? • El cierre hermético de la puerta y sus superficies estén limpios. • Se haya pulsado el botón START/QUICK.
Instalación INSTALACIÓN La microonda se puede caber en la posición A, B 0 C: Posición A B C Tamaño del habitáculo Chimenea Espacio entre el W D H (min) armario y el techo 560 x 550 x 450 560 x 500 x 450 560 x 550 x 460 20 20 20 50 50 No aplicable Chimenea Clip del cable min. 20 mm Medidas expresadas en (mm) Chimenea Clip del cable Posición A Posición A 450 mm Posición B D Horno convencional Horno convencional Posición C 450 mm Posición B Posición C 460 mm 65 mm 20 mm 5 mm 1.
Instalación 205 Conexión del aparato a la alimentación eléctrica • La salida eléctrica debería ser fácilmente accesible de forma que la unidad pueda desenchufarse fácilmente en caso de emergencia. O bien, debe ser posible aislar el horno de la alimentación eléctrica incorporando un interruptor en el cableado fijo, con arreglo a las normas de cableado. • La toma no debería estar situada detrás del armario. (A) • La mejor posición es encima del armario, véase (A).
Información medioambiental INFORMACIÓN MEDIOAMBIENTAL Desechar los materiales de embalaje y los aparatos viejos de un modo responsable con el medio ambiente Material de embalaje Los hornos microondas AEG vienen eficazmente embalados para protegerlos durante el transporte. Solo se utiliza el embalaje imprescindible. Los materiales de embalaje (p. ej. papel metalizado o espuma de estireno) pueden suponer un riesgo para los niños. Peligro de asfixia.
Certificado de garantia 207 Certificado de garantía, Estimado Usuario : Queremos felicitarle por su compra y agradecerle la confianza depositada en nuestra Compañía. Su electrodoméstico dispone de una garantía de 24 meses para piezas y mano de obra y de 6 meses para el desplazamiento.
Móvil: Solicitud del Plan de Ampliación de Garantía El Garantizado queda enterado que los datos que se recogen son necesarios para registrar su GarantÍa. La confidencialidad de esta información está protegida por la Ley. En caso de no estar de acuerdo en que estos datos sean cedidos a otras empresas para el envió de ofertas promocionales u otras, deberá señalarlo marcando con una cruz el espacio reservado para ello.
Condiciones de esta garantía comercial 209 Condiciones de esta garantía comercial Electrolux Home Products España, S.A. garantiza al usuario, dentro del territorio nacional español, por plazo de 2 años contados desde la fecha de entrega, el buen funcionamiento del aparato cuyos datos de identificación constan en el presente documento.
Índice PARA RESULTADOS PERFEITOS Obrigado por escolher este produto AEG. Criámo-lo para lhe oferecer um desempenho impecável durante vários anos, com tecnologias inovadoras que tornam a sua vida mais fácil – funcionalidades que poderá não encontrar em aparelhos convencionais. Continue a ler durante alguns minutos para tirar o máximo partido do produto.
Instruções de segurança importantes 211 INSTRUÇÕES DE SEGURANÇA IMPORTANTES INSTRUÇÕES DE SEGURANÇA IMPORTANTES: LEIA ATENTAMENTE E GUARDE PARA FUTURAS CONSULTAS Para evitar riscos de incêndio Não se afaste do forno micro-ondas quando este estiver em funcionamento. Os níveis de potência demasiado elevados e os tempos de cozedura maiores podem sobreaquecer os alimentos, dando origem a um incêndio.
Instruções de segurança importantes Não deixe acumular gordura ou sujidade nas juntas da porta e peças adjacentes. Siga as instruções em "Cuidados e Limpeza" na Página 242. Se não fizer uma manutenção cuidadosa do seu forno isso poderá resultar em uma deterioração da superfície o que poderá afectar negativamente a vida útil do aparelho e conduzir a uma situação de perigo.
Instruções de segurança importantes 213 Corte os alimentos recheados depois de os cozinhar para libertar o vapor e evitar queimaduras. Deve manter as crianças afastadas do forno de modo a evitar eventuais queimaduras.
Descrição geral do aparelho DESCRIÇÃO GERAL DO APARELHO Forno microondas e acessórios 1 2 4 3 1 5 11 6 10 1 9 8 1 7 Pontos de fixação (4 pontos) Elemento de aquecimento do Grill Elemento de aquecimento de convecção 14 Lâmpada do forno Painel de controlo Calhas para o tabuleiro 15 Protecção da guia de onda Cavidade do forno Retentor Juntas da porta e superfícies isolantes Pega da porta Orifícios de ventilação Estrutura exterior Cabo de alimentação Clip de suporte do cabo de alimentação C
Descrição geral do aparelho & Antes da primeira utilização 215 IMPORTANTE: • Utilize sempre o forno com o prato giratório e o suporte devidamente encaixados, para obter uma cozedura uniforme. Se o prato giratório não estiver bem colocado pode oscilar, não rodar correctamente e danificar o forno. • O prato giratório pode rodar em ambos os sentidos. A direcção da rotação pode mudar sempre que utiliza o forno. Este facto não afecta de forma alguma a cozedura.
Antes da primeira utilização NOTE: Não fizer nada passados 3 minutos o forno desliga-se automaticamente. Neste momento ainda não aparece nada no visor. Para o ligar de novo, abra a porta. 4. Aqueça o forno sem qualquer alimento (Ver página 225 - 226). TRUQUES PARA A UTILIZAÇÃO DO FORNO: O forno possui um “Information Display System” que lhe apresenta instruções, passo a passo, para o orientar em cada uma das funções e que lhe permitem obter informações no idioma escolhido.
Cozinhar conselhos micro-ondas 217 COCCIÓN TECNICAS MICROONDAS Cocción microondas Para cocinar o descongelar alimentos en un horno microondas, la energía microondas debe ser capaz de atravesar el recipiente para penetrar en los alimentos. Por lo tanto es importante elegir recipientes adecuados. Los platos redondos u ovalados son mejores que los cuadrados o alargados, ya que los alimentos situados en las esquinas suelen quedar demasiado hechos.
Cozinhar conselhos micro-ondas Utensilios de cocina aptos para microondas Recipientes Papel de aluminio y recipientes de papel de aluminio Fuentes refractarias Loza y cerámica Cristalería (p. ej. Pyrex ®) Metal Plásticos ypoliestireno (p. ej.
Cozinhar conselhos micro-ondas 219 Recipientes apropriados para micro-ondas Grill Combinado Microondas Convecção X X X X X - - - Vitrocerâmica fabricada com material resistente ao fogo e à congelação (ex.
Funcionamento do forno microondas FUNCIONAMIENTO DEL MICROONDAS Cocción microondas Con las operaciones manuales podrá programar el horno para un máximo de 90 minutos. La unidad de ingreso de tiempo de cocción puede variar entre 10 segundos y cinco minutos. Depende del tiempo total de cocción, tal como se enseña en la tabla.
Funcionamento do forno microondas 221 Exemplo: Suponhamos que pretendia aquecer sopa durante 2 minutos e 30 segundos a uma potência de 630 W. 1. Rode o manípulo MODO DE COZEDURA para a posição micro-ondas. 2. Escolha o modo de cozedura desejado carregando no botão TEMPORIZADOR/PESO uma vez (apenas micro-ondas). 3. Prima o botão do NÍVEL DE POTÊNCIA DO MICRO-ONDAS duas vezes para obter uma potência de 630 W. x2 4. Prima o botão START/QUICK uma vez para iniciar o processo de cozedura. x1 5.
Funcionamento do forno microondas Funcãõ de cozedura rápida O botão START/QUICK permite-lhe aceder às funções seguintes: a. Cozedura em 30 segundos Pode cozinhar no modo de cozedura pretendido, durante 30 segundos, sem ter de seleccionar o tempo de cozedura. Exemplo: Para cozinhar durante 30 segundos, com uma potência de micro-ondas de 630 W. 1. Seleccione o modo de cozedura rodando o manípulo MODO DE COZEDURA para (micro-ondas). 2.
Funcionamento do forno microondas 223 Botão menos/mais Os botões MENOS ( M ) e MAIS ( L ) permitem-lhe diminuir ou aumentar os tempos programados com toda a facilidade (para um resultado mais ou menos bem passado), durante o processo de cozedura. a) Escolher Cozedura Automática com Menos/Mais: Prima os botões MENOS ( M ) e MAIS ( L ) depois de seleccionar o peso e antes de premir o botão START/QUICK. (Ver os modos de cozedura para menus que utilizam Menos e Mais).
Funcionamento do forno microondas Para verificar as definições com o forno em funcionamento Pode verificar o nível de potência e a temperatura actual do forno (por exemplo, durante o pré-aquecimento). PARA VERIFICAR O NÍVEL DE POTÊNCIA: Para verificar o nível de potência do micro-ondas durante a cozedura, prima o botão NÍVEL DE POTÊNCIA DO MICRO-ONDAS. O forno continua a contagem decrescente, apesar do visor indicar o nível de potência.
Funcionamento do forno microondas 225 Cozedura grill O elemento de aquecimento do grill, na parte superior da cavidade do forno, só tem um nível de potência. Exemplo: Para torrar pão com queijo durante 5 minutos (coloque o pão na grelha alta). 1. Rode o manípulo MODO DE COZEDURA para a posição GRILL. 2. Introduza o tempo de cozedura pretendido rodando o manípulo TEMPORIZADOR/PESO. 3. Prima o botão START/QUICK uma vez para iniciar o processo de cozedura. x1 4. Verifique o visor: Important: 1.
Funcionamento do forno microondas 2. Seleccione o tempo de aquecimento necessário (20 min.). 3. Inicie a cozedura premindo o botão START/QUICK. x1 O forno inicia uma contagem decrescente. Quando o processo de cozedura terminar, abra a porta do forno para deixar arrefecer o seu interior. IMPORTANTE: A porta do forno, exterior e cavidade do forno aquecem muito. Tome as medidas necessárias para evitar queimaduras para deixar o forno arrefecer depois da utilização.
Funcionamento do forno microondas 227 5. Utilize o manípulo TEMPORIZADOR/PESO para seleccionar o tempo de cozedura (20 min.). 6. Prima o botão START/QUICK. x1 7. Verifique o visor: NOTAS: 1. No modo de pré-aquecimento, o prato giratório deve estar no interior do forno. 2. Depois do pré-aquecimento, se quiser cozinhar a uma temperatura diferente, prima o botão CONVECÇÃO até surgir a definição pretendida no visor.
Funcionamento do forno microondas NOTAS: 1. Após a cozedura, o forno inicia um processo automático de arrefecimento e o visor indica “A ARREFECER”. 2. Para alterar a temperatura de convecção, prima o botão CONVECÇÃO até a temperatura pretendida surgir no visor. 3. Pode detectar algum fumo ou o cheiro a queimado quando estiver a usar a convecção pela primeira vez. É uma situação normal e não indica qualquer avaria (Ver “Aquecer sem Alimentos”, na página 225 - 226).
Funcionamento do forno microondas 229 4. Prima o botão CONVECÇÃO quatro vezes (200 ºC). x4 5. Prima o botão START/QUICK. x1 6. Verifique o visor: Exemplo 2: Para cozinhar durante 20 minutos no modo DUPLO 2, utilizando uma potência de micro-ondas de 90 W e o GRILL. 1. Seleccione o MODO DE COZEDURA rodando o manípulo do modo de cozedura para . 2. Seleccione o tempo de cozedura pretendido (20 min.). 3. Prima o botão do NÍVEL DE POTÊNCIA MICRO-ONDAS duas vezes (90 W). x2 4. Prima o botão START/QUICK.
Funcionamento do forno microondas Tabelas de Cozedura COZEDURA UTILIZANDO O TABULEIRO DE VIDRO NO MODO DE CONVECÇÃO MENU TEMPO Quiche Pré-aqueça 1) 20’00 2) 12’00 Bolo de Banana Pré-aqueça 60’00 Tarte de Damasco e Pré-aqueça Nozes Pecan 35’00 Bola de Cerejas e Amêndoa Pré-aqueça 40’00 Tarte de Queijo Pré-aqueça 54’00 Pizza Congelada Pré-aqueça 12’00 Pão de Alho Pré-aqueça 15’00 Lasanha Congelada Pré-aqueça 25’00 Pastelaria (com massa) Pré-aqueça (ex.
Receitas para o tabuleiro de vidro 231 RECEITAS PARA O TABULEIRO DE VIDRO E MODO DE CONVECÇÃO Bolo de Banana Pré-aqueça o forno. 1. Unte e forre a tarteira. 2. Bata a manteiga com o açúcar. 3. Adicione o ovo e a essência de café, continuando a mexer. 4. Descasque e esmague as bananas, juntandoas ao preparado. 5. Misture a farinha, o bicarbonato de sódio, o fermento e por fim o leite, até obter uma massa cremosa. 6. Despeje sobre a tarteira e alise a superfície. 7.
Receitas para o tabuleiro de vidro Bolo de Cerejas e Amêndoa 1. Unte e forre uma forma de mola com papel vegetal. 2. Bata a margarina com o açúcar até obter um creme leve e fofo. 3. Vá incorporando os ovos, um de cada vez. 4. Envolva a farinha e o fermento, junte as cerejas, a amêndoa moída, a essência e, por fim, o leite. 5. Deite o creme sobre a forma e alise a superfície. 6. Coloque a forma sobre o tabuleiro de vidro, na posição inferior. 40 Min.
Receitas para o tabuleiro de vidro 233 RECEITAS PARA O TABULEIRO DE VIDRO E MODO DE GRILL Sopa de Cebola 1. Corte as cebolas às rodelas, coloque-as numa tigela com o caldo e tempere com sal e pimenta. Cozinhe durante 8 Min. 900 W 2. Divida a sopa por 4 tigelas individuais. 3. Corte o pão torrado em cubos e coloque-os por cima da sopa. Depois coloque o queijo por cima do pão. 4. Coloque as tigelas sobre o tabuleiro de vidro, na posição inferior e cozinhe durante 71/2 Min.
Receitas para o tabuleiro de vidro & Operações Automáticas Sardinhas/ Sardas Assadas 1. Misture todos os ingredientes para a marinada e espalhe por cima do peixe. Deixe marinar durante uma hora. 2. Coloque o peixe na grelha, sobre o tabuleiro de vidro, na posição inferior. Assar sardinhas: 1. 5 Min. 90 W / GRILL, virar 2. 3 Min. 90 W / GRILL Makrelen garen: 1. 6 Min. 90 W / GRILL, virar 2. 6 Min.
Operações Automáticas 4. Para iniciar a cozedura prima o botão START/QUICK. x1 Sempre que for necessário efectuar alguma operação durante a cozedura (ex.: voltar os alimentos), o forno pára, ouve-se um sinal sonoro e o visor apresenta a acção necessária. Para reiniciar a cozedura, prima o botão START/QUICK. A temperatura final irá variar de acordo com a temperatura inicial. Terminada a cozedura, verifique se os alimentos estão bem quentes.
Gráficos de programas GRÁFICOS DE PROGRAMAS 1.FRENCH FRIED POTATOES 8.CHICKEN LEGS 14.RICE 20.STEAK & CHOPS 29.CHICKEN PAN WITH VEGETABLES Tabela de cozedura automática 2.FROZEN VEGETABLES 9.GRATIN N.º MENU AC-1 Arroz 15.BOILED POTATOES 0,1 - 0,3 kg (100 g) Tigela grande e tampa 8.CHICKEN LEGS 3.FRESH 10.FROZEN 14.RICEVEGETABLES 20.STEAK GRATIN & CHOPS OZEN GETABLES 9.GRATIN 11.FROZEN 16.JAM 4.FISH FILLET+ SAUCE GRATINATED FISH 21.CHICKEN LEGS 15.BOILED READY MEALS30.
Gráficos de programas 1.FRENCH FRIED POTATOES 8.CHICKEN LEGS 14.RICE 20.STEAK & CHOPS 237 29.CHICKEN PAN WITH VEGETABLES Tabela de cozedura automática decongelados N.º MENU 2.FROZEN VEGETABLES 9.GRATIN ACF-1 Cozedura Refeições Preparadas Congeladas (Que se possam mexer) PESO (Unidade de Aumento)/ UTENSÍLIOS 0,3 - 1,0 kg* (100 g) Tigela com tampa 15.BOILED POTATOES 21.CHICKEN LEGS 3.FRESH VEGETABLES 10.FROZEN GRATIN 4.FISH FILLET+ SAUCE 11.FROZEN READY MEALS 16.JAM 23.MINCED MEAT 12.
RATIN ROZEN GRATIN 15.BOILED POTATOES 238 21.CHICKEN LEGS Tabela de descongelação automática JACKET POTATOES 22.POULTRY N.º MENU ROZEN EADY MEALS HICKEN LEGS 16.JAM 23.MINCED MEAT AD-1 Descongelação Bifes e Costeletas 14.RICE 20.STEAK & CHOPS 24.CAKE 17.PIQUANTE CAKES RATIN 15.BOILED POTATOES 18.CAKE 25.BREAD JACKET 14.RICE POTATOES 19.PASTA 22.POULTRY 20.STEAK & CHOPS 26.MEAT JOINT 16.JAM 15.BOILED POTATOES 23.MINCED MEAT 21.
Gráficos de programas 239 IMPORTANTE: Descongelação Automática 1. Os bifes e costeletas devem ser congelados numa única camada. 2. A carne picada deve ser congelada numa camada fina. 3. Depois de voltar os alimentos, proteja as porções já descongeladas com pedaços de folha de alumínio. 4. A carne de aves deve ser cozinhada de imediato uma vez descongelada. 5. Os bolos cobertos ou revestidos com chantily são muito sensíveis à energia de microondas.
Gráficos de programas Receitas para cozedura automática AC-5 Bolo de Cenoura 1. Unte a forma. 2. Bata as gemas com o açúcar. 3. Adicione as cenouras, o sumo de limão e a amêndoa. 4. Misture a farinha com o fermento, adicione ao preparado anterior e misture bem. 5. Bata as claras em castelo e envolva-as à mistura. Despeje a mistura na forma e coloque-a sobre a grelha baixa. Cozinhe utilizando COZEDURA AUTOMÁTICA AC-5. 6. Após a cozedura, deixe arrefecer na forma durante 5 minutos.
Gráficos de programas 241 Tarte de Maçã com Calvados 1. Misture a farinha com o fermento. Adicione 200 g o açúcar, o açúcar baunilhado, o sal, o ovo, a 1 c/chá amêndoa amarga e a manteiga e amasse até 100 g obter uma massa consistente. 1 saqueta 2. Tape a massa e deixe repousar num local 1 pitada fresco durante cerca de 30 minutos. 1 3. Unte a tarteira. Desenrole a massa entre 3-4 gotas duas folhas de película aderente e transfira-a 125 g para a tarteira.
Cuidados e Limpeza CUIDADOS E LIMPEZA CUIDADO: NÃO UTILIZE PRODUTOS DE LIMPEZA PARA FORNOS, PRODUTOS DE LIMPEZA À BASE DE VAPOR, PRODUTOS DE LIMPEZA ABRASIVOS OU AGRESSIVOS OU QUE CONTENHAM HIDRÓXIDO DE SÓDIO OU ESFREGÕES PARA LIMPAR O SEU FORNO MICRO-ONDAS. AVISO: Ao utilizar os modos GRILL, DUPLO, CONVECÇÃO, COZEDURA AUTOMÁTICA, COZEDURA AUTOMÁTICA DE CONGELADOS a cavidade do forno, a porta, a estrutura e os acessórios ficam muito quentes.
Nível de potência reduzida 243 NÍVEL DE POTÊNCIA REDUZIDA IMPORTANTE: 1. Se cozinhar os alimentos para além do tempo normal, apenas a 900 W, a potência do forno é reduzida automaticamente para evitar o sobreaquecimento (o nível de potência do micro-ondas é reduzido). Modo de cozedura Tempo normal Cozedura 900 W com Micro-ondas 20 min. Cozedra grill 15 min. Duplo 1 Micro - 40 min. Duplo 2 (900 W potência do micro-ondas) Micro - 15 min. Duplo 2 (630 W potência do micro-ondas) Micro - 40 min.
O que fazer se . . . e Especificações O QUE FAZER SE . . . Sintoma Verific se O micro-ondas não estiver • Os fusíveis incluídos na caixa de fusíveis estão a funcionar. a funcionar correctamente? • Não houve nenhum corte de energia. • Se os fusíveis continuarem a rebentar, contacte um electricista qualificado. O modo de micro-ondas • A porta está devidamente fechada. não estiver a funcionar? • As juntas da porta e as superfícies estão limpas. • Premiu o botão START/QUICK.
Instalação 245 INSTALAÇÃO A microonda pode ser cabida em posição A, B ou C: Posição Dimensões do armário Chaminé Intervalo entre o B T H (min) armário e o tecto A B C 560 x 550 x 450 560 x 500 x 450 560 x 550 x 460 20 20 20 50 50 Não Aplicável Chaminé Posição A Posição B Clip do cabo Posição A 450 mm Chaminé Clip do cabo min. 20 mm Medidas em (mm) D Forno convencional Forno convencional Posição C 450 mm Posição B Posição C 460 mm 65 mm 20 mm 5 mm 1.
Instalação Ligação do aparelho à alimentação • A tomada deve estar situada num local acessível para que a unidade possa ser desligada facilmente numa situação de emergência. Em alternativa, poderá isolarse o forno da corrente através da montagem de um interruptor na instalação fixa em conformidade com os regulamentos de instalações eléctricas. • A tomada não deve estar localizada por trás do armário. • A posição ideal é por cima do armário, ver (A).
Informações ambientais 247 INFORMAÇÕES AMBIENTAIS Eliminação responsável em termos ecológicos das embalagens e aparelhos antigos Material de embalagem Os fornos a micro-ondas da AEG necessitam de uma embalagem eficaz para os proteger durante o transporte. Só são utilizadas as embalagens realmente necessárias. O material de embalagem (ex.: película transparente ou esferovite) pode colocar as crianças em risco. Perigo de asfixia. Mantenha o material de embalagem longe das crianças.
Certificado de garantia Certificado de garantia, Estimado Cliente Queremos felicitá-lo pela sua compra e agradecer a confiança depositada na nossa Empresa. O seu electrodoméstico possui uma garantia de 24 meses para peças, mão-de-obra e deslocações. Para beneficiar desta garantia NÃO ESQUEÇA DE GUARDAR A FACTURA DE COMPRA. Em caso de avaria contacte o Serviço Técnico Oficial 21 440 39 39 ...
Cidade: Plano de Prolongamento de Garantia Visa Vale postal Mastercard N° do Cartão: O cheque nominal/vale postal a favor de DOMESTIC & GENERAL, Apartado de Correio 3206 1301-903 LISBOA Tipo de Aparelho: Assinatura: . . . . . . . . . . . . . . . . . . Data: . . . . . . . . . . . . . . . . . . . . . . Validade: O Contratante desta Garantia tem conhecimento de que os dados recolhidos são necessários para o registo do seu aparelho e que a sua confidencialidade está protegida por Lei.
Condições de garantia Condições de garantia 1. O aparelho que acaba de adquirir possui uma garantia de 2 anos a partir da data de aquisição. Os pedidos de assistência na garantia são gratuitos, mediante apresentação do respectivo certificado juntamente com a factura de compra. 2. A presente garantia do fabricante (2 anos) cobre a substituição de peças, mão-de-obra e deslocação. 3.
www.electrolux.com u Albania Belgique/België/ Belgien ˘ Ceská republika Danmark Deutschland Eesti España +35 5 4 261 450 +32 2 363 04 44 Rr. Pjeter Bogdani Nr. 7 Tirane Bergensesteenweg 719, 1502 Lembeek +420 2 61 12 61 12 +45 70 11 74 00 +49 180 32 26 622 +37 2 66 50 030 +34 902 11 63 88 ˘ Budejovická 3, Praha 4, 140 21 Strevelinsvej 38-40, 7000 Fredericia Muggenhofer Str. 135, 90429 Nürnberg Mustamäe tee 24, 10621 Tallinn Carretera M-300, Km.
www.aeg-electrolux.