
User Guide


7
Starting up and temperature regulation
Wash the inside of the appliance with lukewarm water with a little bicar-
bonate of soda added (5ml to 0,5 litre of water). Do not use soap or deter-
gent as the smell may linger. Dry the appliance thoroughly.
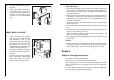
• When the refrigerator compartment door is opened, the internal lighting
is switched on. The temperature control knob is located on the right hand
side of the refrigerator compartment.
Setting “0”: Off.
Setting “1”: Hightest temperature, (warmest setting).
Setting “6” (end-stop) : Lowest temperature, (coldest setting).
The exact setting should be chosen keeping in mind that the temperature
inside the refrigerator depends on:
-the quantity of food stored
-how often the door is opened
The temperatures in the refrigerator compartment and freezer compart-
ment cannot be independently regulated.
If you want to freeze fresh food rapidly, select setting “6”, ensuring that the
temperature in the refrigerator compartment does not drop below 0°C. You
should reset the temperature control knob to setting “3” or “4”, if this does
occur.
As soon as the fresh food placed in the freezer has frozen, return the tem-
perature control knob to “3” or “4”.
Important!
High ambient temperatures (e.g. on hot summer days) and a cold setting on
the temperature regulator (position"5" to "6") can cause the compressor to
run continuously.
If this happens, turn the temperature regulator back to a warmer setting
(position "3" to "4"). At this setting the compressor will be switched on and
off as usual and automatic defrosting recommenced.
18
Positioning
For this appliance to work efficiently, it must not be located where the
temperatures will fall below 10°C (50°F) or rise above 32°C (90°F), e.g.
conservatories.
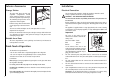
For correct operation this appliance
must be located in a dry atmosphere,
away from heat sources, e.g. cookers,
radiators, boilers and direct sunlight.
You should also ensure that air can
circulate freely around the back and
the top of the cabinet. There should
be 100mm (4”) between the top of
the cabinet and any overhanging
kitchenfurniture. Alternatively allow
50mm (2”) between the top of the
cabinet and any overhanging
kitchen furniture and a gap of
25mm (1”) on either side of the
appliance.
Do not obstruct the space under-
neath. The back of the cabinet may
be placed close to the wall but must
not touch it. DO NOT install in places
with restricted ventilation.
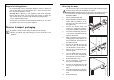
Adjust the level of the appliance by
screwing out the adjustable foot, or
feet, at the bottom of the cabinet
using your fingers.
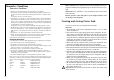
100 mm10 mm
10 mm
NP007
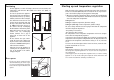
Rear spacers
Fit the rear spacers contained in the
documentation bag to ensure escape
of heat generated during operation.
Proceed in the sequence illustrated in
figures.
D594
D200