
User Guide


25
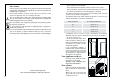
12. Dismantle the handles by sliding
the handle-cover, by unscrewing
its side and middle screws and
reassemble them on the opposite
side. Cover the holes left open
with the plugs contained in the
documentation pack.
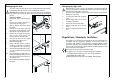
Attention:
After having reversed the opening
direction of the doors check that all
the screws are properly tightened
and that the magnetic seal adheres
to the cabinet. If the ambient tem-
perature is cold (i.e. in Winter), the
gasket may not fit perfectly to the
cabinet. in that case, wait for the
natural fitting of the gasket or acce-
lerate this process by heating up the
part involved with a normal hair-
drier.
Electrical connection
Before initial start-up, refer to the appliance rating plate to ascertain if sup-
ply voltage and current values correspond with those of the mains at the
installation location.
e.g.: AC 220 ... 240 V 50 Hz or
220 ... 240 V~ 50 Hz
(i.e. 220 to 240 volts alternating current, 50 Hertz)
The rating plate is inside the appliance on the left.
A correctly installed, earthed socket is required for the electrical supply. The
supply must have a fuse rating of at least 10 Amps.
If the socket is not accessible once the appliance is built in, the electrical
installation must include suitable means of isolating the appliance from the
mains (e.g. fuse, cut-out, current trip or similar with a minimum contact
separation of 3 mm).
Attention: The mains connection cable may only be replaced by a skilled
electrician. Please contact your dealer or our customer service department
for repairs.
Prior to Initial Start–Up
• Please clean the appliance interior and all accessories prior to initial start-
up (see section: “Cleaning and Care”).
1
2
32
Interior lighting does not
work.
Light bulb is defective. Please look in the "Changing
the Light Bulb" section.
Heavy build up of frost, possi-
bly also on the door seal.
Door seal is not air tight (pos-
sibly after changing over the
hinges).
Carefully warm the leaking
sections of the door seal with
a hair dryer (not hotter than
approx. 50 °C). At the same
time shape the warmed door
seal by hand such that it sits
correctly.
Unusual noises.
The appliance is touching the
wall or other objects.
Appliance is not level.
A component, e.g. a pipe, on
the rear of the appliance is
touching another part of the
appliance or the wall.
The compressor starts after a
period of time.
This is normal, no error has
occurred.
The compressor does not start
immediately after changing
the temperature setting.
If necessary, carefully bend
the component out of the
way.
Move the appliance slightly.
Readjust the feet.
See the "Cleaning and Care"
section.
Water on the floor or on sto-
rage shelves.
Water drain hole is blocked.
Malfunction Possible Cause Remedy
The food is too warm.
The appliance is near a heat
source.
Temperature is not properly
adjusted.
Please look in the "Initial Start
Up" section.
Turn the temperature regula-
tor to a colder setting tempo-
rarily.
Door was open for an exten-
ded period.
Please look in the "Installation
location" section.
A large quantity of warm
food was placed in the
appliance within the last 24
hours.
Open the door only as long as
necessary.