S71440TSW0 EN REFRIGERATOR EL ΨΥΓΕΊΟ IT FRIGORIFERO USER MANUAL ΟΔΗΓΊΕΣ ΧΡΉΣΗΣ ISTRUZIONI PER L’USO 2 21 41
FOR PERFECT RESULTS Thank you for choosing this AEG product. We have created it to give you impeccable performance for many years, with innovative technologies that help make life simpler – features you might not find on ordinary appliances. Please spend a few minutes reading to get the very best from it. ACCESSORIES AND CONSUMABLES In the AEG webshop, you’ll find everything you need to keep all your AEG appliances looking spotless and working perfectly.
Contents 3 CONTENTS 4 6 7 7 9 11 13 15 15 20 Safety information Operation First use Daily use Helpful hints and tips Care and cleaning What to do if… Technical data Installation Environmental concerns The following symbols are used in this user manual: Important information concerning your personal safety and information on how to avoid damaging the appliance.
Safety information SAFETY INFORMATION In the interest of your safety and to ensure the correct use, before installing and first using the appliance, read this user manual carefully, including its hints and warnings. To avoid unnecessary mistakes and accidents, it is important to ensure that all people using the appliance are thoroughly familiar with its operation and safety features.
Safety information 5 • It is dangerous to alter the specifications or modify this product in any way. Any damage to the cord may cause a short-circuit, fire and/or electric shock. WARNING! Any electrical component (power cord, plug, compressor) must be replaced by a certified service agent or qualified service personnel. • • • • 1. Power cord must not be lengthened. 2. Make sure that the power plug is not squashed or damaged by the back of the appliance.
Operation Installation For electrical connection carefully follow the instructions given in specific paragraphs. • Unpack the appliance and check if there are damages on it. Do not connect the appliance if it is damaged. Report possible damages immediately to the place you bought it. In that case retain packing. • It is advisable to wait at least four hours before connecting the appliance to allow the oil to flow back in the compressor.
First use 7 • turn the Temperature regulator toward higher settings to obtain the maximum coldness. A medium setting is generally the most suitable. However, the exact setting should be chosen keeping in mind that the temperature inside the appliance depends on: • room temperature • how often the door is opened • the quantity of food stored • the location of the appliance.
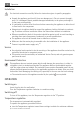
Daily use Thawing Deep-frozen or frozen food, prior to being used, can be thawed in the refrigerator compartment or at room temperature, depending on the time available for this operation. Small pieces may even be cooked still frozen, directly from the freezer: in this case, cooking will take longer. Movable shelves The walls of the refrigerator are equipped with a series of runners so that the shelves can be positioned as desired. this appliance is sold in France.
Helpful hints and tips 9 Positioning the door shelves To permit storage of food packages of various sizes, the door shelves can be placed at different heights. To make these adjustments proceed as follows: gradually pull the shelf in the direction of the arrows until it comes free, then reposition as required. HELPFUL HINTS AND TIPS Normal Operating Sounds • You may hear a faint gurgling and a bubbling sound when the refrigerant is pumped through the coils or tubing. This is correct.
Helpful hints and tips • position food so that air can circulate freely around it Hints for refrigeration Useful hints: Meat (all types) : wrap in polythene bags and place on the glass shelf above the vegetable drawer. For safety, store in this way only one or two days at the most. Cooked foods, cold dishes, etc..: these should be covered and may be placed on any shelf. Fruit and vegetables: these should be thoroughly cleaned and placed in the special drawer(s) provided.
Care and cleaning 11 CARE AND CLEANING CAUTION! Unplug the appliance before carrying out any maintenance operation. This appliance contains hydrocarbons in its cooling unit; maintenance and recharging must therefore only be carried out by authorized technicians. Periodic cleaning The equipment has to be cleaned regularly: • clean the inside and accessories with lukewarm water and some neutral soap. • regularly check the door seals and wipe clean to ensure they are clean and free from debris.
Care and cleaning It is important to periodically clean the defrost water drain hole in the middle of the refrigerator compartment channel to prevent the water overflowing and dripping onto the food inside. Use the special cleaner provided, which you will find already inserted into the drain hole. Defrosting the freezer A certain amount of frost will always form on the freezer shelves and around the top compartment. Defrost the freezer when the frost layer reaches a thickness of about 3-5 mm.
What to do if… 13 If the cabinet will be kept on, ask somebody to check it once in a while to prevent the food inside from spoiling in case of a power failure. WHAT TO DO IF… WARNING! Before troubleshooting, disconnect the mains plug from the mains socket. Only a qualified electrician or competent person must do the troubleshooting that is not in this manual. There are some sounds during normal use (compressor, refrigerant circulation).
What to do if… Problem Possible cause Solution Water flows on the ground. The melting water outlet does not flow in the evaporative tray above the compressor. The temperature in the appliance is too low. The temperature regulator is not Set a higher temperature. set correctly. The temperature in the appliance is too high. The temperature regulator is not Set a lower temperature. set correctly. Attach the melting water outlet to the evaporative tray. The door is not closed correctly.
Technical data 15 TECHNICAL DATA Dimension Height 850 mm Width 595 mm Depth 635 mm Rising Time 11 h The technical information are situated in the rating plate on the internal left side of the appliance and in the energy label. INSTALLATION WARNING! Read the "Safety Information" carefully for your safety and correct operation of the appliance before installing the appliance.
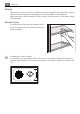
Installation Location 15mm 15mm 100mm The appliance should be installed well away from sources of heat such as radiators, boilers, direct sunlight etc. Ensure that air can circulate freely around the back of the cabinet.To ensure best performance, if the appliance is positioned below an overhanging wall unit, the minimum distance between the top of the cabinet and the wall unit must be at least 100 mm . Ideally, however, the appliance should not be positioned below overhanging wall units.
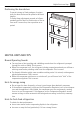
Installation 17 Detaching the worktop To remove the worktop, please proceed as follows: 1. Unscrew left and right screws at the front. 2. Unscrew left and right screws at the back. 3. Lift the worktop slightly at the front, push back about 20 mm and lift off from the front. 4. Unscrew left and right screws at the back. 5. Store the screws in a safe place together with the worktop.
Installation 3. 4. 5. Unscrew both adjustable feet. Unscrew the screws of the door bottom hinge. Take off the appliance door by pulling it slightly downwards. 6. Unscrew the top door hinge pin of the appliance then screw it back on the other side. 7. Fit the appliance door on the upper door hinge pin. 8. Remove the lower hinge. Put over the pin in the direction of the arrow. 9. Unscrew and install the screw on the opposite side. 10.
Installation 19 Reversibility of the freezer door 180˚ Plug socket CAUTION! Make sure that the mains cable can move freely. The plug socket necessary for connection of your appliance to the electricity supply should be positioned so that it is possible to pull out the appliance plug. If your appliance is installed under a continuous worktop, the plug socket should be provided as shown.
Environmental concerns The manufacturer declines all responsibility if the above safety precautions are not observed. This appliance complies with the E.E.C. Directives. ENVIRONMENTAL CONCERNS The symbol on the product or on its packaging indicates that this product may not be treated as household waste. Instead it should be taken to the appropriate collection point for the recycling of electrical and electronic equipment.
ΓΙΑ ΑΡΙΣΤΑ ΑΠΟΤΕΛΕΣΜΑΤΑ Σας ευχαριστούμε που επιλέξατε αυτό το προϊόν της AEG. Το σχεδιάσαμε για να σας παρέχει άψογη απόδοση για πολλά χρόνια, με πρωτοποριακές τεχνολογίες που θα κάνουν τη ζωή σας πιο απλή και με χαρακτηριστικά που ενδεχομένως δεν θα βρείτε σε κοινές συσκευές. Σας παρακαλούμε να αφιερώσετε λίγα λεπτά και να διαβάσετε τις οδηγίες, ώστε να διασφαλίσετε την καλύτερη δυνατή χρήση της συσκευής σας.
Περιεχόμενα ΠΕΡΙΕΧΌΜΕΝΑ 23 26 27 27 29 31 33 35 35 40 Πληροφορίες ασφαλείας Λειτουργία Πρώτη χρήση Καθημερινή χρήση Χρήσιμες συμβουλές Φροντίδα και καθάρισμα Τι να κάνετε αν... Τεχνικά χαρακτηριστικά Εγκατάσταση Περιβαλλοντικά θέματα Τα παρακάτω σύμβολα χρησιμοποιούνται σε αυτό το εγχειρίδιο χρήσης: Σημαντικές πληροφορίες που αφορούν την ασφάλειά σας και πληροφορίες σχετικά με την αποφυγή ζημιάς στη συσκευή.
Πληροφορίες ασφαλείας 23 ΠΛΗΡΟΦΟΡΊΕΣ ΑΣΦΑΛΕΊΑΣ Χάρη της ασφάλειάς σας και για να εξασφαλιστεί η σωστή χρήση, πριν την εγκατάσταση και την πρώτη χρήση της συσκευής, διαβάστε προσεκτικά αυτό το εγχειρίδιο χρήστη, συμπερι‐ λαμβανομένων των συμβουλών και των προειδοποιήσεών του. Για την αποφυγή περιττών λαθών και ατυχημάτων, είναι σημαντικό να εξασφαλίσετε ότι όλα τα άτομα που χρησιμο‐ ποιούν τη συσκευή γνωρίζουν καλά τη λειτουργία της και τα χαρακτηριστικά ασφαλείας της.
Πληροφορίες ασφαλείας 24 Κατά τη μεταφορά και εγκατάσταση της συσκευής, βεβαιωθείτε ότι δεν προκαλείται ζημιά σε κανένα εξάρτημα του κυκλώματος ψυκτικού υγρού. Εάν προκληθεί ζημιά στο κύκλωμα ψυκτικού υγρού: – αποφύγετε τις γυμνές φλόγες και τις πηγές ανάφλεξης – εξαερίστε καλά το χώρο στον οποίο βρίσκεται η συσκευή • Η οποιαδήποτε αλλαγή των τεχνικών χαρακτηριστικών ή η τροποποίηση αυτού του προϊόντος είναι επικίνδυνη.
Πληροφορίες ασφαλείας 25 • Τα παγωτά τύπου ξυλάκι γρανίτα μπορεί να προκαλέσουν εγκαύματα από πάγο εάν κατα‐ ναλωθούν απευθείας από τη συσκευή. Φροντίδα και καθαρισμός • Πριν από τη συντήρηση, απενεργοποιήστε τη συσκευή και αποσυνδέστε το φις τροφοδο‐ σίας από την πρίζα. Εάν δεν μπορείτε να πλησιάσετε την πρίζα, διακόψτε την παροχή ρεύματος. • Μην καθαρίζετε τη συσκευή με μεταλλικά αντικείμενα. • Μη χρησιμοποιείτε αιχμηρά αντικείμενα για να αφαιρείτε τον πάγο από τη συσκευή.
Λειτουργία Προστασία του περιβάλλοντος Η συσκευή αυτή δεν περιέχει αέρια τα οποία μπορούν να προκαλέσουν ζημιά στο στρώμα του όζοντος, είτε στο κύκλωμα ψυκτικού υγρού ή στα μονωτικά υλικά της. Η συσκευή δε θα πρέπει να απορρίπτεται μαζί με τα οικιακά απορρίμματα. Ο αφρός μόνωσης περιέχει εύφλε‐ κτα αέρια: Η συσκευή θα πρέπει να απορρίπτεται σύμφωνα με τους ισχύοντες κανονισμούς που θα λάβετε από τις τοπικές αρχές.
Πρώτη χρήση 27 ΠΡΏΤΗ ΧΡΉΣΗ Καθάρισμα του εσωτερικού Προτού χρησιμοποιήσετε τη συσκευή για πρώτη φορά, πλύντε το εσωτερικό και όλα τα εσω‐ τερικά εξαρτήματα με χλιαρό νερό και λίγο ουδέτερο σαπούνι για να αφαιρέσετε την τυπική μυρωδιά των καινούριων προϊόντων και στη συνέχεια στεγνώστε καλά. Μη χρησιμοποιείτε απορρυπαντικά ή σκόνες που χαράσσουν, διότι καταστρέφουν το φινίρι‐ σμα.
Καθημερινή χρήση Μετακινούμενα ράφια Τα τοιχώματα του ψυγείου είναι εφοδιασμένα με μια σειρά αυλακώσεων ώστε να είναι δυνατή η κατ' επιλογή τοποθέτηση των ραφιών. η παρούσα συσκευή πωλείται στη Γαλλία. Σύμφωνα με ισχύοντες κανονισμούς στη χώρα αυτή, η συσκευή πρέπει να συνοδεύεται από ειδική διάταξη (βλ. εικόνα) που τοποθετείται στο κάτω τμήμα του ψυγείου για να υποδεικνύει τη ζώνη με την περισσότερη ψύξη.
Χρήσιμες συμβουλές 29 Τοποθέτηση των ραφιών της πόρτας Για να είναι δυνατή η αποθήκευση συσκευασιών τροφίμων διαφόρων μεγεθών, τα ράφια της πόρ‐ τας μπορούν να τοποθετούνται σε διαφορετικά ύψη. Για να πραγματοποιήσετε αυτές τις προσαρμογές, κάντε τα εξής: τραβήξτε σταδιακά το ράφι προς την κατεύθυνση των βελών μέχρι να απελευθερωθεί και, στη συν‐ έχεια, τοποθετήστε το ξανά όπως απαιτείται.
Χρήσιμες συμβουλές • μην αποθηκεύετε στο ψυγείο ζεστά τρόφιμα ή υγρά που εξατμίζονται • μην καλύπτετε ή τυλίγετε τα τρόφιμα, ιδιαίτερα εάν μυρίζουν έντονα • τοποθετείτε τα τρόφιμα με τέτοιο τρόπο ώστε ο αέρας να κυκλοφορεί ελεύθερα γύρω τους Συμβουλές ψύξης Χρήσιμες συμβουλές: Κρέας (όλοι οι τύποι) τυλίξτε σε πλαστικές σακούλες και τοποθετήστε το στο γυάλινο ράφι επάνω από το συρτάρι των λαχανικών. Για λόγους ασφαλείας, αποθηκεύστε με αυτό τον τρόπο μόνο για μια ή δύο ημέρες το πολύ.
Φροντίδα και καθάρισμα 31 • να είστε σίγουροι ότι οι συνθήκες διατήρησης των κατεψυγμένων τροφίμων του εμπορίου ήταν κατάλληλες στο κατάστημα αγοράς; • να εξασφαλίζετε την ταχύτερη δυνατή μεταφορά των κατεψυγμένων τροφίμων από το κα‐ τάστημα αγοράς τους στον καταψύκτη; • μην ανοίγετε την πόρτα συχνά και μην την αφήνετε ανοικτή για περισσότερο από ότι είναι απολύτως απαραίτητο. • Μετά το ξεπάγωμα, τα τρόφιμα χαλάνε γρήγορα και δεν μπορούν να καταψυχθούν και πάλι.
Φροντίδα και καθάρισμα Απόψυξη του ψυγείου Ο πάγος εξαλείφεται αυτόματα από τον εξατμιστήρα του θαλάμου ψύξης κάθε φορά που σταματά ο συμπιεστής κινητήρα κατά τη διάρκεια της κανονικής χρήσης. Το νερό από τον πάγο αποστραγγίζεται μέσω μιας σκάφης σε ένα ειδικό δοχείο στο πίσω μέρος της συ‐ σκευής, επάνω από το συμπιεστή κινητήρα, όπου κι εξατμίζεται.
Τι να κάνετε αν... 33 Περίοδοι εκτός λειτουργίας Όταν η συσκευή δεν χρησιμοποιείται για μεγάλα χρονικά διαστήματα, λαμβάνετε τις ακόλου‐ θες προφυλάξεις: 1. Αποσυνδέστε τη συσκευή από την ηλεκτρική τροφοδοσία. 2. Αφαιρέστε όλα τα τρόφιμα. 3. Κάντε απόψυξη και καθαρίστε τη συσκευή και όλα τα εξαρτήματα. 4. Αφήστε τις πόρτες ανοικτές για να αποτρέψετε τις δυσάρεστες οσμές.
Τι να κάνετε αν... Πρόβλημα Πιθανή αιτία Αντιμετώπιση Ανοίγετε την πόρτα πολύ συχνά. Μην κρατάτε την πόρτα ανοιχτή περισσότερο από όσο χρειάζεται. Η θερμοκρασία των προϊόντων είναι πολύ υψηλή. Αφήστε τη θερμοκρασία των προϊόντων να μειωθεί στη θερμο‐ κρασία δωματίου πριν από την αποθήκευση. Η θερμοκρασία δωματίου είναι πολύ υψηλή. Μειώστε τη θερμοκρασία δωμα‐ τίου. Υπάρχει ροή νερού στην πί‐ σω πλάκα του ψυγείου.
Τεχνικά χαρακτηριστικά 35 Αντικατάσταση του λαμπτήρα 1. Αποσυνδέστε το φις τροφοδοσίας από την πρίζα. 2. Αφαιρέστε τη βίδα από το κάλυμμα του λαμπτήρα. 3. Βγάλτε το κάλυμμα του λαμπτήρα (ανα‐ τρέξτε στην εικόνα). 4. Αντικαταστήστε το χρησιμοποιημένο λαμ‐ πτήρα με ένα νέο λαμπτήρα ίδιας ισχύος και ειδικά σχεδιασμένο για οικιακές συ‐ σκευές. (η μέγιστη ισχύς αναγράφεται στο κάλυμμα του λαμπτήρα). 5. Τοποθετήστε το κάλυμμα του λαμπτήρα. 6. Σφίξτε τη βίδα στο κάλυμμα του λαμπτήρα. 7.
Εγκατάσταση κρασία περιβάλλοντος αντιστοιχεί στην κλιματική κατηγορία που αναγράφεται στην πινακίδα τεχνικών στοιχείων της συσκευής: Κλιματική κατηγορία Θερμοκρασία περιβάλλοντος SN +10°C to + 32°C N +16°C to + 32°C ST +16°C to + 38°C T +16°C to + 43°C Οριζοντίωση Όταν τοποθετείτε τη συσκευή, βεβαιωθείτε ότι είναι επίπεδη. Αυτό μπορεί να επιτευχθεί με δύο ρυθμι‐ ζόμενα πόδια, μπροστά στο κάτω μέρος (2). Αν χρειαστεί, αφαιρέστε τον αποστάτη (1) για να ρυθ‐ μίσετε τα πόδια.
Εγκατάσταση 37 Εγκατάσταση κάτω από συνεχόμενη επιφάνεια εργασίας 2 m 200 c 3 93-10 A 105 570 550 820 min Αν το ψυγείο τοποθετηθεί κάτω από συνεχόμενη επιφάνεια εργασίας, πρέπει να τοποθετηθεί άνοιγ‐ μα εξόδου αέρα τουλάχιστον 200 cm2 και γρίλια εξαερισμού που ταιριάζει στο σχεδιασμό της επι‐ φάνειας εργασίας στο πίσω μέρος της επιφάνειας εργασίας. Οι κομμένες επιφάνειες της επιφάνειας εργασίας πρέπει να είναι λουστραρισμένες για να μην φου‐ σκώσουν εξαιτίας της εισχώρησης υγρασίας.
Εγκατάσταση της πόρτας. Εάν απαιτείται, αντισταθμίστε το κενό ανάμεσα στο μεντεσέ της πόρτας και την επιφάνεια εργασίας με ένα κατάλληλο δακτύλιο (πλαστικό ή ξύλινο, ο οποίος δεν παρέχεται). Έτσι, αποτρέπεται το λύγισμα του μεντεσέ και η πιθανή αστοχία στη λειτουργία της πόρτας. Δυνατότητα αντιστροφής της πόρτας Για να πραγματοποιήσετε τις ακόλουθες ενέργειες, συνιστάται να έχετε τη βοήθεια ενός ακό‐ μη ατόμου, το οποίο θα συγκρατεί καλά τις πόρτες της συσκευής κατά τη διάρκεια των εργα‐ σιών.
Εγκατάσταση 39 12. Αφαιρέστε και εγκαταστήστε τη λαβή10) στην αντίθετη πλευρά. 13. Τοποθετήστε ξανά τη συσκευή στη θέση της, οριζοντιώστε την, περιμένετε για τουλάχιστον τέσσερις ώρες και κατόπιν συνδέστε την στην πρίζα. Κάντε έναν τελικό έλεγχο για να βεβαιωθείτε ότι: • Όλες οι βίδες είναι σφιγμένες. • Η πόρτα ανοίγει και κλείνει σωστά. Εάν η θερμοκρασία περιβάλλοντος είναι χα‐ μηλή (δηλ. το χειμώνα), το λάστιχο μπορεί να μην εφαρμόζει απόλυτα στο θάλαμο.
Περιβαλλοντικά θέματα Η πρίζα που απαιτείται για τη σύνδεση της συ‐ σκευής στην ηλεκτρική παροχή πρέπει να βρίσκε‐ ται σε σημείο ώστε να είναι δυνατό να αφαιρέσετε το φις της συσκευής. Αν η συσκευή σας είναι τοποθετημένη κάτω από συνεχόμενη επιφάνεια εργασίας, η πρίζα πρέπει να είναι τοποθετημένη όπως φαίνεται. Ηλεκτρική σύνδεση Πριν από τη σύνδεση, επαληθεύστε ότι η τάση και η συχνότητα που αναγράφονται στην πι‐ νακίδα τεχνικών χαρακτηριστικών αντιστοιχούν στα χαρακτηριστικά της παροχής σας.
PER RISULTATI PERFETTI Grazie per aver scelto di acquistare questo prodotto AEG. Lo abbiamo creato per fornirvi prestazioni impeccabili per molti anni, grazie a tecnologie innovative che vi semplificheranno la vita - funzioni che non troverete sui normali elettrodomestici. Vi invitiamo di dedicare qualche minuto alla lettura per sapere come trarre il massimo dal vostro elettrodomestico.
Indice INDICE 43 46 46 46 48 50 52 54 54 59 Informazioni per la sicurezza Uso dell'apparecchio Primo utilizzo Utilizzo quotidiano Consigli e suggerimenti utili Pulizia e cura Cosa fare se… Dati tecnici Installazione Considerazioni ambientali In questo manuale sono riportati i seguenti simboli: Informazioni importanti relative alla prevenzione dei rischi per la salute personale e dei danni alle apparecchiature.
Informazioni per la sicurezza 43 INFORMAZIONI PER LA SICUREZZA Per garantire un impiego corretto e sicuro dell'apparecchio, prima dell'installazione e del primo utilizzo leggere con attenzione il libretto istruzioni, inclusi i suggerimenti e le avvertenze. Per evitare errori e incidenti, è importante garantire che tutte le persone che utilizzano l'apparecchio ne conoscano il funzionamento e le caratteristiche di sicurezza.
Informazioni per la sicurezza – Evitare fiamme libere e scintille – Aerare bene il locale in cui si trova l'apparecchiatura • È pericoloso cambiare le specifiche o modificare il prodotto in qualunque modo. Un danneggiamento del cavo potrebbe provocare cortocircuiti, incendi e/o scosse elettriche. AVVERTENZA Tutti i componenti elettrici (cavo di alimentazione, spina, compressore) devono essere sostituiti da un tecnico certificato o da personale d'assistenza qualificato. • • • • 1.
Informazioni per la sicurezza 45 Pulizia e cura • Prima della manutenzione, spegnere l'apparecchio e staccare la spina dalla presa. • Non pulire l'apparecchio con oggetti metallici. • Non usare oggetti appuntiti per rimuovere la brina dall'apparecchio. Usare un raschietto di plastica. • Esaminare regolarmente il foro di scarico dell'acqua di sbrinamento nel frigorifero. Se necessario, pulirlo. Se il foro è otturato, l'acqua si raccoglie sul fondo dell'apparecchio.
Uso dell'apparecchio USO DELL'APPARECCHIO Accensione Inserire la spina nella presa. Ruotare il termostato in senso orario fino a una regolazione media. Spegnimento Per spegnere l'apparecchio, ruotare il termostato in posizione "O". Regolazione della temperatura La temperatura è regolata automaticamente. Per utilizzare l'apparecchio, procedere come segue: • ruotare il termostato verso una regolazione bassa per un raffreddamento minimo.
Utilizzo quotidiano 47 Per congelare cibi freschi non è necessario cambiare la regolazione media. Tuttavia, per un'operazione di congelamento più rapida, ruotare il termostato verso una regolazione più alta per ottenere il massimo raffreddamento. In questa condizione la temperatura del vano frigorifero può scendere sotto 0°C. In questo caso riportare il termostato verso una regolazione più calda.
Consigli e suggerimenti utili Posizionamento dei ripiani della porta Per facilitare l'introduzione di alimenti di diverse dimensioni, i ripiani della porta possono essere posizionati ad altezze differenti. Per regolare l'altezza dei ripiani, procedere come segue: tirare delicatamente il ripiano nella direzione indicata dalle frecce fino a sganciarlo, quindi riposizionarlo dove necessario.
Consigli e suggerimenti utili 49 • Se la temperatura ambiente è elevata, il termostato è impostato su una regolazione alta e l'apparecchio è a pieno carico, il compressore può funzionare in continuo causando la formazione di brina o ghiaccio sull'evaporatore. In questo caso, ruotare il termostato su una regolazione più bassa per consentire lo scongelamento automatico risparmiando così energia.
Pulizia e cura Consigli per la conservazione dei surgelati Per ottenere i migliori risultati con questo apparecchio: • Accertare che i cibi congelati commercialmente siano adeguatamente conservati dal rivenditore. • Fare in modo che i cibi congelati siano trasferiti dal negozio al congelatore nel più breve tempo possibile. • Non aprire la porta frequentemente o lasciarla aperta più del tempo strettamente necessario. • Una volta scongelato, il cibo si deteriora rapidamente e non può essere ricongelato.
Pulizia e cura 51 traverso un condotto in un apposito recipiente posto sul retro dell'apparecchio, sopra il motocompressore, dove evapora. È importante pulire periodicamente il foro di scarico dell'acqua di sbrinamento, situato al centro del canale sulla parete posteriore, per evitare che l'acqua fuoriesca sugli alimenti. Usare l'apposito utensile già inserito nel foro di scarico.
Cosa fare se… 2. estrarre tutti gli alimenti 3. Sbrinare e pulire l'apparecchiatura e tutti gli accessori 4. Lasciare le porte aperte per evitare la formazione di odori sgradevoli. Se l'apparecchiatura rimane accesa, farla controllare periodicamente per evitare che gli alimenti si deteriorino in caso di interruzione della corrente elettrica. COSA FARE SE… AVVERTENZA Prima della ricerca guasti, estrarre la spina dalla presa.
Cosa fare se… Problema Possibile causa 53 Soluzione La temperatura ambiente è troppo alta. Abbassare la temperatura ambiente. Scorre acqua sul pannello posteriore del frigorifero. Durante lo sbrinamento automatico, la brina che si forma sul pannello posteriore si scioglie. Non si tratta di un'anomalia. Scorre acqua all'interno del frigorifero. Lo scarico dell'acqua è ostruito. Pulire lo scarico dell'acqua.
Dati tecnici 3. Rimuovere il coprilampada (vedere la figura). 4. Sostituire la lampada usata con una nuova con la stessa potenza e studiata in modo specifico per gli elettrodomestici. (la potenza massima consentita è indicata sul coprilampada). 5. Installare il coprilampada. 6. Serrare la vite del coprilampada. 7. Inserire la spina nella presa. 8. Aprire la porta. Controllare che la lampadina si accenda. Chiusura della porta 1. Pulire le guarnizioni della porta. 2. Se necessario, regolare la porta.
Installazione Classe climatica 55 Temperatura ambiente SN da +10°C a 32°C N da +16°C a 32°C ST da +16°C a 38°C T da +16°C a 43°C Livellamento L'apparecchiatura deve trovarsi perfettamente in piano. Per correggere gli eventuali dislivelli è possibile regolare in altezza i due piedini anteriori (2). Se necessario, regolare i piedini rimuovendo il distanziatore (1).
Installazione Installazione sotto un piano di lavoro continuo 2 m 200 c 3 93-10 A 105 570 550 820 min Se il frigorifero viene installato sotto un piano di lavoro continuo, è necessario lasciare un'apertura per la circolazione dell'aria di almeno 200 cm2 e, sulla parte posteriore del piano di lavoro, occorre installare una griglia di ventilazione, abbinata allo stile del medesimo.
Installazione 57 forme lo spazio tra la cerniera della porta e il piano di lavoro, utilizzando una rondella idonea (non fornita, di plastica o legno). Questo accorgimento impedirà alla cerniera di piegarsi, compromettendo eventualmente in futuro il funzionamento della porta. Reversibilità della porta Per eseguire le seguenti operazioni, si raccomanda di farsi aiutare da un'altra persona che tenga ben ferme le porte dell'apparecchiatura.
Installazione 12. Rimuovere e installare la maniglia15) sul lato opposto. 13. Riposizionare l'apparecchio, metterlo in piano, attendere almeno quattro ore e collegarlo alla rete di alimentazione. Effettuare un controllo finale per verificare che: • Tutte le viti siano serrate. • La porta si apra e si chiuda correttamente. Se la temperatura ambiente è bassa (ad esempio in inverno), è possibile che la guarnizione non aderisca perfettamente. In tal caso, attendere che aderisca naturalmente.
Considerazioni ambientali 59 La posizione della presa a muro, necessaria per collegare l'apparecchiatura alla rete di alimentazione, deve essere tale da permettere di sfilare la spina di alimentazione dell'apparecchiatura. Se l'apparecchiatura è installata sotto un piano di lavoro continuo, la posizione della presa dovrebbe essere quella indicata di seguito.
www.aeg-electrolux.