S72390-6KA User manual Refrigerator
Contents Thank you for choosing one of our high-quality products. To ensure optimal and regular performance of your appliance please read this instruction manual carefully. It will enable you to navigate all processes perfectly and most efficiently. To refer to this manual any time you need to, we recommend you to keep it in a safe place. And please pass it to any future owner of the appliance. We wish you much joy with your new appliance.
Safety information 3 tions and make sure that they remain with the appliance if it is moved or sold, so that everyone using it through its life will be properly informed on appliance use and safety. For the safety of life and property keep the precautions of these user's instructions as the manufacturer is not responsible for damages caused by omission.
Safety information • • • • 4. Do not pull the mains cable. 5. If the power plug socket is loose, do not insert the power plug. There is a risk of electric shock or fire. 6. You must not operate the appliance without the lamp cover1) of interior lighting. This appliance is heavy. Care should be taken when moving it. Do not remove nor touch items from the freezer compartment if your hands are damp/ wet, as this could cause skin abrasions or frost/freezer burns.
Control panel 5 • This product must be serviced by an authorized Service Centre, and only genuine spare parts must be used. Environment Protection This appliance does not contain gasses which could damage the ozone layer, in either its refrigerant circuit or insulation materials. The appliance shall not be discarded together with the urban refuse and rubbish.
Control panel The set temperature will be reached within 24 hours. After a long period out of use it is not necessary to set again the temperature because it remains stored. A medium setting is generally the most suitable. The exact setting should be chosen keeping in mind that the temperature inside the appliance depends on: • room temperature • how often the door is opened • the quantity of food stored • the location of the appliance.
First use 7 Holiday function This function allows you to keep the refrigerator shut and empty during a long holiday period (e.g. the summer holidays) without the formation of a bad smell. The fridge compartment must be empty when the holiday function is on. To activate the function: 1. press continuously the temperature regulator (+ button) until the letter "H" (Holiday) appears on the temperature indicator. The Holiday function sets the temperature approx +15°C.
Daily use Movable shelves The walls of the refrigerator are equipped with a series of runners so that the shelves can be positioned as desired. Positioning the door shelves To permit storage of food packages of various sizes, the door shelves can be placed at different heights. Bottle rack Place the bottles (with the opening facing front) in the pre-positioned shelf. If the shelf is positioned horizontally, place only closed bottles.
Helpful hints and tips 9 The bottle support can be pulled out when chilling larger bottles. Removing the bottle and can holder 1. Take out the Quick Chill Shelf with holder from the cabinet 2. To loosen the holder from the shelf, bend the hooks/brackets that surround the backside of the shelf. Quick Chill shelf The Quick Chill shelf can be placed in one of the upper grooves. To maintain the best performance the shelf should be placed in the second groove from the top.
Care and Cleaning Hints for refrigeration Useful hints: Meat (all types) : wrap in polythene bags and place on the glass shelf above the vegetable drawer. For safety, store in this way only one or two days at the most. Cooked foods, cold dishes, etc..: these should be covered and may be placed on any shelf. Fruit and vegetables: these should be thoroughly cleaned and placed in the special drawer(s) provided.
What to do if… 11 Defrosting of the refrigerator Frost is automatically eliminated from the evaporator of the refrigerator compartment every time the motor compressor stops, during normal use. The defrost water drains out through a trough into a special container at the back of the appliance, over the motor compressor, where it evaporates.
What to do if… Problem The appliance does not operate. The lamp does not operate. Possible cause Solution The appliance is switched off. Switch on the appliance. The mains plug is not connected to the mains socket correctly. Connect the mains plug to the mains socket correctly. The appliance has no power. There is no voltage in the mains socket. Connect a different electrical appliance to the mains socket. Contact a qualified electrician. The lamp is in stand-by. Close and open the door.
Technical data Problem The temperature in the refrigerator is too high. Possible cause 13 Solution The product temperature is too high. Let the product temperature decrease to room temperature before storage. Many products are stored at the same time. Store less products at the same time. There is no cold air circulation in Make sure that there is cold air the appliance. circulation in the appliance. Replacing the lamp 1. Switch off the appliance. 2.
Installation INSTALLATION WARNING! Read the "Safety Information" carefully for your safety and correct operation of the appliance before installing the appliance. Location 10mm 10mm 100mm The appliance should be installed well away from sources of heat such as radiators, boilers, direct sunlight etc. Ensure that air can circulate freely around the back of the cabinet.
Installation 15 Electrical Connection CAUTION! Any electrical work required to install this appliance should be carried out by a qualified electrician or competent person. WARNING! This appliance must be earthed. The manufacturer declines any liability should these safety measures not be observed.
Installation The appliance is supplied with a 13 amp plug fitted 2 . In the event of having to change the fuse in the plug supplied, a 13 amp ASTA approved (BS 1362) fuse must be used. WARNING! A cut off plug inserted into a 13 amp socket is a serious safety (shock) hazard. Ensure that it is disposed of safely.
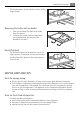
Installation 17 Rear spacers Inside the appliance you find two spacers which must be fitted as shown in the figure. Slacken the screws and insert the spacer under the screw head, then retighten the screws. Door reversibility WARNING! Before carrying out any operations, remove the plug from the power socket. To carry out the following operations, we suggest that this be made with another person that will keep a firm hold on the door of the appliance during the operations.
Environmental concerns 5. 6. 7. Unscrew the pin of the upper hinge and install it on the opposite side. Install the door in the upper hinge. Install the ventilation grille, clipping it into place. 8. Unscrew the handle. Remove the plug with a punch. Install the handle and the plug on opposite side. Take from the accessory bag the two plugs and cover the holes left open after having removed the handle. 9. Make sure that the front board of the door is parallel to the front board of the top. 10.
222344824-A-362010 www.aeg-electrolux.