
User Guide


3
Contents
Safety . . . . . . . . . . . . . . . . . . . . . . . . . . . . . . . . . . . . . . . . . . . . . . . . . .4
Disposal . . . . . . . . . . . . . . . . . . . . . . . . . . . . . . . . . . . . . . . . . . . . . . . .5
Appliance Packaging Information . . . . . . . . . . . . . . . . . . . . . . . . . . . . . . .5
Disposal of old Appliances . . . . . . . . . . . . . . . . . . . . . . . . . . . . . . . . . . . . .6
Remove transport safeguard . . . . . . . . . . . . . . . . . . . . . . . . . . . . . . . .6
Installation . . . . . . . . . . . . . . . . . . . . . . . . . . . . . . . . . . . . . . . . . . . . . .6
Installation Location . . . . . . . . . . . . . . . . . . . . . . . . . . . . . . . . . . . . . . . . . .6
Your appliance needs air . . . . . . . . . . . . . . . . . . . . . . . . . . . . . . . . . . . . . .7
Rear spacers . . . . . . . . . . . . . . . . . . . . . . . . . . . . . . . . . . . . . . . . . . . . . . . . .7
Rehingeing the door . . . . . . . . . . . . . . . . . . . . . . . . . . . . . . . . . . . . . . . . . .8
Electrical Connection . . . . . . . . . . . . . . . . . . . . . . . . . . . . . . . . . . . . . .9
Prior to Initial Start–Up . . . . . . . . . . . . . . . . . . . . . . . . . . . . . . . . . . .9
Starting up and temperature regulation . . . . . . . . . . . . . . . . . . . . .10
Interior Accessories . . . . . . . . . . . . . . . . . . . . . . . . . . . . . . . . . . . . . .10
Storage shelves . . . . . . . . . . . . . . . . . . . . . . . . . . . . . . . . . . . . . . . . . . . .10
Variable Inner Door . . . . . . . . . . . . . . . . . . . . . . . . . . . . . . . . . . . . . . . . . .10
Moisture regulator . . . . . . . . . . . . . . . . . . . . . . . . . . . . . . . . . . . . . . . . . . .11
Drawer . . . . . . . . . . . . . . . . . . . . . . . . . . . . . . . . . . . . . . . . . . . . . . . . . . . . .11
Variable Storage Box . . . . . . . . . . . . . . . . . . . . . . . . . . . . . . . . . . . . . . . . .11
Air recycling . . . . . . . . . . . . . . . . . . . . . . . . . . . . . . . . . . . . . . . . . . . . . . . .12
Bottle holder . . . . . . . . . . . . . . . . . . . . . . . . . . . . . . . . . . . . . . . . . . . . . . .12
Fresh food refrigeration . . . . . . . . . . . . . . . . . . . . . . . . . . . . . . . . . .13
Freezing and storing frozen food . . . . . . . . . . . . . . . . . . . . . . . . . . .13
Preparation of Ice Cubes . . . . . . . . . . . . . . . . . . . . . . . . . . . . . . . . . .14
Freezing Calender . . . . . . . . . . . . . . . . . . . . . . . . . . . . . . . . . . . . . . .14
Defrosting . . . . . . . . . . . . . . . . . . . . . . . . . . . . . . . . . . . . . . . . . . . . .15
Switching off the appliance . . . . . . . . . . . . . . . . . . . . . . . . . . . . . . .15
Cleaning and Care . . . . . . . . . . . . . . . . . . . . . . . . . . . . . . . . . . . . . . .16
Energy Saving Tips . . . . . . . . . . . . . . . . . . . . . . . . . . . . . . . . . . . . . . .17
What to do if . . . . . . . . . . . . . . . . . . . . . . . . . . . . . . . . . . . . . . . . . . .17
Correcting Malfunctions . . . . . . . . . . . . . . . . . . . . . . . . . . . . . . . . . . . . . .17
Changing the light bulb . . . . . . . . . . . . . . . . . . . . . . . . . . . . . . . . . . . . . .19
Regulations, Standards, Guidelines . . . . . . . . . . . . . . . . . . . . . . . . .19
38
O compressor funciona auto-
maticamente apòs um certo
tempo
Veja o capìtlo “Limpeza e cui-
dados
Isto é normal, não se trata de
um defeito
Apòs a modificação do ajuste
de temperatura, o compressor
não funciona imediatamente,
Agua no chão do refrigerador
ou nas pratleiras
O orifìcio de descarga para a
àgua do degel est entupido
Ruídos estranhos.
O aparelho está em tacto com
a parede ou com outros
objectos.
O aparelho não está direito
Um elemento, p. ex. um tubo,
na parte de trás do aparelho,
toca num outro elemento do
aparelho ou na parede.
Curvar, eventualmente, o ele-
mento em causa cuida- dosa-
mente
Afastar o aparelho um pouco
da parede.
Reajustar os pés reguláveis
frontais
Avaria Causa possível Solução
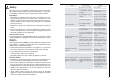
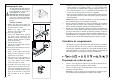
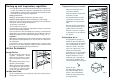
Substituição da lâmpada
Aviso! Perigo de choque eléctrico! Antes de proceder à substituição da lâm-
pada, desligar o aparelho e retirar a ficha de ligaçã o à rede da tomada ou
desconectar o fusível.
Dados da lâmpada: lâmpada halógena, 220-240 V, máx. 15 W, porta-lâm-
padas: E 14
1. Para desligar o aparelho.
2. Retirar a ficha de ligaçã o à rede da
tomada.
3. Para substituir a lâmpada, desatar-
raxar o parafuso de fendas em cruz e
retirar a cobertura da lâmpada
puxando-a para baixo.
4. Substituir a lâmpada fundida.
5. Instalar novamente a cobertura da
lâmpada e voltar a atarraxar o para-
fuso de fendas em cruz.
D411