USR 200 Universalschneider Universal Slicer Trancheuse universelle Universele snijmachine Affettatrice universale Rebanadora universal Cortador universal Yleisleikkuri Univerzální krájeè Univerzális vágógép ÓõóêåõÞ êïðÞò ãåíéêÞò ÷ñÞóçò Gebrauchsanweisung Operating instructions Mode d’emploi Gebruiksaanwijzing Istruzioni per l’uso Instrucciones para el uso Instruções de utilização Käyttöohje Návod k použití Használati útmutató Ïäçãßåò ÷ñÞóçò
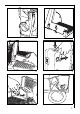
1 K J A B D C H E F G Gerätebeschreibung Appliance Description A B C D E F G H J K A B C D E F G 2 Scheibenmesser gezahnt (Rundmesser) Messerverschluß mit Linksdrehung Schneidgutschlitten mit Fingerschutz Restguthalter Anschlagplatte Schneidetisch mit Schlittenführungsrille Typenschild (Geräteunterseite) Schnittstärke-Einstellrad Schnittstärke-Einstellskala Ein-/Ausschalter Toothed Cutting Disc (Circular Blade) Blade Lock with Left-Hand Thread Slide with Finger Protection Holder Stop Plate Slicing
2 3 4 5 6 7 3
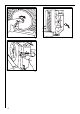
8 10 4 9
g g Dear Customer, Please read these operating instructions carefully. Above all please observe the safety instructions on the first few pages of these operating instructions! Please keep these operating instructions for later reference. Pass them on to any subsequent owner of the appliance. 1 Safety Instructions • Prior to using for the first time, please note that the appliance may only be used with the voltage and type of current that is stated on the rating plate.
g Positioning the Appliance The Universal Slicer, with its non-slip feet, will stand securely without slipping on level, clean, dry work surfaces. Prior to using for the first time, it is advisable to wipe all parts with a damp cloth and dry them. Prior to Using • Check that the appliance is stable and connect to the mains using the mains plug. • Set the required slice thickness. To do this, turn the slice thickness adjustment knob (Fig. 2) anticlockwise. Slice thicknesses from thin to approx.
g Dismantling the Appliance (Fig. 9/10) Remove the circular blade as described above. To remove the slicing table, fold it up and pull it out of the housing at the lower end at the rear (Fig. 9). To replace the slicing table, position it vertically and insert the two pins at the front, followed by those at the rear. To remove the motor unit, the circular blade must be removed first. Unlock the motor unit and then pull it out of the housing to the front by the handle (Fig. 10).
AEG Hausgeräte GmbH Muggenhofer Str. 135 D-90429 Nürnberg http://www.aeg-hausgeraete.