
User manual


35
EN
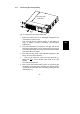
7. You should have already removed the front panels of the
battery units at the beginning of this Section 6.1. The
corresponding access slot covers should also have been
removed.
Now start to lay the battery wiring inside the UPS unit. Lay
the insulated wire in the center downwards. Then carefully
close the front cover of the UPS, lay the wire to the first
external battery unit down through the slot you have
removed the cover from. Also remember to secure the lock
by tightening the two Philips screws located in the middle.
Then push the UPS completely back into the rack and fasten
the UPS on the side with the 4 M6
x 16 screws that come
with it.
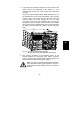
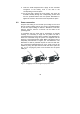
Fig. 16 : Connecting the batteries internally
(shown here with 2 external battery extensions)
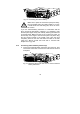
8. Now connect according to the illustration above to the
external batteries by connecting each battery connector
(each consisting of a red, a black and a green plug) with one
another: red in red, black in black
, green in green.
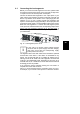
Make sure that you insert the plugs quickly and firmly
(red in red, black in black,
, green in green). If you see a
small electric arc while doing this, this is no cause for
concern.