EN User Manual Cooker 10306GM-MN
www.aeg.com CONTENTS 1. SAFETY INFORMATION............................................................................................. 3 2. SAFETY INSTRUCTIONS.............................................................................................5 3. PRODUCT DESCRIPTION...........................................................................................9 4. BEFORE FIRST USE................................................................................................... 10 5.
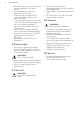
ENGLISH 1. 3 SAFETY INFORMATION Before the installation and use of the appliance, carefully read the supplied instructions. The manufacturer is not responsible for any injuries or damages that are the result of incorrect installation or usage. Always keep the instructions in a safe and accessible location for future reference. 1.1 Children and vulnerable people safety WARNING! Risk of suffocation, injury or permanent disability.
www.aeg.com • • • • • • • • • • • • • • Do not operate the appliance by means of an external timer or separate remote-control system. WARNING: Unattended cooking on a hob with fat or oil can be dangerous and may result in fire. NEVER try to extinguish a fire with water, but switch off the appliance and then cover flame e.g. with a lid or a fire blanket. CAUTION: The cooking process has to be supervised. A short term cooking process has to be supervised continuously.
ENGLISH • 5 side walls. Install the shelf supports in the opposite sequence. WARNING: Use only hob guards designed by the manufacturer of the cooking appliance or indicated by the manufacturer of the appliance in the instructions for use as suitable or hob guards incorporated in the appliance. The use of inappropriate guards can cause accidents. 2. SAFETY INSTRUCTIONS This appliance is suitable for the following markets: ZA 2.1 Installation WARNING! Only a qualified person must install this appliance.
www.aeg.com mains at all poles. The isolation device must have a contact opening width of minimum 3 mm. • Fully close the appliance door, before you connect the mains plug to the mains socket. 2.3 Gas connection • All gas connections should be made by a qualified person. • Before installation, make sure that the local distribution conditions (nature of the gas and gas pressure) and the adjustment of the appliance are compatible. • Make sure that there is air circulation around the appliance.
ENGLISH • Do not put flammable products or items that are wet with flammable products in, near or on the appliance. • Do not let sparks or open flames to come in contact with the appliance when you open the door. • Open the appliance door carefully. The use of ingredients with alcohol can cause a mixture of alcohol and air. WARNING! Risk of damage to the appliance. • To prevent damage or discoloration to the enamel: – do not put ovenware or other objects in the appliance directly on the bottom.
www.aeg.com • Be careful when you remove the door from the appliance. The door is heavy! • Fat and food remaining in the appliance can cause fire. • Clean regularly the appliance to prevent the deterioration of the surface material. • Clean the appliance with a moist soft cloth. Only use neutral detergents. Do not use any abrasive products, abrasive cleaning pads, solvents or metal objects. • If you use an oven spray, obey the safety instructions on the packaging.
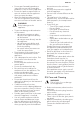
ENGLISH 9 3. PRODUCT DESCRIPTION 3.1 General overview 1 2 3 4 5 6 7 8 5 4 11 3 9 2 10 1 1 2 3 4 5 6 7 8 9 10 11 Button for the turnspit Knob for the Minute Minder Knob for the grill Knob for the oven functions Button for the lamp Knobs for the hob Grill Lamp Turnspit hole Fan Shelf positions 3.2 Cooking surface layout 1 2 5 3 1 Auxiliary burner 2 Steam outlet - number and position depend on the model 3 Semi-rapid burner 4 Semi-rapid burner 5 Rapid burner 4 3.
www.aeg.com 4. BEFORE FIRST USE WARNING! Refer to Safety chapters. 4.1 Initial Cleaning Remove all accessories and removable shelf supports from the appliance. Refer to "Care and cleaning" chapter. Clean the appliance and the accessories before first use. Put the accessories and the removable shelf supports back to their initial position. 1. Set the maximum temperature. 2. Let the appliance operate for approximately 1 hour. WARNING! Accessories can become hotter than usual.
ENGLISH If after some tries the burner does not light, check if the crown and its cap are in the correct position. A. B. C. D. Burner cap Burner crown Ignition candle Thermocouple (if applicable) 5.3 Turning the burner off If the burner accidentally goes out, turn the knob to the off position and try to light the burner again after minimum 1 minute. To put the flame out, turn the knob to the off position 5.
www.aeg.com 6.2 Diameters of cookware WARNING! Use cookware with diameters applicable to the size of burners. Burner Diameter of cookware (mm) Rapid 160 - 260 Semi-rapid 140 - 240 Burner Diameter of cookware (mm) Auxiliary 120 - 180 6.3 Energy saving • If it is possible, always put the lids on the cookware. • When the liquid starts to boil, turn down the flame to barely simmer the liquid. 7. HOB - CARE AND CLEANING WARNING! Refer to Safety chapters. 7.
ENGLISH 13 8. OVEN - DAILY USE WARNING! Refer to Safety chapters. 8.1 Oven Functions Oven function MIN 240°C MIN 240°C Application Off position The appliance is off. Heat settings Range of temperature adjustment. Grilling To grill flat food in the middle of the grill. To make toast. Oven fan To thaw frozen food. To use the fan in combination with the gas oven burner ignite the gas oven and turn the knob for the grill clockwise to activate the fan. Oven lamp To illuminate the oven interior.
www.aeg.com Do not put the meat directly on the tray or pan. CAUTION! Do not put the meat on the highest shelf level. There is a risk of fire. 3. At the same time push the knob for the oven functions and turn it counterclockwise to the maximum gas flow position. 4. When the flame comes on, keep the knob for the oven functions pushed on the maximum gas flow position for 15 seconds or less to let the thermocouple warm up. Do not keep the knob for the oven functions pushed for more than 15 seconds.
ENGLISH 15 9. OVEN - CLOCK FUNCTIONS 9.1 Minute Minder This function has no effect on the operation of the appliance. Turn the knob for the timer as far as it goes, then turn it to necessary time period. After the time period is completed, an acoustic signal sounds. 10. OVEN - USING THE ACCESSORIES WARNING! Refer to Safety chapters. 10.1 Inserting the accessories sure it does not touch the back wall of the oven. 10.2 Using the turnspit WARNING! Be careful when you use the turnspit.
www.aeg.com 3. Put the baking tray on the lowest shelf level. 4. Snap out one end of the support hook from the oven ceiling A and let it hang on the other end. A 5. Install the first fork on the spit, then put the meat on the turnspit and install the second fork. Make sure that the meat is in the middle of the spit. 6. Use the screws to tighten the forks. 7. Put the tip of the spit into the turnspit hole. Refer to "Product description" chapter. 8. Put the front part of the spit on the support hook.
ENGLISH 11.3 Baking cakes when you cook. This can change the baking results and cause damage to the enamel. 11.2 Baking • Your oven may bake or roast differently to the appliance you had before. Adapt your usual settings (temperature, cooking times) and shelf positions to the values in the tables. • The manufacturer recommends that you use the lower temperature the first time. • If you cannot find the settings for a special recipe, look for the one that is almost the same.
www.aeg.com Food Quantity (kg) Temperature (°C) Time (min) Shelf position Traditional Bobo- 1.0 - 1.5 tie 180 50 3 Chicken Pie 180 40 3 1.2 - 1.8 1) Preheat the oven for 10 minutes. Meat & Poultry Food Quantity (kg) Temperature (°C) Time (min) Shelf position Sheep 1.5 - 2.0 210 90 - 120 2 Chicken 1.0 - 1.8 240 80 - 90 2 Duck 1.0 - 1.8 240 80 - 90 2 Goose 2.5 - 3.0 240 80 - 90 2 Rabbit 1.0 - 1.5 195 90 - 120 2 Beef 1.2 - 1.
ENGLISH 19 Cakes Food Quantity (kg) Temperature (°C) Time (min) Shelf position Flat cake 0.6 - 1.0 180 25 - 35 2 Sponge cake 1.0 - 1.5 165 60 - 85 2 Feter Mshalted 1.2 - 1.5 195 40 - 45 1 1.0 - 1.2 195 50 - 60 2 1.0 - 1.5 195 45 - 50 2 0.6 - 0.8 165 40 2 1) 1) Salty cake 1) Yeast cake 1) Malva pudding 1) Preheat the oven for 10 minutes. Grilling Food Quantity (kg) Grill position Time (min) Shelf position Sheep chops1) 0.7 - 1.2 half 20 - 25 3 Ribs 1.0 - 1.
www.aeg.com 12. OVEN - CARE AND CLEANING WARNING! Refer to Safety chapters. 12.1 Notes on cleaning • Clean the front of the appliance with a soft cloth with warm water and a cleaning agent. • To clean metal surfaces, use a dedicated cleaning agent. • Clean the appliance interior after each use. Fat accumulation or other food remains may result in a fire. • Clean stubborn dirt with a special oven cleaner. • Clean all accessories after each use and let them dry.
ENGLISH 3. When the appliance is cool, clean it with a soft and moist sponge. 21 forward and remove the door from its seat. 12.5 Cleaning the oven door The oven door has two panels of glass installed one behind the other. To make the cleaning easier remove the oven door. WARNING! The oven door can close if you try to remove the internal panel of glass when the door is still assembled. Do not lose the screws. 1. Open the door fully and hold the two door hinges. 4.
www.aeg.com 7. Clean the oven door with water and soap. Clean inner side of the door. Dry the oven door carefully. When the cleaning is completed, install the glass panels and the oven door. To install the oven door, do the above steps in the opposite sequence. WARNING! Danger of electrocution! Disconnect the fuse before you replace the lamp. The lamp and the lamp glass cover can be hot. 1. Deactivate the appliance. 2. Remove the fuses from the fuse box or deactivate the circuit breaker.
ENGLISH 23 Problem Possible cause Remedy The flame extinguishes immediately after ignition. Thermocouple is not heated up sufficiently. After lightning the flame, keep the spark generator activated for equal or less than 10 seconds The flame ring is uneven. Burner crown is blocked with Make sure that the injector is food residues. not blocked and the burner crown is clean. The burners do not work. There is no gas supply. Check the gas connection. The appliance makes noises.
www.aeg.com We recommend that you write the data here: Serial number (S.N.) ......................................... 14. INSTALLATION WARNING! Refer to Safety chapters. 14.1 Location of the appliance You can install your freestanding appliance with cabinets on one or two sides and in the corner. For minimal distances for fitting check the table. Dimension mm B 650 C 150 D 20 14.
ENGLISH BURNER 25 Ø BYPASS 1/100 mm Grill 59 14.5 Gas burners for NATURAL GAS G20 2.0 kPa BURNER NORMAL POWER kW REDUCED POWER kW INJECTOR MARK 1/100 mm Rapid 3.0 0.75 119 Semi-rapid 2.0 0.45 96 Auxiliary 1.0 0.35 70 Oven 2.25 1.0 108 Grill 2.0 1.5 108 14.6 Gas burners for LPG G30 2.8-3.0 kPa BURNER NORMAL POWER kW REDUCED POWER kW INJECTOR MARK 1/100 mm Rapid 3.0 0.72 88 Semi-rapid 2.0 0.43 71 Auxiliary 1.0 0.35 50 Oven 2.25 1.0 71 Grill 2.0 1.5 71 14.
www.aeg.com • it does not show cracks, cuts, marks of burnings on the two ends and on its full length, • the material is not hardened, but shows its correct elasticity, • the fastening clamps are not rusted, • expired term is not due. If one or more defects are visible, do not repair the pipe, but replace it. The appliance is set to default gas. To change the setting choose a pipe holder from the list. Always use the gasket sealing.
ENGLISH You can find this plate in the bag supplied with the appliance. If the supply gas pressure is not constant or it is different from the necessary pressure, install an applicable pressure adjuster on the gas supply pipe. 14.11 Adjusting the minimum gas level on the hob burner 1. Disconnect the appliance from the electricity. 2. Remove the knob for the hob. If there is no access to the bypass screw dismount the control panel before adjustment start. 3.
www.aeg.com A 1 2 4. Release the burner injector with a 7 mm socket spanner and replace it with a right one. Changing from natural gas to liquid gas 1. Fully tighten the bypass screw. 2. Put the knob back. 3. Connect the appliance to the electricity. Changing from liquid gas to natural gas Assemble the burner in a revers sequence. Replace the gas type sticker near the gas supply ramp with the one related to the new gas type. 1. Unscrew approximately one turn the bypass screw position A. 2.
ENGLISH and let the oven heat for at least 10 minutes. 10. Quickly turn the knob for the oven functions from maximum to the minimum gas flow position. Control the flame. Make sure the flame does not go out when you turn the knob to the minimum gas flow position. There must be a small regular flame on the oven burner crown. If the flame goes out adjust the oven burner again. 29 1. Disassemble the pan supports and all the burner assemblies. 14.14 Gas grill injector replacement 1.
www.aeg.com Connection to the mains 1. Fit the power cable with a standardized plug suitable for the load indicated on the data label. 2. Connect the wires as shown below. 3. Remember that the earth wire must be longer than the phase wires letter L (phase) = brown wire letter N (neutral) = blue wire symbol To install all the accessories, do the first step in an opposite sequence. 14.16 Backguard Fix backguard B on the side holes C from hob using a cross screwdriver and the screws A.
ENGLISH 2. a. In the first 6 (six) months from date of purchase, for valid warranty claims, collection, return and installation (Built-in and gas appliances) of the appliance will be free of charge within South Africa if installed by an authorized Electrolux service agent. b.
www.aeg.com Service and Spares In the event of your appliance requiring a service or if you wish to purchase spare parts, contact your local Electrolux Service Centre by telephoning: 0800 222 825 (Tollfree in South Africa) Help us to help you Please determine your type of enquiry before writing or telephoning.
ENGLISH 33
www.aeg.
ENGLISH 35
867330243-A-432016 www.aeg.