050F-W Elektripliit °C KASUTAMISJUHEND
Sisukord Sisukord Ohutus ............................................................ 3 Pliit .................................................................. 4 Lahtipakkimine ...................................... 4 Lisaseadmed ......................................... 4 Ohutusvarustus ................................................ 5 Kallutusvastane seade ............................ 5 Keeduplaadi kaitse (juurdeostetav lisa) .... 5 Ukselukk ..............................................
Ohutus Ohutus Pliitide tehnoloogia areneb pidevalt. Uue pliidi kasutamine võib olla Teie vana pliidi omast erinev. Palun, lugege läbi kogu instruktsioon, enne kui uut pliiti kasutama asute. See pliit on mõeldud tavaliseks koduseks kasutuseks. Hoidke instruktsioon alles, et vajadusel anda see uuele omanikule (kui Te pliidi edasi müüte või kingite). Ärge häbenege esitada meile küsimusi ja märkusi pliidi ja selle kasutamise kohta. TEKSTID, MIS ON TÄHISTATUD ohukolmnurgaga, on ohutusest.
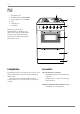
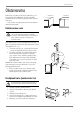
Pliit Pliit 1 1 Eemaldatav ahi 2 Pliidirõngad koos KEEDUPLAADIGA 2 3 Kontrollpaneel koos LÜLITITEGA 4 Ahi 5 Säilituslaegas 6 Alusplaat °C Pliidi taguse puhastamise hõlbustamiseks on pliidi tagaosas rattad. Pliidi ettepoole liigutamiseks avage ahju uks, tõstke pliiti hoides ka ülemisest servast ning tõmmake pliit seinast eemale. 3 4 5 6 Lahtipakkimine Lisaseadmed Kontrollida, et pliit on vigastamata ja heas korras. Igast transpordil tekkinud vigastusest tuleb müüjat kohe informeerida.
Ohutusvarustus Ohutusvarustus Kummalgi pool pliiti peavad olema vähemalt 40 cm laiused tööpinnad (VAATA PILTI). Teisalt võib pliidi paigaldada seina või kõrge köögikapi kõrvale, tööpind teisel pool. Laste ohutus on tagatud paremini, kui kasutatakse järgmist lisavarustust : min. 40 cm min. 40 cm Kallutusvastane seade Pliit tuleks varustada kallutusvastase vahendiga, et ära hoida pliidi ettekaldumine ebaühtlase koormatuse tõttu.
Ohutusvarustus Ukselukk Ukselukk raskendab lastel ahjuukse/hoiulaeka avamist. Lukud on pliidi uuena muretsemisel juba töösse rakendatud, kuid vajadusel saab seda välja lülitada. A Ukse avamiseks vajutage lukk alla. B Kui tahate lukku välja lülitada, kontrollige esmalt, et ahi ei oleks kuum. Vajutage lukku ukse ülaservas allapoole ja seejärel mõned millimeetrid paremale. C Kui tahate lukku uuestitöösse rakendada, suruge lukku ukse ülaservas mõned millimeetrid vasakule.
Ohutusvarustus Kuumutage ahju tühjalt Hoidke lapsi järelevalve all! Pliit läheb väga kuumaks. Enne ahju esimest kasutamist tuleb seda tühjalt kuumutada. Järgi instruktsioone: max.°C 1 Vali (ülemine/alumine kuumutus) ja maksimaalne temperatuur. Ahipeab olema suletud. 2 Õhutage ruumi. Lülitage ahi välja, kui “uue” lõhna ja vingu teke on lakanud. 3 Pühkige ahi, külghoidikud ja ukse sisekülg kuuma vee ja nõudepesuvahendiga. Seejärel pühkige kõik need osad kuivaks.
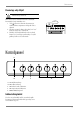
Keeduplaat Keeduplaat Keeduplaadil on neli valumalmist plaati. Kiirkeeduplaadid on tähistatud punaste ringidega pliidiplaadi keskel. Kiirkeeduplaadid kaitstud ülekuumenemise eest. ø 145 mm ø 180 mm Keeduplaadi kasutamine Ärge jätke pliiti praadimisel ning rasva, parafiini, vaha või teiste kergsüttivate ainete sulatamisel järelevalveta. Süttimisel tuleb välja lülitada kõik lülitid ja pliidi kohal olev ventilaator. LEEK SUMMUTADA PANNI KAANEGA D, iialgi ei tohi kasutada vett.
Keeduplaat Praadimine Oleks parem, kui ei praetaks otse külmikust võetud toitu. Ainult umbes 2/3 panni põhjast võiks olla kaetud toiduga. Pange margariin või või pannile ja keerake kuumus sobivaks. Parima tulemuse saamiseks on tähtis, et praadimist alustades oleks rasv õiget värvi (õigel temperatuuril). Hoidke heledat labidakest panni põhjal, et näha rasva õiget värvi. HELEPRUUN RASV: Sobib munade, sibula, tooreste kartulite, karbonaadi ja liha ning terve kala praadimiseks.
Keeduplaat Keeduplaatide puhastamine Eemaldage pritsmed võimalikult kohe, et ära hoida nende sissepõlemine. Mustus takistab soojuse ülekandumist potile. Puhastamine ja korrosioonivastane kaitse 1 Puhastage keeduplaadid hoolikalt seebiveega immutatud terasvillaga. Peske maha kõik seebijäljed ja kuivatage paberkäterätiga. 2 Kui keeduplaadid on külmad ja puhtad, kandke neile ühtlane kiht korrosioonivastast vahendit. Seda vahendit leidub Electroluxi edasimüüjate juures.
Ahi Ahi Ahjul on kolm eemaldatavat külghoidikut kolme siiniga kummalgi küljel. Ahju funktsioonid Iga funktsiooni puhul süttib indikaatorlamp, kui ahi kuumeneb ning kustub, kui määratud temperatuur on saavutatud (süttib ja kustub kui termostaat sisse või välja lülitub). Ahju funktsiooni valimiseks pöörake funktsioonide lülitit päripäeva soovitud funktsiooni sümbolini (vaata allpool). AHJU FUNKTSIOONID ON: Ahju valgus Ahju valgus süttib automaatselt iga määrangu puhul.
Ahi Praktiline kasutamine Ärge kunagi pange alumiiniumfooliumi, küpsetusnõusid ega küpsetusplaate vahetult ahju põhjale. Põhjast tuleva kuumuse blokeerimine võib ülekuumenemise tagajärjel rikkuda emaili. Ahi kuumeneb kasutamise ajal: LÄHEDALOLEVATE LASTE JÄRELE TULEB VALVATA. Küpsetusplaat võib veidi painduda temperatuuri kõikumiste tõttu või kui toit, (pizza jms.) on plaadile jaotatud ebaühtlaselt. Plaat taastab oma kuju, kui jahtub.
Ahi Parima tulemuse saamiseks hoiduge grillimast otse külmikust võetud toitu. Kuivatage liha pind, pange ta ahjurestile ja maitsestage. Asetage ahjupott, parem, kui ääristatult fooliumiga, resti alla, et püüda kinni rasv jm., mis välja jookseb. Klopitud liha, lihalõigud ja kala tuleks grillida ahju ülemises osas, pakse ribitükke aga parem võimalikult allpool. Määrake funktsioon ja vajalik temperatuur (maksimaalselt 250°C). Kuumutage grilli eelnevalt 3 kuni 5 minutit.
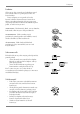
Ahi KAHE KLAASI VAHELT PUHASTAMISEKS: 1 kontrollige, et ahi ei oleks kuum ja et ukselukk on 2 3 4 5 6 3 rakendatud, enne kui eemaldate välisosa, ukse esiosa. Avage uks ja pange rullikeeratud pajalapid hingede vahele (VAATA PILTI). Need hoiavad ust kinni langemast. Tõstke uks uuesti üles. Haarake ukse käepidemest ja vajutage sisse ukse ülaääres olevad kaks vedrut, seejärel tõstke uks eest. Pärast puhastamist (kasutades aknapuhastusvahendit), pange ukse esiosa tagasi kronsteinidele (VAATA PILTI).
Paigaldamine Paigaldamine Pliidi peaks paigaldama kvalifitseeritud elektrik. Pliit on raske. Mõned tavaliselt varjatud nurgad võivad olla teravad. KASUTAGE KINDAID kui liigutate pliiti. Enne pliidi paigaldamist tuleks kontrollida, et plidi mõõtmed sobiksid ülejäänud köögimööbliga. Mõõtke tööplaadi kõrgus põrandast tööplaadi pealispinnani ja alusplaadi laius seinast plaadi esiservani (VAATA PILTI). Pliidi võib paigaldada ka ühe seina või kõrge kapi äärde.
Hooldus Hooldus Pliidi remonti ja elektritöid peaks tegema kvalifitseeritud elektrik. Väljaõppimata isikud võivad pliiti või iseennast vigastada/või kahjustada muud sisseseadet. Kui Teie pliit ei tööta korralikult, vaadake lehekülgedel 18 ja 19 soovitusi, kuidas lahendada probleem. Tarbijakaitse Pöörduge müüja poole, kui teil on küsimusi, mis puudutavad pliiti või selle kasutamist. Hooldus ja tagavaraosad Pöörduge tootja või tootja poolt volitatud hooldusfirma poole.
Tehnilised andmed Tehnilised andmed Tootjal on õigus muuta siin toodud andmeid. See toode vastab EL-direktiivile 89/336/EEC ja 73/23/EEC IEC klass:Y.
Praktilised nõuanded ja soovitused Praktilised nõuanded ja soovitused Probleem Põhjus Mida teha Leib ja koogid ei kerki korralikult. Liiga madal ahju temperatuur põhjustab seda, et Kontrollige, kas kasutatav temperatuur vastab küpsetis kerkib, kuid langeb seejärel uuesti retseptis soovitatule. kokku. Leivatainas ei ole korralikult kerkinud. Kui jätta Kontrollige retseptis soovitatud kerkimisaega. tainas liiga kauaks tõmbe kätte kerkima, võib leib välja tulla madal.
Probleemid ja lahendused Probleemid ja lahendused Ärge hakake ise pliiti parandama, see võb Teid vigastada või lõhkuda pliidi. Kui Te ei suuda probleemi lahendada, pöörduge volitatud hooldusfirma poole. Probleem Mida teha Ahi ei võta voolu sisse Kontrollige, kas: • KAITSMED on terved • VOOLUJUHE on korralikult kontaktis • RCD (kui on olemas) ei ole katki Keetmine/praadimine võtab kaua aega.
821 04 55-00 2B tecknare ab Trükitud keskkonnasõbralikul paberil © MO-STK 2001-01-15