
User manual


ENGLISH 7
leaving the minute counter time showing
on the display and the
symbol lights
up. Time is given in seconds during
countdown. At the end of the set time
the buzzer goes off, the
symbol
disappears and the time reappears. You
can see the time while the minute counter
is functioning by pressing push button 1.
Buzzer
The buzzer goes off at the end of the
minute counter function and lasts about 7
minutes. The buzzer can be stopped by
pressing button 3.
Buzzer intensity
There are three different buzzer intensities:
to select the one you want press push
button 2 when the time is displayed.
#ORRECTINGCANCELLINGªTHEªMINUTEª
counter function
To correct or cancel the time set on
the minute counter, press keys 2 and
3 simultaneously and then release key
3 first. The time can be corrected at
any moment by pressing push button 1
followed by 2 or 3.
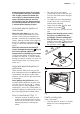
1 2 3
Hob: general notes on safety
When a gas cooker is being used
it produces heat and humidity in
THEªROOMªWHEREªITªISªINSTALLEDª&ORª
this reason the room must be well
ventilated, keeping the natural
ventilation openings free and
switching on the mechanical aeration
system (suction hood or electric fan,
see “Ventilation” and “Location and
!ERATIONvªPARAGRAPHS
If the cooker is used for a long time
additional aeration may be necessary,
for instance, opening a window, or a
more effective aeration by increasing
the power of the mechanical system if
there is one.
Lighting the burners
N.B. Burners are equipped with safety
thermocouples and can only be
IGNITEDªWITHªTHEªKNOBªATªTHEªh&ULLªONvª
POSITIONª/NCEªAªBURNERªHASªBEENªLITª
keep the knob pressed for about
10 seconds.
Automatic electric ignition of
burners
Push lightly the knob corresponding
to the burner you wish to use and
turn counterclockwise to the “Full on“
position, then depress the control knob.
Automatically the ignition spark shoots.
Matches can be used to light the burners
in a blackout.
Optimum use of the burners
To get the maximum yield with the
minimum consumption of gas it is handy
to keep the following points in mind:
r© /NCE©THE©BURNER©HAS©BEEN©LIT©ADJUST©
the flame according to your needs.
r© 5SE©AN©APPROPRIATELY©SIZED©PAN©FOR©
each burner (see the table below and
fig. 4).
r© 7HEN©THE©CONTENT©OF©THE©PAN©START©TO©
boil, turn the knob down to “Reduced
rate position” (small flame).
r© !LWAYS©PUT©A©LID©ON©THE©PAN
3. OPERATION