1681 BEDIENUNGSANLEITUNG INSTRUCTION MANUAL
WICHTIGE SICHERHEITSHINWEISE Beim Gebrauch eines Elektrogeräts sollten stets grundlegende Sicherheitsmaßnahmen beachtet werden. Lesen Sie sämtliche Hinweise vor Gebrauch Ihre Haushaltsnähmaschine aufmerksam durch. ACHTUNG – Zur Vermeidung von Verletzungen durch elektrischen Stromschlag: Die Maschine nie unbeaufsichtigt lassen, wenn sie mit dem Stromnetz verbunden ist. Unmittelbar nach dem Gebrauch sowie vor jeder Reinigung den Stecker aus der Steckdose ziehen.
Important Safety Instructions When using an electrical appliance, basic safety precautions should always be followed, including the following: Read all instructions before using your household sewing machine. DANGER-To reduce the risk of electric shock: Your household sewing machine should never be left unattended when plugged in. Always unplug your machine from the electric outlet immediately after using and before cleaning. Always unplug before changing lamp. Use a bulb 5 W max.
INHALTSVERZEICHNIS Hauptbestandteile der Maschine ..........................................................................................................................................5 Zubehör ................................................................................................................................................................................6 Betriebsschalter........................................................................................................................
CONTENTS Principal parts of the machine...............................................................................................................................................5 Accessories ..........................................................................................................................................................................6 Power switch ...................................................................................................................................
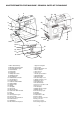
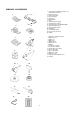
HAUPTBESTANDTEILE DER MASCHINE / PRINCIPAL PARTS OF THE MACHINE 1 2 19 20 18 5 21 6 22 7 23 8 3 4 24 25 9 26 12 13 10 14 11 15 16 17 1. Obere Fadenführung 2. Obefadenspannungsregler 3. Geschwindigkeitsregler 4. Rückwärtstaste 5. Fadengeber 6. Frontdeckel 7. Nadelpositionstaste 8. Start/Stopp-Taste 9. Anschiebetisch 10. Nadelklammerschraube 11. Schieberdeckel 12. Knopflochhebel 13. Hebel für Nadeleinfädler 14. Nadeleinfädler 15. Nähfußschaft 16. Nähfuß 17. Stichplatte 18. Spulenstop 19.
ZUBEHÖR / ACCESSORIES 1 1. Universaltfuß Geradstich Zickzack (an Nähmaschine montiert) 2. Knopflochschiene 3. Reißverschlussfuß 4. Knopfannähfuß 5. Kräuselfuß 6. Blindstichfuß 7. Spule 8. Schraubendreher (groß) 9. Schraubendeher (klein) 10. Schraubendreher für Stickplatteplatte 11. Garnrollenhalter (groß) 12. Garnrollenhalter (klein) 13. Nahttrenner 14. Extra-Garnrollenstift 15. Fingerschutz (montiert) 16. Nadeln 2 3 4 5 7 8 9 10 11 12 13 14 15 1. All purpose foot (On machine) 2.
BETRIEBSSCHALTER / POWER SWITCH 1. Verbinden Sie den Stecker des Anlassers mit der Nähmaschine und schließen Sie dann die Maschine an das Stromnetz an.. 2. Drücken Sie den Schalter "EIN". 3. Die Nähgeschwindigkeit kann mit Hilfe des Geschwindigkeitsreglers eingestellt werden. Nehmen Sie die Maschine von der Stromversorgung, wenn Sie diese unbeaufsichtigt lassen. 4. Benutzen Sie nur den Original Fußanlasser, um Schäden zu vermeiden. 1. Insert the foot control plug into the sewing machine.
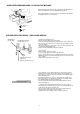
AUSRICHTEN DER MASCHINE / LEVELING THE MACHINE Wenn die Nähmaschine nicht fest steht, entfernen Sie den Nähtisch und stellen Sie die Maschine, wie in der Abbildung dargestellt, ein. If the sewing machine is not level, remove the sewing table and adjust the leveling by turning the foot as illustrated. Hinunter Down Herauf Up AUSWECHSELN DER NADEL / REPLACING NEEDLE Nadelklammer Needle clamp Nadelklammerschraube Needle clamp screw Fest Tight Locker Loose Flache Seite von Ihnen abgewandt.
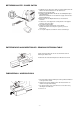
ABNEHMEN UND ANBRINGEN DES NÄHFUßSCHAFTES / HOW TO REMOVE AND ATTACH THE SHANK 1. 2. 3. 4. 1. 2. 3. 4. Schalten Sie die Maschine aus. Heben Sie den Nähfuß an. Drehen Sie die Schraube mit dem Schraubendreher gegen den Uhrzeigersinn, um den Schaft zu entfernen. Zum Anbringen legen Sie den Schaft auf die Nähfußsohle. Senken Sie den Nähfußlifter. Drehen Sie die Schraube im Uhrzeigersinn fest. Switch off the machine. Raise the presser foot.
AUFSPULEN DER UNTERFADENSPULE / WINDING THE BOBBIN Garnrolle Spool Garnrollenhalter Spool cap 1. Schieben Sie eine Garnrolle auf den Garnrollenstift und sichern Sie diesen mit einem Garnrollenhalter. Fadenkerbe Gap 1﹒ Place thread spool and spool cap onto spool pin Garnrollenstift Spool pin 2. Fädeln Sie den Faden, wie in der Abbildung dargestellt, ein. 2﹒ Follow the arrow direction, thread as diagram 3. Fädeln Sie den Faden von innen durch die obere Öffnung in der Spule.
5. Wenn die Spule voll ist, wird das Aufspulen automatisch beendet. Schneiden Sie dann den Faden ab. 5﹒ When winding is completed, release the foot control to stop machine, then cut the thread. 6. Drücken Sie den Spuler wieder nach links und entfernen Sie die volle Spule. 6﹒ Return winder spindle to left and remove full bobbin. Verändern Sie die Einstellung, wenn das Spulen ungleichmäßig ist: Drehen im Uhrzeigersinn bedeutet eine tiefere Position.
EINLEGEN DER UNTERFADENSPULE / INSERT AND REMOVE THE BOBBIN 1. Lösen Sie die Verriegelung des Schieberdeckels (drücken Sie nach rechts) und entfernen Sie den Schieberdeckel. 1. Release the lock of bobbin cover plate (push to right) and remove the bobbin cover. 2. Entfernen Sie die Spule. 2. Remove the bobbin. 3. Ziehen Sie etwa 10 cm Faden aus der aufgewickelten Spule und setzen Sie diese so ein, dass sie sich beim Ziehen des Fadens entgegen dem Uhrzeigersinn dreht. 3. Pull out thread approx.
5. Ziehen Sie dann den Faden in die Kerbe (B). (B) (A) 5. Next, pull thread into notch (B). 6. Ziehen Sie den Faden wie in der Abbildung dargestellt ein. 6. Pull the thread as arrow direction. 7. Bringen Sie den Schieberdeckel an (siehe Schritte A und B). Hinweis: Die Spule dreht sich gegen den Uhrzeigersinn. 7. Attach bobbin cover, follow step A and B. Note: Bobbin will rotate in counter-clockwise direction.
EINFÄDELN DES OBERFADENS / THREADING UPPER THREAD 1 2 4 3 5 6 7 Drehen Sie das Handrad zu sich, um die Nadel ganz nach oben zu stellen. Heben Sie den Nähfuß an. 1. Ziehen Sie den Faden unter die Fadenführung und ziehen Sie ihn nach oben über die Fadenführung. 2. Legen Sie ihn zwischen die beiden Spannungsscheiben. 3. Führen Sie den Faden durch den Schlitz auf der rechten Seite nach unten und durch den Schlitz auf der linken Seite nach oben. 4.
EINFÄDELN MIT DER ZWILLINGSNADEL / TWIN NEEDLE THREADING 1. Nehmen Sie den 2. Garnrollenhalter aus dem Zubehörfach und stecken Sie ihn in die dafür vorgesehene Halterung. 2. Stecken Sie die Garnrollen auf die beiden Garnrollenstifte. (Achten Sie darauf, dass die Enden auf der rechten Seite sind.) 3. Fädeln Sie die beiden Fäden genauso wie bei einem einzelnen Faden ein. 4. Nach dem Durchfädeln durch die Führungen siehe 5 müssen die Fäden dann durch die einzelnen Nadelöhre 6 gefädelt werden. Hinweis: 1.
AUTOMATISCHES NADELEINFÄDELN / AUTOMATIC NEEDLE THREADER HINWEIS: * Die Nadel muss in der höchsten Position stehen. * Der Nadeleinfädler kann nicht mit der Zwillingsnadel verwendet werden. (1) 1. Stellen Sie die Nadel auf die höchste Position. Senken Sie den Nadeleinfädler so weit wie möglich. 2. Haken A geht automatisch in das Nadelöhr. Ziehen Sie den Faden um die Führung B herum und unter den Haken A. 3.
HERAUSZIEHEN DES SPULENFADENS / PULLING UP BOBBIN THREAD 1. Halten Sie den Oberfaden mit der linken Hand und drehen Sie das Handrad langsam zu sich, bis die Nadel den Unterfaden heraufholt. 1. Hold the upper thread with your left hand and turn handwheel slowly and towards you until the needle pulls up the lower thread. 2. Ziehen Sie vorsichtig am oberen Faden, so dass der untere Faden in einer Schlinge heraus kommt. 2. Gently pull the upper thread, and the lower thread will come up in a loop. 3.
EINSTELLUNG DER OBERFADENSPANNUNG / ADJUSTING THREAD TENSION Bei geraden Nähten sollten der Nadelfaden und der Spulenfaden sich in der Mitte der beiden Stofflagen miteinander verbinden. Wenn Sie von oben und unten auf den Stich schauen, werden Sie bemerken, dass keine Lücken vorhanden sind. Jeder Stich ist gerade und gleichmäßig. Beim Einstellen der Oberfadenspannung gibt eine größere Zahl eine höhere Spannung an. Gründe, warum die Oberfadenspannung verändert werden sollte: 1.
EINSTELLUNG DER UNTERFADENSPANNUNG / BOBBIN THREAD ADJUSTMENT 1. Drehen Sie die Schraube durch das Loch hindurch links herum, um die Spannung zu verringern. 2. Die untere Fadenspannung ist bereits eingestellt. Verstellen Sie diese nicht, wenn es nicht wirklich erforderlich ist. 1﹒ Turn the screw to the left to decrease the tension. Verringern Decrease 2﹒ The lower thread tension is already adjusted, do not adjust it if it is not necessary.
STOFF-FADEN-NADEL –TABELLE / FABRIC–THREAD–NEEDLE –CHART Bitte beachten Sie die Hinweise zum Nähen der verschiedenen Stoffe in der folgenden Tabelle. Please pay attention to the following list as a guide for sewing different types of fabric.
LCD BILDSCHIRM & WAHLTASTEN/ LCD SCREEN & OPERATION BUTTONS 1 3 2 4 LCD Bildschirm Nähanzeige 7 5 8 1. Grundeinstellung (Geradstich) 2. Anzeige der Mustergruppen 3. Anzeige des Nähfußes 4. Musteranzeige 5. Stichlängenanzeige 6. Stichbreitenanzeige 7. Stichlängeneinstellung/Mustergruppenauswahl 8. Musterauswahltaste/Enter 9. Stichbreiteneinstellung/Mustergruppenauswahl 10. PES Einzelmusteranzeige 11. PES Einzelmustertaste 12. Spiegeltaste 13. Anzeige für den Spiegeltaste 14.
1 3 2 4 LCD Bildschirm Näh-Modus 5 1. Näh-Modus Anzeige 2. Näh -Modus Musterposition 3. Näh -Modus Musteranzahl im Display 4. Näh -Modus Nähanzeige 5. Näh -Modus Musteranzeige 6. PES Autostop Anzeige 7. PES Autostopptaste 8. Spiegeltaste 9. Anzeige für die Spiegeltaste 10. SPEICHER-Modus Einstelltaste im Nähmodus MEM SEW oder im Speichermodus MEM EDIT 11. Mustergruppenauswahltaste 11 10 9 8 7 6 MEM mode sewing screen 1. SEW mode indicator 2. SEW mode Pattern position 3.
TASTE NADELSTOPP OBEN /UNTEN / NEEDLE POSITION BUTTON 1. Das Drücken der Taste verändert die Nadelposition (nach oben/unten). 2. Die Nadel ist nach dem Drücken der Start/Stop-Taste während des Nähens automatisch in der obersten Position. 1. When you press the button your can change needle position (up/down) 2. The needle is automatically set at "top" position, when you press the Start/Stop button during sewing.
START / STOPP-TASTE / START / STOP BUTTON 1. Drücken Sie die Taste zum Starten oder Stoppen der Maschine. 2. Wenn Sie die Taste drücken, beginnt die Maschine langsam zu nähen und geht dann zu der eingestellten Geschwindigkeit über. 3. Wenn der Fußanlasser eingesteckt ist, ist die Start-/Stopp-Taste außer Funktion. 1. Press this button to start or stop the machine. 2. Press this button; machine will sew slowly then speed up to setting speed. 3.
MUSTERLISTE / PATTERN LIST Mustergruppe 1 Mustergruppe 2 Mustergruppe 3 MUSTERGRUPPENAUSWAHLTASTE (Select) 1. 2. 3. 4. 5. Drücken Sie die Mustergruppenauswahltaste „Select“ und wählen Sie die Mustergruppe 1, 2 oder 3. Die ausgewählte Mustergruppe muss durch enter bestätigt werden. Jetzt erscheint sie auf dem Display. Wählen Sie mit den Tasten hoch / runter – rechts / links Ihr Muster aus. Ihr ausgewähltes Muster ist jetzt schwarz unterlegt. Drücken Sie die Entertaste erneut.
EINSTELLUNG DER STICHBREITE/ ODER RECHTS/LINKS TASTE 1. Stellen Sie die Breite ein. Die Breite ist für jedes Muster begrenzt. Wenn die Einstellung außerhalb der Begrenzung liegt, ertönt der Summer 3 Mal. Dies bedeutet, dass Sie die Naht nicht breiter stellen können.. 2. Die Stichbreiteneinstellung kann mit ( +) und min. ( -) eingestellt werden. 3. Die Buchstabengröße kann mit dieser Funktion eingestellt werden. 4. Mit dieser Funktion können auch Muster ausgewählt werden.
PES AUTOSTOPTASTE- Einzelmusterfunktion / PES AUTO STOP BUTTON 1. Wenn das Zeichen ”﹀” angezeigt wird, kann die „PES Autostoppfunktion” eingestellt werden. 1. When ”﹀” shows, then “PES auto stop button” can be setup. 2. Die PES Autostoppfunktion ist eingestellt, wenn die Anzeige erscheint. 3. Die Nähmaschine stoppt automatisch nach dem Ende des gesamten Musters. 2. The PES auto stop function is set when indicator turns on. 3. Sewing machine will automatically stop after the complete pattern is finished.
Info – LCD Bildschirm Fehlerbehebung / Info – LCD Screen Error Correction SPULEN/ WINDING BOBBIN Nach dem Aufspulen schieben Sie den Spuler nach links. Nun können Sie nähen. After winding, push winder spindle to left and start sewing. FEHLERBEHEBUNG/ CORRECTION Während des Nähens erschein “x”. Die Maschine stoppt. Drehen Sie das Handrad, um das Problem der Fadenschlingung zu lösen. During sewing, LCD shows “ X ” and machine stops. Turn hand wheel to solve torque problem.
EINSTELLUNG DER MUSTERANZEIGE IM SPEICHER- UND NÄHMODUS / MODE EDIT SEWING INDICATOR Oben Up Drücken Sie den Stichlängeneinstellung/ oben-unten-Taste, um die Mustereinstellseite auszuwählen. Press stitch length set up/down button to choose edit pattern page. Unten Down Links Left Drücken Sie links/rechts zur Auswahl des Musters. Press left/right to choose pattern.
MUSTERFOLGE EINGEBEN IM SPEICHERMODUS MEM EDIT / PATTERN SEQUENCE IN EDIT INDICATOR 1. Drücken Sie die Taste “Select” bis der grüne Punkt bei der Position MEM leuchtet. 1. Press button „Select“ until the green light at position MEM appears. 2. Drücken Sie die Edit Taste, so lange bis „MEM EDIT“ im LCD Bildschirm erscheint. 2. Press Edit button, until „MEM EDIT“ appears oin display. 3. Betätigen Sie die Musterauswahltaste. 3. Press pattern selection button. 4.
MUSTER LÖSCHEN / DELETE PATTERN 1. Drücken Sie die Edit Taste bis im LCD Bildschirm „MEM EDIT“ erscheint. 1. Press Edit button till “MEM EDIT” appears on display. 2. Drücken Sie die Stichbreiteneinstelltasten links/rechts oder Stichlängeneinstelltasten oben/unten, um zu den zu löschenden Muster zu kommen 2. Press Stitch width button left/right or stitchlength button up/down in order to reach the pattern for deletion. 3. Drücken Sie auf löschen (delete). Das Muster rechts davon schiebt sich nach links. 3.
EINFÜGEN IN DEN NÄHMODUS / SEWING OPERATION INDICATOR PES Autostopptaste PES Autostopp button Im LCD Bildschirm sehen Sie: 1. Keine links/rechts Umkehrfunktion. 2. Stopp ohne das Muster zu beenden. 1. No left/right reverse function. 2. Stop without completed pattern. Im LCD Bildschirm sehen Sie: 1. Links/rechts Umkehrfunktion. 2. Stopp nach beendetem Muster. Info: Drücken Sie vor dem Nähbeginn die Taste pes Autostoptaste und Ihr Muster wird einmal genäht. 1. Left/Right reverse function 2.
Mustervergrößerung /Pattern Enlargement 1. 1. 2. 3. - 33 - Sie können das Muster bis zu 5 Mal vergrößern, indem Sie die Insert Taste drücken ( Siehe Musterabbildung) You can increase the pattern up to 5 times by pressing insert button. (see patterns) Beispiel für Vergrößerung.
MIT DEM NÄHEN BEGINNEN (VORBEREITUNG) Nachdem Sie sich mit der Bedienung der Nähmaschine vertraut gemacht haben, können Sie mit dem Nähen beginnen. Beachten Sie bitte vor dem Nähen die folgenden Punkte, um problemlos zu nähen. 1. Überprüfen Sie, ob die Nadel gerade, unbeschädigt und richtig eingesetzt ist. 2. Stellen Sie die Nadel vor Beginn und nach Ende des Nähens ganz nach oben. 3. Ziehen Sie vor dem Nähen vorsichtig den Ober- und Unterfaden ca. 10 cm heraus und durch den Nähfuß hindurch. 4.
GERADSTICH / STRAIGHT STITCHES 1. Dies ist eine der gebräuchlichsten Sticharten. 2. Der Universalfuß Zickzack Geradstich kann sowohl für Zickzack als auch für gerade Stiche verwendet werden. 3. Zum Nähen dünner Stoffe sollten Sie kleinere Stichlängen verwenden. 01 1. This stitching is one of most commonly used pattern. 2. The zigzag presser foot also can be used for straight stitches and zig zag stitches 3. For sewing thinner fabrics use a smaller stitch length.
ÄNDERN DER NÄHRICHTUNG / CHANGE SEWING DIRECTION 1. 2. 3. 1. 2. 3. Stoppen Sie beim Erreichen einer Ecke die Nähmaschine. Senken Sie dann die Nadel in den Stoff. Tipp: Benutzen Sie die Nadelposition oben/unten. Heben Sie den Nähfuß an und verwenden Sie die Nadel als Drehpunkt. Drehen Sie den Stoff um die Nadel herum in die gewünschte Richtung. Senken Sie den Nähfuß und fahren Sie mit dem Nähen fort. Stop the sewing machine when you reach a corner. Then lower the needle into fabric.
OVERLOCK STICHE (NÄHFUß Sonderzubehör) / OVERLOCK SEWING (OVERLOCK FOOT Optional) Verwenden Sie diese Stiche der Mustergruppe 1 und 2 zum Zusammennähen und Versäubern von Stoffkanten in einem Arbeitsgang. Use these stitches to sew and cast in one step. MG 1 MG 2 MG 2 GERADER STRETCHSTICH / STRAIGHT STRETCH STITCH Verwenden Sie diesen Stich für gestrickte, Trikot oder andere dehnbare Stoffe, auch geeignet für Schrittnaht und Taschenbeutel. Bei diesem Stich näht die Maschine vorwärts und rückwärts.
BLINDSTICH / BLIND STITCH Einstellungsposition: 1. Setzen Sie den Blindstichfuß ein. 2. Wählen Sie Muster “ 1 ” aus. (Mustergruppe 2) 3. Stellen Sie die Stichlänge auf “2,5 – 3 ” ein. 4. Stellen Sie die Stichbreite auf “3-5” ein. Set up position: 1. Fit blind stitch presser foot. 2. Pattern selection “ ”. 3. Stitch length dial at “2,5- 3” 4. Needle width dial at “3-5” 1. Falten Sie den Stoff wie dargestellt. Die Falten sollten so breit wie die spätere Saumbreite sein: die unterste Falte sollte ca.
KNOPFLÖCHER NÄHEN / BUTTONHOLE SEWING 1. Setzen Sie die Knopflochschiene ein. 2. Ziehen Sie den oberen und den unteren Faden ca. 10 cm heraus, und legen Sie diese unter die Knopflochschiene (Abbildung 1). 3. Markieren Sie die Knopflöcher auf dem Stoff (Abbildung 3). 4. Legen Sie den Stoff unter den Nähfuß. Legen Sie den Knopf, wie in Abbildung 4 dargestellt (siehe Pfeil), hinein. 5. Senken Sie den Nähfuß ab. 6. Ziehen Sie den Knopflochhebel nach unten und drücken Sie ihn nach hinten. 7.
REISSVERSCHLÜSSE EINNÄHEN / ZIPPER SEWING Verwenden Sie den Reißverschlussfuß. Wählen Sie den Geradstich 1. Der Reißverschlussfuß ist zum Nähen an einer Kante ausgelegt, um so das Nähen auf dem Reißverschluss zu vermeiden. 2. Bringen Sie den Reißverschlussfuß an. Tip: Heften Sie den Reißverschluss vorher ein. Use the zipper foot. Select straight stitch. 1. Zipper foot sews close to a seam, thus preventing sewing on the zipper. 2. Place zipper foot in position and attach firmly.
SÄUMER (Sonderzubehör) / HEMMING (Optional) 1. Heben Sie den Nähfuß an und stellen Sie die Nadel ganz nach oben. 2. Falten Sie den Stoffrand 2 Mal etwa 3 mm und legen Sie ihn unter den Nähfuß. 3. Senken Sie den Nähfuß. Nähen Sie ein paar Stiche und lassen Sie die Nadel im Stoff stecken. 4. Ziehen Sie den gefalteten Stoff in die spiralförmige Öffnung des Rollsaumfußes. 5. Zum Nähen halten Sie mit der linken Hand den Stoffrand etwas nach links.
REINIGEN UND ÖLEN / CLEANING AND OILING Achtung: Ziehen Sie stets den Netzstecker, bevor Sie die Glühlampe austauschen oder Wartungsarbeiten an der Maschine vornehmen. Schraube Screw Schraube Screw Ziehen Sie vor dem Reinigen den Stecker aus der Steckdose. Die Nähmaschine muss, damit sie ihre Funktionen beibehält und eine lange Lebensdauer hat, in regelmäßigen Abständen, gewartet und geölt werden. Note: Unplug the machine, if you clean it or if you change the lamp. Unplug the machine before cleaning.
ÖLEN DER BEWEGLICHEN TEILE IM KOPFDECKEL / OIL MOVEABLE PARTS INSIDE OF THE FACE COVER Achtung: Ziehen Sie stets den Netzstecker, bevor Sie die Glühlampe austauschen oder Wartungsarbeiten an der Maschine vornehmen. Ziehen Sie den Stecker aus der Steckdose und öffnen Sie den Kopfdeckel mit einem Schraubenzieher und tropfen Sie je einen Tropfen Öl ausschließlich auf die beweglichen Teile. Note: Pull out power supply plug before cleaning.
FEHLERTABELLE Problem Die Fäden verknoten unter dem Stoff Unregelmäßige Stiche Nadel gebrochen Fäden verheddert Faltenbildung Stiche werden ausgelassen Oberer Faden reißt Unterer Faden reißt Stoff bewegt sich nicht Nähmaschine blockiert, klopfendes Geräusch Die Nähmaschine arbeitet nicht Der untere Faden wird über den Stoff nach oben gezogen Mögliche Ursache Mögliche Fehlerbehebung - Der obere Faden ist falsch eingefädelt. - Die Oberfadenspannung ist auf O eingestellt. - Fädeln Sie neu ein.
FAULT FINDING CHART Suspected problem Threads kink together under the fabric. Irregular stitches Breaking needle Bunching of thread Puckering Probable cause Possible easy correction - Upper thread improper threading. - Upper tension dial at O position. - Re-thread. See page 14 - Increase upper thread tension. See page 18 - Incorrect needle size. - Improper threading. - Loose top thread tension - Pulling fabric. - Loose presser foot.
24 Monate Garantie Der Kaufbeleg mit dem Kaufdatum gilt als Garantienachweis. Bitte bewahren Sie den Beleg sorgfältig auf. Bitte setzen Sie sich im Garantiefall mit unserer Service Hotline in Verbindung. Die Garantieleistung gilt nur für Material- oder Fabrikationsfehler, nicht aber für Verschleißteile oder für Beschädigung an zerbrechlichen Teilen, z.B. Garnrollenstift. Das Produkt ist lediglich für den privaten und nicht für den gewerblichen Gebrauch bestimmt.
Guarantee 24 Months The receipt of purchase with date of purchase is the certificate for the guarantee. Please always keep carefully. In case of guarantee please contact our service hotline number. The guaranteeing is only for material defect and production errors, not for high mortality parts or damage on breakable parts; e.g. spool pin. The sewing machine is only for private and not for commercial or industrial use.