14 Contents Introduction 18 Extractor version 18 Filter version 18 Electrical connections 17 Safety warnings for electrician 17 Specifications 18 Installation 19 Satiety wakings for kitchen unit installer 19 ‘Wall unit mounting 20 ‘Wail mounting 21 Hood operation 22 Safety warnings for user 22 Maintenance and care 23 Opening the gristle 23 Grease filter 23 carbon filter 23 Changing the fight bulb 24 Cleaning 25 Special Accessories 25 Technical Assistance Service 25 /8 Vs o j’ Printed on recycled paper.
Introduction The hood s supplied as an extractor unit and can also be used with a filtering function by fitting activated carbon filters (special accessory). The unit features two outset holes, one of which A is located on the top of the unit while the other B is located on the rear. To connect up the has, you should first it my bayonet mounting flange € (@120 mm) on the outset required (if using the top outlet, fix the flange in place using the screw supplied as shown in Fig. 1).
Filter version | The air is filtered and recirculated through the front grille. Move the handle F to position F — Fig. 3. 81 You will need an original AEG KLF60/80 activated carbon filter for my filtering function. (See special accessories).
Electrical connections Check that the power supply voltage shown on the rating plate corresponds to the mains supply before proceeding to make any electrical connections. If the unit is supplied ready-fitted with a pig, it can be connected to any easily accessible socket installed in compliance with the regulations in force. it a fixed connection is required, the hood must be installed exclusively by an electrician registered with the local electrical company.
18 When wiring the plug ensure that ali strands of wire are securely retained in each terminal. Do not forget to tighten the mains lead clamp on the plug. Electrical connections 230 V using fixed power supply line with pig. 240 V using fixed power supply line {Great Britain}. {The unit should only be connects up by an authorized electrician. The units screened against radio interference in compliance with European Community directives 87/308 EWG, EN 550141 DIN VDE 0875 Part 1.
Installation When used as an extractor unit, the hood must be fitted with a 120mm diameter hose. ¥ the outset hose is instated in & horizontal position, it must nevertheless be slanted at an angle of 10° so that the air can flow outside without impediment. When installing the hood, make sure you respect the following minimum distance from the top edge of the cooking hob/ ring surfaces: electric cookers B850 mm . gas cookers 650 mm coal and ol cookers 700 mm min.
Wall unit mounting 20 Since the rule for rooms with fuel burning appliances Is “outlet hole of the same size as the ventilation hole”, a hole 0f500-800 cm?, which is 1o say larger hole, could reduce the performance of the extractor hood. 1# the hood Is used in Rs filtering function, it will operate simply and safely in the above conditions without the need for any of the aforementioned measures.
— Position the template on the wail. Drill four & mm & holes in the wall, 2in points H and 2in points |, — Fit the four 8 mm screw anchor plugs in the wall. Resew two screws in points H but do not tighten them fully home. — Adjust the units that iris positioned ata right angle to the wall by muting the two support screws G. Now hang the hood on the wall (holes H). Tighten the first two screws and, for safety's sake, screw the other two screws into the holes in the hood, — Fig.
Safety warnings for user 22 Hood Operation The hood is fitted with a variable speed motor. The most effective use of the hood is obtained by switching it on a few minutes before you start cooking and leaving it on a for approximately 15 minutes after you have finished, thus ensuring all cooking odors are eliminated.
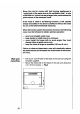
Maintenance? and care The hood must airways be disconnected from the mains power supply before beginning any maintenance work. — Open my aitch L and swing the grille downwards. — Fig. 7. — To remove the grille, pull it forwards from the right and release it. My grease filter has been designed to absorb the grease particles that are formed during cooking and is always used, irrespective of whether the hood s set up for extractor or filter operation. The synthetic filter is very thin {approx.
Warning Changing the light bulb 24 Removing the filter — Press the stops N and remove the fitter by pulling it downwards. Fig. 8 Always specify the hood model code number and serial number when ordering replacement filters. This information is shown on the registration plate located on the inside of the unit. The activated carbon filter can be ordered from the AEG technical assistance service. Failure to observe the instructions on cleaning the unit and changing the filters will cause a fire hazard.
Cleaning Warning: always disconnect the hood from the mains power supply before cleaning it. Neva insert pointed objects in the motor's protective grille. Wash my outside surfaces using a delicate detergent solution. Never use caustic detergents or abrasive brushes or powders. Only ever clean the switch panel and filter grille using a damp cloth and delicate detergents. Iris extremely important to clean the unit and change the filters at the recommended intervals.
it your appliance has a fault, please contact our service engineer and state the following numbers: F-NR. AEG Domestic Appliances Ltd Customer Care Department 55-77 High Street Slough Berkshire SL11DZ Telephone: 08705 350350 AEG Exaggerate AG Posthaste 1036 D-90327 Nirenberg © Copyright by AEG H 260 264 700 L 486 Ed.