
User manual


35
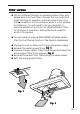
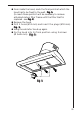
● From inside the hood, mark the final points at which the
hood has to be fixed to the wall.
Fig. 5.Fig. 5.
Fig. 5.Fig. 5.
Fig. 5.
(to reach these points it will be necessary to remove
activated carbon filter frame until the filter itself is
replaced - see
Fig. 2Fig. 2
Fig. 2Fig. 2
Fig. 2).
● Remove the hood.
● Drill 2 holes (Ø 8 mm) and insert the plugs (Ø 8 mm).
Fig. 5.Fig. 5.
Fig. 5.Fig. 5.
Fig. 5.
● Hang the extractor hood up again.
● Fix the hood into its final position using 2 screws
(Ø 5x45 mm).
Fig. 5.Fig. 5.
Fig. 5.Fig. 5.
Fig. 5.
Fig. 5Fig. 5
Fig. 5Fig. 5
Fig. 5