ÖKO-ARCTIS SUPER 2170-4 Upright Freezer Operating Instructions 818 14 33-00/7
Dear customer, Before placing your new freezer into operation please read these operating instructions carefully. They contain important information for safe use, for installation and for care of the appliance. Please keep these operating instructions for future reference. Pass them on to possible new owners of the appliance.
Contents Important Safety Instructions . . . . . . . . . . . . . . . . . . . . . . . . . . . . . . . . . . . 5 Environmental Information . . . . . . . . . . . . . . . . . . . . . . . . . . . . . . . . . . . . . Packaging . . . . . . . . . . . . . . . . . . . . . . . . . . . . . . . . . . . . . . . . . . . . . . . . . . . . . Old Appliances . . . . . . . . . . . . . . . . . . . . . . . . . . . . . . . . . . . . . . . . . . . . . . . . . 7 7 7 Appliance Transport . . . . . . . . . . . . . . . . . . . . .
Contents Maintenance and Cleaning . . . . . . . . . . . . . . . . . . . . . . . . . . . . . . . . . . . . . 24 Internal Cleaning . . . . . . . . . . . . . . . . . . . . . . . . . . . . . . . . . . . . . . . . . . . . 24 External Cleaning . . . . . . . . . . . . . . . . . . . . . . . . . . . . . . . . . . . . . . . . . . . . 24 Something not Working . . . . . . . . . . . . . . . . . . . . . . . . . . . . . . . . . . . . . . . . 24 Service & Spare Parts . . . . . . . . . . . . . . . . . . . . . . . . . . . .
1 Important Safety Instructions These warnings are provided in the interests of your safety. Ensure that you understand them all before installing or using this appliance. Your safety is of paramount importance. If you are unsure about any of the meanings of these warnings contact the Customer Care Department. Prior to Installation • Check the freezer for transport damage. Under no circumstances should a damaged appliance be installed! In the event of damage, please contact your retailer.
Important Safety Instructions Child Safety • Do not allow children to tamper with the controls or play with the product. • Keep packaging material away from children! (There is a risk of suffocation!) • • • • • • • • During Use This appliance is designed for domestic use only, specifically for the storage of edible foodstuffs only. It is not intended for commercial or industrial use. Containers with flammable gases or liquids can leak at low temperatures.
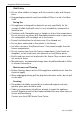
Environmental Information Packaging All transit packaging materials are environmentally compatible and can be reused. Wood is un-treated. The plastics can be recycled and are identified as follows: >PE< for polyethylene, e.g. the outer covering and the bags in the interior. >PS< for polystyrene foam, e.g. the pads, which are pure hydrocarbon compounds and can be recycled. The carton parts are made from recycled paper. Please dispose of the packaging with due care for the environment.
0 In order to push the appliance into its final position, press carefully at the top of the door and tip the appliance back slightly. The weight is then transferred to the back wheels and the appliance can be easily pushed. Before Use Packaging 0 Remove all adhesive tape and packaging from the interior of the appliance. 3 Any remnants of adhesive can be removed with white spirit. 0 Remove the transport protection pieces and pull off the adhesive tape.
Installation Installation Location The appliance should be installed in a well ventilated, dry room. Energy use is affected by the ambient temperature. The appliance should therefore – not be exposed to direct sunlight; – not be installed next to radiators, cookers or other sources of heat; – only be installed at a location whose ambient temperature corresponds to the climate classification, for which the appliance is designed.
Installation The freezer needs air Air is fed under the door through the vent slots in the base and is exhausted upwards along the back wall. To ensure proper air circulation never cover or alter the vent openings. Important! If the appliance is installed under, for example, a hanging cabinet, a clearance of at least 10 cm between the top of the appliance and the cabinet above it must be maintained.
Installation Electrical Connection Any electrical work required to install this appliance should be carried out by a qualified electrician or competent person. 1 WARNING – THIS APPLIANCE MUST BE EARTHED The manufacturer declines any liability should these safety measures not be observed. Before switching on, make sure the electricity supply voltage is the same as that indicated on the appliance rating plate. The rating plate is inside, on the left. The appliance is supplied with a 13 amp plug fitted.
Opening the Freezer Door If the freezer door is closed when the appliance is in operation, it is possible that it cannot be immediately opened again, because a vacuum occurs in the freezer which holds the door closed until pressure has been equalised. The door can be opened again after several minutes. Changing Over The Door Hinges The door hinges can be changed from right (as supplied) to left if required to suit the location where the appliance is installed.
Changing Over The Door Hinges 0 Remove the door fitting from the door bearing (1, 2). Move the bearing pivot from the right to the left hand hole (3). Place the door fitting supplied on the bearing pivot (4, 5). 0 Remove the door fitting on the lower right (1) and reposition the door bearing cover from the lower left to the right of the door (2), place the door fitting supplied in the lower left of the door (3). Carefully remove the door to the front and place on one side.
Changing Over The Door Hinges 0 Carefully slide the door onto the top bearing pivot and close. 0 Place the lower door bearing with the bearing pivot in the lower left of the door and fasten. 0 Move the door handle from the left to the right and cover the remaining holes with the hole cover pins attached. 0 Open the door and fit the plinth cover.
Description of the appliance View of the appliance ➀ ➁ ➂ Freezer tray with ice cube trays and ice pack Compartments with lids and drawers (for storage and freezing) Drawer (for frozen food storage only) The bottom drawer also serves as a water collector when defrosting Freezer tray A freezer tray with two ice cube trays and one cold accumulation block is inserted at the very top of the freezer compartment. 3 Berries, for example, can be pre-frozen on the freezer tray.
Cold accumulation block There is one cold accumulation block in the freezer tray. Refer to the section “Prior to Initial Start–Up” concerning freezing of the cold accumulation block. 3 In the event of a power failure or malfunction, the cold accumulation block will increase the hold over period by several hours, providing it is placed in the uppermost drawer, at the front, above the frozen food. You can also use the cold accumulation block in a cool bag.
Initial use 1 2 3 4 5 6 Warning indicator light (red) WARNING OFF button Fast freeze indicator light (yellow) Fast freeze button Pilot light (green) Temperature regulator and ON/OFF-switch The temperature regulator is also the ON/OFF-switch. A coin is needed to turn the temperature regulator. This makes it more difficult to change the temperature setting accidentally (child protection).
Initial use 0 Insert plug into mains socket. 0 Turn the temperature regulator to the desired setting with the aid of a coin. The green pilot light illuminates. The compressor starts and then runs automatically. A warning tone sounds and the red warning light flashes indicating that the required storage temperature has not yet been reached. 0 Press the WARNING OFF button to switch off the warning tone.
Switching the Appliance Off 0 To switch off, turn the temperature regulator to position "0". The green pilot light goes out. 0 0 0 0 If the appliance is not going to be used for an extended period: Turn the temperature regulator to position "0". The green pilot light goes out. Unplug or switch off at the mains supply. Defrost freezer compartment and clean thoroughly (see section: "Maintenance and Cleaning"). Leave door open after defrosting to avoid accumulation of odours.
Caution! Do not touch frozen food with wet hands. Your hands could freeze to the food. 0 Place the packed food in the drawers. Unfrozen food must not touch items already frozen, otherwise the frozen food could begin to defrost. Tips: • The following are suited for the packaging of frozen goods: – freezer bags and polyethylene wraps; – plastic containers for frozen goods; – extra–thick aluminium foil. • The following are suitable for sealing bags and wrap: plastic clips, rubber bands or tape.
Preparation of Ice Cubes 0 Fill the ice cube tray 3/4 full with cold water, place it in the freezer and leave to freeze. 0 To loosen the frozen cubes, either bend the ice cube tray or hold it under running water for a few seconds. Important! Never try to free an ice tray that is frozen to the freezer compartment using pointed or sharp edged objects. Use a soft plastic scraper. Storage Goods Symbols/Freezing Calendar • The symbols on the drawers show different types of frozen goods.
Defrosting 1 0 0 0 0 0 22 Warning! • Do not use electrical heating appliances or any other mechanical or artificial devices to speed up the defrosting process, with the exception of those recommended in these operating instructions. • Do not use defrosting sprays, they can be hazardous to your health and/or contain substances that damage plastics.
Hints and Tips Normal Operating Sounds • You may hear faint gurgling or bubbling sounds when the refrigerant is pumped through the coils or tubing at the rear, to the cooling plate/evaporator. • When the compressor is on, the refrigerant is being pumped round and you will hear a whirring sound or pulsating noise from the compressor. • A thermostat controls the compressor and you will hear a faint click when the thermostat cuts in and out.
Maintenance and Cleaning Before any maintenance or cleaning work is carried out DISCONNECT the appliance from the ELECTRICITY supply. Internal Cleaning 0 Defrost the freezer compartment (see section: "Defrosting"). 0 Clean the inside and accessories with warm water and bicarbonate of soda (5 ml to 0.5 litre of water). Rinse and dry thoroughly. Warning! • Do not use detergents, abrasive powders, highly perfumed cleaning products, wax polishes or cleaning products containing bleach or alcohol.
Something not Working Sympton Solution Check the ambient temperature is within the appliances operating limits The temperature in the freezer is too high. Check the temperature regulator is turned to the correct setting relative to ambient conditions. Adjust the temperature regulator to give correct temperature control. Check that the door is closed. The compressor runs continuously Large quantities of food have recently been placed in the cabinet and/or door is frequently opened.
Service & Spare Parts In the event of your appliance requiring service, or if you wish to purchase spare parts, contact your local AEG Service Force Centre by telephoning 08705 929 929 Your call will be automatically routed to the Service Centre covering your post code area. Help us to help you Please determine your type of enquiry before writing or telephoning.
Guarantee Conditions AEG offer the following guarantee to the first purchaser of this appliance: 1. The guarantee is valid for 12 month commencing when the appliance is handed over to the first retail purchaser, which must be verified by purchase invoice or similar documentation. The guarantee does not cover commercial use. 2. The guarantee covers all parts or components which fail due to faulty workmanship or faulty material.
Guarantee Conditions European Guarantee If you should move to another country within Europe then your guarantee moves with you to your new home subject to the following qualifications: • The guarantee starts from the date you first purchased your product. • The guarantee is for the same period and to the same extent for labour and parts as exist in the new country of use for this brand or range of products. • This guarantee relates to you and cannot be transferred to another user.
Technical Terminology • Refrigerant Liquids that can be used to a generate a cooling effect are known as refrigerants. They have a relatively low boiling-point, indeed so low, that the warmth from the food stored in the fridge or freezer can cause the refrigerant to boil and vaporise. • Refrigerant Circuit Closed circulation system that contains the refrigerant. The refrigerant circuit comprises primarily of an evaporator, a compressor, a condenser and pipe work.
Regulations, Standards, Guidelines This appliance was designed for household use and was manufactured in accordance with the appropriate standards. The necessary measures in accordance with appliance safety legislation regulations (GSG), accident prevention regulations for refrigeration appliances (VBG 20) and the regulations of the German Society of Electrical Engineers (VDE) were observed in the manufacture of this appliance. The refrigerant circuit has been checked for leaks.
AEG Hausgeräte GmbH Postfach 1036 D-90327 Nürnberg http://www.aeg.hausgeraete.