2600 D Cooker hood Operating and Installation Instructions
Contents Safety instructions ..................................................... 2 Description of the cooker hood ................................... 3 Using the cooker hood ............................................... 4 Maintenance and cleaning .......................................... 6 What to do if .............................................................. 8 Service and Spare Parts ............................................ 9 Customer Care ....................................................
Use of cooker hood ● This appliance is for domestic use only in a normal household. ● Never leave any deep-frying, melting fat, paraffin or any other ● ● inflammable liquid unattended on the hob. In the event of fire: Immediately switch off the cooker hood and the cooker. Note! Cover the fire. Never use water. Never do any flambé cooking underneath the cooker hood. It can cause a fire. Remember that overheated fat may spontaneously ignite. Never leave the frying pan unattended.
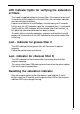
Using the cooker hood The control panel Best results are obtained by using a low speed for normal conditions and high speed when odours are more concentrated. Turn the hood on a few minutes before you start cooking then you will get an underpressure in the kitchen. It should be left on after cooking for about 15 minutes or until all odours have disappeared. Fig. 2 A B C D E F G - H - Main switch, hood on/off. Start and choice of motor speed 1-2-3-1-2.........
LED Indicator lights for verifying the saturation of filters This hood is supplied without a charcoal filter. If the hood is to be used in the recirculation mode with a charcoal filter, the saturation indicator must be activated as follows: Depress and hold the A and B buttons simultaneously for 3 seconds.
Maintenance and cleaning Before doing any maintenance work on the hood, disconnect it from the main supply by disconnecting the plug from the wall socket or unscrewing the fuse. Cleaning the hood Clean the outside of the hood using a damp cloth and a mild detergent. Never use corrosive, abrasive or flammable cleaning products. Cleaning the grease filters Clean the filter every month or every other month according to how much the hood is used. The cleaner the filters, the more grease they collect.
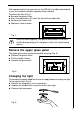
After approximately three years of use, the KF8 filter should be replaced with a new, as the odour reduction capacity will be reduced. To remove the filter (Fig. 4): ● Remove the grease filters. ● Press the red buttons (A), lower the front of the carbon filter. ● Remove the carbon filter. ● Replace in reverse order. A A Fig. 4 Clean the filters regularly. The grease that collects in the filters and the duct could ignite if a hot plate is left on (or if overheating occurs).
What to do if If your appliance fails to work properly please carry out the following checks. Symptom Solution The cooker hood will not start... Check that: The hood is connected to the electricity supply. Check that the fan speed control is set to 1, 2 or 3. The cooker hood is not working effectively.. . Chec k that: The fan speed is set high enough for the task. The grease filters are clean. The kitchen is adequately vented to allow the entry of fresh air.
Service and spare parts In the event of your appliance requiring service, or if you wish to purchase spare parts, contact your local AEG Service Force Centre by telephoning 08705 929 929 Your call will be automatically routed to the Service Centre covering your post code area. For the address of your local Service Force Centre and further information about Service Force, please visit the website at www.serviceforce.co.uk Please ensure that you have read the section „What to do if....
Guarantee conditions Guarantee Conditions AEG offer the following guarantee to the first purchaser of this appliance. 1. The guarantee is valid for 12 months commencing when the appliance is handed over to the first retail purchaser, which must be verified by purchase invoice or similar documentation.The guarantee does not cover commercial use. 2. The guarantee covers all parts or components which fail due to faulty workmanship or faulty materials.
Before you move please contact your nearest Customer Care Centre, listed below, to give them details of your new home.They will then ensure that the local Service Organisation is aware of your move and able to look after you and your appliances.
Installation Unpacking Check that the cooker hood is not damaged. Transportation damages should immediately be reported to the transport company. Damages, faults and missing parts should immediately be reported to the retailer. Dispose carefully of the packaging material so that it is out of the way of small children. Position The cooker hood should be mounted freely hanging on the wall.
Mounting the cooker hood - Fig. 8 Position the template (1) on the wall and mark the position, and drill the holes (2 x Ø 8 mm).Mount the two rawl plugs with the hooks (3) ● Hang the hood on the hooks and level it with the adjustment screws (4) ● Remove the grease filters (5) and mark for the two screws (6). Remove the hood and drill the holes (2 x Ø 8 mm). ● Insert the rawl plugs (7) and hang the hood on the wall again.
a a S Fig.
Exhaust tube Power outlet Electric hob 500 mm Gas hob 650 mm Charcoal and oil 700 mm Wall bracket Electric hob 500 mm Gas hob 650 mm Charcoal and oil 700 mm Fig.
AEG Hausgeräte GmbH Postfach 1036 D-90327 Nürnberg http://www.aeg.hausgeraete.de © Copyright by AEG LI1LLD Ed.