…KO - SANTO 2842-6 i Integrating Fridge Freezer Operating and Installation Instructions
Dear customer, Before placing your new refrigerator/freezer into operation please read these operating instructions carefully. They contain important information for safe use, for installation and for care of the appliance. Please keep these operating instructions for future reference. Pass them on to possible new owners of the appliance.
Contents Safety . . . . . . . . . . . . . . . . . . . . . . . . . . . . . . . . . . . . . . . . . . . 4 Disposal . . . . . . . . . . . . . . . . . . . . . . . . . . . . . . . . . . . . . . . . . 5 Appliance Packaging Information . . . . . . . . . . . . . . . . . . . . . . . 5 Disposal of old Appliances . . . . . . . . . . . . . . . . . . . . . . . . . . . . 5 Remove transport safeguard . . . . . . . . . . . . . . . . . . . . . . . . . 6 Starting up and temperature regulation . . . . . . . . . . . . . . . .
Safety Please read this instruction book before using the appliance and retain for future reference. These warnings are provided in the interests of your safety, ensure you understand them fully before using the appliance. Intended use ¥ The appliance is intended for use in the home. It is suitable for the cooling, freezing and storing of frozen food, as well as for making ice.
extinguisher refill cartridges etc in the refrigerator/freezer. ¥ Bottles and cans must not be placed in the freezer compartment. They can burst when the contents freeze, high carbonate content drinks can even explode! Never store lemonade, juices, beer, wine, sparkling wine etc. in the freezer compartment. ¥ Ice cream or ice cubes can cause Òfrost/freezerÓ burns if consumed straight from the freezer. ¥ Do not touch frozen food with wet hands. Your hands could freeze to the food.
Warning! Before disposing of old appliances make them inoperable. Remove plug from mains, sever the power cable, remove or destroy any snap or latch closures, to prevent small children being trapped inside. ¥ Use an authorised disposal site. Remove transport safeguard The appliance and the interior fittings are protected for transport. ¥ Remove all adhesive tape and packing pieces from the interior of the appliance. You can remove any remnants of adhesive using white spirit.
Starting up and temperature regulation Wash the inside of the appliance with lukewarm water with a little bicarbonate of soda added (5ml to 0,5 litre of water). Do not use soap or detergent as the smell may linger. Dry the appliance thoroughly. ¥ When the refrigerator compartment door is opened, the internal lighting is switched on. The temperature selector knob is located on the RH side of the refrigerator compartment. Setting Ò0Ó: Off. Setting Ò1Ó: Hightest temperature, (warmest setting).
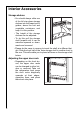
Interior Accessories Storage shelves ¥ You should always slide one of the full size glass storage shelves into the lowest set of guides, above the fruit and vegetable containers, and keep it in this position. ¥ The height of the storage shelves can be adjusted: ¥ To do this pull the storage shelf forward until it can be swivelled upwards or downwards and removed. D338 ¥ Please do the same in reverse to insert the shelf at a different height.
Fresh food refrigeration To obtain the best performance: ¥ do not store warm food or evaporating liquid in the refrigeator ¥ do cover or wrap the food, particularly if it has a strong flavour. ¥ Position food so that air can circuiate freely round it. Useful hints: Meat (all types): wrap in polythene bags and place on the glass shelf above the vegetable drawer(s) For safety, store in this way only one or two days at the most.
¥ Allow warm food to cool down before freezing. The warmth will cause increased ice formation and increase the power consumption. ¥ Please note the maximum storage times specified by the manufacturer. ¥ Thawed foods which have not been processed further (cooked into meals) may not under any circumstances be frozen a second time. ¥ Containers with flammable gases or liquids can leak at low temperatures.
Ice pack There is an ice pack in one drawer of the freezer. In the event of a power failure or malfunction, the ice pack will lengthen the amount of time it takes for the frozen food to become too warm by several hours. The ice pack can only fulfil this task optimally if it is placed in the uppermost drawer, at the front, above the frozen food. You can use the ice pack for cooling cold bags. Preparation of Ice Cubes 1.
Freezer The freezer compartment, however, will become progressively covered with frost. This should be removed with the special plastic scraper provided, whenever the thickness of the frost exceeds 4 mm. During this operation it is not necessary to switch off the power supply or to remove the foodstuffs. However when the ice becomes very thick on the inner liner, complete defrosting should be carried out as follows: 1.
3. 4. Defrost freezer compartment and clean thoroughly (see section: ÒCleaning and CareÓ). Leave the door open to avoid the build up of odours. Cleaning and Care For hygienic reasons the appliance interior, including interior accessories, should be cleaned regularly. Warning! Before carrying out any cleaning or maintenance, disconnect the appliance from the electricity supply. ¥ Never clean the appliance with a steam cleaner.
5. Check the water drain hole on the rear wall of the fridge. Clear a blocked drain hole with the aid of the drain cleaning tool included with the appliance. 6. When everything is dry place appliance back into service. Energy Saving Tips ¥ Do not install the appliance near cookers, radiators or other sources of warmth. High ambient temperatures cause longer, more frequent operation of the compressor.
Something Not Working If the appliance is not functioning correctly, please carry out the following checks before contacting your local AEG Service Force Centre. Warning! Repairs should only be carried out by qualified service engineers. Repairs carried out by inexperienced persons may cause injury or serious malfunctioning. Malfunction Possible Cause Remedy Appliance is not switched on Switch on the appliance. Mains plug is not plugged in Insert mains plug. or is loose. Appliance does not work.
Malfunction Possible Cause Remedy The compressor does not This is normal, no error has The compressor starts after start immediately after chan- occurred. a period of time. ging the temperature setting. Water on the floor or on sto- Water drain hole is blocked. See the "Cleaning and rage shelves. Care" section. If, after carrying out the necessary checks there is still a fault with your appliance please contact your local AEG Service Force Centre.
Service and Spare Parts If you require a service engineer or wish to purchase spare parts, contact your local AEG Service Force Centre by telephoning: 0870 5 929929 Help us to help you Please determine your type of enquiry before telephoning. When you contact us we need to know: 1.Your name, address and post code 2.Your telephone number 3.Clear and concise details of the fault - What is the fault? - When does the fault occur? 4.The model, production number and product identification number. 5.
Guarantee Conditions Guarantee Conditions AEG offer the following guarantee to the first purchaser of this appliance. 1. The guarantee is valid for 12 months commencing when the appliance is handed over to the first retail purchaser, which must be verified by purchase invoice or similar documentation. The guarantee does not cover commercial use. 2. The guarantee covers all parts or components which fail due to faulty workmanship or faulty materials.
Installation Electrical Connection Any electrical work required to install this appliance should be carried out by a qualified electrician or competent person. WARNING Ð THIS APPLIANCE MUST BE EARTHED The manufacturer declines any liability should these safety measures not be observed. Before switching on, make sure the electricity supply voltage is the same as that indicated on the appliance rating plate. The rating plate is inside, on the left. The appliance is supplied with a 13 amp plug fitted.
Installation Location The appliance should be set up in a well ventilated, dry room. Energy use is affected by the ambient temperature. The appliance should therefore Ð not be exposed to direct sunlight; Ð not be installed next to radiators, or other sources of continuous heat; Ð only be installed at a location whose ambient temperature corresponds to the climate classification, for which the appliance is designed.
P P A P1 P1 D114 Right opening Remove the pins ÒPÓ and ÒP1Ó. Left opening 1. Remove ÒPÓ from both sides and the door. 2. Remove middle hinge (A) from the left side refit it on the right side. 4. Refit door and ÒPÓ on the left side. 5. Remove ÒP1Ó from the right side. Housing dimensions Height Depth Width 1780 mm 550 mm 560 mm Instructions for building-in Apply joint the sealing strip as shown in figure.
Push appliance into the housing until stop strip (A) touches the kitchen unit. A D023 Open the door and push the appliance against the side of the kitchen unit opposite to that of appliance hinges. Fasten the appliance with 4 screws provided in the kit included with the appliance. Snap vent grille (C) and hinge cover (D) into position. D D723 C Apply covers (B) on joint cover lugs and into hinge holes.
Separate parts A, B, C, D as shown in the figure B A C D PR266 50mm Place guide (A) on the inside part of the furniture door, up and down as shown in the figure and mark the position of external holes. After having drilled holes, fix the guide with the screws supplied. A 20 m m PR166 Fix cover (C) on guide (A) until it clips into place.
Open the appliance door and the furniture door at 90¡. Insert the small square (B) into guide (A). Put together the appliance door and the furniture door and mark the holes as indicated in the figure. Remove the squares and drill holes with ¿ 2 mm at 8 mm from the outer edge of the door. Place the small square on the guide again and fix it with the screws supplied. 8mm A PR167 B Should the lining up of the furniture door be necessary, use the clearance of slots.
Regulations, Standards, Guidelines This appliance was designed for household use and was manufactured in accordance with the appropriate standards. The necessary measures in accordance with appliance safety legislation regulations (GSG), accident prevention regulations for refrigeration appliances (VBG 20) and the regulations of the German Society of Electrical Engineers (VDE) were observed in the manufacture of this appliance. The refrigerant circuit has been checked for leaks.
AEG HausgerŠte GmbH Postfach 1036 D-90327 NŸrnberg http://www.aeg.hausgeraete.