OVERLOCK NÄHMASCHINE Modell: 300 Modell: 320 BEDIENUNGSANLEITUNG
WICHTIGE SICHERHEITSHINWEISE Beim Gebrauch eines Elektrogeräts sollten stets grundlegende Sicherheitsmaßnahmen beachtet werden. Dazu gehören: Lesen Sie sämtliche Hinweise vor Gebrauch Ihre Haushaltsnähmaschine aufmerksam durch. ACHTUNG – Zur Vermeidung elektrischer Schläge: Die Maschine nie unbeaufsichtigt lassen, wenn sie mit dem Stromnetz verbunden ist. Unmittelbar nach dem Gebrauch sowie vor jeder Reinigung den Stecker aus der Steckdose ziehen.
INHALTSVERZEICHNIS 1. IHRE OVERLOCKMASCHINE IM ÜBERBLICK Die wichtigsten Teile ...................................................................................................................2 Zubehör .......................................................................................................................................3 Aufstellen der Maschine ..............................................................................................................4 Vorbereiten des Einfädelns ........
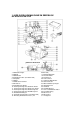
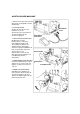
1. IHRE OVERLOCKMASCHINE IM ÜBERBLICK DIE WICHTIGSTEN TEILE geöffneter Arbeitstisch 1. Nähfußdruckregler 2. Nählicht 3. Nähfußhebel 4. Fadenabschneider (nur Modell 320) 5. Stichplatte 6. Nähfuß 7. Nahtbreiteneinstellrad 8. Arbeitstisch 9. Fadenführungsständer 10. Fadenspannungseinstellrad linke Nadel 11. Fadenspannungseinstellrad rechte Nadel 12. Fadenspannungseinstellrad Untergreifer 13. Fadenspannungseinstellrad Obergreifer 14. Nadelfadenführungen 15. Fadenabschneiderhebel (nur Modell 320) 16.
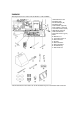
ZUBEHÖR Alle aufgelisteten Teile sind bei Ihrem Händler vor Ort erhältlich. 1. Zweifadenkonverter (nur Modell 320) 2. Rollsaumfinger (B) (nur Modell 320) 3. Satz Nadeln (optional) 4. Flusenbürste (optional) 5. Schraubenzieher (klein) 6. Bandmaß (optional) 7. Maschinenhaube 8. Schraubenzieher (groß) 9. Öler 10. Obermesser 11. Schraubenschlüssel 12. Garnrollennetz 13. Pinzette 14. Garnrollenteller 15. Garnrollenhalter 16. Kordelführung 17.
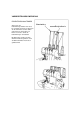
AUFSTELLEN DER MASCHINE 1. Entfernen Sie überschüssiges Öl im Bereich der Stichplatte und der Arbeitsplatte. 2. FUSSANLASSER Stecken Sie den Stecker des Fußanlassers in die Anschlussbuchse und schließen Sie das Netzkabel an die Stromversorgung an. 3. NETZ-/NÄHLICHTSCHALTER Die Maschine ist nicht funktionsbereit, solange der Netz-/Nählichtschalter nicht eingeschaltet ist. Mit diesem Schalter werden gleichzeitig Stromversorgung und Nählicht einbzw. ausgeschaltet.
VORBEREITEN DES EINFÄDELNS FADENFÜHRUNGSSTÄNDER Ziehen Sie den Fadenführungsständer nach oben, bis er hörbar ausrastet. Positionieren Sie die Garnrollen auf den Stiften und ziehen Sie den Faden von hinten nach vorne durch die Fadenführungen am Ständer. Die Garnrollen werden auf dem Garnrollenständer gehalten, wenn der Garnrollenhalter nach unten gedrückt wird.
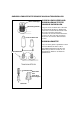
GARNROLLENKAPPEN FÜR GÄNGIGE HAUSHALTSGARNROLLEN Garnrollenkappe Haushaltsgarnrolle konische Garnrolle GARNROLLENSCHEIBEN UND GARNROLLENHALTER FÜR KONISCHE GARNROLLEN Für große konische Garnrollen verwenden Sie die Garnrollenhalter aus Gummi und setzen diese mit dem breiteren Ende nach oben auf. Für kleinere Garnrollen verwenden Sie dieselben Garnrollenhalter, nur dass Sie diese mit dem schmaleren Ende nach oben auf den Garnrollenstift stecken. GARNROLLENNETZE Polyester- bzw.
FLUSENBEHÄLTER Bei angebrachtem Flusenbehälter werden dort alle Nähabfälle gesammelt. Nach beendigter Arbeit klappen Sie den Flusenbehälter wie abgebildet nach oben, sodass Nase C in Schlitz D greift und der Stift auf der linken Seite des Flusenbehälters in die untere Aussparung B gleitet. KANTENLINEAL Bei Verwendung des Kantenlineals wird der Stoff im gleichen Abstand zur Stoffkante zugeschnitten und genäht. Die Breite lässt sich über das Kantenlineal einstellen.
AUSWECHSELN DER NADELN Nadelklammersc hraube Bringen Sie die Nadelstange in die höchste Stellung, indem Sie das Handrad zu sich drehen. Lassen Sie den Nähfuß dabei jedoch unten. Lösen Sie zum Entfernen der Nadel die Nadelklammerschraube und schieben Sie die neue Nadel mit der flachen Seite nach hinten bis zum Anschlag in die Nadelstange. Drehen Sie dann die Nadelklammerschraube wieder fest.
2. NÄHBEGINN EINFÄDELN DER MASCHINE Falsches Einfädeln führt zu ausgelassenen Stichen, Nadelbruch, etc. Stellen Sie daher sicher, dass Sie richtig einfädeln können, bevor Sie eine Probenaht ausführen. Die Einfädelreihenfolge ist wie folgt: Untergreifer, Obergreifer, Nadel. Öffnen Sie die Frontabdeckung und den Arbeitstisch. Bringen Sie die Nadel in die höchste Stellung, indem Sie das Handrad zu sich drehen, und heben Sie den Nähfuß an.
EINFÄDELN DES OBERGREIFERS 1. Führen Sie den Faden wie abgebildet durch die Fadenführung. 2. Ziehen Sie den Oberfaden durch den Schlitz und halten Sie ihn dabei mit der linken Hand fest. 3. Ziehen Sie den Faden wie abgebildet durch die Fadenführung. 4. Führen Sie den Faden durch die Spannungs- und die Greiferöse. Lassen Sie dabei ca. 10 cm Faden überstehen.
EINFÄDELN DER NADELN 1. Führen Sie den Faden wie abgebildet durch die Fa denführung. 2. Ziehen Sie die Nadelfäden durch den Spannungsschlitz auf der linken Seite. Halten Sie den Faden mit der linken Hand gut fest und ziehen Sie ihn mit der rechten Hand nach unten. 3. Ziehen Sie den Faden wie abgebildet durch die Fadenführung. 4. Fädeln Sie die Nadeln von vorne nach hinten durch das Nadelöhr ein und ziehen Sie die Fäden rechts am Nähfuß vorbei nach hinten. Lassen Sie ca. 10 cm Faden überstehen.
NÜTZLICHE HINWEISE AUSTAUSCHEN DER GARNROLLEN Zum schnelleren Austauschen der Garnrollen sollten Sie folgende Hinweise beachten: 1. Schneiden Sie die vorhandenen Fäden knapp an den Garnrollen ab. Knoten Sie die Fadenenden der neuen Garnrollen wie abgebildet an den Fadenenden der alten Garnrollen mit einem Seemannsknoten fest. 2. Heben Sie den Nähfuß an. 3. Bringen Sie die Nadelstange in ihre tiefste Position, indem Sie das Handrad von sich weg drehen.
PROBENÄHTE MIT OVERLOCKSTICHEN Nachdem Sie die Maschine eingefädelt haben, sollten Sie auf einem kleinen Stück Stoff des zu verwendenden Materials eine Probenaht ausführen. Gehen Sie dazu wie folgt vor: 1. Ziehen Sie alle Fäden vorsichtig nach links und senken Sie dabei den Nähfuß ab. Drehen Sie das Handrad einige Umdrehungen zu sich, um zu überprüfen, ob die Fadenverschlingung ordnungsgemäß ausgeführt wird. 2.
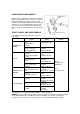
14 EINSTELLTABELLE Anzahl Fäden Nahtbreiteneinstellrad Verwendete Nadel Links & Rechts Links Rechts Links Rechts Rechts Links & Rechts Links Rechts Rollsaumfinger Zweifadenkonverter Fadenspannungseinstellrad Nadelfaden links Nadelfaden rechts Obergreiferfaden Untergreiferfaden Stichlängenrad Bezugszeichen Flachnaht Schmale Naht Rollsaum Picotkante Superstretch Rollsaum Siehe Seite * Falls das Stichlängenrad Ihrer Maschine nicht über die Einstellung R bzw.
5. Das Einstellen der Fadenspannung ist schwierig, wenn die Einstellung der Nadel inkorrekt ist. Experimentieren Sie auf einem Stück des zu verwendenden Stoffes, um die optimale Einstellung herauszufinden.
DREIFADEN-OVERLOCK MIT EINER NADEL Wenn Sie nur die LINKE Nadel einfädeln, erhalten Sie eine Nahtbreite von 6 mm; beim Einfädeln der RECHTEN Nadel eine Nahtbreite von 3,8 mm. Bitte bewahren Sie die nicht benutzte Nadel wie abgebildet auf dem Nadelkissen auf. Zweifadenk onverter Obergreifer Abb. 2 Abb. 3 Abb. 1 Abb.
SCHMALE KANTEN, ROLLSÄUME UND PICOTKANTEN Schmale Kanten und Rollsäume sind ideal auf dünnen Stoffen wie Crêpe Georgette, Chinakrepp, Seide, etc. Ebenfalls sehr geeignet sind Picotkanten beim Nähen von feinen, „schalartigen“ Stoffen. Aufgrund ihrer Natur sind diese Säume auf festen bzw. schweren Materialien nicht geeignet. 1. Heben Sie den Nähfuß an. 2. Öffnen Sie die Frontabdeckung und den Arbeitstisch. 3.
EINSTELLEN DER FADENSPANNUNG Je höher die Zahl am Fadenspannungseinstellrad, desto größer die Fadenspannung. Je niedriger die Zahl am Fadenspannungseinstellrad, desto geringer die Fadenspannung. Führen Sie eine Probenaht auf einem Stück Stoff des zu verwendenden Nähguts aus, um die optimale Fadenspannung herauszufinden.
EINSTELLEN DER STICHLÄNGE EINSTELLEN DER NAHTBREITE Drehen Sie das Stichlängenrad, bis die gewünschte Länge angezeigt wird. Je höher die Zahl, desto länger der Stich. Die Stichlänge ist im Bereich von 1 bis 5 mm einstellbar. Die Nahtbreite ist im Bereich von 4 bis 7 mm einstellbar. Stellen Sie die Nahtbreite einfach am Nahtbreiteneinstellrad je nach verwendetem Stoff ein. Die Standardeinstellung ab Werk beträgt 6 mm.
DIFFERENTIALTRANSPORT Der Differentialtransport hat zwei unabhängige Transporteure, einen vorderen (A) und einen hinteren (B). Jeder Transporteur verfügt über einen individuellen Transportmechanismus, der den Stofftransport in einem unterschiedlichen Transportverhältnis ermöglicht. Differentialtransporteure POSITIVER DIFFERENTIALTRANSPORT BEI POSITIVEM DIFFERENTIALTRANSPORT führt der vordere Transporteur (A) eine größere Transportbewegung aus als der hintere Transporteur (B).
EINSTELLEN DES DIFFERENTIALTRANSPORTS Stellen Sie den Differentialtransportregler unter Bezugnahme auf die nachstehende Tabelle auf Ihre Nähbedürfnisse ein. Eine Einstellung ist zwischen 0.7 (negativer Transport) und 2 (positiver Transport) möglich. Mit diesen Einstellungen werden die besten Transportverhältnisse erzielt. Für normale Näharbeiten sollte der Regler auf 1 gestellt werden. Es ist möglich, den Regler selbst während des Nähens zu verstellen.
GRUNDLEGENDE NÄHTECHNIKEN UM DIE ECKE NÄHEN OHNE FADENSCHNEIDEN 1. Halten Sie die Maschine beim Erreichen der Stoffecke an, mit der Nadel leicht über dem Stoff. 2. Heben Sie den Nähfuß an und ziehen Sie vorsichtig an der Leerkette, bis der Rollsaumfinger freiliegt. 3. Drehen Sie den Stoff, senken Sie den Nähfuß wieder ab und nähen Sie in der neuen Richtung weiter (siehe Abb. 1). HINWEIS: Wenn Sie gleichzeitig Kanten versäubern und beschneiden, schneiden Sie den Stoff ca.
OVERLOCKNAHT MIT BEILAUFGARN Overlocknähte mit Beilaufgarn werden eingesetzt, um beim Zusammennähen von Strickstoffen Schulter-, Ärmel- bzw. Seitennähte zu verstärken. Äußerst dekorativ ist es auch, farblich kontrastierendes Strickgarn zu verwenden, um dem fertigen Kleidungsstück einen größeren Reiz zu verleihen. Die Maschine ist mit einem Nähfuß ausgestattet, mit dem die Kordel oder das Beilaufgarn links bzw. rechts vom Sicherheitsstich zugeführt werden kann. Gehen Sie dazu wie folgt vor: 1.
nähen.
DEKORATIVE EFFEKTE Zusätzlich zu der herkömmlichen, in dieser Bedienungsanleitung ausführlich beschriebenen Overlocknaht kann Ihre Maschine auch für eine Vielzahl von dekorativen Anwendungen eingesetzt werden. Dazu gehören z. B. das dekorative Absteppen, Stoßnähte, Biesennähte oder das Herstellen von Zierborten. Dekoratives Absteppen mit nur zwei Fäden bzw. drei Fäden (Flachnaht) Falten Sie den Stoff entlang der Linie, die Sie absteppen möchten.
ANWENDUNGEN FÜR UNTERSCHIEDLICHE EINSTELLUNGEN DES DIFFERENTIALTRANSPORTS Naht ohne Wellen und Kräuseln Der Differentialtransport dient dazu, ein Wellen und unbeabsichtigtes Kräuseln des Stoffes weitestgehend zu verhindern. Darüber hinaus kann er auch für gewünschte Kräuselarbeiten eingesetzt werden. Bitte beachten Sie hierzu auch die Ausführungen zum Differentialtransport auf Seite 19 und 20. 1. Unbeabsichtigtes Kräuseln Unbeabsichtigtes Kräuseln tritt oftmals an gewebten oder sehr feinen Stoffen auf.
3. WARTUNG UND PFLEGE DER MASCHINE AUSWECHSELN DES OBERMESSERS Tauschen Sie das Obermesser aus, wenn es stumpf wird. Ein Ersatzmesser findet sich beim Zubehör. HINWEIS: Unter normalen Umständen ist es nicht erforderlich, das Untermesser auszuwechseln, da es aus einer speziell gehärteten Metalllegierung gefertigt ist. ZIEHEN SIE DEN NETZSTECKER AUS DER STECKDOSE HERAUS, BEVOR SIE MIT DIESEN ARBEITEN BEGINNEN! 1. Lösen Sie die Schraube und entfernen Sie das Obermesser. Schraube Obermesser 2.
REINIGEN UND ÖLEN Damit Ihre Maschine gut und rund läuft, sollte sie stets sauber und gut geschmiert sein. TRENNEN SIE DEM MASCHINE VOM STROMNETZ, INDEM SIE DEN NETZSTECKER AUS DER STECKDOSE HERAUSZIEHEN. 1. Öffnen Sie die Frontabdeckung und den Arbeitstisch. Mit der Flusenbürste aus dem Zubehör entfernen Sie nun angesammelten Staub und Flusen. 2. Geben Sie ein paar Tropfen Öl auf die gekennzeichneten Stellen. Verwenden Sie ausschließlich qualitativ hochwertiges Nähmaschinenöl. 3.
4. PROBLEMBEHEBUNG PROBLEM MÖGLICHE URSACHE Falsche Fadenspannung(en) Inkorrekte Nadelgröße Ungleichmäßige Stichbildung Falsches Einfädeln „Ziehen“ am Stoff Lockerer Nähfuß „Ziehen“ am Stoff Nadelbruch Inkorrekte Nadelgröße Nadel sitzt nicht richtig Lockerer Nähfuß Falsche Fadenspannung(en) Unbeabsichtigtes Kräuseln Wellen Ausgelassene Stiche BEHEBUNG Fadenspannung(en) neu einstellen. Die richtige Nadelgröße für den Stoff und das Garn verwenden. Die Maschine neu einfädeln.
Technische Daten Anschlussspannung 230 Volt, 50/60 Hz Leistungsaufnahme 105 Watt (gesamt) Motor 90 Watt Arbeitsplatzbeleuchtung Watt) 15 Watt (Birnenformlampe Gewinde E 14, max. 15 Nähgeschwindigkeit max. 1300 Stiche/Minute Unsere Geräte besitzen das CE Zeichen und sind TÜV / GS geprüft.