30006VL EN User manual DE Benutzerinformation 2 29
www.aeg.com CONTENTS 1. 2. 3. 4. 5. 6. 7. 8. 9. 10. 11. 12. SAFETY INFORMATION . . . . . . . . . . . . . . . . . . . . . . . . . . . . . . . . . . . . . . . . . . . . . . . . . . . . . . 3 SAFETY INSTRUCTIONS . . . . . . . . . . . . . . . . . . . . . . . . . . . . . . . . . . . . . . . . . . . . . . . . . . . . . . 4 PRODUCT DESCRIPTION . . . . . . . . . . . . . . . . . . . . . . . . . . . . . . . . . . . . . . . . . . . . . . . . . . . . . 7 BEFORE FIRST USE . . . . . . . . . . . . . . . . . . . . . .
ENGLISH 3 1. SAFETY INFORMATION Before the installation and use of the appliance, carefully read the supplied instructions. The manufacturer is not responsible if an incorrect installation and use causes injuries and damages. Always keep the instructions with the appliance for future reference. 1.1 Children and vulnerable people safety WARNING! Risk of suffocation, injury or permanent disability.
www.aeg.com • Never try to extinguish a fire with water, but switch off the appliance and then cover flame e.g. with a lid or a fire blanket. • Do not store items on the cooking surfaces. • Do not use a steam cleaner to clean the appliance. • Metallic objects such as knives, forks, spoons and lids should not be placed on the hob surface since they can get hot.
ENGLISH WARNING! Make sure to install a stabilizing means in order to prevent tipping of the appliance. Refer to Installation chapter. Electrical connection WARNING! Risk of fire and electrical shock. • All electrical connections should be made by a qualified electrician. • The appliance must be earthed. • Make sure that the electrical information on the rating plate agrees with the power supply. If not, contact an electrician. • Always use a correctly installed shockproof socket.
www.aeg.com • The vapours that very hot oil releases can cause spontaneous combustion. • Used oil, that can contain food remnants, can cause fire at a lower temperature than oil used for the first time. • Do not put flammable products or items that are wet with flammable products in, near or on the appliance. • Do not let sparks or open flames to come in contact with the appliance when you open the door. • Open the appliance door carefully.
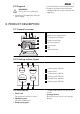
ENGLISH 2.5 Disposal WARNING! Risk of injury or suffocation. • Cut off the mains cable and discard it. • Remove the door catch to prevent children and pets to get closed in the appliance. • Disconnect the appliance from the mains supply. 3. PRODUCT DESCRIPTION 3.1 General overview 1 2 1 Knob for the oven functions 3 2 Knob for the temperature 8 5 4 3 2 1 4 3 Temperature indicator 5 4 Knobs for the hob 6 7 5 Heating element 6 Oven lamp 7 Fan 8 Shelf positions 3.
www.aeg.com 4. BEFORE FIRST USE WARNING! Refer to the Safety chapters. 4.1 Initial Cleaning • Remove all accessories and removable shelf supports (if applicable). • Clean the appliance before first use. Refer to the chapter "Care and cleaning". 4.2 Preheating 1. Set the function and the maximum temperature. 2. Let the appliance operate for 45 minutes. 3. Set the function and the maximum temperature. 4. Let the appliance operate for 15 minutes. Accessories can become hotter than usually.
ENGLISH • The bottom of pans and cooking zones must have the same dimension. 6.2 Energy saving • If it is possible, always put the lids on the cookware. • Put cookware on a cooking zone before you start it. • Deactivate the cooking zones before the end of the cooking time to use residual heat. Heat setting 1 9 6.3 The Examples of cooking applications The data in the table is for guidance only.
www.aeg.com damage to the appliance. Use a special scraper for the glass. Put the scraper on the glass surface at an acute angle and move the blade across the surface. – Remove after the appliance is sufficiently cool: limescale rings, water rings, fat stains and shiny metallic discolorations. Use a special cleaning agent for glass-ceramic or stainless steel. 2. Clean the appliance with a moist cloth and some detergent. 3. At the end, rub the appliance dry with a clean cloth. 8.
ENGLISH Oven function 11 Application Light Cooking To bake in tins and dry on one shelf level at a low temperature. Turbo Grilling To cook large pieces of meat. The grill element and the oven fan operate one after the other and circulate hot air around the food. 8.4 Installing the oven accessories The deep pan and the oven shelf have side edges. These edges and the shape of the guide-bars are a special device to prevent the cookware from slipping.
www.aeg.com How to use the Baking Tables • We recommend to use the lower temperature the first time. • If you cannot find the settings for a special recipe, look for the one that is almost the same. • Baking time can be extended by 10-15 minutes, if you bake cakes on more than one level. • Cakes and pastries at different heights do not always brown equally at first. If this occurs, do not change the temperature setting. The differences equalize during the baking procedure. 9.
ENGLISH 9.3 Light Cooking Hints for the Light Cooking function: • Use the function to bake in tins and dry on one shelf level at a low temperature. • Bake only one tin or tray at a time. • If you want to preheat the . oven use Type of baking Temperature °C Time in minutes Biscuits 180 – 190 10 - 201) Pastry: Choux 180 – 190 30 - 401) Pastry: Shortcrust 180 - 190 25 - 351) 80-100 120 - 150 Meringues 1) Preheat the oven. 9.
www.aeg.com Type of baking Shelf position Temperature °C Time in min. Fruit flans (made with yeast dough/ sponge mixture) 3 150 35 - 55 3 160 - 170 40 - 80 1) Fruit flans made with short pastry 1) Use deep pan Biscuits Shelf position Temperature °C Time in min.
ENGLISH Multileveled Baking Cakes/pastries/breads on baking trays Type of baking Shelf position 2 levels Temperature °C Time in min. Cream puffs/ Eclairs 2/4 160 - 1801) 25 - 45 Dry streusel cake 2/4 150 - 1601) 30 - 45 Temperature °C Time in min.
www.aeg.com Type of baking Shelf position Temperature °C Time in min. 2 170 - 190 20 - 25 Apple pie (2tins Ø20cm, diagonally off set) 1-2 180 60 - 90 Savoury flan (e. g, quiche lorraine) 1 180 - 220 35- 60 1-2 160 - 180 60 - 90 Flan base sponge mixture Cheesecake 1) Pre-heat the oven Cakes/pastries/breads on baking trays Shelf position Temperature °C Time in min.
ENGLISH Type of baking Shelf position Temperature °C Time in min. 1-2 220 - 250 1) 15 - 25 Unleavened bread 1 230 - 250 10 - 15 Tarts (CH) 1 210 - 230 35 - 50 Shelf positions Temperature °C Time in min.
www.aeg.com 1) Pre-heat the oven • Roast lean meats in a roasting tin with a lid. This will keep the meat more succulent. • All types of meat, that can be browned or have crackling, can be roasted in the roasting tin without the lid. 9.6 Roasting Roasting dishes • Use heat-resistant ovenware to roast (please read the instructions of the manufacturer). • Large roasting joints can be roasted directly in the deep pan (if present) or on the wire shelf above the deep pan. 9.
ENGLISH 19 Lamb Type of meat Quantity Shelf position Temperature °C Time in min. Leg of lamb, roast lamb 1- 1.5 kg 1 210 - 220 90 - 120 Saddle of lamb 1- 1.5 kg 1 210 - 220 40 - 60 Type of meat Quantity Shelf position Temperature °C Time in min. Saddle of hare, leg of hare up to 1 kg 1 220 - 240 1) 30 - 40 Saddle of venison 1.5-2 kg 1 210 - 220 35 - 40 Haunch of venison 1.5-2 kg 1 200 - 210 90 - 120 Type of meat Quantity Shelf position Temperature °C Time in min.
www.aeg.com 9.8 Roasting with Turbo Grilling Beef Type of meat Quantity Shelf position Temperature °C Time min. Roast beef or fillet: rare per cm. of thickness 1 190 - 200 1) 5-6 Roast beef or fillet: medium per cm. of thickness 1 180 - 190 6-8 Roast beef or fillet: well done per cm. of thickness 1 170 - 180 8 - 10 Type of meat Quantity Shelf position Temperature °C Time min. Shoulder, neck, ham joint 1-1.5 kg 1 160 - 180 90 - 120 Chop, spare rib 1-1.
ENGLISH 21 Poultry Type of meat Quantity Shelf position Temperature °C Time min. Poultry portions 200-250 g each 1 200 - 220 30 - 50 Half chicken 400-500 g each 1 190 - 210 35 - 50 Chicken, poulard 1-1.5 kg 1 190 - 210 50 - 70 Duck 1.5-2 kg 1 180 - 200 80 - 100 Goose 3.5-5 kg 1 160 - 180 120 - 180 Turkey 2.5-3.5 kg 1 160 - 180 120 - 150 Turkey 4-6 kg 1 140 - 160 150 - 240 • Always set the pan to collect the fat into the first shelf level.
www.aeg.com • Fill the jars up to the same level and close with a clamp. • The jars cannot touch each other. • Put approximately 1/2 litre of water into the baking tray to give sufficient moisture in the oven. • When the liquid in the jars starts to simmer (after approx. 35-60 minutes with one-litre jars), stop the oven or decrease the temperature to 100°C (see the table).
ENGLISH 23 Defrosting time in min. Further defrosting time in min. Strawberries, 300 g 30 - 40 10 - 20 - Butter, 250 g 30 - 40 10 - 15 - Cream, 2 x 200 g 80 - 100 10 - 15 Cream can also be whipped when still slightly frozen in places 60 60 Dish Gateau, 1400 g Information on acrylamides Important! According to the newest scientific knowledge, if you brown food (specially the one which contains starch), Comment - acrylamides can pose a health risk.
www.aeg.com 2. 1 Pull the rear end of the shelf support away from the side wall and remove it. 2 WARNING! Make sure that the glass panels are cool before you clean the glass door. There is a risk that the glass could break. Installing the shelf supports Install the shelf supports in the opposite sequence.
ENGLISH 25 Removing and cleaning the door glasses 1. Hold the door trim (B) on the top edge of the door at the two sides and push inwards to release the clip seal. 2. Pull the door trim to the front to remove it. Hold the door glass panels on their top edge one by one and pull them upwards from the guide. Clean the door glass panels. B 3. 4. To install panels, do the above steps in the opposite sequence. CAUTION! The removable glass panels have a marking on one side.
www.aeg.com Inserting the drawer 1. Set the drawer on the support rails. Make sure that the catches engage correctly into the rails. 2. Lower the drawer until it is horizontal and push it in. WARNING! When the oven is in use, heat can build up in the drawer. Do not keep flammable things in there (e.g. cleaning materials, plastic bags, oven gloves, paper, cleaning sprays, etc.). 11. WHAT TO DO IF… WARNING! Refer to the Safety chapters.
ENGLISH 12.3 Anti-tilt protection Dimensions Width 596 mm Depth 600 mm Oven capacity 27 CAUTION! You must install the anti-tilt protection. If you do not install it, the appliance can tilt. Your appliance has the symbol shown on the picture (if applicable) to remind you about the installation of the anti-tilt protection. 74 l 12.1 Location of the appliance You can install your freestanding appliance with cabinets on one or two sides and in the corner.
www.aeg.com Make sure that the surface behind the appliance is smooth. 49 mm 77 mm 1 12.4 Electrical installation The manufacturer is not responsible if you do not follow the safety precautions from the chapter "Safety information". This appliance is supplied without a main plug or a main cable. Applicable cable types: H07 RN-F, H05 RN-F, H05 RRF, H05 VV-F, H05 V2V2-F (T90), H05 BB-F. 2 13. ENVIRONMENT CONCERNS Recycle the materials with the symbol .
DEUTSCH 29 INHALT 1. 2. 3. 4. 5. 6. 7. 8. 9. 10. 11. 12. SICHERHEITSINFORMATIONEN . . . . . . . . . . . . . . . . . . . . . . . . . . . . . . . . . . . . . . . . . . . . . . SICHERHEITSHINWEISE . . . . . . . . . . . . . . . . . . . . . . . . . . . . . . . . . . . . . . . . . . . . . . . . . . . . . GERÄTEBESCHREIBUNG . . . . . . . . . . . . . . . . . . . . . . . . . . . . . . . . . . . . . . . . . . . . . . . . . . . . VOR DER ERSTEN INBETRIEBNAHME . . . . . . . . . . . . . . . . . . . . . . . . . . . .
www.aeg.com 1. SICHERHEITSINFORMATIONEN Lesen Sie vor der Montage und Verwendung des Geräts sorgfältig die mitgelieferte Anleitung. Der Hersteller haftet nicht für Verletzungen oder Schäden, die durch eine fehlerhafte Montage entstehen. Bewahren Sie die Anleitung zum Nachschlagen auf. 1.1 Sicherheit von Kindern und schutzbedürftigen Personen WARNUNG! Es besteht Erstickungsgefahr, das Risiko von Verletzungen oder permanenten Behinderungen.
DEUTSCH 31 • Kochen mit Fett oder Öl auf einem unbeaufsichtigten Kochfeld ist gefährlich und kann zu einem Brand führen. • Versuchen Sie nicht einen Brand mit Wasser zu löschen, sondern schalten Sie das Gerät aus und bedecken Sie die Flamme mit einem Deckel oder einer Feuerlöschdecke. • Legen Sie keine Gegenstände auf dem Kochfeld ab. • Benutzen Sie zum Reinigen des Gerätes keinen Dampfreiniger.
www.aeg.com • Seien Sie beim Umsetzen des Geräts vorsichtig, denn es ist schwer. Tragen Sie stets Sicherheitshandschuhe. • Ziehen Sie das Gerät nicht am Türgriff. • Die Mindestabstände zu anderen Geräten und Küchenmöbeln sind einzuhalten. • Stellen Sie sicher, dass das Gerät unterhalb von bzw. zwischen sicheren Konstruktionen montiert wird. • Die Seiten des Geräts dürfen nur an Geräte oder Einheiten in gleicher Höhe angrenzen. • Stellen Sie das Gerät nicht auf einem Sockel auf.
DEUTSCH • Bedienen Sie das Gerät nicht mit feuchten oder nassen Händen oder wenn es mit Wasser in Kontakt gekommen ist. • Üben Sie keinen Druck auf die geöffnete Gerätetür aus. • Schalten Sie das Gerät nicht über eine externe Zeitschaltuhr oder eine separate Fernsteuerung ein. • Halten Sie die Tür immer geschlossen, wenn das Gerät in Betrieb ist. • Legen Sie kein Besteck und keine Topfdeckel auf die Kochzonen. Sie werden heiß. • Schalten Sie die Kochzonen nach jedem Gebrauch aus.
www.aeg.com 2.3 Reinigung und Pflege WARNUNG! Risiko von Verletzungen, Brand oder Beschädigungen am Gerät. • Schalten Sie vor Reinigungsarbeiten immer das Gerät aus und ziehen Sie den Netzstecker aus der Steckdose. • Vergewissern Sie sich, dass das Gerät abgekühlt ist. Zusätzlich besteht die Gefahr, dass die Glasscheiben brechen. • Ersetzen Sie die Glasscheiben der Tür umgehend, wenn sie beschädigt sind. Wenden Sie sich hierzu an den Kundendienst. • Gehen Sie beim Aushängen der Tür sorgsam vor.
DEUTSCH 35 3.2 Kochfeldanordnung 1 2 145 mm 3 180 mm 1 Kochzone 1200 W 2 Dampfauslass 3 Kochzone 1800 W 145 mm 210 mm 4 Kochzone 1200 W 5 Restwärmeanzeige 6 Kochzone 2300 W 6 5 4 3.3 Zubehör • Rost Für Kochgeschirr, Kuchenformen, Braten. • Backblech Für Kuchen und Plätzchen. • Fettpfanne Zum Backen und Braten oder zum Auffangen von austretendem Fett. • Schublade Die Schublade befindet sich unterhalb des Garraums. 4. VOR DER ERSTEN INBETRIEBNAHME WARNUNG! Siehe Sicherheitshinweise. 4.
www.aeg.com Nutzen Sie die Restwärme, um den Energieverbrauch zu senken. Schalten Sie die Kochzone ca. 5-10 Minuten vor Ende des Garvorgangs aus. 5.1 Kochstufe Knopf Funktion Warmhalten 0 1-9 Position Aus Kochstufen (1 - niedrigste Kochstufe, 9 - höchste Kochstufe) 5.2 Restwärmeanzeige Die Restwärmeanzeige leuchtet auf, wenn eine Kochzone heiß ist. Drehen Sie den Knopf auf die gewünschte Kochstufe. 2. Um den Garvorgang zu beenden, drehen Sie den Knopf auf die Position 0. 1.
DEUTSCH 37 Koch stufe Verwendung: Zeit Tipps 3-4 Dünsten von Gemüse, Fisch, Fleisch 20 Einige Esslöffel Flüssigkeit 45 Min hinzugeben . 4-5 Dampfgaren von Kartoffeln 20 - 60 Min. 4-5 Kochen größerer Speisemengen, Eintopfgerichte und Suppen 60 Bis zu 3 l Flüssigkeit plus Zu150 Mi taten n.
www.aeg.com dem Abschalten des Geräts läuft das Kühlgebläse weiter, bis das Gerät abgekühlt ist. 8.2 Ein- und Ausschalten des Geräts 1. Drehen Sie den Backofen-Einstellknopf auf die gewünschte Backofenfunktion. 2. Drehen Sie den Temperaturwahlknopf auf eine Temperatur. Die Temperatur-Kontrolllampe leuchtet, solange die Temperatur im Gerät ansteigt. 3. Drehen Sie zum Ausschalten des Geräts den Backofen-Einstellknopf und den Temperaturwahlknopf in die Position Aus. 8.
DEUTSCH 39 8.4 Einsetzen des Backofenzubehörs Die Brat- und Fettpfanne und der Rost haben Seitenränder. Durch die Seitenränder und die Form der Führungsstäbe wird das Kippen der Einschubteile verhindert. Brat- und Fettpfanne und Rost zusammen einsetzen Legen Sie den Rost auf die Brat- und Fettpfanne. Schieben Sie die Brat- und Fettpfanne zwischen die Führungsstäbe einer der Einschubebenen. 9. BACKOFEN - PRAKTISCHE TIPPS UND HINWEISE WARNUNG! Siehe Sicherheitshinweise.
www.aeg.com terschiede gleichen sich während des Backvorgangs aus. 9.2 Tipps zum Backen Backergebnis Mögliche Ursache Abhilfe Der Kuchen ist unten nicht ausreichend gebräunt. Falsche Einschubebene. Setzen Sie den Kuchen tiefer ein. Der Kuchen fällt zusammen (wird feucht, klumpig, streifig). Stellen Sie beim nächsten Kuchen eine etwas Die Backofentemperatur niedrigere Backofentemist zu hoch. peratur ein. Der Kuchen fällt zusammen (wird feucht, klumpig, streifig). Die Backzeit ist zu kurz.
DEUTSCH 9.3 Bio-Garen Hinweise für die Funktion „BioGaren“: • Verwenden Sie diese Funktion zum Backen in Formen und zum Dörren von Lebensmitteln auf einer Einschubebene bei niedrigen Temperaturen. • Backen Sie nur in einer Form/ einem Blech gleichzeitig. • Wenn Sie den Backofen vorheizen möchten, verwenden .
www.aeg.com Einschubebene Temperatur in °C Zeit in Min. Obstkuchen (auf Hefeteig/Rührteig)1) Backware 3 150 35 - 55 Obstkuchen mit Mürbeteig 3 160 - 170 40 - 80 Einschubebene Temperatur in °C Zeit in Min.
DEUTSCH Plätzchen/kleine Kuchen/Gebäck/Brötchen Backware Einschubebene 2 Ebenen Temperatur in °C Zeit in Min. Mürbeteigplätzchen 2/4 150 - 1601) 20 - 40 Short bread/ Pastry Stripes 2/4 1401) 20 - 45 Rührteigplätzchen 2/4 160 - 1701) 25 - 45 Eiweißgebäck, Baiser 2/4 80 - 100 130 - 170 Makronen 2/4 100 - 1201) 40 - 80 Hefekleingebäck 2/4 160 - 1701) 30 - 60 Blätterteiggebäck 2/4 170 - 1801) 30 - 50 1) Backofen vorheizen 9.
www.aeg.com Backware Christstollen Brot (Roggenbrot): 1. Erster Teil des Backvorgangs. 2. Zweiter Teil des Backvorgangs. Einschubebene Temperatur in °C Zeit in Min. 2 160 - 180 1) 50 - 70 1-2 1. 230 1) 1. 2. 160 - 180 1) 2.
DEUTSCH Einschubebenen Temperatur in °C Zeit in Min. Eiweißgebäck, Baiser Backware 3 80 - 100 120 - 150 Makronen 3 120 - 130 30 - 60 Hefekleingebäck 3 170 - 190 20 - 40 Blätterteiggebäck 3 190 - 210 1) 20 - 30 Brötchen 3 190 - 2101) 10 - 55 3-4 170 1) 20 - 30 Einschubebenen Temperatur in °C Zeit in Min.
www.aeg.com Fleischart Menge Einschubebene Temperatur in °C Zeit in Min. Roastbeef oder Filet: Medium je cm Höhe 1 220 - 230 8 - 10 Roastbeef oder Filet: durchgebraten je cm Höhe 1 200 - 220 10 - 12 Menge Einschubebene Temperatur in °C Zeit in Min.
DEUTSCH 47 Fleischart Menge Einschubebene Temperatur in °C Zeit in Min. Reh-/Hirschkeule 1,5-2 kg 1 200 - 210 90 - 120 Menge Einschubebene Temperatur in °C Zeit in Min.
www.aeg.com Schweinefleisch Menge Einschubebene Temperatur in °C Zeit (Min.) Schulter, Nacken, Schinkenstück 1-1,5 kg 1 160 - 180 90 - 120 Kotelett, Schälrippchen 1-1,5 kg 1 170 - 180 60 - 90 Hackbraten 750 g - 1 kg 1 160 - 170 50 - 60 Schweinshaxe (vorgegart) 750 g - 1 kg 1 150 - 170 90 - 120 Menge Einschubebene Temperatur in °C Zeit (Min.) 1 kg 1 160 - 180 90 - 120 1,5-2 kg 1 160 - 180 120 - 150 Fleischart Menge Einschubebene Temperatur in °C Zeit (Min.
DEUTSCH • Schieben Sie den Rost gemäß den Empfehlungen in der Grilltabelle in die entsprechende Einsatzebene. • Schieben Sie zum Auffangen von Fett die Fettpfanne immer in die erste Einschubebene. • Nur flache Fleisch- oder Fischstücke grillen. 49 Der Grillbereich befindet sich in der Mitte des Rostes.
www.aeg.com Steinobst Temperatur in °C Einkochen bis Perlbeginn in Min. Weiter kochen bei 100 °C in Min. 160 - 170 35 - 45 10 - 15 Temperatur in °C Einkochen bis Perlbeginn in Min. Weiter kochen bei 100 °C in Min. Karotten 1) 160 - 170 50 - 60 5 - 10 Gurken 160 - 170 50 - 60 - Mixed Pickles 160 - 170 50 - 60 5 - 10 Kohlrabi, Erbsen, Spargel 160 - 170 50 - 60 15 - 20 Einkochen Birnen, Quitten, Zwetschgen Gemüse Einkochen 1) Nach dem Ausschalten im Backofen stehen lassen 9.
DEUTSCH Informationen zu Acrylamiden Wichtig! Nach neuesten wissenschaftlichen Erkenntnissen kann die Bräunung von Lebensmitteln, 51 speziell bei stärkehaltigen Produkten, eine gesundheitliche Gefährdung durch Acrylamid verursachen. Daher empfehlen wir, bei möglichst niedrigen Temperaturen zu garen und die Speisen nicht zu stark zu bräunen. 10. BACKOFEN - REINIGUNG UND PFLEGE WARNUNG! Siehe Sicherheitshinweise.
www.aeg.com 2. 1 Ziehen Sie das Einhängegitter hinten von der Seitenwand weg und nehmen Sie es heraus. 2 WARNUNG! Zur Reinigung der Glastür müssen die Glasscheiben vorher abgekühlt sein. Es besteht die Gefahr, dass die Glasscheiben brechen. Einsetzen der Einhängegitter Führen Sie zum Einsetzen der Einhängegitter die obigen Schritte in umgekehrter Reihenfolge durch.
DEUTSCH 53 Abnehmen und Reinigen der Türgläser 1. Fassen Sie die Türabdeckung (B) an der Oberkante der Tür an beiden Seiten an. Drücken Sie sie nach innen, um den Schnappverschluss zu lösen. 2. Ziehen Sie die Türabdeckung nach vorn, um sie abzunehmen. Fassen Sie die Türgläser nacheinander am oberen Rand an. Ziehen Sie sie nach oben aus der Führung. Reinigen Sie die Glasscheiben. B 3. 4. Um die Glasscheiben wieder einzusetzen, führen Sie die Schritte oben in umgekehrter Reihenfolge durch.
www.aeg.com 2 1 2. Heben Sie die Schublade leicht an und ziehen Sie sie aus den Führungen. die Arretierungen korrekt in den Führungen einrasten. 2. Senken Sie die Schublade ab in die Waagerechte und schieben Sie sie ein. WARNUNG! In der Schublade kann bei Benutzung des Backofens ein Wärmestau entstehen. Bewahren Sie keine brennbaren Gegenstände, wie Reinigungsmittel, Plastiktüten, Topfhandschuhe, Papier, Reinigungssprays usw. in der Schublade auf.
DEUTSCH Wenn Sie das Problem nicht selbst lösen können, wenden Sie sich an Ihren Fachhändler oder Kundendienst. Die vom Kundendienst benötigten Daten finden Sie auf dem Typenschild. Das 55 Typenschild befindet sich am Frontrahmen des Garraums. Wir empfehlen, dass Sie folgende Daten hier notieren: Modell (MOD.) ......................................... Produktnummer (PNC) ......................................... Seriennummer (S.N.) ......................................... 12.
www.aeg.com Mitte zwischen den angrenzenden Küchenmöbeln (2). Ist der Abstand zwischen den angrenzenden Küchenmöbeln breiter als das Gerät, müssen Sie die seitlichen Abstände anpassen, damit der Herd mittig steht. Stellen Sie sicher, dass die Fläche hinter dem Gerät glatt ist. 49 mm 77 mm Achten Sie darauf, den Kippschutz in der richtigen Höhe anzubringen. 1. Stellen Sie die korrekte Höhe des Geräts ein, bevor Sie den Kippschutz anbringen. 2.
DEUTSCH 57
www.aeg.
DEUTSCH 59
892950766-A-372012 www.aeg.