
User manual


7
INSTALLATION
TECHNICAL INSTRUCTIONS FOR
THE INSTALLER
Installation may only be carried out by a
competent technician or electrician.
3) INSERTING
After having cleared out all the packing
components, make sure of the integrity of the
appliance.
Please keep children away from all packing
materials (carton, polystyrene, nails,..).
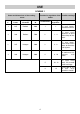
Make a cutout in the worktop, according to the
dimensions indicated in fig. 7-8; make sure the
critical dimensions of the space in which the
appliance has to be installed (fig. 9) are respected.
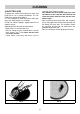
4) FIXING
A special sealing strip underneath the hob must be
used.
Make sure it is correctly positioned with no gaps to
avoid any water infiltration. To fit the strip in the
right way, please, respect the following
instructions:
- Fix the hooks in the relative accomodations of the body.
- Turn the hob over, take the seal strips off from
their support, taking care that the transparent
protection remains attached to the seal. Correctly
place the seal “E” (fig. 11) under the hob edge,
so that the external side of the seal fits together
with the external perimeter of the hob.
The ends of the strip must fit together without
overlapping.
- Stick the seal to the hotplate uniformly, pressing
it with fingers.
- Take the protective paper strip of the seal off,
place the hotplate in the opening made in the
table top, and lock it with the special screws
“F”(fig. 12).
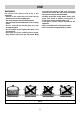
WARNINGS:
Be aware that the glue joining laminated plastic to
the wood, has to resist to temperatures above
150° C, to avoid delamination.
The installer should bear in mind that the mixed
appliance is the Y type. The rear wall, adjacent
and surrounding surfaces must therefore be able
to withstand temperatures above 65° C.
FIG. 10 FIG. 11 FIG. 12
FIG. 7
FIG. 8 FIG. 9
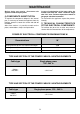
ABCDE
2 ELEM.
285 485 57.5 57.5 100 min.
4 ELEM.
560 490 57.5 57.5 100 min.
COMPLY WITH THE
DIMENSIONS (mm)