Dear Muhammadanism, You have just acquired one of our hobs and we congratulate you. in order to be able to use it full advantage and in order o obtain from it the results which you are entities to expect, we advise you to read very carefully this instruction manual, which is supplied with the unit, and has been written with you in mind, taking into account suggestions and remarks made by consumers.
IMPORTANT NOTE PRIOR TO INSTALLATION What you must take note of before installation and connection to the electric These fitted hobs are intended for installation requirements work surface. Only a qualified electrician may wire in the appliance. This in a recess let into a ensures that legal and connection regulations laid down by the local electricity distribution company are observed (specifications).
CONNECTING UP TO GAS VENTILATION OF THE ROOM The combustion of gas is made possible by the oxygen in the air. It is therefore necessary that this air should be constantly renewed and that the products of combustion be evacuated. Ventilation is of the utmost importance. The installation of your hob, like all gas cooking appliances.
CONNECTING UP TO GAS CONNECTION TO MAINS GAS it must conform 1o the relevant Standards and regulations in force and be carried out by a qualified fitter, It is recommended that an isolation cock is fitted at the time of installation. The connection to the gas mains, when aerating your hob on natural gas, is to 1/2" BSP male fitting but can be to a bottled gas by means of a hose. when operating on LPG.
ADAPTING FOR DIFFERENT GASES The hob is delivered per-set for natural gas. A pouch supplied with the appliance contain the union nipples required 1o adapt # for butane/propane, as well as the appropriate spanner and junction-joint, and the sealing gasket. NOTE: it work is carried out on the elbow. # must be lightened 1o a torque greater than 2.5 Medan (avkaf). When changing from natural gas to butane, proceed as folios. 1. CHANGING UNION NIPPLES © Remove rifles, black burner caps and aluminum burner heads.
ADAPTING FOR DIFFERENT GASES 2. ADJUSTING THE TAPS © Remove regulators {depending on model} by pulling therm upwards. Make a careful note of how dismantled, in order to be able to reassemble. # Using a shank screw-driver, screw the reduced flow regulator screw of each tap down as far as it will go, in a clock-wise direction. ® Refit regulators. Refer to CONNECTING UP TO GAS section for selection of connecting fitting. When carrying out in ite direct hanging; from butane !Q No! M gas.
CONNECTION TO ELECTRIC GAS HOBS Tess hobs are delivered with & 3-wire power lead {2 conductors + earth) and must be wired into the 240 ¥ mono phase system. The protection wire {green-yellow) is linked to the earth connector of the equipment. « Type H 08 RAF section 1 mmg ELECTRIC HOTPLATES PRELIMINARY COMMENTS «The power cable is supplied. It must always include an neath wire which will be linked to the connector marked.
CONNECTION TO ELECTRIC WIRING UP @ Turn hotplate upside down. ® Unscrew plastic flap located on heating surface, then open it up. @ Pass the cable into the passage provided inside flap and into cable clamp. © Carrying out wiring on terminal plate in accordance with preceding diagram and figure below. Make sure that strap is fitted between terminals and L. @ Tighten cable clamp whilst being careful not to pull cable ® Close flap again carefully and screw it up agar.
FITTING PRELIMINARY COMMENTS The hob must be fitted inside a kitchen unit surface at least 3¢ mm thick, which is made of a heat-resistant material, or covered in such material. « In order not to interfere with the handling of kitchen utensils, there should be na unit higher than the one into which the hob is fitted for at least 30 cm to both the right and left. » Vertical and Lateral surrounds and the back of the hob must be able to withstand heat if they are at a distance of less than 7.5 cm away.
FITTING PROCEDURE © Take off the covering grilles, boomer caps and heads. ® Turn heating surface upside down carefully and place it above the recess in the unit into which it is be fitted, making sure not to damage the spark plugs & Stick the sealing material supplied, all around the perimeter of the heating surface. This joint guarantees air-tightness between the hob and the kitchen unit surface. & Place the hob in the opening of the work surface and link up the power cable to the electrical equipment.
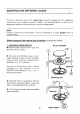
DESCRIPTION OF EQUIPMENT ALL GAS Ref. 311 GK {with automatic ignition} Ret.
DESCRIPTION OF EQUIPMENT ALL ELECTRIC Ref. 310K Ref.
USING THE GAS BURNERS DESCRIPTION OF BURNERS « Each number is controlled by a tap with a safety mechanism, which is opened by turning the appropriate regulator in the ¥ Direction, Adjustment to a reduced flow is carried out between the symbol 0 and the symbol Q . The marker ® corresponds to complete closure of the tap, s To light a burger, press the electronic ignition button, with the burner regulator on maximum flow . then release it. #f necessary, repeat the operation at a reduced flow..
COOKING ON ELECTRIC HOTPLATES x General Comments The useful output of heat is regulated progressively by turning the regulator switches to left or right. As soon as you switch on a hotplate, the "ON" indicator light is illuminated.
COOKING ON ELECTRIC HOTPLATES, Cocking economically Use pans which have a fiat base and ensure complete contact with the heating surface, and are made of » Stainless steel with a thick detrimental or “sandwich” base. * Aluminum with a thick smoothed base. » Enamel-covered steel Vary the size of the pan according to actual need: the base diameter of the pan should be equal to or greater than that of the heating surface used Finish off cooking with electric switched off.
ADVICE ON USING GAS BURNERS = it is necessary {0 keep the spark-plugs clean ignition will be impaired if they are safflower to get dirty. « In the event of a power-cool, i i5 always easy o light the gas with a match « Do not press the electronic ignition button when the boomers are not in position * We recommend you to use the following pans: On the medium (semi-rapid} burner, use 8 pan 24 ¢m in diameter (18 cm min.) on the large {rapid) burners, use a pan 28 cm in diameter (20 cm min.
GENERAL ADVICE = Maintenance is facilitated if carried out before the hob has cooled down completely, Never try and carry this out whilst the appliance is in use: turn off all electric switches. » When cleaning surface of hob, make sure that no cleaning material drops into the housing of the burners, as this could impair their operation. « Do not use abrasive products or metallic sponges te clean the lim of the hob surface. as il might damage it.
ROUTINE MAINTENANCE ROUTINE REPAIRS They must be carried out by a qualified technician. access to the infernal components of the hob is gained by raising the circular burner clips and.
AFTER-SALES SERVICE In order to take advantage of our guarantee, do not forget to have your guarantee certificate date-stamped and signed by your fitter. Any repairs must be carried out by a qualified technician. Only concessionaires and distributors of your make of appliance: have a perfect knowledge of the appliances, apply in full our methods of adjustment, maintenance and repairing, use and apply exclusively original factory-made parts.