
User manual


English
34
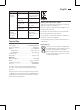
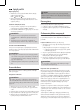
18 ECHO (Echo) control
19 MIC VOL (Microphone volume) control
20 GUITAR VOL control (guitar volume)
21 POWER ON/OFF mains switch
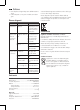
A Markings for installation of the microphone holder
Back (not shown)
AC IN ~ power cord connection
Extendablehandle
Delivery scope (not shown)
1x Microphone
1x Microphoneholder(withtwocrossheadscrews)
1x Mainscable
First Use of the Device/Introduction
• Selectaproperplaceforthedevice.Adry,level,andslip
proof surface is suitable.
• Makesurethedeviceisventilatedsufciently!
• Removetheprotectivelmfromthedevice,ifpresent.
• Youcanattachtheincludedholderforthemicrophoneas
required on the rear of the unit. Use the included cross-
head screws for this, and screw them into the indicated
holes (A) (see the illustration on page 3).
Power supply
1. Make sure the grid voltage corresponds to the specifica-
tions on the rating plate.
2. Connect the supplied power cord with the AC IN ~ con-
nection on the back.
3. Insert the mains plug to a properly installed socket.
NOTE:
Disconnect from mains power supply during longer periods
of non-use.
Battery operation
It is possible to operate this device with the built-in battery.
General information
• Chargethebatterycompletelybeforeyouuseittooper-
ate the device.
• Avoidfullydischargingthebattery.
• Chargethebatterycompletelyaftereachuse.
• AssoonastheindicatorlampCHARGE(7)lightsred,the
battery must be charged.
Charging the battery
1. Connect the supplied power cord with the AC IN ~ con-
nection on the back.
2. Connect the mains plug to a properly installed socket.
3. Set the mains switch (21) to the position “OFF”. The
indicator lamp CHARGE (7) lights red and the battery is
being charged.
4. When the battery has been charged completely, the
indicator lamp CHARGE lights green.
Depending on the battery’s capacity charging can take up to
8 hours.
CAUTION:
Never leave the device unattended during charging.
NOTE:
If you do not use the device for a longer time, charge the
battery at least every 6 to 12 weeks. Even when switched
off, the battery discharges continuously.
Operation
Turn the device on/off
• Setthemainsswitchtotheposition“ON”toturnthe
device on.
• Setthemainsswitchtotheposition“OFF”toturnthe
device off.
NOTE:
• Afterabout15minuteswithoutsignalorinthecaseof
a weak signal, the system will automatically switch to
standby. Press the button /PAIR/ to use the device
again.
• Thebuilt-inbatteryischargedwhenthemainscableis
connected. The indicator lamp CHARGE lights red.
Volume
Use the VOL control (14) to adjust the volume as desired.
Select the operating mode
• RepeatedlypresstheFUNC./LIGHTbutton(10)toselect
the desired operating mode.
USB 1 Bluetooth AUX
• Holdthebuttondepressedrepeatedlytoselectoneof
the different illumination modes for the speaker. The set-
ting “OFF” deactivates this function.
Sound settings (15/16/17)
• YoucanadjusttrebleandbasswiththecontrolsTREBLE
and BASS.
• TheEQOPERATIONcontrolscanbeusedtosetan
individual sound.
NOTE:
• Ifnecessary,adjusttheEQsettingsonyourplayback
device in order to generate a better sound.
• Thesettingswiththecontrolsdonotinuencethe
acoustic sound of the microphone or a connected e-
guitar.