40095FA-WN USER MANUAL DE Benutzerinformation Herd
www.aeg.com INHALTSVERZEICHNIS 1. SICHERHEITSHINWEISE............................................................................................. 3 2. SICHERHEITSANWEISUNGEN...................................................................................6 3. GERÄTEBESCHREIBUNG........................................................................................... 9 4. VOR DER ERSTEN INBETRIEBNAHME................................................................... 10 5.
DEUTSCH 1. 3 SICHERHEITSHINWEISE Lesen Sie vor der Montage und dem Gebrauch des Geräts zuerst die Gebrauchsanleitung. Bei Verletzungen oder Schäden infolge nicht ordnungsgemäßer Montage oder Verwendung des Geräts übernimmt der Hersteller keine Haftung. Bewahren Sie die Anleitung immer an einem sicheren und zugänglichen Ort zum späteren Nachschlagen auf. 1.1 Sicherheit von Kindern und schutzbedürftigen Personen WARNUNG! Erstickungs- und Verletzungsgefahr sowie Gefahr einer dauerhaften Behinderung.
www.aeg.com • • • • • • • • • • • • • • Dieses Gerät muss mit einem Kabel des Typs H05VV-F an die Stromversorgung angeschlossen werden, das der Temperatur der Rückwand standhält. Dieses Gerät ist für den Gebrauch bis zu einer Höhe von 2000 m über dem Meeresspiegel vorgesehen. Dieses Gerät ist nicht für die Verwendung auf Schiffen, Booten oder anderen Wasserfahrzeugen vorgesehen. Installieren Sie das Gerät nicht hinter einer Dekortür, um eine Überhitzung zu vermeiden.
DEUTSCH • • • • • • • • • 5 WARNUNG: Das Gerät und die zugänglichen Geräteteile werden während des Betriebs heiß. Seien Sie vorsichtig und berühren Sie niemals die Heizelemente. Halten Sie Kinder unter 8 Jahren vom Gerät fern, wenn sie nicht ständig beaufsichtigt werden. Verwenden Sie zum Anfassen des Zubehörs und der Töpfe wärmeisolierende Handschuhe. Trennen Sie das Gerät vor Wartungsarbeiten von der Stromversorgung.
www.aeg.com 2. SICHERHEITSANWEISUNGEN 2.1 Montage WARNUNG! Die Montage des Geräts darf nur von einer qualifizierten Fachkraft durchgeführt werden. • Entfernen Sie das gesamte Verpackungsmaterial. • Montieren Sie ein beschädigtes Gerät nicht und benutzen Sie es nicht. • Halten Sie sich an die mitgelieferte Montageanleitung. • Seien Sie beim Umsetzen des Gerätes vorsichtig, da es sehr schwer ist. Tragen Sie stets Sicherheitshandschuhe und festes Schuhwerk. • Ziehen Sie das Gerät nicht am Griff.
DEUTSCH 2.3 Gebrauch WARNUNG! Es besteht Verletzungs- und Verbrennungsgefahr. Stromschlaggefahr. • Dieses Gerät ist ausschließlich zur Verwendung im Haushalt bestimmt. • Nehmen Sie keine technischen Änderungen am Gerät vor. • Die Lüftungsöffnungen dürfen nicht abgedeckt werden. • Lassen Sie das Gerät bei Betrieb nicht unbeaufsichtigt. • Schalten Sie das Gerät nach jedem Gebrauch aus. • Gehen Sie beim Öffnen der Tür vorsichtig vor, wenn das Gerät in Betrieb ist. Es kann heiße Luft austreten.
www.aeg.com zum Beispiel das Beheizen eines Raums. 2.4 Reinigung und Pflege WARNUNG! Verletzungs-, Brandgefahr sowie Risiko von Schäden am Gerät. • Schalten Sie vor Wartungsarbeiten immer das Gerät aus. Ziehen Sie den Netzstecker aus der Netzsteckdose. • Vergewissern Sie sich, dass das Gerät abgekühlt ist. Es besteht die Gefahr, dass die Glasscheiben brechen. • Ersetzen Sie die Türglasscheiben umgehend, wenn sie beschädigt sind. Wenden Sie sich an den autorisierten Kundendienst.
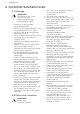
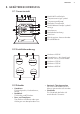
DEUTSCH 3. GERÄTEBESCHREIBUNG 3.1 Gesamtansicht 1 2 3 4 5 6 4 7 1 2 3 4 5 3 10 8 2 9 1 6 7 8 9 10 Kochfeld-Einstellknöpfe Temperaturanzeige/-symbol Temperaturwahlknopf Backofen-Einstellknopf Kochfeldkontrolllampe/-symbol/anzeige Heizelement Backofenbeleuchtung Ventilator Einhängegitter, herausnehmbar Einschubebenen 3.
www.aeg.com 4. VOR DER ERSTEN INBETRIEBNAHME WARNUNG! Siehe Kapitel Sicherheitshinweise. 4.1 Erste Reinigung Nehmen Sie die Zubehörteile und die herausnehmbaren Einhängegitter aus dem Backofen. Siehe Kapitel „Reinigung und Pflege“. Reinigen Sie den Backofen und die Zubehörteile vor der ersten Inbetriebnahme. Setzen Sie das Zubehör und die herausnehmbaren Einhängegitter wieder in ihrer ursprünglichen Position ein. 4.2 Vorheizen Heizen Sie den leeren Backofen vor der ersten Inbetriebnahme vor. 1.
DEUTSCH 11 6. KOCHFELD – TIPPS UND HINWEISE WARNUNG! Siehe Kapitel Sicherheitshinweise. 6.1 Kochgeschirr Der Boden des Kochgeschirrs sollte so dick und flach wie möglich sein. 6.2 Anwendungsbeispiele für das Kochen Kochstufe: Anwendung: 1 Warmhalten Kochstufe: Anwendung: 2 Sanftes Köcheln 3 Köcheln 4 Braten/Bräunen 5 Zum Kochen bringen 6 Zum Kochen bringen/SchnellBraten/Frittieren 7. KOCHFELD - REINIGUNG UND PFLEGE WARNUNG! Siehe Kapitel Sicherheitshinweise. 7.
www.aeg.com 8.1 Ein- und Ausschalten des Geräts Je nach Modell besitzt Ihr Gerät Kontrolllampen, Knopfsymbole oder Anzeigen: • Die Lampe leuchtet, während das Gerät in Betrieb ist. • Das Symbol zeigt an, ob der Knopf eine der Kochzonen, die Ofenfunktionen oder die Temperatur regelt. • Die Kontrolllampe leuchtet während der Aufheizphase des Backofens auf. 2. Drehen Sie den Temperaturwahlknopf auf die gewünschte Temperatur. 3.
DEUTSCH Symbol Ofenfunktionen 13 Anwendung Heißluftgrillen Pour rôtir de grosses pièces de viande ou de la volaille sur un seul niveau. Auch zum Gratinieren und Überbacken. Pizzastufe Zum Backen auf einer Ebene für Gerichte mit einer intensiveren Bräunung und einem knusprigen Boden. Stellen Sie eine 20 - 40 °C niedrigere Backofentemperatur als bei der konventionellen Heizfunktion ein. Niedertemperatur-Garen Zum Backen in Formen und zum Dörren auf einer Einschubebene bei niedrigen Temperaturen. 9.
www.aeg.com 10. BACKOFEN – HINWEISE UND TIPPS WARNUNG! Siehe Kapitel Sicherheitshinweise. Die Temperaturen und Backzeiten in den Tabellen sind nur Richtwerte. Sie sind abhängig von den Rezepten, der Qualität und der Menge der verwendeten Zutaten. 10.1 Allgemeine Informationen • Das Gerät hat vier Einschubebenen. Die Einschubebenen werden vom Boden des Backofens aus gezählt.
DEUTSCH 15 10.6 Ober-/Unterhitze Gargut Menge (g) Temperatur (°C) Dauer (Min.
www.aeg.com Gargut Menge (g) Temperatur (°C) Dauer (Min.
DEUTSCH Temperatur (°C) Dauer (Min.
www.aeg.com Gargut Menge (g) Temperatur (°C) Dauer (Min.
DEUTSCH Gargut Menge (g) Temperatur (°C) Dauer (Min.
www.aeg.com Gargut Menge (g) Temperatur (°C) Dauer (Min.) Biskuit 1) 600 150 - 170 20 - 30 Ebene 2 Zubehör Backblech 1) Backofen 10 Minuten vorheizen. 2) Lassen Sie den Kuchen nach dem Ausschalten des Geräts noch 7 Minuten im Backofen. 3) Backofen 15 Minuten vorheizen. 4) Lassen Sie den Kuchen nach dem Ausschalten des Geräts noch 10 Minuten im Backofen. 5) Temperatur auf 230 °C einstellen und Backofen 15 Minuten vorheizen. 10.9 Grillstufe 2 Gargut Menge (g) Temperatur Dauer (Min.
DEUTSCH 21 10.11 Pizza-Funktion Gargut Menge (g) Temperatur (°C) Dauer (Min.) Ebene Zubehör Pizza 1000 200 - 210 20 - 30 2 Backblech Hähnchen, ganz 1400 165 - 175 55 - 65 2 Backblech Hähnchenhälften 1350 165 - 175 30 + 35 3 Backblech Quiche Lor- 1000 210 - 220 20 - 30 2 Backblech raine 1) 1) Backofen 10 - 15 Min. vorheizen. 10.12 Bio-Garen Gargut Menge (g) Temperatur (°C) Dauer (Min.
www.aeg.com der Grillpfanne ist das Risiko besonders hoch. • Entfernen Sie hartnäckige Verschmutzungen mit einem speziellen Backofenreiniger. • Reinigen Sie alle Zubehörteile nach jedem Gebrauch und lassen Sie sie trocknen. Feuchten Sie ein weiches Tuch mit warmem Wasser und etwas Reinigungsmittel an. • Zubehörteile mit Antihaftbeschichtung dürfen nicht mit aggressiven Reinigungsmitteln, scharfkantigen Gegenständen oder im Geschirrspüler gereinigt werden.
DEUTSCH 23 WARNUNG! Lassen Sie die Backofentür während der Reinigung leicht geöffnet. Öffnen Sie sie ganz, könnte sie aus Versehen schließen und Schäden verursachen. 2. Ziehen Sie das Heizelement vorsichtig nach unten. WARNUNG! Verwenden Sie das Gerät nicht ohne die Glasscheiben. 1. Öffnen Sie die Tür bis zu einem Winkel von ca. 30°. Die Tür bleibt in ihrer Position stehen, wenn sie leicht geöffnet ist. 30° 3.
www.aeg.com 5. Reinigen Sie die Glasscheibe mit Wasser und Spülmittel. Trocknen Sie die Glasscheiben sorgfältig ab. Nach der Reinigung müssen die Backofentür und die Glasscheiben wieder eingebaut werden. Führen Sie die oben aufgeführten Schritte in umgekehrter Reihenfolge durch. Setzen Sie zuerst die kleinere Scheibe ein und dann die größere Scheibe. VORSICHT! Der Aufdruck auf der inneren Glasscheibe muss zur Innenseite der Tür zeigen.
DEUTSCH 25 12. FEHLERSUCHE WARNUNG! Siehe Kapitel Sicherheitshinweise. 12.1 Was tun, wenn ... Störung Mögliche Ursache Abhilfe Das Gerät lässt sich nicht einschalten. Das Gerät ist nicht oder nicht ordnungsgemäß an die Spannungsversorgung angeschlossen. Prüfen Sie, ob das Gerät ordnungsgemäß an die Spannungsversorgung angeschlossen ist. Die Sicherung ist durchgebrannt. Vergewissern Sie sich, dass die Sicherung der Grund für die Störung ist.
www.aeg.com Wir empfehlen, hier folgende Daten zu notieren: Modell (MOD.) ......................................... Produktnummer (PNC) ......................................... Seriennummer (S.N.) ......................................... 13. MONTAGE 13.2 Technische Daten WARNUNG! Siehe Kapitel Sicherheitshinweise. Spannung 230 V 13.1 Standort des Geräts Frequenz 50 Hz Sie können Ihr freistehendes Gerät neben oder zwischen Küchenmöbel sowie in einer Ecke aufstellen.
DEUTSCH Stellen Sie sicher, dass die Fläche hinter dem Gerät glatt ist. Sie müssen den Kippschutz anbringen. Andernfalls könnte das Gerät kippen. 27 80-85 mm 317-322 mm Ihr Gerät ist mit dem Symbol, das in der Abbildung ersichtlich ist, gekennzeichnet (sofern vorhanden). Es soll Sie daran erinnern, dass der Kippschutz montiert werden muss. 2. Die Öffnung befindet sich auf der linken Seite der Rückwand.
www.aeg.com Das Gerät wird ohne Netzstecker und Netzkabel geliefert. WARNUNG! Bevor Sie das Netzkabel anschließen, messen Sie die Spannung zwischen den Phasen des Hausnetzes. Richten Sie sich anschließend nach dem Schaltbild auf der Rückseite des Geräts, um einen ordnungsgemäßen elektrischen Anschluss zu gewährleisten. Führen Sie die Schritte in der beschriebenen Reihenfolge aus, um mögliche Fehler beim elektrischen Anschluss sowie Beschädigungen der elektrischen Gerätebauteile zu verhindern.
DEUTSCH Energieverbrauch pro Kochzone (EC electric cooking) Hinten links Hinten rechts Vorne rechts Vorne links 197,5 Wh/kg 198,5 Wh/kg 199,5 Wh/kg 196,0 Wh/kg Energieverbrauch des Kochfelds (EC electric hob) EN 60350-2 - Elektrische Kochgeräte für den Hausgebrauch - Teil 2: Kochfelder Verfahren zur Messung der Gebrauchseigenschaften. 14.2 Kochfeld - Energie sparen Beachten Sie folgende Tipps, um beim täglichen Kochen Energie zu sparen.
www.aeg.com 14.4 Backofen - Energie sparen nach Gardauer 3 - 10 Minuten vor Ablauf des Garvorgangs auf die Mindesttemperatur. Durch die Restwärme des Backofens werden die Speisen weiter gegart. Der Backofen verfügt über Funktionen, mit deren Hilfe Sie beim täglichen Kochen Energie sparen können. Nutzen Sie die Restwärme, um andere Speisen aufzuwärmen. Allgemeine Tipps Achten Sie darauf, dass die Backofentür während des Betriebs richtig geschlossen ist.
DEUTSCH 31
867342125-A-282017 www.aeg.