41056VH-MN EN COOKER USER MANUAL
FOR PERFECT RESULTS Thank you for choosing this AEG product. We have created it to give you impeccable performance for many years, with innovative technologies that help make life simpler – features you might not find on ordinary appliances. Please spend a few minutes reading to get the very best from it. ACCESSORIES AND CONSUMABLES In the AEG webshop, you’ll find everything you need to keep all your AEG appliances looking spotless and working perfectly.
Contents 3 CONTENTS 4 8 9 10 11 12 12 14 15 24 28 29 30 Safety information Product description Before first use Hob - Daily Use Hob - Helpful hints and tips Hob - Care and Cleaning Oven - Daily Use Oven - Clock functions Oven - Helpful hints and tips Oven - Care and Cleaning What to do if… Installation Environment concerns The following symbols are used in this user manual: Important information concerning your personal safety and information on how to avoid damaging the appliance.
Safety information SAFETY INFORMATION Before the installation and use, read this manual carefully: • For your own safety and the safety of your property • For the protection of the environment • For the correct operation of the appliance. Always keep these instructions with the appliance also if you move or sell it. The manufacturer is not responsible if incorrect installation or use results in damage.
Safety information 5 Electrical connection • Only an approved electrician can install and connect the appliance. Contact an approved service centre. This is to prevent the risks of structural damage or physical injury. • The appliance must be earthed. • Make sure that the electrical data on the rating plate agree with your domestic power supply. • Information on the voltage is on the rating plate.
Safety information • Open the door carefully. The use of ingredients with alcohol can cause a mixture of alcohol and air. There is the risk of fire. • Do not let sparks or open flames come near the appliance when you open the door. • Do not put flammable products or items that are wet with flammable products, and/or fusible objects (made of plastic or aluminium) in, near or on the appliance. There is a risk of explosion or fire. • Set the cooking zones to "off" after each use.
Safety information 7 • If you use an oven spray, follow the instructions from the manufacturer. Do not spray anything on the heating elements and the thermostat sensor (if applicable). • Do not clean the glass door with abrasive cleaning agents or metal scraper. Heat resistant surface of the inner glass can break and shatter. • When the door glass panels are damaged they become weak and can break. You must replace them. Contact the service centre. • Be careful when you remove the door from the appliance.
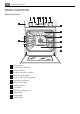
Product description PRODUCT DESCRIPTION General overview 2 3 4 5 6 7 2 1 8 9 5 4 14 3 2 1 10 11 12 13 1 2 3 4 5 6 7 8 9 10 11 12 13 14 Control panel Cooking zone indicators Power indicator Knob for the oven functions Electronic programmer Knob for the oven temperature Temperature indicator Hob control knobs Heating element Oven lamp Fan and heating element Bottom heat Rating plate Shelf runners
Before first use 9 Cooking surface layout 1 2 3 145 180 120/210 145 mm mm mm 6 mm 5 1 2 3 4 5 6 Single cooking zone 1200 W Oven steam outlet Single cooking zone 1800 W Single cooking zone 1200 W Residual heat indicator Double cooking zone 2200 W 4 Accessories • Oven shelf For cookware, cake tins, roasts. • Flat baking tray For cakes and biscuits. • Deep roasting pan To bake and roast or as pan to collect fat. • Storage drawer Below the oven cavity is the storage drawer.
Hob - Daily Use When you connect the appliance to the electrical supply or in case of a power cut, the Time function indicator flashes automatically. To set the current time use " + " or " - " button. After approximately 5 seconds, the flashing stops and the display shows the time of day set. For time change you must not set an automatic ) at the same function (Duration or End time. HOB - DAILY USE WARNING! Refer to "Safety information" chapter. When a cooking zone operates, it hums for a short time.
Hob - Helpful hints and tips 11 HOB - HELPFUL HINTS AND TIPS WARNING! Refer to "Safety information" chapter. Cookware • The bottom of the cookware must be as thick and flat as possible. • Cookware made of enamelled steel and with aluminium or copper bottoms can cause discoloration on glass ceramic surface. Energy saving • • • • If possible, always put the lids on the cookware. Put cookware on a cooking zone before you start it.
Hob - Care and Cleaning HOB - CARE AND CLEANING WARNING! Refer to "Safety information" chapter. Clean the appliance after each use. Always use cookware with clean bottom. Scratches or dark stains on the glass ceramic have no effect on how the appliance operates. To remove the dirt: 1. – Remove immediately:melted plastic, plastic foil, and food with sugar. If not, the dirt can cause damage to the appliance. Use a special scraper for the glass .
Oven - Daily Use Oven Functions Oven function LIGHT TRUE FAN FAN BAKING CONVENTIONAL BASE HEAT DEFROST SINGLE GRILL Application Use this function to light up the oven interior. To bake maximum on three oven levels at the same time. Decrease the oven temperatures (20-40 °C) compared with Conventional. And to dry food. To bake on one oven level food with a more intensive browning and a crispy base.
Oven - Clock functions 2. Put the shelf on the telescopic shelf supports and carefully push them inside the oven. °C WARNING! Do not close the oven door if the telescopic shelf supports are not completely inside the oven. This can damage the door enamel and glass. WARNING! Telescopic shelf supports and other accessories become very hot when you use the appliance. Wear oven gloves or equivalent.
Oven - Helpful hints and tips 15 Setting the clock functions 1. 2. Push the Selection button again and again until necessary function indicator flashes. To set the time for Minute minder , Duration or End , use "+" or "-" button. The related function indicator comes on. When the time period is completed, the function indicator flashes and an acoustic signal sounds for 2 minutes. With the functions Duration 3. and End the oven switches off automatically. Push any button to stop the signal.
Oven - Helpful hints and tips • Baking time can be extended by 10-15 minutes, if you bake cakes on more than one level. • Cakes and pastries at different heights do not always brown equally at first. If this occurs, do not change the temperature setting. The differences equalize during the baking procedure.
Oven - Helpful hints and tips Type of baking Oven function 17 Level Temperature (°C) Time (h:min) 1 180 1:10 - 1:30 Level Temperature (°C) Time (h:min) Plaited bread/bread crown 3 170 - 190 0:30 - 0:40 Christmas stollen1) 3 160 - 180 0:40 - 1:00 Bread ( rye bread) 1 230 0:25 160 - 180 0:30 - 1:00 Apple pie (2 tins, Ø 20 cm, diagonally off set) 1) Pre-heat oven Baking on one oven level - Cakes/pastries/breads on baking trays Type of baking Oven function - first of all1) - then Cre
Oven - Helpful hints and tips Type of baking Oven function Level Temperature (°C) Time (h:min) Pastries made with egg white, meringues 3 80 - 100 2:00 - 2:30 Macaroons 3 100 - 120 0:30 - 0:60 Biscuits made with yeast dough 3 150 - 160 0:20 - 0:40 Puff pastries1) 3 170 - 180 0:20 - 0:30 Rolls1) 3 160 0:20 - 0:35 Rolls1) 3 180 0:20 - 0:35 Small cakes (20 per tray)1) 3 140 0:20 - 0:30 Small cakes (20 per tray)1) 3 170 0:20 - 0:30 1) Pre-heat oven Baking on more than on
Oven - Helpful hints and tips 19 Fan baking table To see which oven function you must use please refer to the oven functions list in Daily use chapter.
Oven - Helpful hints and tips Ready meals Food to be cooked Oven function Shelf level Temperature °C Time Frozen pizza 3 refer to instructions of the manufacturer refer to instructions of the manufacturer Chips1) 3 200-220 refer to instructions of the manufacturer Baguettes 3 refer to instructions of the manufacturer refer to instructions of the manufacturer Fruit flans 3 refer to instructions of the manufacturer refer to instructions of the manufacturer 1) Comment: Turn chips 2 or
Oven - Helpful hints and tips Type of meat Quantity Oven function 21 Shelf level Temperature °C Time (h:min) Meat loaf 750 g - 1 kg 1 160 - 170 0:45 - 1:00 Porknuckle (precooked) 750 g - 1 kg 1 150 - 170 1:30 - 2:00 Shelf level Temperature °C Time (h:min) 1 kg 1 160 - 180 1:30 - 2:00 1,5 -2 kg 1 160 - 180 2:00 - 2:30 Shelf level Temperature °C Time (h:min) Veal Type of meat Roast Veal Knuckle of veal Quantity Oven function Lamb Type of meat Quantity Oven function Leg of
Oven - Helpful hints and tips Grilling Always use the grilling function with maximum temperature setting Always grill with the oven door closed Always pre-heat the empty oven with the grill functions for 5 minutes. • Set the shelf in the shelf level as recommended in the grilling table. • Always set the pan to collect the fat into the first shelf level. • Grill only flat pieces of meat or fish. To see which oven function you must use please refer to the oven functions list in Daily use chapter.
Oven - Helpful hints and tips Dish 23 Defrosting time (mins) Further defrosting time (mins) Comments Strawberries, 300g 30-40 10-20 ------- Butter, 250g 30-40 10-15 ------- Cream, 2 x 200g 80-100 10-15 Cream can also be whipped when still slightly frozen in places Gateau, 1400g 60 60 ------- Drying • Cover the oven shelves with baking parchment. To see which oven function you must use please refer to the oven functions list in Daily use chapter.
Oven - Care and Cleaning • Fill approximately 1/2 litre of water into the flat baking tray to have sufficient moisture in the oven. • When the liquid lightly starts to bubble in the first jars (after about 35-60 minutes with 1 litre jars), switch off the oven or decrease the temperature to 100°C ( see table). To see which oven function you must use please refer to the oven functions list in Daily use chapter. Soft fruit Preserve Temperature in °C Time until simmering in mins.
Oven - Care and Cleaning 25 • Clean all oven accessories (with a soft cloth with warm water and cleaning agent) after each use and let them dry. • If you have nonstick accessories, do not clean them using an aggressive agents, sharp edged objects or dishwasher. It can destroy nonstick coating! Shelf Support Rails Removing the shelf support rails 1. Pull the front of the shelf support rail away from the side wall. 2. Pull the rear shelf support rail away from the side wall and remove it.
Oven - Care and Cleaning Folding down the heating element 1. Remove the shelf support rails. 2. Hold the heating element with the two hands at the front 3. Pull it forwards against the spring pressure and out along the support on both sides. 4. The heating element folds down. The oven ceiling is ready to clean. Installing the heating element 1. Install the heating element in opposite sequence. Install the heating element correctly on the two sides above the support on the inner wall of the oven. 2.
Oven - Care and Cleaning 27 The oven door has 2, 3 or 4 panels of glass (depends on the model) Put the oven door with the outer side down on a soft and level surface to prevent scratches Removing and cleaning the door glasses 1. Hold the door trim (B) on the top edge of the door at the two sides and push inwards to release the clip seal. B 2. Pull the door trim to the front to remove it. 3.
What to do if… 4. Install the glass cover. Removing the drawer The drawer underneath the oven can be removed for easier cleaning. Removing the drawer 1. Pull the drawer out as far as possible. 2. Lift the drawer slightly, so that can be lifted upwards at an angle of the drawer guides. Inserting the drawer 1. Set the drawer on the drawer's support rails. Make sure that drawer's middle guide engages into the middle rail. 2. Lower the drawer to the horizontal and push it in.
Installation 29 If you cannot find a solution to the problem yourself, contact your dealer or the service centre. The necessary data for the service centre is on the rating plate. The rating plate is on the front frame of the oven cavity. We recommend that you write the data here: Model (MOD.) Product number (PNC) Serial number (S.N.) ......................................... ......................................... .........................................
Environment concerns The manufacturer is not responsible if you do not follow safety precautions from chapter "Safety". This appliance is supplied without a main plug and a main cable. ENVIRONMENT CONCERNS The symbol on the product or on its packaging indicates that this product may not be treated as household waste. Instead it should be taken to the appropriate collection point for the recycling of electrical and electronic equipment.
www.aeg.