47056IU EN User manual DE Benutzerinformation 2 36
www.aeg.com CONTENTS 1. 2. 3. 4. 5. 6. 7. 8. 9. 10. 11. 12. 13. 14. 15. SAFETY INFORMATION . . . . . . . . . . . . . . . . . . . . . . . . . . . . . . . . . . . . . . . . . . . . . . . . . . . . . . 3 SAFETY INSTRUCTIONS . . . . . . . . . . . . . . . . . . . . . . . . . . . . . . . . . . . . . . . . . . . . . . . . . . . . . . 4 PRODUCT DESCRIPTION . . . . . . . . . . . . . . . . . . . . . . . . . . . . . . . . . . . . . . . . . . . . . . . . . . . . . 7 BEFORE FIRST USE . . . . . . . . . . . . . . . .
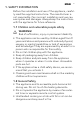
ENGLISH 3 1. SAFETY INFORMATION Before the installation and use of the appliance, carefully read the supplied instructions. The manufacturer is not responsible if an incorrect installation and use causes injuries and damages. Always keep the instructions with the appliance for future reference. 1.1 Children and vulnerable people safety WARNING! Risk of suffocation, injury or permanent disability.
www.aeg.com • Never try to extinguish a fire with water, but switch off the appliance and then cover flame e.g. with a lid or a fire blanket. • Do not store items on the cooking surfaces. • Do not use a steam cleaner to clean the appliance. • Metallic objects such as knives, forks, spoons and lids should not be placed on the hob surface since they can get hot.
ENGLISH Electrical connection WARNING! Risk of fire and electrical shock. • All electrical connections should be made by a qualified electrician. • The appliance must be earthed. • Make sure that the electrical information on the rating plate agrees with the power supply. If not, contact an electrician. • Always use a correctly installed shockproof socket. • Do not use multi-plug adapters and extension cables. • Make sure not to cause damage to the mains plug and to the mains cable.
www.aeg.com • • • • perature than oil used for the first time. Do not put flammable products or items that are wet with flammable products in, near or on the appliance. Do not let sparks or open flames to come in contact with the appliance when you open the door. Open the appliance door carefully. The use of ingredients with alcohol can cause a mixture of alcohol and air. Do not try to extinguish a fire with water. Disconnect the appliance and cover the flame with a lid or a fire blanket.
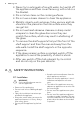
ENGLISH • Disconnect the appliance from the mains supply. • Cut off the mains cable and discard it. 7 • Remove the door catch to prevent children and pets to get closed in the appliance. 3. PRODUCT DESCRIPTION 3.1 General overview 1 1 Knob for the oven functions 2 3 4 2 Electronic programmer 5 6 7 5 9 4 3 8 2 3 Knob for the temperature 4 Temperature indicator 5 Knobs for the hob 6 Heating element 7 Oven lamp 8 Fan and heating element 1 9 Shelf positions 3.
www.aeg.com 4. BEFORE FIRST USE WARNING! Refer to "Safety information" chapter. To change the time, press again and again until the indicator for the Time of Day function flashes. You must not set the Duor End function at ration the same time. 4.1 Initial Cleaning • Remove all parts from the appliance. • Clean the appliance before first use. Refer to chapter "Care and Cleaning". 4.2 Setting the time You must set the time before you operate the oven.
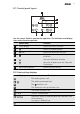
ENGLISH 5.1 Control panel layout 1 2 3 4 7 6 5 Use the sensor fields to operate the appliance. The indicators and display show which function operates. 1 Sensor field Function Timer display Shows the time in minutes. 2 Selects the cooking zone. 3 Increase or decrease the time. / 4 Activates or deactivates the key lock or child lock. 5 Activates the Power function. 6 Activates or deactivates the Stop and Go function. 7 Heat setting display Shows the heat setting. 5.
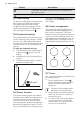
www.aeg.com Display Description Cookware unsuitable or too small, or no cookware on the cooking zone. The automatic switch-off is on. 5.3 Heat setting To activate a coking zone or increase the heat setting, turn the knob clockwise. The display shows the heat setting. To decrease the heat setting, turn the knob counterclockwise. To deactivate, . turn the knob to the position 5.4 Automatic heat-up The automatic heat-up function lets you get the necessary heat setting in a shorter time.
ENGLISH The indicator of the cooking zone flashes slowly. The timer starts to count down. 4. 5. To see the remaining time, touch again and again until the indicator for the necessary cooking zone flashes quickly. The display shows the remaining time. When the set time ends, 00 flashes and an acoustic signal sounds. The cooking zone deactivates. Touch to stop the signal. To deactivate the timer before the set time is completed, set the cooking zone with and touch -. The remaining time counts down to 00.
www.aeg.com • You spill something or put something on the hob control panel for more than 10 seconds (a pan, a cloth, etc.). An acoustic signal sounds and the hob deactivates. Remove the object or clean the control panel. • The hob becomes too hot (e.g. when a saucepan boils dry). Before you use the hob again, the cooking zone must be cool. • You use incorrect cookware. The disand the play shows the symbol cooking zone deactivates automatically after 2 minutes.
ENGLISH • Put cookware on a cooking zone before you start it. 13 6.4 Examples of cooking applications The data in the table is for guidance only.
www.aeg.com water rings, fat stains, shiny metallic discolorations. Use a special cleaning agent for glass ceramic or stainless steel. 2. Clean the appliance with a moist cloth and some detergent. 3. At the end rub the appliance dry with a clean cloth. 8. OVEN - DAILY USE WARNING! Refer to "Safety information" chapter. 8.1 Cooling fan When the appliance operates, the cooling fan switches on automatically.
ENGLISH Oven function 15 Application Defrost To thaw frozen food. Oven Lamp To activate the oven lamp without a cooking function. 9. OVEN - CLOCK FUNCTIONS 9.1 Electronic programmer 1 2 1 1 Function indicators 2 Time display 3 Button + 4 Selection button hr min 5 4 5 Button - 3 Clock function Time of day Minute Minder Duration End Application To set, change or check the time of day. To set a countdown time. This function has no effect on the operation of the oven.
www.aeg.com and an acoustic signal sounds for two minutes. With the Duration and End functions, the appliance deactivates automatically. 4. Press a button to stop the signal. 5. Turn the knob for the oven functions and the knob for the temperature to the off position. 9.3 Cancelling the clock functions 1. Press the Selection button again and again until the necessary function indicator flashes. 2. Press and hold the button -. The clock function goes out after some seconds. 10.
ENGLISH 17 10.2 Telescopic runners - inserting the oven accessories Put the baking tray or roasting pan on the telescopic runners. The high rim around the oven shelf is a special device to prevent the cookware from slipping. 10.3 Inserting the oven shelf and the roasting pan together Put the oven shelf on the roasting pan. Put the oven shelf and the roasting pan on the telescopic runners. 11. OVEN - HELPFUL HINTS AND TIPS WARNING! Refer to "Safety information" chapter.
www.aeg.com perature, cooking times) and shelf levels to the values in the tables. • With longer baking times, the oven can be switched off about 10 minutes before the end of baking time, to use the residual heat. When you use frozen food, the trays in the oven can twist during baking. When the trays get cold again, the distortion will be gone. • If you cannot find the settings for a special recipe, look for the one that is almost the same.
ENGLISH Type of baking Shelf position Temperature °C Time in min. Madeira cake/fruit cakes 1-2 140 - 160 50 - 90 Fatless sponge cake 3 150 - 160 1) 25 - 40 Flan base - short pastry 2 170-180 1) 10 - 25 Flan base sponge mixture 2 150 - 170 20 - 25 2-3 160 60 - 90 Shelf position Temperature °C Time in min. 3 150 - 160 20 - 40 3 150 35 - 55 3 160 - 170 40 - 80 Shelf position Temperature °C Time in min.
www.aeg.com Type of baking Shelf position Temperature °C Time in min. Small cakes (20per tray) 3 150 1) 20 - 35 Dish Shelf position Temperature °C Time in min. Baguettes topped with melted cheese 1 160 - 170 1) 15 - 30 Stuffed vegetables 1 160 - 170 30- 60 Temperature °C Time in min.
ENGLISH Type of baking Small cakes (20per tray) Shelf position 2 levels Temperature °C Time in min. 150 1) 20 - 40 2/4 1) Pre-heat the oven 11.3 Conventional Baking on one level Baking in tins Type of baking Shelf position Temperature °C Time in min.
www.aeg.com Type of baking Shelf position Temperature °C Time in min. Swiss roll 3 180 - 200 1) 10 - 20 Cake with crumble topping (dry) 3 160 - 180 20 - 40 Buttered almond cake/sugar cakes 3 190 - 210 1) 20 - 30 3 170 35 - 55 Fruit flans made with short pastry 3 170 - 190 40 - 60 Yeast cakes with delicate toppings (e.g.
ENGLISH Type of baking Shelf positions Temperature °C Time in min. Small cakes (20per tray) 3-4 170 1) 20 - 30 Shelf positions Temperature °C Time in min.
www.aeg.com Type of baking Shelf position Temperature °C Time Min. Piroggen (Russian version of calzone) 2-3 180 - 200 2) 15 - 25 1) Use deep pan 2) Pre-heat the oven • Roast lean meats in a roasting tin with a lid. This will keep the meat more succulent. • All types of meat, that can be browned or have crackling, can be roasted in the roasting tin without the lid. 11.5 Roasting Roasting dishes • Use heat-resistant ovenware to roast (please read the instructions of the manufacturer).
ENGLISH 25 Veal Type of meat Roast veal1) Knuckle of veal Quantity Shelf position Temperature °C Time in min. 1 kg 1 210 - 220 90 - 120 1.5-2 kg 1 200 - 220 150 - 180 1) use a closed roasting dish Lamb Type of meat Quantity Shelf position Temperature °C Time in min. Leg of lamb, roast lamb 1- 1.5 kg 1 210 - 220 90 - 120 Saddle of lamb 1- 1.5 kg 1 210 - 220 40 - 60 Type of meat Quantity Shelf position Temperature °C Time in min.
www.aeg.com Fish Type of meat Quantity Shelf position Temperature °C Time in min. Whole fish 1-1.5 kg 1 210 - 220 40 - 70 11.7 Roasting with Turbo Grilling Beef Type of meat Quantity Shelf position Temperature °C Time min. Roast beef or fillet: rare per cm. of thickness 1 190 - 200 1) 5-6 Roast beef or fillet: medium per cm. of thickness 1 180 - 190 6-8 Roast beef or fillet: well done per cm.
ENGLISH Type of meat Quantity Shelf position Temperature °C Time min. Saddle of lamb 1-1.5 kg 1 160 - 180 40 - 60 Type of meat Quantity Shelf position Temperature °C Time min. Poultry portions 200-250 g each 1 200 - 220 30 - 50 Half chicken 400-500 g each 1 190 - 210 35 - 50 Chicken, poulard 1-1.5 kg 1 190 - 210 50 - 70 Duck 1.5-2 kg 1 180 - 200 80 - 100 Goose 3.5-5 kg 1 160 - 180 120 - 180 Turkey 2.5-3.
www.aeg.com the appliance door and let the appliance cool down. After that finish the drying process. 11.9 Drying Cover the oven shelves with baking parchment. For best results: deactivate the appliance after half the time required.
ENGLISH Information on acrylamides Important! According to the newest scientific knowledge, if you brown food (specially the one which contains starch), 29 acrylamides can pose a health risk. Thus, we recommend that you cook at the lowest temperatures and do not brown food too much. 12. OVEN - CARE AND CLEANING WARNING! Refer to "Safety information" chapter. • Clean the front of the appliance with a soft cloth with warm water and cleaning agent.
www.aeg.com WARNING! Make sure that the glass panels are cool before you clean the glass door. There is a risk that the glass could break. Installing the shelf supports Install the shelf supports in the opposite sequence. Valid with telescopic runners: The retaining pins on the telescopic shelf runners must point to the front! WARNING! When the door glass panels are damaged or have scratches, the glass becomes weak and can break. To prevent this, you must replace them.
ENGLISH 31 Removing and cleaning the door glasses 1. Hold the door trim (B) on the top edge of the door at the two sides and push inwards to release the clip seal. 2. Pull the door trim to the front to remove it. Hold the door glass panels on their top edge one by one and pull them upwards from the guide. Clean the door glass panels. B 3. 4. To install panels, do the above steps in the opposite sequence. 12.4 Oven lamp 12.
www.aeg.com WARNING! When the oven is in use, heat can build up in the drawer. Do not keep flammable things in there (e.g. cleaning materials, plastic bags, oven gloves, paper, cleaning sprays, etc.). 13. WHAT TO DO IF… WARNING! Refer to "Safety information" chapter. Problem Possible cause Remedy The appliance does not operate The fuse in the fuse box is released Control the fuse. If the fuse is released more than one time, refer to a qualified electrician.
ENGLISH Problem Possible cause 33 Remedy The cooking zone reYou covered one or duces the heat setting to more sensor fields or there is water or fat stains on the control panel. Uncover the sensor fields. Clean the control panel A sound operates when the appliance is off You covered one or more sensor fields Uncover the sensor fields. Heat setting alternates The Power management is active See the section Power management A sound operates and appliance starts and stops again.
www.aeg.com Problem come on Possible cause Remedy There is an error in the appliance, because a cookware boils dry or you use not correct cookware. Overheating protection for the cooking zone operates. The automatic switch-off operates Switch off the appliance. Remove the hot cookware. After approximately 30 seconds switch on the cooking zone again. should disappear, residual heat indicator can stay.
ENGLISH 35 tween the cupboards (2). If the space between the bench cupboards is larger than the width of the appliance, you must adjust the side measurement to centre the appliance. Make sure that the surface behind the appliance is smooth. 49 mm 77 mm 14.3 Anti-tilt protection CAUTION! You must install the anti-tilt protection. If you do not install it, the appliance can tilt. Make sure you install the anti-tilt protection at the correct height. 1.
www.aeg.com INHALT 1. 2. 3. 4. 5. 6. 7. 8. 9. 10. 11. 12. 13. 14. 15. SICHERHEITSINFORMATIONEN . . . . . . . . . . . . . . . . . . . . . . . . . . . . . . . . . . . . . . . . . . . . . . SICHERHEITSHINWEISE . . . . . . . . . . . . . . . . . . . . . . . . . . . . . . . . . . . . . . . . . . . . . . . . . . . . . GERÄTEBESCHREIBUNG . . . . . . . . . . . . . . . . . . . . . . . . . . . . . . . . . . . . . . . . . . . . . . . . . . . . VOR DER ERSTEN INBETRIEBNAHME . . . . . . . . . . . . . . . . . . . . .
DEUTSCH 37 1. SICHERHEITSINFORMATIONEN Lesen Sie vor der Montage und Verwendung des Geräts sorgfältig die mitgelieferte Anleitung. Der Hersteller haftet nicht für Verletzungen oder Schäden, die durch eine fehlerhafte Montage entstehen. Bewahren Sie die Anleitung zum Nachschlagen auf. 1.1 Sicherheit von Kindern und schutzbedürftigen Personen WARNUNG! Es besteht Erstickungsgefahr, das Risiko von Verletzungen oder permanenten Behinderungen.
www.aeg.com • Kochen mit Fett oder Öl auf einem unbeaufsichtigten Kochfeld ist gefährlich und kann zu einem Brand führen. • Versuchen Sie nicht einen Brand mit Wasser zu löschen, sondern schalten Sie das Gerät aus und bedecken Sie die Flamme mit einem Deckel oder einer Feuerlöschdecke. • Legen Sie keine Gegenstände auf dem Kochfeld ab. • Benutzen Sie zum Reinigen des Gerätes keinen Dampfreiniger.
DEUTSCH • Seien Sie beim Umsetzen des Geräts vorsichtig, denn es ist schwer. Tragen Sie stets Sicherheitshandschuhe. • Ziehen Sie das Gerät nicht am Türgriff. • Die Mindestabstände zu anderen Geräten und Küchenmöbeln sind einzuhalten. • Stellen Sie sicher, dass das Gerät unterhalb von bzw. zwischen sicheren Konstruktionen montiert wird. • Die Seiten des Geräts dürfen nur an Geräte oder Einheiten in gleicher Höhe angrenzen. • Stellen Sie das Gerät nicht auf einem Sockel auf.
www.aeg.com • Üben Sie keinen Druck auf die geöffnete Gerätetür aus. • Schalten Sie das Gerät nicht über eine externe Zeitschaltuhr oder eine separate Fernsteuerung ein. • Halten Sie die Tür immer geschlossen, wenn das Gerät in Betrieb ist. • Legen Sie kein Besteck und keine Topfdeckel auf die Kochzonen. Sie werden heiß. • Schalten Sie die Kochzonen nach jedem Gebrauch aus. • Benutzen Sie das Gerät nicht als Arbeits- oder Abstellfläche.
DEUTSCH 2.3 Reinigung und Pflege WARNUNG! Risiko von Verletzungen, Brand oder Beschädigungen am Gerät. • Schalten Sie vor Reinigungsarbeiten immer das Gerät aus und ziehen Sie den Netzstecker aus der Steckdose. • Vergewissern Sie sich, dass das Gerät abgekühlt ist. Zusätzlich besteht die Gefahr, dass die Glasscheiben brechen. • Ersetzen Sie die Glasscheiben der Tür umgehend, wenn sie beschädigt sind. Wenden Sie sich hierzu an den Kundendienst. • Gehen Sie beim Aushängen der Tür sorgsam vor.
www.aeg.com 3. GERÄTEBESCHREIBUNG 3.1 Allgemeine Übersicht 1 1 Backofen-Einstellknopf 2 3 4 2 Elektronischer Programmspeicher 3 Temperaturwahlknopf 6 5 Kochfeld-Einstellknöpfe 7 5 9 5 4 3 8 2 4 Temperaturanzeige 6 Heizelement 7 Backofenlampe 8 Ventilator und Heizelement 1 9 Einschubebenen 3.
DEUTSCH 43 4. VOR DER ERSTEN INBETRIEBNAHME WARNUNG! Siehe Kapitel „Sicherheitshinweise“. Nach etwa 5 Sekunden hört die Anzeige auf zu blinken und zeigt die eingestellte Uhrzeit an. Drücken Sie zum Ändern der , Uhrzeit mehrmals die Taste bis die Uhranzeige zu blinken beginnt. Die Funktionen „Dauer“ und „Ende“ dürfen nicht gleichzeitig eingestellt werden. 4.1 Erstes Reinigen • Entfernen Sie alle Teile aus dem Gerät. • Reinigen Sie das Gerät vor dem ersten Gebrauch. Siehe Kapitel „Reinigung und Pflege“.
www.aeg.com 5.1 Bedienfeldanordnung 1 2 3 4 7 6 5 Bedienen Sie das Gerät über die Sensorfelder. Die Anzeigen, Kontrolllampen und akustischen Signale informieren Sie über die aktiven Funktionen. 1 Sensorfeld Funktion Timer-Anzeige Anzeige der Zeit in Minuten. 2 Auswahl der Kochzone. 3 Verlängerung oder Verkürzung der eingestellten Zeit. / 4 Ein- und Ausschalten der Tastenverriegelung oder Kindersicherung. 5 Einschalten der Power-Funktion.
DEUTSCH Display 45 Beschreibung Das Kochgeschirr ist ungeeignet oder zu klein bzw. es befindet sich kein Kochgeschirr auf der Kochzone. Die Abschaltautomatik ist eingeschaltet. 5.3 Kochstufe Drehen Sie den Knopf im Uhrzeigersinn, um die Kochzone einzuschalten oder die Kochstufe zu erhöhen. Das Display zeigt die eingestellte Kochstufe an. Drehen Sie den Knopf entgegen dem Uhrzeigersinn, um die Kochstufe zu verringern. Zum Ausschalten drehen Sie . den Knopf auf die Position 5.6 Power-Management 5.
www.aeg.com 2. Stellen Sie die Kochstufe für die Kochzone ein. Sie können diese auch nach dem Einschalten der Uhr einstellen. 3. Berühren Sie zum Einschalten der Uhr oder zur Änderung der Zeit + oder - auf dem Bedienfeld. Die längste einstellbare Zeit beträgt 99 Minuten. Die Kochzonenanzeige blinkt langsam. Die eingestellte Zeit beginnt abzulaufen. 4. Berühren Sie zur Anzeige der verbleibenden Zeit wiederholt, bis die Anzeige der entsprechenden Kochzone schnell blinkt.
DEUTSCH 4. Nachdem das Gerät ausgeschaltet wurde, ist die Kindersicherung wieder in Betrieb. 5.11 OptiHeat Control (Restwärmeanzeige, 3-stufig) WARNUNG! \ \ Es besteht Verbrennungsgefahr durch Restwärme! OptiHeat Control zeigt die Restwärmestufe an. Die Induktionskochzonen erzeugen die erforderliche Hitze zum Kochen direkt im Boden des Kochgeschirrs. Die Glaskeramik wird nur durch die Wärme des Kochgeschirrs erhitzt. 5.
www.aeg.com Kochzone Min. Kochgeschirrdurchmesser [mm] Hinten rechts — 180 mm 145 Vorne rechts — 180 mm 145 Hinten links — 145 mm 125 Vorne links — 210 mm 180 • Summen: nutzen Sie eine oder mehrere Kochzonen mit hohen Leistungen. • Klicken: es erfolgen elektronische Schaltvorgänge. • Zischen, Surren: das Gebläse ist in Betrieb. Die beschriebenen Geräusche sind normal und weisen nicht auf einen Defekt hin. 6.
DEUTSCH 49 Koch stufe Zweck: Zeit Tipps 7-8 Bei starker Hitze anbraten: Rösti, Lendenstücke, Steaks 5-15 Min. Nach der Hälfte der Garzeit einmal wenden 9 Große Mengen Wasser zum Kochen bringen, Kochen von Nudeln, Anbraten von Fleisch (Gulasch, Schmorbraten), Frittieren von Pommes frites Die Power-Funktion ist für das Erhitzen großer Wassermengen geeignet. 7. KOCHFELD - REINIGUNG UND PFLEGE WARNUNG! Siehe Kapitel „Sicherheitshinweise“. Reinigen Sie das Gerät nach jedem Gebrauch.
www.aeg.com funktionen und die Temperatur in die Position Aus. 8.3 Backofenfunktionen Backofenfunktion Stellung „Aus“ Anwendung Das Gerät ist ausgeschaltet. Heißluft mit Ringheizkörper Zum Braten und/oder Backen von Speisen bei gleicher Gartemperatur auf mehreren Ebenen gleichzeitig, ohne dass es zu einer Aromaübertragung kommt. Stellen Sie eine 20-40 °C niedrigere Backofentemperatur als bei Ober-/Unterhitze ein. Ober-/Unterhitze Zum Backen und Braten auf einer Ebene.
DEUTSCH 51 9. BACKOFEN - UHRFUNKTIONEN 9.1 Elektronischer Programmspeicher 1 2 1 1 Funktionsanzeigen 2 Zeitanzeige 3 Taste + 4 Auswahltaste hr min 5 4 5 Taste - 3 Uhrfunktion Anwendung Tageszeit Zum Einstellen, Ändern oder Abfragen der Tageszeit. Kurzzeitwecker Zum Einstellen einer Kurzzeit. Diese Funktion hat keine Auswirkung auf den Backofenbetrieb. Dauer Einstellen der Einschaltdauer für das Gerät. Ende Einstellen der Abschaltzeit für das Gerät.
www.aeg.com 5. Drehen Sie den Backofen-Einstellknopf und den Temperaturwahlknopf in die Position „Aus“. 2. Halten Sie die Taste - gedrückt. Die Uhrfunktion schaltet sich nach einigen Sekunden aus. 9.3 Ausschalten der Uhrfunktionen 1. Drücken Sie die Auswahltaste so oft, bis die gewünschte Funktionsleuchte blinkt. 10. BACKOFEN - VERWENDUNG DES ZUBEHÖRS WARNUNG! Siehe Kapitel „Sicherheitshinweise“. 10.1 Einsetzen des Backofenzubehörs Die Brat- und Fettpfanne und der Rost haben Seitenränder.
DEUTSCH 53 10.2 Teleskopauszüge - Einsetzen des Backofenzubehörs Setzen Sie das Backblech oder die Bratund Fettpfanne auf die Teleskopauszüge. Durch den umlaufend erhöhten Rahmen des Rosts ist das Geschirr zusätzlich gegen Abrutschen gesichert. 10.3 Rost und Fettpfanne zusammen einsetzen Rost auf die Fettpfanne legen. Setzen Sie den Rost und die Fettpfanne auf die Teleskopauszüge. 11. BACKOFEN - PRAKTISCHE TIPPS UND HINWEISE WARNUNG! Siehe Kapitel „Sicherheitshinweise“.
www.aeg.com Gerät. Passen Sie Ihre normalen Einstellungen (Temperatur, Kochzeiten) und die Einsatzebenen an die Werte in den Tabellen an. • Bei längeren Backzeiten kann der Backofen ca. 10 Minuten vor Ende der Backzeit ausgeschaltet werden, um die Restwärme auszunutzen. Wenn Sie gefrorene Lebensmittel in den Backofen geben, können sich die Backbleche beim Backen verziehen. Nachdem die Backbleche abgekühlt sind, hebt sich die Verformung wieder auf.
DEUTSCH Backergebnis Der Kuchen ist nach der eingestellten Zeit noch nicht fertig gebacken Mögliche Ursache Die Temperatur ist zu niedrig Abhilfe Eine etwas höhere Ofentemperatur einstellen 11.2 Heißluft mit Ringheizkörper Backen auf einer Einschubebene Backen in Formen Backware Einschubebene Temperatur in °C Zeit in Min.
www.aeg.com Einschubebene Temperatur in °C Zeit in Min.
DEUTSCH Backware Einschubebene 2 Ebenen Temperatur in °C Zeit in Min. Eiweißgebäck, Baiser 2/4 80 - 100 130 - 170 Makronen 2/4 100 - 120 40 - 80 Hefekleingebäck 2/4 160 - 170 30 - 60 2/4 170 - 180 1) 30 - 50 Brötchen 2/4 180 1) 25 - 40 Small cakes (20 pro Blech) 2/4 150 1) 20 - 40 Blätterteiggebäck 1) Backofen vorheizen 11.3 Backen mit Ober-/Unterhitze auf einer Ebene Backen in Formen Backware Einschubebene Temperatur in °C Zeit in Min.
www.aeg.com Backware Einschubebene Brot (Roggenbrot): 1. Erster Teil des Backvorgangs. 2. Zweiter Teil des Backvorgangs. 1-2 Temperatur in °C Zeit in Min. 1. 230 1) 1. 2. 160 - 180 1) 2.
DEUTSCH Einschubebenen Temperatur in °C Zeit in Min. Makronen Backware 3 120 - 130 30 - 60 Hefekleingebäck 3 170 - 190 20 - 40 Blätterteiggebäck 3 190 - 210 1) 20 - 30 Brötchen 3 190 - 2101) 10 - 55 3-4 170 1) 20 - 30 Small cakes (20 pro Blech) 1) Backofen vorheizen Tabelle für Aufläufe und Überbackenes Einschubebenen Temperatur in °C Zeit in Min.
www.aeg.com Backware Einschubebene Temperatur in °C Zeit (Min.) 2-3 160 - 180 2) 45 - 55 Flammkuchen 2-3 230 - 250 2) 12 - 20 Piroggen (Russische Version der Calzone) 2-3 180 - 200 2) 15 - 25 Blätterteigquiche 1) Tiefes Blech benutzen 2) Backofen vorheizen • Braten Sie magere Fleischsorten in einem Bräter mit Deckel. So bleibt das Fleisch saftiger. • Alle Fleischsorten, die sich zum Bräunen eignen oder eine Kruste haben sollen, können im Bräter ohne Deckel gebraten werden. 11.
DEUTSCH 61 Fleischart Menge Einschubebene Temperatur in °C Zeit in Min. Schweinshaxe (vorgegart) 750 g - 1 kg 1 200 - 220 90 - 120 Fleischart Menge Einschubebene Temperatur in °C Zeit in Min. Kalbsbraten1) 1 kg 1 210 - 220 90 - 120 1,5-2 kg 1 200 - 220 150 - 180 Menge Einschubebene Temperatur in °C Zeit in Min.
www.aeg.com Fisch Fleischart Menge Einschubebene Temperatur in °C Zeit in Min. Ganzer Fisch 1-1,5 kg 1 210 - 220 40 - 70 Menge Einschubebene Temperatur in °C Zeit (Min.) Roastbeef oder Filet: Englisch je cm Höhe 1 190 - 200 1) 5-6 Roastbeef oder Filet: Medium je cm Höhe 1 180 - 190 6-8 Roastbeef oder Filet: durchgebraten je cm Höhe 1 170 - 180 8 - 10 Menge Einschubebene Temperatur in °C Zeit (Min.
DEUTSCH 63 Lammfleisch Fleischart Menge Einschubebene Temperatur in °C Zeit (Min.) Lammkeule, Lammbraten 1-1,5 kg 1 150 - 170 100 - 120 Lammrücken 1-1,5 kg 1 160 - 180 40 - 60 Menge Einschubebene Temperatur in °C Zeit (Min.
www.aeg.com Grillgut Einschubebene Temperatur in °C Überbackener Toast 4 max Grillzeit in Minuten Erste Seite Zweite Seite 6-8 - 1) Backofen vorheizen nen Sie die Gerätetür und lassen Sie das Gerät abkühlen. Danach das Dörrgut fertig dörren. 11.9 Dörren Decken Sie die Backbleche mit Backpapier ab. Für beste Ergebnisse: Schalten Sie das Gerät nach der Hälfte der Zeit aus.
DEUTSCH 65 Auftauzeit in Min. Zusätzliche Auftauzeit in Min. Fleisch, 500 g 90 - 120 20 - 30 Nach der Hälfte der Zeit wenden Forelle, 150 g 25 - 35 10 - 15 - Erdbeeren, 300 g 30 - 40 10 - 20 - Butter, 250 g 30 - 40 10 - 15 Sahne lässt sich auch mit noch leicht gefrorenen Stellen gut aufschlagen.
www.aeg.com Abnehmen der Einhängegitter 1 1. Ziehen Sie das Einhängegitter vorne von der Seitenwand weg. 2. Ziehen Sie das Einhängegitter hinten von der Seitenwand weg und nehmen Sie es heraus. 2 Einsetzen der Einhängegitter Führen Sie zum Einsetzen der Einhängegitter die obigen Schritte in umgekehrter Reihenfolge durch. Gilt für Auszüge: Die Haltestifte der Auszüge müssen nach vorne zeigen! VORSICHT! Achten Sie darauf, dass der längere Befestigungsdraht vorne ist.
DEUTSCH 67 Aushängen der Tür: Öffnen Sie die Tür vollständig. Drücken Sie den Schieber, bis Sie ein Klicken hören. 3. Schließen Sie die Tür, bis der Schieber einrastet. 4. Hängen Sie die Tür aus. 1. 2. 1 2 Um die Tür zu entfernen, ziehen Sie sie erst aus der einen und dann aus der anderen Seite heraus. Nach der Reinigung muss die Backofentür in umgekehrter Reihenfolge wieder eingebaut werden. Achten Sie darauf, dass die Tür beim Einsetzen hörbar einrastet.
www.aeg.com Bevor Sie die Backofenlampe austauschen: • Schalten Sie den Backofen aus. • Nehmen Sie die Sicherungen aus dem Sicherungskasten oder legen Sie den Schutzschalter um. 2 1 Legen Sie ein Tuch auf den Boden des Backofens, um die Backofenlampe und die Glasabdeckung zu schützen. Backofenlampe auswechseln Die Glasabdeckung der Backofenlampe befindet sich an der Rückwand des Backofeninnenraums. Drehen Sie die Glasabdeckung gegen den Uhrzeigersinn und nehmen Sie sie ab. 2.
DEUTSCH Problem Mögliche Ursache 69 Abhilfe Das Gerät funktioniert nicht. Sie haben mindestens 2 Berühren Sie nur ein Sensorfelder gleichzeitig Sensorfeld. berührt. Das Gerät funktioniert nicht. Wasser- oder Fettspritzer Reinigen Sie das Bedienbefinden sich auf dem feld. Bedienfeld. Das Gerät funktioniert nicht. Die Kindersicherung, die ist Tastensperre oder eingeschaltet. Siehe den Abschnitt „Bedienung des Geräts“. Das Gerät funktioniert nicht. Das Gerät ist nicht eingeschaltet.
www.aeg.com Problem Mögliche Ursache Abhilfe leuchtet auf. Der Überhitzungsschutz für die Kochzone wurde aktiviert. Schalten Sie die Kochzone aus. Schalten Sie die Kochzone wieder ein. leuchtet auf. Es befindet sich kein Kochgeschirr auf der Kochzone. Stellen Sie Kochgeschirr auf die Kochzone. leuchtet auf. Das Kochgeschirr ist ungeeignet. Benutzen Sie geeignetes Kochgeschirr. leuchtet auf. Der Durchmesser des Kochgefäßbodens ist für die Kochzone zu klein.
DEUTSCH 71 14. MONTAGE WARNUNG! Siehe Kapitel „Sicherheitshinweise“. Abmessungen Höhe 847 - 867 mm Breite 596 mm Tiefe 600 mm Backofenkapazität 74 Liter Spannung 230 V Frequenz 50 Hz 14.3 Kippschutz VORSICHT! Sie müssen den Kippschutz anbringen. Andernfalls könnte das Gerät kippen. 14.1 Standort des Geräts Sie können Ihr freistehendes Gerät neben oder zwischen Küchenmöbel sowie in einer Ecke aufstellen. B A A Mindestabstände Abmessungen mm A 2 B 685 14.
www.aeg.com 49 mm 77 mm 14.4 Elektroinstallation Der Hersteller haftet nicht für Schäden, die aufgrund der Nichtbeachtung der Sicherheitsvorkehrungen des Kapitels „Sicherheitshinweise“ entstehen. Das Gerät wird ohne Netzstecker und Netzkabel geliefert. Einsetzbare Kabeltypen: H07 RN-F, H05 RN-F, H05 RRF, H05 VV-F, H05 V2V2-F (T90), H05 BB-F. 1 2 15. UMWELTTIPPS Recyceln Sie Materialien mit dem Symbol . Entsorgen Sie die Verpackung in den entsprechenden Recyclingbehältern.
DEUTSCH 73
www.aeg.
DEUTSCH 75
892950693-A-272012 www.aeg.