47056IU NL Gebruiksaanwijzing FR Notice d'utilisation 2 38
www.aeg.com INHOUD 1. 2. 3. 4. 5. 6. 7. 8. 9. 10. 11. 12. 13. VEILIGHEIDSINFORMATIE . . . . . . . . . . . . . . . . . . . . . . . . . . . . . . . . . . . . . . . . . . . . . . . . . . . . 3 VEILIGHEIDSVOORSCHRIFTEN . . . . . . . . . . . . . . . . . . . . . . . . . . . . . . . . . . . . . . . . . . . . . . . . 4 BESCHRIJVING VAN HET PRODUCT . . . . . . . . . . . . . . . . . . . . . . . . . . . . . . . . . . . . . . . . . . . 7 VOOR HET EERSTE GEBRUIK . . . . . . . . . . . . . . . . . . . . . . . . . . .
NEDERLANDS 3 1. VEILIGHEIDSINFORMATIE Lees zorgvuldig de meegeleverde instructies voor installatie en gebruik van het apparaat. De fabrikant is niet verantwoordelijk voor letsel en schade veroorzaakt door een foutieve installatie. Bewaar de instructies van het apparaat voor toekomstig gebruik. 1.1 Veiligheid van kinderen en kwetsbare mensen WAARSCHUWING! Gevaar voor verstikking, letsel of permanente invaliditeit.
www.aeg.com • Zonder toezicht koken op een kookplaat met vet of olie kan gevaarlijk zijn en brandgevaar opleveren. • Probeer brand nooit met water te blussen, maar schakel in plaats daarvan het apparaat uit en bedek de vlam, d.w.z. met een deksel of blusdeken. • Bewaar geen voorwerpen op de kookplaten. • Gebruik geen stoomreiniger om het apparaat schoon te maken. • Metalen voorwerpen, zoals messen, vorken, lepels en deksels mogen niet op de kookplaat worden geplaatst, aangezien ze heet kunnen worden.
NEDERLANDS • Verwijder alle verpakkingsmaterialen. • Installeer en gebruik geen beschadigd apparaat. • Volg de installatie-instructies op die zijn meegeleverd met het apparaat. • Wees voorzichtig met het verplaatsen van het apparaat, het is zwaar. Draag altijd veiligheidshandschoenen. • Trek het apparaat nooit aan de handgreep van zijn plaats. • Houd de minimumafstand naar andere apparaten en units in acht. • Zorg ervoor dat het apparaat onder en naast veilige installaties wordt geïnstalleerd.
www.aeg.com • Wees voorzichtig met het openen van de deur van het apparaat als het apparaat aan staat. Er kan hete lucht ontsnappen. • Bedien het apparaat niet met natte handen of als het contact maakt met water. • Oefen geen kracht uit op een geopende deur. • Bedien het apparaat niet met een externe timer of een apart afstandbedieningssysteem. • Houd de deur van het apparaat altijd dicht als het apparaat in werking is. • Leg geen bestek of deksels van steelpannen op de kookzones. Ze zijn heet.
NEDERLANDS • Schakel het apparaat uit en trek de stekker uit het stopcontact voordat u onderhoudshandelingen verricht. • Zorg ervoor dat het apparaat is afgekoeld. Er bestaat een risico dat de glasplaten kunnen breken. • Vervang direct de glazen deurpanelen als deze beschadigd zijn. Neem contact op met de service-afdeling. • Wees voorzichtig bij het verwijderen van de deur uit het apparaat. De deur is zwaar! • Reinig het apparaat regelmatig om te voorkomen dat het materiaal van het oppervlak achteruitgaat.
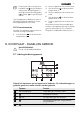
www.aeg.com 3.2 Indeling kookplaat 1 3 2 1 Inductiekookzone 1400 W, met Po- 145 mm 180 mm 180 mm 210 mm 4 werfunctie 2500 W 2 Stoomuitlaat 3 Inductiekookzone 1800 W, met Powerfunctie 2800 W 4 Inductiekookzone 1800 W, met powerfunctie 2800 W. 5 Bedieningspaneel 6 Inductiekookzone 2300 W, met Po- werfunctie 3600 W 6 5 3.3 Accessoires • Ovenrek Voor servies, bak- en braadvormen. • Vlakke bakplaat Voor gebak en koekjes • Braadpan Om te bakken en te braden of om vet op te vangen.
NEDERLANDS Druk om de tijd te wijzigen herhaaldelijk op tot het indicatielampje voor de tijd knippert. U moet de functie Bereidingsduur of Einde niet gelijktijdig instellen. Om het apparaat te bedienen, moet u de bedieningsknop indrukken. De bedieningsknop komt naar voren. 4.3 Voorverwarmen Verwarm het apparaat voor om het resterende vet weg te branden. 1. Stel de functie temperatuur in. 2. 3. 9 Laat het apparaat een uur aan staan. Stel de functie en de maximumtemperatuur in. 4.
www.aeg.com Tiptoets Functie De functie STOP+GO in- en uitschakelen. 6 7 Een kookstanddisplay De kookstand weergeven. 5.2 Kookstanddisplays Display (weergave) Beschrijving Kookzone is uitgeschakeld De kookzone wordt gebruikt. - De functie is aan. Het automatisch opwarmen is ingeschakeld. De Powerfunctie is ingeschakeld. + cijfer Er is een storing. / OptiHeat Control (3 staps restwarmte-indicatie): doorgaan met koken / warmhouden / restwarmte.
NEDERLANDS de kookstand om de kookstand uit te schakelen. play wordt de resterende tijd weergegeven. Wanneer de ingestelde tijd is verstreken, knippert 00 en hoort u een geluidssignaal. De kookzone wordt uitgeschakeld. 5.6 Vermogensbeheer Het vermogensbeheer verdeelt het vermogen tussen twee kookzones die een paar vormen (zie afbeelding). De Powerfunctie verhoogt het vermogen tot het maximale niveau voor de ene kookzone van het paar, en verlaagt het vermogen in de tweede kookzone.
www.aeg.com 5.10 Kinderslot Deze functie voorkomt dat het kooktoestel onbedoeld wordt gebruikt. Het kinderslot inschakelen 1. Zorg ervoor dat de kookplaat is uitgeschakeld. Er moeten geen symbolen op het bedieningspaneel staan, / / . behalve 2. Raak 4 seconden aan. Het symbool knippert op het bedieningspaneel. 3. Raak aan terwijl het symbool knippert. 4. Het symbool verschijnt 4 seconden op het display. Het kinderslot is ingeschakeld. Voer dezelfde stappen uit om het kinderslot uit te schakelen.
NEDERLANDS 6.1 Kookgerei voor inductiekookzones Kookzone Bij inductiekookzones creëert een krachtig elektromagnetisch veld een bijna onmiddellijke warmte in het kookgerei. Materiaal van het kookgerei • Juist: gietijzer, staal, geëmailleerd staal, roestvrij staal, meerlaagse bodem (aangemerkt als geschikt voor inductie door de fabrikant). • Onjuist: aluminium, koper, messing, glas, keramiek, porselein.
www.aeg.
NEDERLANDS ken, waterkringen, vetvlekken, glimmende metaalachtige verkleuringen. Gebruik een speciaal schoonmaakmiddel voor glaskeramiek of roestvrij staal. 15 2. Reinig het apparaat met een vochtige doek en een beetje afwasmiddel. 3. Wrijf het apparaat ten slotte droog met een schone doek. 8. OVEN - DAGELIJKS GEBRUIK WAARSCHUWING! Zie de veiligheidshoofdstukken . 8.
www.aeg.com Ovenfunctie Applicatie Licht koken Om te bakken in bakblikken en te drogen op één niveau bij lage temperatuur. Ontdooien Voor het ontdooien van diepvriesvoedsel. Ovenlampje Het ovenlampje activeren zonder een bereidingsfunctie. 8.4 De ovenaccessoires plaatsen De diepe pan en het ovenrooster hebben zijranden. Deze randen en de vorm van de geleidestangen vormen een speciaal accessoire om te zorgen dat het kookgerei niet verschuift.
NEDERLANDS 17 Door de verhoogde rand rond het ovenrooster is het kookgerei bovendien beveiligd tegen wegglijden. 8.6 Ovenrooster en diepe bakplaat samen plaatsen Plaats het ovenrooster op de braadslede. Plaats het ovenrooster en de braadpan op de telescopische geleiders. 9. OVEN - KLOKFUNCTIES 9.
www.aeg.com Klokfunctie Einde Toepassing Instellen wanneer het apparaat moet worden uitgeschakeld. U kunt Duur en Eindtijd tegelijkertijd gebruiken om in te stellen wanneer het apparaat moet worden geactiveerd, en vervolgens gedeactiveerd. Stel eerst de Duur in, en daarna de Eindtijd. 3. 9.2 De klokfuncties instellen 1. Stel voor Bereidingsduur en Einde een ovenfunctie en temperatuur in. Dit is niet nodig voor de kookwekker . 2.
NEDERLANDS Aanwijzigen bij de baktabellen • Wij raden aan om de eerste keer de lagere temperatuur in te stellen. • Als u geen concrete aanwijzingen kunt vinden voor uw eigen recept, kijkt u dan bij een soortgelijk product. • Bij het bakken van gebak op meerdere niveaus kan de baktijd ca. 10-15 minuten langer zijn. 19 • Als het gebak niet overal even hoog is, wordt het gebak in het begin van het bakproces niet overal even bruin. Verander in dit geval de temperatuurinstelling niet.
www.aeg.com 10.2 Licht koken Tips voor de functie Licht koken: • Gebruik de functie om te bakken in bakblikken en te drogen op één niveau bij lage temperatuur. • Bak maar één bakblik of bakplaat tegelijkertijd. • Als u de oven wilt voorverwar. men, gebruik dan Temperatuur °C Tijd in minuten Koekjes Verwarmingssoort 180 – 190 10 - 201) Gebak: Soesjes 180 – 190 30 - 401) Gebak: Zandtaartdeeg 180 - 190 25 - 351) 80-100 120 - 150 Schuimgebakjes 1) Oven voorverwarmen. 10.
NEDERLANDS Verwarmingssoort Plaathoogte Temperatuur °C Tijd in min. Vruchtentaart (op gistdeeg/roerdeeg) 1) 3 150 35 - 55 Vruchtentaart met kruimeldeeg 3 160 - 170 40 - 80 Plaathoogte Temperatuur °C Tijd in min.
www.aeg.com Bakken op meerdere niveaus Gebak op bakplaat Verwarmingssoort Plaathoogte 2 niveaus Temperatuur °C Tijd in min. Roomsoezen/ tompoezen 2/4 160 - 180 1) 25 - 45 Kruimeltaart 2/4 150 - 160 30 - 45 Temperatuur °C Tijd in min.
NEDERLANDS Verwarmingssoort Plaathoogte Temperatuur °C Tijd in min. 2 170 - 190 20 - 25 Apple pie (2 vormen Ø20cm, diagonaal geplaatst) 1-2 180 60 - 90 Hartige taart (bijv. quiche lorraine) 1 180 - 220 35- 60 1-2 160 - 180 60 - 90 Plaathoogte Temperatuur °C Tijd in min. Vlechtbrood/ broodkrans 2 170 - 190 40 - 50 Kerststol 2 160 - 180 1) 50 - 70 Taartbodem roerdeeg Kwarktaart 1) Oven voorverwarmen Gebak op bakplaat Verwarmingssoort Brood (roggebrood): 1.
www.aeg.com Verwarmingssoort Plaathoogte Temperatuur °C Tijd in min. Pizza (met veel garnering) 2) 1-2 190 - 210 1) 30 - 50 Pizza (dunne korst) 1-2 220 - 250 1) 15 - 25 Ongedesemd brood 1 230 - 250 10 - 15 Vlaaien (CH) 1 210 - 230 35 - 50 Inzetniveaus Temperatuur °C Tijd in min.
NEDERLANDS Schotel Inzetniveaus Temperatuur °C Tijd in min. 1 180 - 200 40 - 60 Plaathoogte Temperatuur °C Tijd min.
www.aeg.com 10.7 Braden met boven- en onderwarmte Rundvlees Soort vlees Hoeveelheid Plaathoogte Temperatuur °C Tijd in min. 1-1,5 kg 1 200 - 230 105 - 150 Rosbief of ossehaas: rood per cm dikte 1 230 - 2501) 6-8 Rosbief of ossehaas: medium per cm dikte 1 220 - 230 8 - 10 Rosbief of ossehaas: gaar per cm dikte 1 200 - 220 10 - 12 Stoofvlees 1) Oven voorverwarmen Varkensrug Soort vlees Hoeveelheid Plaathoogte Temperatuur °C Tijd in min.
NEDERLANDS 27 Wild Soort vlees Hoeveelheid Plaathoogte Temperatuur °C Tijd in min. Hazenrug, hazenbout tot 1 kg 1 220 - 240 1) 30 - 40 Reerug, hertenrug 1,5-2 kg 1 210 - 220 35 - 40 Reebout, hertenbout 1,5-2 kg 1 200 - 210 90 - 120 1) Oven voorverwarmen Gevogelte Soort vlees Hoeveelheid Plaathoogte Temperatuur °C Tijd in min.
www.aeg.com Varkensrug Soort vlees Hoeveelheid Plaathoogte Temperatuur °C Tijd min. Schouderstuk, nekstuk, hamlap 1-1,5 kg 1 160 - 180 90 - 120 Kotelet, ribbetje 1-1,5 kg 1 170 - 180 60 - 90 Gehaktbrood 750 g -1 kg 1 160 - 170 50 - 60 Varkensschenkel (voorgekookt) 750 g -1 kg 1 150 - 170 90 - 120 Hoeveelheid Plaathoogte Temperatuur °C Tijd min. 1 kg 1 160 - 180 90 - 120 1,5-2 kg 1 160 - 180 120 - 150 Hoeveelheid Plaathoogte Temperatuur °C Tijd min.
NEDERLANDS 29 • Rooster op inschuifhoogte plaatsen, zoals aangeraden in grilleertabel. • Altijd de pan plaatsen om vet op te vangen op de eerste inschuifhoogte. • Alleen platte stukken vlees of vis grillen. De grillzone bevindt zich in het midden van het rooster Grillen Voedingssoorten voor grillen Grilltijd in min.
www.aeg.com Schotel Taart, 1400 g Ontdooitijd in min. Verdere ontdooitijd in min. 60 Informatie over acrylamides Belangrijk! Volgens recente wetenschappelijke informatie kan het intensief bruinen van levensmiddelen (met name in producten die zetmeel 60 Opmerking - bevatten), een gezondheidsrisico vormen tengevolge van acrylamides. Om die reden adviseren wij levensmiddelen zoveel mogelijk bij lage temperaturen gaar te laten worden en de gerechten niet te veel te bruinen. 11.
NEDERLANDS 2. 1 31 Trek de inschuifrail bij de achterkant uit de zijwand en verwijder deze. 2 WAARSCHUWING! Zorg dat het glas is afgekoeld alvorens u de glasplaat schoonmaakt. De glazen panelen kunnen breken. De inschuifrails installeren Installeer de inschuifrails in de omgekeerde volgorde. Geldig bij de telescopische geleiders: De pinnetjes op de telescopische geleiders moeten naar voren wijzen! WAARSCHUWING! Als de glasplaten beschadigd raken of bekrast worden, worden ze zwak en kunnen ze breken.
www.aeg.com 11.3 Ovenglasplaten De glasplaten van de ovendeur op uw product kunnen in type en vorm verschillen van de voorbeelden die u hier ziet. Het aantal glasplaten kan ook verschillen. Verwijderen en reinigen van de deurglazen 1. Deurafdekking (B) aan de bovenkant van de deur aan beide kanten vastpakken en naar binnen drukken om de klemsluiting te ontgrendelen. 2. Trek de deur naar voor om deze te verwijderen.
NEDERLANDS 2. 2 1 2. 33 Laat de lade tot horizontale stand zakken en duw de lade naar binnen. WAARSCHUWING! Wanneer de oven in gebruik is, kan de lade heet worden. Bewaar geen ontvlambare dingen in de oven (bijv. schoonmaakmiddelen, plastic zakken, ovenhandschoenen, papier, reinigingssprays, enz). Til de lade iets schuin omhoog en verwijder de lade uit de steunrails. De lade plaatsen Plaats de lade op de steunrails. Zorg ervoor dat de uitsparingen goed in de rails vallen. 1. 12.
www.aeg.com Probleem Mogelijke oorzaak Oplossing Stoom en condens slaan Het gerecht heeft te lang Laat gerechten na het neer op de gerechten en in de oven gestaan. bereiden niet langer dan in de ovenruimte. 15-20 minuten in de oven staan. Op het display verschijnen "12.00" en "LED" Een stroomonderbreking. Stel de klok opnieuw in. De restwarmte-indicator gaat niet aan.
NEDERLANDS Probleem gaat aan. Mogelijke oorzaak Oplossing Er is een storing in het apparaat opgetreden, omdat het kookgerei is droog gekookt of omdat u ongeschikt kookgerei hebt gebruikt. De oververhittingsbeveiliging voor de kookzone is in werking getreden. De automatische uitschakeling is in werking getreden. Schakel het apparaat uit. Verwijder het hete kookgerei. Schakel na ongeveer 30 seconden de kookzone opnieuw in. moet nu verdwijnen, de restwarmte-indicatie kan blijven branden.
www.aeg.com 13.2 Waterpas zetten Gebruik kleine pootjes aan de onderkant van het apparaat om het kookoppervlak aan de bovenkant waterpas met andere oppervlakken te brengen. 13.3 Anti-kantelbescherming LET OP! U moet de anti-kantelbescherming installeren. Als u dat niet doet, kan het apparaat kantelen. Uw apparaat is vorozien van het symbool weergegeven in de afbeelding (indien van toepassing) om u te herinneren aan de montage van de anti-kantelbescherming. 1.
NEDERLANDS 14. MILIEUBESCHERMING Recycle de materialen met het symbool . Gooi de verpakking in een geschikte verzamelcontainer om het te recyclen. Help om het milieu en de volksgezondheid te beschermen en recycle het afval van elektrische en elektronische apparaten. Gooi apparaten gemarkeerd met het symbool niet weg met het huishoudelijk afval. Breng het product naar het milieustation bij u in de buurt of neem contact op met de gemeente.
www.aeg.com SOMMAIRE 1. 2. 3. 4. 5. 6. 7. 8. 9. 10. 11. 12. 13. CONSIGNES DE SÉCURITÉ . . . . . . . . . . . . . . . . . . . . . . . . . . . . . . . . . . . . . . . . . . . . . . . . . . INSTRUCTIONS DE SÉCURITÉ . . . . . . . . . . . . . . . . . . . . . . . . . . . . . . . . . . . . . . . . . . . . . . . . DESCRIPTION DE L'APPAREIL . . . . . . . . . . . . . . . . . . . . . . . . . . . . . . . . . . . . . . . . . . . . . . . . AVANT LA PREMIÈRE UTILISATION . . . . . . . . . . . . . . . . . . . . . . . .
FRANÇAIS 39 1. CONSIGNES DE SÉCURITÉ Avant d'installer et d'utiliser cet appareil, lisez soigneusement les instructions fournies. Le fabricant ne peut être tenu pour responsable des dommages et blessures liés à une mauvaise installation ou utilisation. Conservez toujours cette notice avec votre appareil pour vous y référer ultérieurement. 1.1 Sécurité des enfants et des personnes vulnérables AVERTISSEMENT Risque d'asphyxie, de blessure ou d'invalidité permanente.
www.aeg.com • Ne faites pas fonctionner l'appareil avec un minuteur externe ou un système de commande à distance. • Il peut être dangereux de laisser chauffer de la graisse ou de l'huile sans surveillance sur une table de cuisson car cela pourrait provoquer un incendie. • N'essayez jamais d'éteindre un feu avec de l'eau. Mettez à l'arrêt l'appareil puis couvrez les flammes, par exemple avec un couvercle ou une couverture ignifuge. • N'entreposez rien sur les surfaces de cuisson.
FRANÇAIS 2.1 Installation AVERTISSEMENT L'appareil doit être installé uniquement par un professionnel qualifié. • Retirez l'intégralité de l'emballage. • N'installez pas et ne branchez pas un appareil endommagé. • Suivez scrupuleusement les instructions d'installation fournies avec l'appareil. • Soyez toujours vigilants lorsque vous déplacez l'appareil car il est lourd. Portez toujours des gants de sécurité. • Ne tirez jamais l'appareil par la poignée.
www.aeg.com • Ne laissez jamais l'appareil sans surveillance pendant son fonctionnement. • Éteignez l'appareil après chaque utilisation. • L'intérieur de l'appareil devient chaud lorsqu'il est en fonctionnement. Ne touchez pas les éléments chauffants se trouvant dans l'appareil. Utilisez toujours des gants de cuisine pour retirer ou enfourner des accessoires ou des plats allant au four. • Soyez prudent lors de l'ouverture de la porte de l'appareil lorsque celui-ci est en fonctionnement.
FRANÇAIS • Ne laissez pas le contenu des récipients de cuisson s'évaporer complètement. • Prenez soin de ne pas laisser tomber d'objets ou de récipients sur l'appareil. Sa surface risque d'être endommagée. • Ne faites jamais fonctionner les zones de cuisson avec des récipients de cuisson vides ou sans aucun récipient de cuisson. • Ne placez jamais de papier aluminium sur l'appareil. • N'utilisez pas de récipients en fonte ou en aluminium, ni de récipients dont le fond est endommagé et rugueux.
www.aeg.com 3. DESCRIPTION DE L'APPAREIL 3.1 Vue d'ensemble 1 1 Manette de sélection des fonctions 2 3 4 5 5 9 4 3 6 4 Indicateur de température 7 5 Manettes de la table de cuisson 8 2 du four 2 Programmateur électronique 3 Manette du thermostat 1 6 Élément chauffant 7 Éclairage du four 8 Ventilateur et élément chauffant 9 Positions des grilles 3.
FRANÇAIS 45 4. AVANT LA PREMIÈRE UTILISATION AVERTISSEMENT Reportez-vous aux chapitres concernant la sécurité. Pour modifier l'heure, appuyez sur à plusieurs reprises jusqu'à ce que l'indicateur de la fonction Heure clignote. La foncou Fin ne doit tion Durée pas être réglée en même temps. 4.1 Premier nettoyage • Retirez tous les accessoires de l'appareil. • Nettoyez l'appareil avant de l'utiliser pour la première fois. Reportez-vous au chapitre « Entretien et nettoyage ». 4.
www.aeg.com 5.1 Description du bandeau de commande 1 2 3 4 7 6 5 Les touches sensitives permettent de faire fonctionner l'appareil. Les voyants et l'affichage indiquent les fonctions en cours. 1 Touche sensitive Fonction Affichage du minuteur Pour indiquer la durée, en minutes. 2 Pour sélectionner une zone de cuisson. 3 Pour augmenter ou diminuer la durée. / 4 Pour verrouiller ou déverrouiller le bandeau de commande. 5 Pour activer la fonction Booster.
FRANÇAIS Affichage 47 Description Le récipient est inapproprié ou trop petit ou bien il n'y a pas de récipient sur la zone de cuisson. La fonction d'arrêt automatique est activée. 5.3 Niveau de cuisson 5.5 Fonction Booster Pour activer la zone de cuisson ou augmenter le niveau de cuisson, tournez la manette vers la droite. L'affichage indique le niveau de cuisson. Pour diminuer le niveau de cuisson, tournez la manette vers la gauche. Pour désactiver la zone de cuisson, positionnez la .
www.aeg.com Vous devez régler la zone de cuisson avant d'activer le minuteur. 2. Réglez le niveau de cuisson de la zone de cuisson. Vous pouvez également le régler après avoir activé le minuteur. 3. Pour activer le minuteur ou modifier le temps défini, appuyez sur + ou sur le bandeau de commande de la table de cuisson. La durée maximale pouvant être définie est de 99 minutes. Le voyant de la zone de cuisson clignote lentement. Le décompte commence. 4.
FRANÇAIS 2. Tandis que est affiché, appuyez sur jusqu'à ce que s'affiche. 3. Réglez le niveau de cuisson de la zone de cuisson dans les 4 secondes qui suivent. 4. Lorsque vous éteignez la table de cuisson, la sécurité enfants fonctionne à nouveau. 5.11 OptiHeat Control (Voyant de chaleur résiduelle - 3 niveaux) AVERTISSEMENT / / La chaleur résiduelle peut être source de brûlures ! OptiHeat Control indique le niveau de chaleur résiduelle.
www.aeg.com Le fond du récipient de cuisson doit être aussi plat et épais que possible. Dimensions du récipient de cuisson : les zones de cuisson à induction s'adaptent automatiquement au diamètre du fond du récipient utilisé, jusqu'à une certaine limite. Cependant, la zone magnétique au fond du récipient doit avoir un certain diamètre minimal.
FRANÇAIS 51 Niveau de cuisson adapté à : Durée Conseils 3-4 Faire cuire à la vapeur les légumes, le poisson à l'étuvée, la viande 20-45 min Ajouter quelques cuillères à soupe de liquide 4-5 Faire bouillir des pommes de terre 20-60 min Utiliser max.
www.aeg.com 8. FOUR - UTILISATION QUOTIDIENNE AVERTISSEMENT Reportez-vous aux chapitres concernant la sécurité. 8.1 Ventilateur de refroidissement Le ventilateur de refroidissement s'enclenche automatiquement lorsque l'appareil fonctionne. Lorsque vous l'éteignez, le ventilateur de refroidissement continue de fonctionner jusqu'à ce que l'appareil refroidisse. Tournez le thermostat sur la température désirée. L'indicateur de température s'allume lorsque la température du four augmente. 3.
FRANÇAIS Fonction du four Éclairage du four 53 Utilisation Pour allumer l'éclairage du four même si aucune fonction de cuisson n'est sélectionnée. 8.4 Installation des accessoires du four La lèchefrite et la grille possèdent des rebords latéraux. Ces rebords, ainsi que la forme des guides d'insertion, empêchent les récipients de glisser. Installation simultanée de la grille et de la lèchefrite Posez la grille sur la lèchefrite. Poussez la lèchefrite entre les guides de l'un des niveaux.
www.aeg.com Le rebord élevé de la grille est un dispositif complémentaire pour empêcher les plats de glisser. 8.6 Installation simultanée de la grille et de la lèchefrite Posez la grille sur la lèchefrite. Posez la grille et la lèchefrite sur les rails télescopiques. 9. FOUR - FONCTIONS DE L'HORLOGE 9.
FRANÇAIS Fonction de l'horloge Fin 55 Utilisation Pour régler l'heure à laquelle l'appareil s'éteint. Vous pouvez utiliser simultanément les fonctions Durée et Fin pour définir l'heure à laquelle l'appareil doit s'allumer et s'éteindre. Réglez d’abord la fonction Durée, puis la fonction Fin. 9.2 Réglage des fonctions de l'horloge 1. Pour les fonctions Durée et Fin , réglez une fonction du four et une température. Ce n'est pas nécessaire pour la fonction Minuterie . 2.
www.aeg.com (température, temps de cuisson, etc.) et niveaux de gradins aux recommandations fournies dans les tableaux suivants. • Avec des temps de cuisson plus longs, vous pouvez mettre à l'arrêt le four une dizaine de minutes avant la fin du temps de cuisson afin de profiter de la chaleur résiduelle. Lorsque des aliments surgelés sont déposés à même le plateau multi-usages, celui-ci peut se déformer en cours de cuisson. Une fois refroidi, le plateau retrouvera sa forme d'origine.
FRANÇAIS Résultats de cuisson Cause probable Solution Le gâteau n'est Température du four pas cuit à la fin de trop basse la durée de cuisson Augmentez légèrement la température du four 10.2 Cuisson légère Conseils d'utilisation de la fonction Cuisson légère : • Utilisez cette fonction pour cuire dans des moules et déshydrater à basse température sur un seul niveau. • Faites cuire un seul moule ou plateau à la fois. • Si vous souhaitez préchauffer .
www.aeg.com Type de cuisson Apple pie (2 moules de 20 cm de diamètre, décalés en diagonale) Position de la grille Température en °C Durée en min 2-3 160 60 - 90 1) Préchauffez le four.
FRANÇAIS Tableau des soufflés et gratins Plat Position de la grille Température en °C Durée en min Baguettes garnies de fromage fondu 1 160 - 170 1) 15 - 30 Légumes farcis 1 160 - 170 30- 60 1) Préchauffez le four. Cuisson sur plusieurs gradins Gâteaux/viennoiseries/pains sur plateaux de cuisson Type de cuisson Position de la grille 2 niveaux Température en °C Durée en min Choux à la crème/ éclairs 2/4 160 - 180 1) 25 - 45 Crumble sec 2/4 150 - 160 30 - 45 1) Préchauffez le four.
www.aeg.com 10.4 Cuisson par convection naturelle sur un niveau Cuisson dans des moules Position de la grille Température en °C Durée en min Kouglof ou brioche 2 160 - 180 50 - 70 Gâteau de madère/cake aux fruits 1-2 150 - 170 50 - 90 Fatless sponge cake 3 170 1) 25 - 40 Fond de tarte – pâte brisée 2 190 - 210 1) 10 - 25 Fond de tarte – génoise 2 170 - 190 20 - 25 Apple pie (2 moules de 20 cm de diamètre, décalés en diagonale) 1-2 180 60 - 90 Tarte salée (par ex.
FRANÇAIS Position de la grille Température en °C Durée en min Gâteau roulé 3 180 - 200 1) 10 - 20 Gâteaux avec garniture de type crumble (sec) 3 160 - 180 20 - 40 Gâteau au beurre et aux amandes / tartes au sucre 3 190 - 210 1) 20 - 30 Gâteau aux fruits (pâte levée / génoise) 2) 3 170 35 - 55 Gâteau aux fruits (pâte brisée) 3 170 - 190 40 - 60 Gâteaux à pâte levée avec garniture délicate (par exemple fromage blanc, crème, crème anglaise) 3 160 - 180 1) 40 - 80 2) 1-2 190 - 210
www.aeg.
FRANÇAIS Position de la grille Température en °C Durée en min Tourte aux légumes 1-2 160 - 180 50 - 60 Pain sans levain 2-3 230 - 250 2) 10 - 20 Quiche à pâte feuilletée 2-3 160 - 180 2) 45 - 55 Flammekuche 2-3 230 - 250 2) 12 - 20 Piroggen (version russe de la calzone) 2-3 180 - 200 2) 15 - 25 Type de cuisson 63 1) Utilisez la lèchefrite 2) Préchauffez le four. ou sur la grille métallique en plaçant la lèchefrite en dessous.
www.aeg.
FRANÇAIS Type de viande Quantité Position de la Température Durée en min grille en °C Poulet, poularde 1-1,5 kg 1 220 - 250 50 - 70 Canard 1,5-2 kg 1 210 - 220 80 - 100 Oie 65 3,5-5 kg 1 200 - 210 150 - 180 Dinde 2,5-3,5 kg 1 200 - 210 120 - 180 Dinde 4-6 kg 1 180 - 200 180 - 240 Poisson Type de viande Quantité Poisson entier 1-1,5 kg Position de la Température Durée en min grille en °C 1 210 - 220 40 - 70 10.
www.aeg.
FRANÇAIS 67 Gril Types d'aliments à griller Position de la grille Température en °C Burgers 4 Filet de porc Durée de grillade en min 1re face 2ème face max1) 9 - 15 8 - 13 4 max 10 - 12 6 - 10 Saucisses 4 max 10 - 12 6-8 Tournedos, steaks de veau 4 max 7 - 10 6-8 4-5 max1) 1-4 1-4 4 max 6-8 - Toasts Toasts avec garniture 1) Préchauffez le four. 10.10 Décongélation Retirez l'emballage des aliments. Disposez les aliments sur une assiette.
www.aeg.com de l'acrylamide. C'est pourquoi nous vous recommandons de faire cuire les aliments à basse température et de ne pas trop les faire brunir. 11. FOUR - ENTRETIEN ET NETTOYAGE AVERTISSEMENT Reportez-vous aux chapitres concernant la sécurité. • Nettoyez la façade du four à l'aide d'une éponge humide additionné d'eau savonneuse. • Utilisez les produits spécifiques vendus dans le commerce pour l'entretien des surfaces en métal. • Nettoyez l'appareil après chaque utilisation.
FRANÇAIS 69 AVERTISSEMENT Assurez-vous que les panneaux de verre sont froids avant de nettoyer la vitre de la porte. Le verre risque de se briser. Remontage des supports de grille Installez les supports de grille en suivant la même procédure, mais dans l'ordre inverse. AVERTISSEMENT Lorsque les panneaux en verre de la porte sont endommagés ou s'ils présentent des rainures, la vitre s'affaiblit et peut se briser. Pour éviter cela, vous devez alors les remplacer.
www.aeg.com Retrait et nettoyage des vitres de la porte 1. Saisissez les deux côtés du cache (B) situé sur l'arête supérieure de la porte et poussez-le vers l'intérieur pour permettre le déverrouillage du système de fermeture. 2. Retirez le cache de la porte en le tirant vers l'avant. Saisissez un panneau de verre à la fois par son bord supérieur et dégagez-le du guide en le soulevant. Nettoyez les panneaux de verre de la porte. B 3. 4.
FRANÇAIS 2. Baissez le tiroir en position horizontale et poussez-le. 71 AVERTISSEMENT Lorsque le four fonctionne, de la chaleur peut s'accumuler dans le tiroir. N'y rangez pas de produits inflammables (tels que des produits nettoyants, des sacs en plastique, des gants de cuisine, du papier, des aérosols de nettoyage, etc.). 12. EN CAS D'ANOMALIE DE FONCTIONNEMENT AVERTISSEMENT Reportez-vous aux chapitres concernant la sécurité.
www.aeg.com Problème Cause possible Solution La zone de cuisson raVous avez recouvert une mène le réglage de tem- ou plusieurs touches sensitives ou il y a de pérature à l'eau ou des projections de graisse sur le bandeau de commande. Enlevez ce qui recouvre les touches sensitives. Nettoyez le bandeau de commande Un signal sonore retentit lorsque l'appareil est à l'arrêt Vous avez recouvert une ou plusieurs touches sensitives Enlevez ce qui recouvre les touches sensitives.
FRANÇAIS Problème s'allume. Cause possible Solution Une erreur s'est produite dans l'appareil, car un récipient chauffe à vide ou vous n'utilisez pas un récipient adapté. La protection anti-surchauffe de la zone de cuisson est activée. La fonction d'arrêt automatique est activée Éteignez l'appareil. Enlevez le récipient chaud. Au bout d'environ 30 secondes, rallumez la zone doit disde cuisson. paraître, l'indicateur de chaleur résiduelle peut rester allumé.
www.aeg.com 13.2 Mise à niveau Utilisez les petits pieds situés sous l'appareil pour mettre la surface supérieure de l'appareil de niveau avec les autres surfaces environnantes. 13.3 Protection anti-bascule : ATTENTION Vous devez installer la protection anti-bascule. Si vous ne l'installez pas, l'appareil peut basculer. Votre appareil dispose du symbole illustré ci-dessous (si applicable) afin de vous rappeler d'installer la protection anti-bascule. 2.
FRANÇAIS 75 14. EN MATIÈRE DE PROTECTION DE L'ENVIRONNEMENT Recyclez les matériaux portant le symbole . Déposez les emballages dans les conteneurs prévus à cet effet. Contribuez à la protection de l'environnement et à votre sécurité, recyclez vos produits électriques et électroniques. Ne jetez pas les appareils portant le symbole avec les ordures ménagères. Emmenez un tel produit dans votre centre local de recyclage ou contactez vos services municipaux.
892950784-A-372012 www.aeg.