47056VS PL Instrukcja obsługi PT Manual de instruções 2 34
www.aeg.com SPIS TREŚCI 1. 2. 3. 4. 5. 6. 7. 8. 9. 10. 11. 12. 13. 14. WSKAZÓWKI DOTYCZĄCE BEZPIECZEŃSTWA . . . . . . . . . . . . . . . . . . . . . . . . . . . . . . 3 OPIS URZĄDZENIA . . . . . . . . . . . . . . . . . . . . . . . . . . . . . . . . . . . . . . . . . . . . . . . . . . . . . . 6 PRZED PIERWSZYM UŻYCIEM . . . . . . . . . . . . . . . . . . . . . . . . . . . . . . . . . . . . . . . . . . . . 7 PŁYTA GRZEJNA – CODZIENNA EKSPLOATACJA . . . . . . . . . . . . . . . . . . . . . . . . . . . .
POLSKI 1. 3 WSKAZÓWKI DOTYCZĄCE BEZPIECZEŃSTWA Przed instalacją i rozpoczęciem eksploa‐ tacji urządzenia należy uważnie przeczy‐ tać instrukcję obsługi: • ze względu na własne bezpieczeń‐ stwo oraz bezpieczeństwo mienia, • ze względu na ochronę środowiska, • aby zapewnić prawidłowe działanie urządzenia. Instrukcję należy przechowywać wraz z urządzeniem – również w przypadku je‐ go odsprzedaży lub przeprowadzki.
www.aeg.com • Nie ustawiać urządzenia na cokole. 1.4 Podłączenie do sieci elektrycznej • Instalacji i podłączenia urządzenia może dokonać tylko uprawniony elek‐ tryk. Należy skontaktować się z auto‐ ryzowanym punktem serwisowym. Po‐ zwoli to uniknąć ryzyka poważnych uszkodzeń lub obrażeń ciała. • Urządzenie musi zostać uziemione. • Upewnić się, że parametry elektryczne podane na tabliczce znamionowej są zgodne z parametrami domowej insta‐ lacji elektrycznej.
POLSKI • Podczas otwierania drzwi nie wolno zbliżać do urządzenia iskrzących przedmiotów ani otwartego płomienia. • Nie umieszczać w urządzeniu, na nim lub w jego pobliżu produktów łatwopal‐ nych, przedmiotów nasączonych pro‐ duktami łatwopalnymi i/lub przedmio‐ tów z materiałów topliwych (plastiku lub aluminium). Zagrożenie wybuchem lub pożarem. • Po każdym użyciu wyłączyć pola grzejne. • Nie wolno używać pól grzejnych z pus‐ tymi naczyniami lub bez naczyń. • Nie dopuszczać do wygotowania się potrawy.
www.aeg.com • • • • ciem. Konieczna jest ich wymiana. Skontaktować się z punktem serwiso‐ wym. Zachować ostrożność przy demontażu drzwi urządzenia. Drzwi są ciężkie. Do oświetlenia urządzenia zastosowa‐ no specjalne żarówki przeznaczone wyłącznie do urządzeń domowych. Nie można ich używać do pełnego ani miejscowego oświetlania pomie‐ szczeń. Jeżeli konieczna będzie wymiana ża‐ rówki, należy wymienić ją na żarówkę o takiej samej mocy i przeznaczoną wyłącznie do urządzeń domowych.
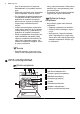
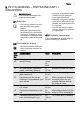
POLSKI 7 2.2 Układ powierzchni gotowania 1 2 145 mm 3 170 mm 265 mm 1 Pole grzejne o mocy 1200 W 2 Wylot pary 3 Pole grzejne o mocy 1500/2400 W 4 Pole grzejne o mocy 1200 W 140/210 mm 145 mm 5 Wskaźnik ciepła resztkowego 6 Pole grzejne o mocy 1000/2200 W 6 5 4 2.3 Akcesoria • Ruszt piekarnika Do ustawiania naczyń, form do ciast oraz do pieczenia mięs. • Płytka blacha do pieczenia Do pieczenia ciast i ciastek.
www.aeg.com Nacisnąć kilkakrotnie , aż za‐ cznie migać wskaźnik żądanej funkcji zegara. Nie można usta‐ wiać w tym samym czasie funkcji Czas ani Koniec . Aby użyć urządzenia, należy nacisnąć pokrętło. Pokrętło wysunie się. 3.3 Wstępne nagrzewanie Należy wstępnie nagrzać puste urządze‐ nie w celu wypalenia pozostałości sma‐ ru. 1. Wybrać funkcję i ustawić maksy‐ malną temperaturę. 2. Pozostawić włączone urządzenie na jedną godzinę. 3. Wybrać funkcję i ustawić maksy‐ malną temperaturę.
POLSKI 9 5. PŁYTA GRZEJNA – PRZYDATNE RADY I WSKAZÓWKI OSTRZEŻENIE! Patrz rozdział „Informacje doty‐ czące bezpieczeństwa”. • Naczynie do gotowania należy postawić na polu grzejnym przed jego włączeniem. • Wyłączyć pola grzejne na kilka minut przed zakończeniem go‐ towania, aby wykorzystać ciep‐ ło resztkowe. • Rozmiar dna naczynia powi‐ nien być dobrany do wielkości pola grzejnego. 5.1 Naczynia • Dno naczyń powinno być moż‐ liwie jak najbardziej grube i płaskie.
www.aeg.
POLSKI 3. Wskaźnik temperatury włącza się, gdy rośnie temperatura w urządze‐ niu. Aby wyłączyć urządzenie, należy ob‐ rócić pokrętło funkcji piekarnika i po‐ 11 krętło temperatury do położenia wy‐ łączenia. 7.3 Funkcje piekarnika Funkcja piekarnika Zastosowanie Położenie wy‐ Urządzenie jest wyłączone. łączenia Termoobieg Do pieczenia mięsa lub do pieczenia mięsa i ciast wy‐ magających jednakowej temperatury, na więcej niż jed‐ nym poziomie, bez przenikania zapachów.
www.aeg.com 8. PIEKARNIK – FUNKCJE ZEGARA 8.1 Sterowanie elektroniczne 1 2 1 1 Wskaźniki funkcji 2 Wskazanie czasu 3 Przycisk + 4 Przycisk wyboru 5 Przycisk - hr min 5 4 3 Funkcja zegara Zastosowanie Aktualny czas Ustawianie, zmienianie lub sprawdzanie aktualnego czasu. Minutnik Odliczanie ustawionego czasu. Funkcja nie ma wpły‐ wu na działanie piekarnika. Czas Koniec Ustawianie czasu pracy urządzenia. Ustawianie czasu wyłączenia urządzenia.
POLSKI 5. Ustawić pokrętło funkcji piekarnika i pokrętło temperatury w położeniu wyłączenia. 2. 13 Nacisnąć i przytrzymać przycisk -. Funkcja zegara wyłączy się po kilku sekundach. 8.3 Anulowanie funkcji zegara 1. Naciskać przycisk wyboru, aż zacz‐ nie migać wskaźnik żądanej funkcji. 9. PIEKARNIK – KORZYSTANIE Z AKCESORIÓW OSTRZEŻENIE! Patrz rozdział „Informacje doty‐ czące bezpieczeństwa”. 9.
www.aeg.com 9.2 Prowadnice teleskopowe – wkładanie akcesoriów piekarnika Umieścić blachę do pieczenia na pro‐ wadnicach teleskopowych. Wysoka krawędź wokół rusztu zapobiega zsunięciu się naczyń. 9.3 Wkładanie rusztu piekarnika razem z głęboką blachą do pieczenia Umieścić ruszt na blasze do pieczenia. Umieścić ruszt wraz z blachą do piecze‐ nia na prowadnicach teleskopowych. 10. PIEKARNIK – PRZYDATNE RADY I WSKAZÓWKI OSTRZEŻENIE! Patrz rozdział „Informacje doty‐ czące bezpieczeństwa”.
POLSKI 10.1 Pieczenie ciast Ogólne wskazówki • Nowy piekarnik może piec inaczej niż dotychczas używane urządzenie. Na‐ leży dostosować dotychczasowe usta‐ wienia (temperatury, czasu pieczenia) i poziomy do wartości podanych w ta‐ belach. • W przypadku dłuższych czasów pie‐ czenia piekarnik można wyłączyć oko‐ ło 10 minut przed zakończeniem pie‐ czenia, aby wykorzystać ciepło reszt‐ kowe. Umieszczenie w piekarniku mrożonej żywności może spowodować odkształce‐ nie blach podczas pieczenia.
www.aeg.com Prawdopodobna przy‐ czyna Środek zaradczy Ciasto nierówno się przyrumienia. Ciasto nie zostało rów‐ nomiernie rozprowadzo‐ ne. Rozprowadzić ciasto równomiernie na blasze. Ciasto nie jest gotowe po upływie podanego czasu pieczenia. Temperatura piekarnika jest zbyt niska. Przy następnym piecze‐ niu należy zwiększyć temperaturę piekarnika. Efekt pieczenia 10.
POLSKI 17 Ciastka Rodzaj wypieku Poziom umie‐ szczenia potrawy Temperatura w °C Czas w minutach Ciasteczka kruche 3 150 - 160 10 - 20 Short bread / Pas‐ try Stripes 3 140 20 - 35 Ciasteczka z cias‐ ta biszkoptowego 3 150 - 160 15 - 20 Ciasteczka z bia‐ łek jaj, bezy 3 80 - 100 120 - 150 Makaroniki 3 100 - 120 30 - 50 Ciasteczka droż‐ dżowe 3 150 - 160 20 - 40 Ciasteczka z cias‐ ta francuskiego 3 170 - 180 1) 20 - 30 Bułki 3 160 1) 10 - 35 Small cakes (20 na blasze) 3
www.aeg.
POLSKI Rodzaj wypieku 19 Poziom umie‐ szczenia potrawy Temperatura w °C Czas w minutach 1-2 160 - 180 60 - 90 Sernik 1) Wstępnie rozgrzać piekarnik Ciasta/ciastka/chleb na blachach do pieczenia Poziom umie‐ szczenia potrawy Temperatura w °C Czas w minutach Plecionka droż‐ dżowa/wieniec drożdżowy 2 170 - 190 40 - 50 Strucla bożonaro‐ dzeniowa 2 160 - 180 1) 50 - 70 Chleb (żytni): 1. Pierwszy etap pieczenia. 2. Drugi etap pieczenia.
www.aeg.
POLSKI 21 10.
www.aeg.com 10.
POLSKI 23 Jagnięcina Rodzaj mięsa Ilość Poziom umie‐ szczenia po‐ trawy Temperatura w °C Czas w minu‐ tach Pieczeń jag‐ nięca, udziec jagnięcy 1-1,5 kg 1 210 - 220 90 - 120 Comber jag‐ nięcy 1-1,5 kg 1 210 - 220 40 - 60 Rodzaj mięsa Ilość Poziom umie‐ szczenia po‐ trawy Temperatura w °C Czas w minu‐ tach Comber z zaj‐ ąca, udko zaj‐ ęcze do 1 kg 1 220 - 240 1) 30 - 40 Comber z sar‐ ny/jelenia 1,5-2 kg 1 210 - 220 35 - 40 Udziec z sar‐ ny 1,5-2 kg 1 200 - 210 90 - 120 Ilo
www.aeg.com 10.
POLSKI 25 Jagnięcina Rodzaj mięsa Ilość Poziom umie‐ szczenia po‐ trawy Temperatura w °C Czas (min) Pieczeń jag‐ nięca, udziec jagnięcy 1-1,5 kg 1 150 - 170 100 - 120 Comber jag‐ nięcy 1-1,5 kg 1 160 - 180 40 - 60 Ilość Poziom umie‐ szczenia po‐ trawy Temperatura w °C Czas (min) Kawałki dro‐ biu po 200-250 g 1 200 - 220 30 - 50 Połówka kur‐ czaka po 400-500 g 1 190 - 210 35 - 50 Kurczak, pu‐ larda 1-1,5 kg 1 190 - 210 50 - 70 Kaczka 1,5-2 kg 1 180 - 200 80 - 100 Gęś
www.aeg.com Rodzaj grillo‐ wanej potra‐ wy Poziom umieszcze‐ nia potrawy Temperatura w °C Filet wieprzo‐ wy 4 Kiełbaski Steki wołowe, steki cielęce Tosty Grzanki z do‐ datkami Czas grillowania w minutach 1. strona 2. strona maks 10 - 12 6 - 10 4 maks 10 - 12 6-8 4 maks 7 - 10 6-8 4-5 maks.1) 1-4 1-4 4 maks 6-8 - 1) Wstępnie rozgrzać piekarnik 10.10 Suszenie trzebnego czasu. Otworzyć drzwi urzą‐ dzenia i poczekać aż urządzenie ostyg‐ nie.
POLSKI Potrawa Czas rozmra‐ żania w mi‐ nutach Czas dalszego rozmrażania w minutach Uwagi 27 Kurczak, 1000 g 100 - 140 20 - 30 Ułożyć kurczaka na od‐ wróconej podstawce pod filiżankę na dużym talerzu; obrócić po upływie połowy czasu Mięso, 1000 g 100 - 140 20 - 30 Obrócić po upływie po‐ łowy czasu Mięso, 500 g 90 - 120 20 - 30 Obrócić po upływie po‐ łowy czasu Pstrąg, 150 g 25 - 35 10 - 15 - Truskawki, 300 g 30 - 40 10 - 20 - Masło, 250 g 30 - 40 10 - 15 - Śmietana, 2 x 200 g
www.aeg.com Urządzenia wykonane ze stali nierdzewnej lub aluminium Drzwi piekarnika należy czyścić wyłącznie za pomocą wilgotnej gąbki. Osuszyć miękką ścierecz‐ ką. Nie należy używać myjek stalo‐ wych, kwasów ani produktów ściernych, ponieważ mogą one uszkodzić powierzchnię piekarni‐ ka. Panel sterowania piekarnika należy czyścić stosując się do tych samych zaleceń. 11.1 Prowadnice blach W celu wyczyszczenia bocznych ścianek można wymontować prowadnice blach. Demontaż prowadnic blach 1 1.
POLSKI Na dnie piekarnika umieścić szmatkę, aby zapobiec uszko‐ dzeniu żarówki i szklanego klo‐ sza. 29 OSTRZEŻENIE! Przed przystąpieniem do czy‐ szczenia szyb drzwi należy upewnić się, że drzwi ostygły. Występuje zagrożenie pęknięcia szyb. Wymiana żarówki oświetlenia piekarnika Klosz oświetlenia znajduje się na tyl‐ nej ściance komory. Obrócić szklany klosz w kierunku przeciwnym do ruchu wskazówek zegara, aby go zdjąć. 2. Wyczyścić klosz. 3.
www.aeg.com Wyjmowanie i czyszczenie szyb drzwi 1. Chwycić z obu stron górną listwę drzwi (B) i nacisnąć do środka, aby zwolnić zatrzaski. 2. Pociągnąć listwę drzwi do przodu, aby ją zdjąć. Przytrzymując pojedynczo szyby drzwi przy górnej krawędzi, wyciąg‐ nąć je do góry wzdłuż prowadnicy. Wyczyścić szyby. B 3. 4. Aby zamontować szyby, należy wykonać powyższe czynności w odwrotnej kolej‐ ności. UWAGA! Zdejmowane szyby są oznaczo‐ ne z jednej strony.
POLSKI 31 12. CO ZROBIĆ, GDY… OSTRZEŻENIE! Patrz rozdział „Informacje doty‐ czące bezpieczeństwa”.
www.aeg.com 13. INSTALACJA OSTRZEŻENIE! Patrz rozdział „Informacje doty‐ czące bezpieczeństwa”. Wymiary Wysokość 847 - 867 mm Szerokość 596 mm Głębokość 600 mm Pojemność pie‐ karnika 74 l Napięcie 230 V Częstotliwość 50 Hz 13.3 Zabezpieczenie przed przechyleniem UWAGA! Konieczne jest zamontowanie zabezpieczenia przed przechyle‐ niem. W przeciwnym razie urzą‐ dzenie może się przechylić. 13.
POLSKI 49 mm 77 mm 1 2 13.4 Instalacja elektryczna Producent nie ponosi odpowie‐ dzialności za nieprzestrzeganie zaleceń dotyczących bezpie‐ czeństwa, które zawarto w roz‐ dziale „Informacje dotyczące bezpieczeństwa”. Urządzenie jest dostarczane bez wtyczki lub przewodu zasilającego. Odpowiednie rodzaje przewodów: H07 RN-F, H05 RN-F, H05 RRF, H05 VV-F, H05 V2V2-F (T90), H05 BB-F. 14. OCHRONA ŚRODOWISKA Materiały oznaczone symbolem należy poddać utylizacji.
www.aeg.com ÍNDICE 1. 2. 3. 4. 5. 6. 7. 8. 9. 10. 11. 12. 13. 14. INSTRUÇÕES DE SEGURANÇA . . . . . . . . . . . . . . . . . . . . . . . . . . . . . . . . . . . . . . . . . . . . . . . DESCRIÇÃO DO PRODUTO . . . . . . . . . . . . . . . . . . . . . . . . . . . . . . . . . . . . . . . . . . . . . . . . . . ANTES DA PRIMEIRA UTILIZAÇÃO . . . . . . . . . . . . . . . . . . . . . . . . . . . . . . . . . . . . . . . . . . . . PLACA - UTILIZAÇÃO DIÁRIA . . . . . . . . . . . . . . . . . . . . . . . . . . . . . .
PORTUGUÊS 1. 35 INSTRUÇÕES DE SEGURANÇA Antes da instalação e utilização, leia atentamente este manual: • Para a sua segurança e para a segurança do seu aparelho • Para a protecção do meio ambiente • Para o funcionamento correcto do aparelho. Guarde este manual, mesmo que o aparelho seja transferido ou vendido. O fabricante não se responsabiliza por danos resultantes de uma instalação e utilização incorrectas. 1.
www.aeg.com • Deve dispor dos dispositivos de isolamento correctos: disjuntores de protecção, fusíveis (os fusíveis de rosca devem ser retirados do suporte), diferenciais. • O dispositivo de isolamento deve ter uma abertura de contacto com uma largura mínima de 3 mm. • As peças de protecção contra choques eléctricos devem estar fixas de modo a que não possam ser retiradas sem ferramentas. • Utilize sempre uma tomada devidamente instalada e à prova de choques eléctricos.
PORTUGUÊS • • • • • • – não coloque água quente no aparelho; – não coloque pratos e alimentos húmidos no aparelho após acabar de cozinhar. Não faça pressão quando a porta estiver aberta. Não coloque materiais inflamáveis sob o forno. Só devem ser colocados acessórios resistentes ao calor (se aplicável). Não tape as saídas de vapor do forno. Estas encontram-se na parte posterior da superfície superior (se aplicável). Não coloque na placa nenhum objecto que possa derreter.
www.aeg.com 2. DESCRIÇÃO DO PRODUTO 2.1 Descrição geral 1 1 Botão das funções do forno 2 3 4 2 Programador electrónico 3 Botão da temperatura 6 5 Botões para a placa 7 5 9 5 4 3 8 2 4 Indicador de temperatura 6 Aquecimento 7 Lâmpada do forno 8 Resistência e ventoinha 1 9 Posições das prateleiras 2.
PORTUGUÊS 39 3. ANTES DA PRIMEIRA UTILIZAÇÃO ADVERTÊNCIA Consulte o capítulo "Informações de segurança". Após cerca de cinco segundos, o indicador deixa de piscar e o visor indica a hora do dia que definir. Para alterar a hora, prima repetidamente até o indicador da função Hora do dia ficar intermitente. Não pode definir a função ou Fim em simulDuração tâneo. 3.1 Limpeza inicial • Remova todos os acessórios e apoios para prateleiras amovíveis (se aplicável).
www.aeg.com Utilize o calor residual para reduzir o consumo de energia. Desactive a zona de cozedura 5 a 10 minutos antes do fim da cozedura. 4.2 Utilizar a zona dupla CUIDADO Para activar a zona dupla, rode o botão para a direita. Não rode para a posição de desactivação. As duas zonas de cozedura estão ligadas. 3. Para definir o grau de cozedura necessário, consulte "Graus de cozedura". 4.3 Indicador de calor residual O indicador de calor residual acende-se quando uma zona de cozedura está quente.
PORTUGUÊS 41 Grau Utilize para: de cozedura Tempo Sugestões 1-2 Solidificar: omeletas fofas, ovos cozidos 10-40 minutos Coza com uma tampa 2-3 Cozer arroz e pratos à base de leite em lume brando, aquecer refeições pré-cozinhadas 25-50 minutos Adicione, no mínimo, duas vezes mais líquido do que arroz, mexa os pratos de leite a meio da cozedura 3-4 Cozer legumes, peixe e carne a vapor 20-45 minutos Adicione algumas colheres de sopa de líquido 4-5 Cozer batatas a vapor 20-60 minutos Utilize
www.aeg.com 7. FORNO - UTILIZAÇÃO DIÁRIA ADVERTÊNCIA Consulte o capítulo "Informações de segurança". 7.1 Ventoinha de arrefecimento Quando o aparelho é colocado em funcionamento, a ventoinha de arrefecimento é activada automaticamente para manter as superfícies do aparelho frias. Se desactivar o aparelho, a ventoinha de arrefecimento continua a funcionar até a temperatura do aparelho baixar. Rode o botão da temperatura para uma temperatura.
PORTUGUÊS 43 8. FORNO - FUNÇÕES DE RELÓGIO 8.1 Programador electrónico 1 2 1 1 Indicadores de funções 2 Visor do tempo 3 Botão + 4 Botão de selecção hr min 5 4 5 Botão - 3 Função de relógio Hora do dia Aplicação Para acertar, alterar ou verificar a hora do dia. Conta-Minutos Para definir um tempo de contagem decrescente. Esta função não tem qualquer efeito no funcionamento do forno. Duração Para definir quanto tempo o aparelho deve funcionar.
www.aeg.com 5. Rode o botão das funções do forno e o botão da temperatura para a posição de desligado (off). 2. Mantenha premido o botão -. A função de relógio apaga-se após alguns segundos. 8.3 Cancelar as funções de relógio 1. Prima o botão de selecção várias vezes até que o indicador da função necessária fique intermitente. 9. FORNO - UTILIZAR OS ACESSÓRIOS ADVERTÊNCIA Consulte o capítulo "Informações de segurança". 9.
PORTUGUÊS 45 9.2 Calhas telescópicas - inserir os acessórios do forno Coloque o tabuleiro para cozer ou assar nas calhas telescópicas. A armação elevada à volta da grelha do forno evita que os tabuleiros e as assadeiras deslizem. 9.3 Inserir a grelha do forno e o tabuleiro de assar em conjunto Coloque a grelha do forno sobre o tabuleiro de assar. Coloque a grelha do forno e o tabuleiro de assar nas calhas telescópicas. 10.
www.aeg.com Adapte as suas definições habituais (temperatura, tempos de cozedura) e níveis da grelha aos valores nas tabelas. • Para tempos de cozedura longos, pode desligar o forno aproximadamente 10 minutos antes do fim do tempo de cozedura, para utilizar o calor residual. Quando utiliza alimentos congelados, os tabuleiros no forno podem torcer durante a cozedura. Quando os tabuleiros ficarem novamente frios, a distorção desaparecerá.
PORTUGUÊS Resultado da cozedura O bolo não fica cozido no tempo de cozedura indicado. 47 Causa possível Solução A temperatura do forno é demasiado baixa. Quando voltar a cozer, seleccione uma temperatura do forno ligeiramente superior. 10.
www.aeg.
PORTUGUÊS 49 Biscoitos/small cakes/pastéis/pãezinhos Tipo de cozedura Posição da prateleira 2 níveis Temperatura em °C Tempo em minutos Biscoitos de massa areada 2/4 150 - 160 20 - 40 Bolachas de manteiga/biscoitos 2/4 140 25 - 45 Biscoitos de massa batida 2/4 160 - 170 25 - 40 Biscoitos de claras, suspiros 2/4 80 - 100 130 - 170 Macaroons (biscoitos de amêndoa) 2/4 100 - 120 40 - 80 Biscoitos de massa levedada 2/4 160 - 170 30 - 60 Bolos de massa folhada 2/4 170 - 180 1) 30
www.aeg.com Tipo de cozedura Posição da prateleira Temperatura em °C Tempo em minutos Tartes salgadas (p. ex., quiche lorraine) 1 180 - 220 35- 60 1-2 160 - 180 60 - 90 Posição da prateleira Temperatura em °C Tempo em minutos Pão entrançado/ pão em coroa 2 170 - 190 40 - 50 Stollen (bolo de Natal alemão) 2 160 - 180 1) 50 - 70 Cheesecake 1) Pré-aqueça o forno Bolos/pastéis/pães em tabuleiros Tipo de cozedura Pão (pão de centeio): 1. Primeira parte do processo de cozedura. 2.
PORTUGUÊS 51 Tipo de cozedura Posição da prateleira Temperatura em °C Tempo em minutos Pizza (com muitos ingredientes)2) 1-2 190 - 210 1) 30 - 50 Pizza (massa fina) 1-2 220 - 250 1) 15 - 25 Pão não fermentado 1 230 - 250 10 - 15 Tartes (CH) 1 210 - 230 35 - 50 Tipo de cozedura Posições de prateleiras Temperatura em °C Tempo em minutos Biscoitos de massa areada 3 170 - 190 10 - 20 Short bread/ Pastry Stripes 3 160 1) 20 - 35 Biscoitos de massa batida 3 170 - 190 20 - 30
www.aeg.
PORTUGUÊS • Asse carnes magras em tabuleiros de assar com tampa. Desta forma, a carne ficará mais suculenta. • Todos os tipos de carne que possam ser confeccionados com pele poderão ser assados em tabuleiros de assar sem tampa. 10.
www.aeg.
PORTUGUÊS 10.
www.aeg.com Aves Tipo de carne Quantidade Posição da prateleira Temperatura em °C Tempo em minutos Partes de aves 200-250g cada 1 200 - 220 30 - 50 Meio frango 400-500g cada 1 190 - 210 35 - 50 Frango, galinha 1 - 1,5 kg 1 190 - 210 50 - 70 Pato 1,5 - 2 kg 1 180 - 200 80 - 100 Ganso 3,5 - 5 kg 1 160 - 180 120 - 180 Peru 2,5 - 3,5 kg 1 160 - 180 120 - 150 Peru 4 - 6 kg 1 140 - 160 150 - 240 10.
PORTUGUÊS 57 tempo necessário. Abra a porta do aparelho e permita que ele arrefeça. Em seguida, conclua o processo de secagem. 10.10 Secar Cubra as prateleira do forno com papel vegetal.
www.aeg.com Tempo de descongelação em min. Tempo adicional de descongelação em min.
PORTUGUÊS 59 Remover os apoios para prateleiras 1 1. Puxe a parte da frente do apoio para prateleiras para fora da parede lateral. 2. Puxe a parte de trás do apoio para prateleiras para fora da parede lateral e retire-o. 2 Instalar os apoios para prateleiras Instale os apoios para prateleiras na sequência inversa.
www.aeg.com ADVERTÊNCIA Certifique-se de que os painéis de vidro estão frios antes de limpar a porta de vidro. Existe o risco de quebra dos painéis de vidro. ADVERTÊNCIA Quando os painéis de vidro da porta estão danificados ou riscados, o vidro torna-se fraco e pode partir. Para evitar isto, é necessário substituí-los. Para mais instruções, contacte um Centro de Assistência Técnica. Remover a porta: Abra a porta totalmente. Desloque a parte deslizante até ouvir um clique. 3.
PORTUGUÊS 2. 3. 4. Para instalar os painéis, execute os passos indicados acima em sequência inversa. CUIDADO Os painéis de vidro amovíveis têm uma marca num dos lados. Certifique-se de que esta marca fica no canto superior esquerdo. 2. 61 Puxe o friso da porta para a frente para o remover. Segure nos painéis de vidro da porta, um após o outro, pela extremidade superior e puxe-os para cima, para fora da guia. Limpe os painéis de vidro da porta.
www.aeg.com Problema Causa possível Solução O forno não aquece Não está definida a regulação necessária Regule as definições O forno não aquece O disjuntor do quadro eléctrico dispara Verifique o disjuntor. Se o disjuntor disparar mais vezes, contacte um electricista qualificado.
PORTUGUÊS 63 2. B A A Distâncias mínimas Dimensão mm A 2 B 685 Instale a protecção anti-inclinação 77 mm abaixo da superfície superior do aparelho e 49 mm à esquerda do aparelho, no orifício circular do suporte (ver fig.). Aparafuse-o em material sólido ou utilize um reforço aplicável. 3. O orifício encontra-se no lado esquerdo da parte de trás do aparelho (ver fig.). Levante a parte da frente do aparelho (1) e coloque-o no meio do espaço entre os armários (2).
www.aeg.com 14. PREOCUPAÇÕES AMBIENTAIS Recicle os materiais que apresentem o símbolo . Coloque a embalagem nos contentores indicados para reciclagem. Ajude a proteger o ambiente e a saúde pública através da reciclagem de aparelhos eléctricos e electrónicos. Não elimine os aparelhos que tenham o símbolo juntamente com os resíduos domésticos. Coloque o produto num ponto de recolha para reciclagem local ou contacte as suas autoridades municipais.
PORTUGUÊS 65
www.aeg.
PORTUGUÊS 67
892950599-A-202012 www.aeg.