47056VS EN COOKER DE HERD USER MANUAL BENUTZERINFORMATION 2 34
www.aeg.com CONTENTS 4 7 8 9 10 11 12 13 14 16 28 31 32 SAFETY INFORMATION PRODUCT DESCRIPTION BEFORE FIRST USE HOB - DAILY USE HOB - HELPFUL HINTS AND TIPS HOB - CARE AND CLEANING OVEN - DAILY USE OVEN - CLOCK FUNCTIONS OVEN - USING THE ACCESSORIES OVEN - HELPFUL HINTS AND TIPS OVEN - CARE AND CLEANING WHAT TO DO IF… INSTALLATION ENVIRONMENT CONCERNS Recycle the materials with the symbol . Put the packaging in applicable containers to recycle it.
ENGLISH 3 FOR PERFECT RESULTS Thank you for choosing this AEG product. We have created it to give you impeccable performance for many years, with innovative technologies that help make life simpler – features you might not find on ordinary appliances. Please spend a few minutes reading to get the very best from it. ACCESSORIES AND CONSUMABLES In the AEG webshop, you’ll find everything you need to keep all your AEG appliances looking spotless and working perfectly.
www.aeg.com SAFETY INFORMATION Before the installation and use, read this manual carefully: • For your own safety and the safety of your property • For the protection of the environment • For the correct operation of the appliance. Always keep these instructions with the appliance also if you move or sell it. The manufacturer is not responsible if incorrect installation or use results in damage.
ENGLISH • The electrical installation must have an isolation device which lets you disconnect the appliance from the mains at all poles. The isolation device must have a contact opening width of minimum 3 mm. • The shock protection parts must be fixed in such a way that they cannot be undone without tools. • Always use a correctly installed shockproof socket. • When you connect electrical appliances to mains sockets, do not let cables touch or come near the hot appliance door.
www.aeg.com • Do not apply pressure on the open door. • Do not put flammable materials in the compartment below the oven. Keep there only heat-resistant accessories (if applicable). • Do not cover oven steam outlets. They are at the rear side of the top surface (if applicable). • Do not put anything on the hob that is liable to melt. • If there is a crack on the surface, disconnect the power supply. There is a risk of electric shock. • Do not put heat-conducting materials (e.g.
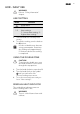
ENGLISH PRODUCT DESCRIPTION GENERAL OVERVIEW 1 1 Knob for the oven functions 2 3 4 2 Electronic programmer 5 6 7 5 9 4 3 8 2 3 Knob for the temperature 4 Temperature indicator 5 Knobs for the hob 6 Heating element 7 Oven lamp 8 Fan and heating element 1 9 Shelf positions COOKING SURFACE LAYOUT 1 2 145 mm 3 170 mm 265 mm 1 Cooking zone 1200 W 2 Steam outlet 3 Cooking zone 1500/2400 W 4 Cooking zone 1200 W 140/210 mm 145 mm 5 Residual heat indicator 6 Cooking zone 1000/2200 W 6 5 4 A
www.aeg.com BEFORE FIRST USE WARNING! Refer to "Safety information" chapter. INITIAL CLEANING • Remove all accessories and removable shelf supports (if applicable). • Clean the appliance before first use. Refer to the chapter "Care and cleaning". SETTING THE TIME You must set the time before you operate the oven. When you connect the appliance to the electrical supply or after a power cut, the indicator for the Time function flashes. Press the + or - button to set the correct time.
ENGLISH HOB - DAILY USE WARNING! Refer to "Safety information" chapter. HEAT SETTING Knob Function Keep Warm 0 1-9 Off position Heat settings (1 - lowest heat setting, 9 highest heat setting) 1. Turn the knob to a necessary heat setting. 2. To stop the cooking, turn the knob to the 0 position. Use the residual heat to decrease energy consumption. Deactivate the cooking zone approximately 5-10 minutes before the cooking is completed.
www.aeg.com HOB - HELPFUL HINTS AND TIPS WARNING! Refer to "Safety information" chapter. ENERGY SAVING • If it is possible, always put the lids on the cookware. • Put cookware on a cooking zone before you start it. • Deactivate the cooking zones before the end of the cooking time to use residual heat. • The bottom of pans and cooking zones must have the same dimension. COOKWARE • The bottom of the cookware must be as thick and flat as possible.
ENGLISH HOB - CARE AND CLEANING WARNING! Refer to "Safety information" chapter. Clean the appliance after each use. Always use cookware with clean bottom. Scratches or dark stains on the glass-ceramic cause no effect on how the appliance operates. To remove the dirt: 1. – Remove immediately: melted plastic, plastic foil and food with sugar. If not, the dirt can cause damage to the appliance. Use a special scraper for the glass.
www.aeg.com OVEN - DAILY USE WARNING! Refer to "Safety information" chapter. COOLING FAN When the appliance operates, the cooling fan activates automatically to keep the surfaces of the appliance cool. If you deactivate the appliance, the cooling fan continues to operate until the temperature in the appliance cools down. Turn the knob for the temperature to a temperature. The temperature indicator comes on while the temperature in the appliance increases. 3.
ENGLISH 13 OVEN - CLOCK FUNCTIONS ELECTRONIC PROGRAMMER 1 2 3 1 Function indicators 2 Time display 3 Function indicators 4 Button + 5 Selection button 6 Button - 6 5 4 Clock function Time of day Minute Minder Duration End Application To set, change or check the time of day. To set a countdown time. This function has no effect on the operation of the oven. To set how long the appliance must operate. To set when the appliance must be deactivated.
www.aeg.com OVEN - USING THE ACCESSORIES WARNING! Refer to "Safety information" chapter. INSTALLING THE OVEN ACCESSORIES The deep pan and the oven shelf have side edges. These edges and the shape of the guide-bars are a special device to prevent the cookware from slipping. Installing the oven shelf and the deep pan together Put the oven shelf on the deep pan. Push the deep pan between the guide-bars of one of the oven levels.
ENGLISH 15 The high rim around the oven shelf is a special device to prevent the cookware from slipping. INSERTING THE OVEN SHELF AND THE ROASTING PAN TOGETHER Put the oven shelf on the roasting pan. Put the oven shelf and the roasting pan on the telescopic runners.
www.aeg.com OVEN - HELPFUL HINTS AND TIPS WARNING! Refer to "Safety information" chapter. The temperature and baking times in the tables are guidelines only. They depend on the recipes, quality and quantity of the ingredients used. CAUTION! Use a deep baking tray for very moist cakes. Fruit juices can cause permanent stains on the enamel. BAKING General instructions • Your new oven may bake or roast differently to the appliance you had before.
ENGLISH 17 Baking results Possible cause Remedy The cake browns unevenly. The mixture is unevenly distributed. Spread the mixture evenly on the baking tray. The cake is not ready in the baking time given. The oven temperature is too low. The next time you bake set a slightly higher oven temperature. TRUE FAN COOKING Baking on one oven level Baking in tins Type of baking Shelf position Temperature °C Time in min.
www.aeg.com Type of baking Shelf position Temperature °C Time in min. Short bread / Pastry Stripes 3 140 20 - 35 Biscuits made with sponge mixture 3 150 - 160 15 - 20 Pastries made with egg white, meringues 3 80 - 100 120 - 150 Macaroons 3 100 - 120 30 - 50 Biscuits made with yeast dough 3 150 - 160 20 - 40 Puff pastries 3 170 - 180 1) 20 - 30 Rolls 3 160 1) 10 - 35 Small cakes (20per tray) 3 150 1) 20 - 35 Dish Shelf position Temperature °C Time in min.
ENGLISH Type of baking Shelf position 2 levels Temperature °C Time in min.
www.aeg.com Type of baking Christmas stollen Bread (rye bread): 1. First part of baking process. 2. Second part of baking process. Shelf position Temperature °C Time in min. 2 160 - 180 1) 50 - 70 1-2 1. 230 1) 1. 2. 160 - 180 1) 2.
ENGLISH Type of baking Shelf positions Temperature °C Time in min. Pastries made with egg white, meringues 3 80 - 100 120- 150 Macaroons 3 120 - 130 30 - 60 Biscuits made with yeast dough 3 170 - 190 20 - 40 Puff pastries 3 190 - 210 1) 20 - 30 Rolls 3 190 - 2101) 10 - 55 3-4 170 1) 20 - 30 Shelf positions Temperature °C Time in min.
www.aeg.com Shelf position Temperature °C Time Min. Vegetable pie Type of baking 1-2 160 - 180 50 - 60 Unleavened bread 2-3 230 - 250 2) 10 - 20 Puff pastry flan 2-3 160 - 180 2) 45 - 55 Flammekuchen 2-3 230 - 250 2) 12 - 20 Piroggen (Russian version of calzone) 2-3 180 - 200 2) 15 - 25 1) Use deep pan 2) Pre-heat the oven • Roast lean meats in a roasting tin with a lid. This will keep the meat more succulent.
ENGLISH Type of meat Porkknuckle (precooked) 23 Quantity Shelf position Temperature °C Time in min. 750 g -1 kg 1 200 - 220 90 - 120 Quantity Shelf position Temperature °C Time in min. 1 kg 1 210 - 220 90 - 120 1.5-2 kg 1 200 - 220 150 - 180 Veal Type of meat Roast veal1) Knuckle of veal 1) use a closed roasting dish Lamb Type of meat Quantity Shelf position Temperature °C Time in min. Leg of lamb, roast lamb 1- 1.5 kg 1 210 - 220 90 - 120 Saddle of lamb 1- 1.
www.aeg.com Type of meat Quantity Shelf position Temperature °C Time in min. Turkey 2.5-3.5 kg 1 200 - 210 120 - 180 Turkey 4-6 kg 1 180 - 200 180 - 240 Type of meat Quantity Shelf position Temperature °C Time in min. Whole fish 1-1.5 kg 1 210 - 220 40 - 70 Fish ROASTING WITH TURBO GRILLING Beef Type of meat Quantity Shelf position Temperature °C Time min. Roast beef or fillet: rare per cm. of thickness 1 190 - 200 1) 5-6 Roast beef or fillet: medium per cm.
ENGLISH 25 Lamb Type of meat Quantity Shelf position Temperature °C Time min. Leg of lamb, roast lamb 1-1.5 kg 1 150 - 170 100 - 120 Saddle of lamb 1-1.5 kg 1 160 - 180 40 - 60 Type of meat Quantity Shelf position Temperature °C Time min. Poultry portions 200-250 g each 1 200 - 220 30 - 50 Half chicken 400-500 g each 1 190 - 210 35 - 50 Chicken, poulard 1-1.5 kg 1 190 - 210 50 - 70 Duck 1.5-2 kg 1 180 - 200 80 - 100 Goose 3.
www.aeg.com Food types for grilling Shelf position Temperature °C 4 max Toast with topping Grilling time in min. 1st side 2nd side 6-8 - 1) Pre-heat the oven DRYING Cover the oven shelves with baking parchment. For best results: deactivate the appliance after half the time required. Open the appliance door and let the appliance cool down. After that finish the drying process.
ENGLISH Dish Cream, 2 x 200 g Gateau, 1400 g 27 Defrosting time in min. Further defrosting time in min. Comment 80 - 100 10 - 15 Cream can also be whipped when still slightly frozen in places 60 60 Information on acrylamides Important! According to the newest scientific knowledge, if you brown food (specially the one which contains starch), acrylamides can pose a health risk. Thus, we recommend that you cook at the lowest temperatures and do not brown food too much.
www.aeg.com OVEN - CARE AND CLEANING WARNING! Refer to "Safety information" chapter. • Clean the front of the appliance with a soft cloth with warm water and cleaning agent. • To clean metal surfaces, use a usual cleaning agent • Clean the oven interior after each use. Then you can remove dirt more easily and it does not burn on. • Clean stubborn dirt with a special oven cleaner. • Clean all oven accessories after each use and let them dry. Use a soft cloth with warm water and a cleaning agent.
ENGLISH 29 Use the same oven lamp type. OVEN LAMP WARNING! Be careful when you change the oven lamp. There is a risk of electrical shock. Before you change the oven lamp: • Deactivate the oven. • Remove the fuses in the fuse box or deactivate the circuit breaker. 4. Install the glass cover. CLEANING THE OVEN DOOR To make the cleaning easier, remove the door. WARNING! Make sure that the glass panels are cool before you clean the glass door. There is a risk that the glass could break.
www.aeg.com Removing and cleaning the door glasses 1. Hold the door trim (B) on the top edge of the door at the two sides and push inwards to release the clip seal. 2. Pull the door trim to the front to remove it. Hold the door glass panels on their top edge one by one and pull them upwards from the guide. Clean the door glass panels. B 3. 4. To install panels, do the above steps in the opposite sequence. CAUTION! The removable glass panels have a marking on one side.
ENGLISH 31 WHAT TO DO IF… WARNING! Refer to "Safety information" chapter. Problem Possible cause Remedy The hob does not operate The heat setting is not set Set the heat setting The oven does not heat up The oven is not switched on Switch on the oven The oven does not heat up The clock is not set Set the clock The oven does not heat up The necessary settings are not set Control the settings The oven does not heat up The fuse in the fuse box is Control the fuse.
www.aeg.com INSTALLATION WARNING! Refer to "Safety information" chapter. TECHNICAL DATA Dimensions Height 847 - 867 mm Width 596 mm Depth 600 mm Oven capacity ANTI-TILT PROTECTION 74 l Voltage 230 V Frequency 50 Hz Make sure you install the anti-tilt protection at the correct height. LOCATION OF THE APPLIANCE You can install your freestanding appliance with cabinets on one or two sides and in the corner.
ENGLISH 49 mm 77 mm 1 2 ELECTRICAL INSTALLATION The manufacturer is not responsible if you do not follow the safety precautions from the chapter "Safety information". This appliance is supplied without a main plug or a main cable. Applicable cable types: H07 RN-F, H05 RN-F, H05 RRF, H05 VV-F, H05 V2V2-F (T90), H05 BB-F.
www.aeg.com INHALT 36 40 41 42 43 45 46 48 49 51 63 67 68 SICHERHEITSHINWEISE GERÄTEBESCHREIBUNG VOR DER ERSTEN INBETRIEBNAHME KOCHFELD - TÄGLICHER GEBRAUCH KOCHFELD - PRAKTISCHE TIPPS UND HINWEISE KOCHFELD - REINIGUNG UND PFLEGE BACKOFEN - TÄGLICHER GEBRAUCH BACKOFEN - UHRFUNKTIONEN BACKOFEN - VERWENDUNG DES ZUBEHÖRS BACKOFEN - PRAKTISCHE TIPPS UND HINWEISE BACKOFEN - REINIGUNG UND PFLEGE WAS TUN, WENN … MONTAGE UMWELTTIPPS Recyceln Sie Materialien mit dem Symbol .
DEUTSCH 35 FÜR PERFEKTE ERGEBNISSE Danke, dass Sie sich für dieses AEG Produkt entschieden haben. Wir haben es geschaffen, damit Sie viele Jahre von seiner ausgezeichneten Leistung und den innovativen Technologien, die Ihnen das Leben erleichtern, profitieren können. Es ist mit Funktionen ausgestattet, die in gewöhnlichen Geräten nicht vorhanden sind. Nehmen Sie sich ein paar Minuten Zeit zum Lesen, um seine Vorzüge kennen zu lernen.
www.aeg.com SICHERHEITSHINWEISE Lesen Sie vor der Montage und Anwendung sorgfältig dieses Handbuch: • im Interesse Ihrer eigenen Sicherheit und der Ihres Eigentums • im Interesse der Umwelt • Im Interesse einer korrekten Bedienung des Geräts Bewahren Sie diese Bedienungsanleitung zusammen mit dem Gerät auf, auch wenn Sie umziehen oder das Gerät verkaufen. Der Hersteller ist nicht dafür verantwortlich, wenn eine inkorrekte Montage und Verwendung Schäden verursacht.
DEUTSCH • Stellen Sie sicher, dass die elektrischen Daten auf dem Typenschild den Daten Ihrer Haushaltsstromversorgung entsprechen. • Informationen zur Spannungsversorgung finden Sie auf dem Typenschild. • Geeignete Trenneinrichtungen sind: Überlastschalter, Sicherungen (Schraubsicherungen müssen aus dem Halter entfernt werden können), Fehlerstromschutzschalter und Schütze.
www.aeg.com • Wenn Kochgeschirr oder andere Gegenstände auf die Kochfläche fallen, kann die Oberfläche beschädigt werden. • Stellen Sie heißes Kochgeschirr nicht zu dicht an das Bedienfeld, da die Hitze das Gerät beschädigen kann. • Das Zubehör vorsichtig entfernen oder einsetzen, um die Emailbeschichtung des Geräts nicht zu beschädigen. • Kochgeschirr aus Gusseisen, Aluguss oder mit beschädigtem Boden kann die Kochfläche beim Verschieben verkratzen.
DEUTSCH fahr eines elektrischen Schlags! Lassen Sie das Gerät abkühlen. Es besteht Verbrennungsgefahr! KUNDENDIENSTZENTRUM • Nur qualifizierte Fachkräfte dürfen an dem Gerät Reparaturarbeiten durchführen. Wenden Sie sich hierzu an einen zugelassenen Kundendienst. • Verwenden Sie nur Originalersatzteile. ENTSORGUNG DES GERÄTS • Um das Risiko von Verletzungen oder Sachschäden zu vermeiden: – Trennen Sie das Gerät von der Stromversorgung. – Schneiden Sie das Netzkabel ab und entsorgen Sie es.
www.aeg.
DEUTSCH 41 VOR DER ERSTEN INBETRIEBNAHME WARNUNG! Siehe Kapitel „Sicherheitshinweise“. ERSTE REINIGUNG • Entfernen Sie alle Zubehörteile und die herausnehmbaren Auszüge (falls vorhanden). • Reinigen Sie das Gerät vor der ersten Inbetriebnahme. Siehe Kapitel „Reinigung und Pflege“. EINSTELLEN DER UHRZEIT Sie müssen die Uhrzeit einstellen, bevor Sie den Backofen benutzen können. Nach dem elektrischen Anschluss des Geräts oder bei einem Stromausfall blinkt die Uhranzeige.
www.aeg.com KOCHFELD - TÄGLICHER GEBRAUCH WARNUNG! Siehe Kapitel „Sicherheitshinweise“. KOCHSTUFE Knopf Funktion Warmhalten 0 1-9 Position Aus Kochstufen (1 - niedrigste Kochstufe, 9 höchste Kochstufe) 1. Drehen Sie den Knopf auf die gewünschte Kochstufe. 2. Um den Garvorgang zu beenden, drehen Sie den Knopf auf die Position 0. Nutzen Sie die Restwärme, um den Energieverbrauch zu senken. Schalten Sie die Kochzone ca. 5-10 Minuten vor Ende des Garvorgangs aus.
DEUTSCH 43 KOCHFELD - PRAKTISCHE TIPPS UND HINWEISE WARNUNG! Siehe Kapitel „Sicherheitshinweise“. KOCHGESCHIRR ANWENDUNGSBEISPIELE ZUM KOCHEN Bei den Angaben in der folgenden Tabelle handelt es sich um Richtwerte. • Der Boden des Kochgeschirrs sollte so dick und flach wie möglich sein. • Kochgeschirr aus Stahlemaille oder mit Aluminium- oder Kupferböden kann Verfärbungen der Glaskeramikoberfläche verursachen. ENERGIESPAREN • Decken Sie Kochgeschirr, wenn möglich, mit einem Deckel ab.
www.aeg.
DEUTSCH KOCHFELD - REINIGUNG UND PFLEGE WARNUNG! Siehe Kapitel „Sicherheitshinweise“. Reinigen Sie das Gerät nach jedem Gebrauch. Achten Sie immer darauf, dass der Boden des Kochgeschirrs sauber ist. Kratzer oder dunkle Flecken in der Glaskeramik beeinträchtigen die Funktionsfähigkeit des Geräts nicht. So entfernen Sie Verschmutzungen: 1. – Sofort entfernen: geschmolzener Kunststoff, Frischhaltefolie und zuckerhaltige Lebensmittel. Andernfalls können die Verschmutzungen das Gerät beschädigen.
www.aeg.com BACKOFEN - TÄGLICHER GEBRAUCH WARNUNG! Siehe Kapitel „Sicherheitshinweise“. KÜHLGEBLÄSE Wenn das Gerät in Betrieb ist, wird automatisch das Kühlgebläse eingeschaltet, um die Geräteflächen zu kühlen. Nach dem Abschalten des Geräts läuft das Kühlgebläse weiter, bis das Gerät abgekühlt ist. Drehen Sie den Temperaturwahlknopf auf eine Temperatur. Die Temperatur-Kontrolllampe leuchtet, solange die Temperatur im Gerät ansteigt. 3.
DEUTSCH Backofenfunktion Backofenbeleuchtung Anwendung Zum Einschalten der Backofenlampe, wenn keine Garfunktion eingeschaltet ist.
www.aeg.com BACKOFEN - UHRFUNKTIONEN ELEKTRONISCHER PROGRAMMSPEICHER 1 2 3 1 Funktionskontrolllampen 2 Zeitanzeige 3 Funktionskontrolllampen 4 Taste + 5 Auswahltaste 6 Taste - 6 5 4 Uhrfunktion Anwendung Tageszeit Zum Einstellen, Ändern oder Abfragen der Tageszeit. Kurzzeitwecker Zum Einstellen einer Kurzzeit. Diese Funktion hat keine Auswirkung auf den Backofenbetrieb. Dauer Einstellen der Einschaltdauer für das Gerät. Ende Einstellen der Abschaltzeit für das Gerät.
DEUTSCH 49 BACKOFEN - VERWENDUNG DES ZUBEHÖRS WARNUNG! Siehe Kapitel „Sicherheitshinweise“. EINSETZEN DES BACKOFENZUBEHÖRS Das tiefe Blech und der Rost haben Seitenränder. Durch die Seitenränder und die Form der Führungsstäbe wird das Kippen des Kochgeschirrs verhindert. Tiefes Blech und Rost zusammen einsetzen Legen Sie den Rost auf das tiefe Blech. Schieben Sie das tiefe Blech zwischen die Führungsstäbe einer der Einschubebenen.
www.aeg.com Durch den umlaufend erhöhten Rahmen des Rosts ist das Geschirr zusätzlich gegen Abrutschen gesichert. ROST UND FETTPFANNE ZUSAMMEN EINSETZEN Rost auf die Fettpfanne legen. Setzen Sie den Rost und die Fettpfanne auf die Teleskopauszüge.
DEUTSCH 51 BACKOFEN - PRAKTISCHE TIPPS UND HINWEISE WARNUNG! Siehe Kapitel „Sicherheitshinweise“. Die Temperaturen und Backzeiten in den Tabellen sind nur Richtwerte. Sie richten sich nach den Rezepten, der Qualität und der Menge der verwendeten Zutaten. VORSICHT! Verwenden Sie für sehr feuchte Kuchen ein tiefes Backblech. Obstsäfte können bleibende Flecken auf der Emailoberfläche verursachen. BACKEN Allgemeine Hinweise • Ihr neuer Backofen backt oder brät unter Umständen anders als Ihr früheres Gerät.
www.aeg.com Backergebnis Mögliche Ursache Abhilfe Der Kuchen ist zu trocken. Die Backofentemperatur ist zu niedrig. Stellen Sie beim nächsten Kuchen eine höhere Backofentemperatur ein. Der Kuchen ist zu trocken. Die Backzeit ist zu lang. Stellen Sie beim nächsten Kuchen eine kürzere Backzeit ein. Der Kuchen ist unregelmäßig gebräunt. Die Backofentemperatur ist zu hoch und die Backzeit zu kurz. Stellen Sie eine niedrigere Backofentemperatur und eine längere Backzeit ein.
DEUTSCH Backware Einschubebene Temperatur in °C Zeit in Min. Obstkuchen (mit Hefeteig/Rührteig) 3 150 35 - 55 3 160 - 170 40 - 80 Einschubebene Temperatur in °C Zeit in Min.
www.aeg.com Plätzchen/small cakes/Gebäck/Brötchen Backware Einschubebene 2 Ebenen Temperatur in °C Zeit in Min.
DEUTSCH Kuchen/Gebäck/Brot auf Backblechen Backware Einschubebene Temperatur in °C Zeit in Min. Hefezopf/Hefekranz 2 170 - 190 40 - 50 Christstollen 2 160 - 180 1) 50 - 70 Brot (Roggenbrot): 1. Erster Teil des Backvorgangs. 2. Zweiter Teil des Backvorgangs.
www.aeg.com Backware Einschubebenen Temperatur in °C Zeit in Min. Rührteigplätzchen 3 170 - 190 20 - 30 Eiweißgebäck, Baiser 3 80 - 100 120 - 150 Makronen 3 120 - 130 30 - 60 Hefekleingebäck 3 170 - 190 20 - 40 3 190 - 210 1) 20 - 30 3 190 - 2101) 10 - 55 3-4 170 1) 20 - 30 Blätterteiggebäck Brötchen Small cakes (20 pro Blech) 1) Backofen vorheizen Tabelle für Aufläufe und Überbackenes Einschubebenen Temperatur in °C Zeit in Min.
DEUTSCH Backware Einschubebene Temperatur in °C Zeit (Min.) 2-3 230 - 250 2) 10 - 20 Blätterteigquiche 2-3 160 - 180 2) 45 - 55 Flammkuchen 2-3 230 - 250 2) 12 - 20 Piroggen (Russische Version der Calzone) 2-3 180 - 200 2) 15 - 25 Ungesäuertes Brot 57 1) Tiefes Blech benutzen 2) Backofen vorheizen • Braten Sie magere Fleischsorten in einem Bräter mit Deckel. So bleibt das Fleisch saftiger.
www.aeg.com Menge Einschubebene Temperatur in °C Zeit in Min. Hackbraten 750 g - 1 kg 1 170 - 190 50 - 60 Schweinshaxe (vorgegart) 750 g - 1 kg 1 200 - 220 90 - 120 Fleischart Menge Einschubebene Temperatur in °C Zeit in Min. Kalbsbraten1) 1 kg 1 210 - 220 90 - 120 1,5-2 kg 1 200 - 220 150 - 180 Menge Einschubebene Temperatur in °C Zeit in Min.
DEUTSCH 59 Fleischart Menge Einschubebene Temperatur in °C Zeit in Min. Truthahn/Pute 4-6 kg 1 180 - 200 180 - 240 Fleischart Menge Einschubebene Temperatur in °C Zeit in Min. Ganzer Fisch 1-1,5 kg 1 210 - 220 40 - 70 Fisch BRATEN MIT HEISSLUFT GRILLEN Rindfleisch Fleischart Menge Einschubebe- Temperatur in ne °C Zeit (Min.
www.aeg.com Lammfleisch Fleischart Menge Einschubebe- Temperatur in ne °C Zeit (Min.) Lammkeule, Lammbraten 1-1,5 kg 1 150 - 170 100 - 120 Lammrücken 1-1,5 kg 1 160 - 180 40 - 60 Geflügel Fleischart Menge Einschubebe- Temperatur in ne °C Zeit (Min.
DEUTSCH Grillgut Einschubebene Temperatur in °C Überbackener Toast 4 max 61 Grillzeit in Minuten Erste Seite Zweite Seite 6-8 - 1) Backofen vorheizen Sie die Gerätetür und lassen Sie das Gerät abkühlen. Danach das Dörrgut fertig dörren. DÖRREN Decken Sie die Backbleche mit Backpapier ab. Für beste Ergebnisse: Schalten Sie das Gerät nach der Hälfte der Zeit aus.
www.aeg.com Auftauzeit in Min. Zusätzliche Auftauzeit in Min. Bemerkung Fleisch, 500 g 90 - 120 20 - 30 Nach der Hälfte der Zeit wenden Forelle, 150 g 25 - 35 10 - 15 - Erdbeeren, 300 g 30 - 40 10 - 20 - Butter, 250 g 30 - 40 10 - 15 Sahne lässt sich auch mit noch leicht gefrorenen Stellen gut aufschlagen.
DEUTSCH 63 BACKOFEN - REINIGUNG UND PFLEGE WARNUNG! Siehe Kapitel „Sicherheitshinweise“. • Feuchten Sie ein weiches Tuch mit warmem Wasser und etwas Reinigungsmittel an und reinigen Sie damit die Vorderseite des Geräts. • Verwenden Sie zum Reinigen der Metalloberflächen ein handelsübliches Reinigungsmittel. • Reinigen Sie den Innenraum des Backofens nach jedem Gebrauch. So lassen sich Verschmutzungen leichter entfernen und es kann nichts einbrennen.
www.aeg.com VORSICHT! Achten Sie darauf, dass der längere Befestigungsdraht vorne ist. Die Enden der beiden Drähte müssen nach hinten zeigen. Eine fehlerhafte Installation kann die Emaille beschädigen. BACKOFENLAMPE WARNUNG! Vorsicht beim Austausch der Backofenlampe. Es besteht die Gefahr eines elektrischen Schlags. Bevor Sie die Backofenlampe austauschen: • Schalten Sie den Backofen aus. • Entfernen Sie die Sicherungen aus dem Sicherungskasten, oder schalten Sie den Schutzschalter aus. 2. 3.
DEUTSCH 65 Abnehmen und Reinigen der Türgläser 1. Fassen Sie die Türabdeckung (B) an der Oberkante der Tür an beiden Seiten an. Drücken Sie sie nach innen, um den Schnappverschluss zu lösen. 2. Ziehen Sie die Türabdeckung nach vorn, um sie abzunehmen. Fassen Sie die Türgläser nacheinander am oberen Rand an. Ziehen Sie sie nach oben aus der Führung. Reinigen Sie die Glasscheiben. B 3. 4. Um die Glasscheiben wieder einzusetzen, führen Sie die Schritte oben in umgekehrter Reihenfolge durch.
www.aeg.com WARNUNG! In der Schublade kann bei Benutzung des Backofens ein Wärmestau entstehen. Bewahren Sie keine brennbaren Gegenstände, wie Reinigungsmittel, Plastiktüten, Topfhandschuhe, Papier, Reinigungssprays usw. in der Schublade auf.
DEUTSCH 67 WAS TUN, WENN … WARNUNG! Siehe Kapitel „Sicherheitshinweise“. Problem Mögliche Ursache Abhilfe Das Kochfeld funktioniert nicht Es wurde keine Temperatureinstellung gewählt Stellen Sie die Temperatur ein Der Backofen heizt nicht auf Der Ofen ist nicht eingeschaltet Schalten Sie den Backofen ein.
www.aeg.com MONTAGE WARNUNG! Siehe Kapitel „Sicherheitshinweise“. TECHNISCHE DATEN Abmessungen Höhe 847 - 867 mm Breite 596 mm Tiefe 600 mm Backofenkapazität 74 Liter Spannung 230 V Frequenz 50 Hz KIPPSCHUTZ VORSICHT! Sie müssen den Kippschutz anbringen. Andernfalls könnte das Gerät kippen. Achten Sie darauf, den Kippschutz in der richtigen Höhe anzubringen. STANDORT DES GERÄTS Sie können Ihr freistehendes Gerät neben oder zwischen Küchenmöbel sowie in einer Ecke aufstellen.
DEUTSCH 49 mm 77 mm 1 2 ELEKTROINSTALLATION Der Hersteller haftet nicht für Schäden, die aufgrund der Nichtbeachtung der Sicherheitsvorkehrungen des Kapitels „Sicherheitshinweise“ entstehen. Das Gerät wird ohne Netzstecker und Netzkabel geliefert. Einsetzbare Kabeltypen: H07 RN-F, H05 RN-F, H05 RRF, H05 VV-F, H05 V2V2-F (T90), H05 BB-F.
www.aeg.
DEUTSCH 71
www.aeg.