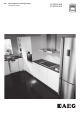
RU Инструкция по эксплуатации Кухонная плита 4705RVS-MN 4705RVS-WN
www.aeg.com СОДЕРЖАНИЕ 1. СВЕДЕНИЯ ПО ТЕХНИКЕ БЕЗОПАСНОСТИ...................................................3 2. УКАЗАНИЯ ПО БЕЗОПАСНОСТИ..................................................................... 6 3. ОПИСАНИЕ ИЗДЕЛИЯ....................................................................................... 9 4. ПЕРЕД ПЕРВЫМ ИСПОЛЬЗОВАНИЕМ.......................................................... 10 5. ВАРОЧНАЯ ПАНЕЛЬ - ЕЖЕДНЕВНОЕ ИСПОЛЬЗОВАНИЕ......................... 11 6.
РУССКИЙ 1. СВЕДЕНИЯ ПО ТЕХНИКЕ БЕЗОПАСНОСТИ Перед установкой и эксплуатацией прибора внимательно ознакомьтесь с приложенным руководством. Производитель не несет ответственности за какие-либо травмы или ущерб, возникший вследствие неправильной установки или эксплуатации. Всегда храните данное руководство под рукой в надежном месте для последующего использования. 1.
www.aeg.com 1.2 Общие правила техники безопасности • • • • • • • • • • • • • Установка прибора и замена кабеля должна осуществляться только квалифицированным персоналом! При подключении данного прибора к электросети необходимо использовать кабель типа H05VV-F, выдерживающий температуру задней панели. Данный прибор предназначен для эксплуатации на высоте 2000 м и выше над уровнем моря. Прибор не предназначен для эксплуатации на кораблях, лодках и судах.
РУССКИЙ • • • • • • • • • 5 поверхность, в результате чего стекло может лопнуть. Не следует класть на варочную поверхность металлические предметы, такие как ножи, вилки, ложки и крышки, так как они могут нагреться. При обнаружении трещин на стеклокерамической поверхности или при ее растрескивании отключите прибор во избежание поражения электрическим током. ВНИМАНИЕ: Прибор и его доступные для контакта части сильно нагреваются во время эксплуатации.
www.aeg.com • • В соответствии с правилами монтажа должны быть обеспечены средства разъединения цепи. ВНИМАНИЕ: Используйте только защиту варочной поверхности, которая была разработана производителем прибора для приготовления пищи, обозначена производителем прибора в инструкциях в качестве пригодной для использования с данным прибором, либо встроена в прибор. Использование ненадлежащей защиты может стать причиной несчастного случая. 2. УКАЗАНИЯ ПО БЕЗОПАСНОСТИ 2.
РУССКИЙ • • • • • • • • Не допускайте контакта сетевых кабелей с дверцей прибора или приближения к ней, особенно, если дверца сильно нагрета. Детали, защищающие токоведущие или изолированные части прибора, должны быть закреплены так, чтобы их было невозможно удалить без специальных инструментов. Вставляйте вилку сетевого кабеля в розетку только по окончании установки прибора. Убедитесь, что после установки прибора к вилке электропитания имеется свободный доступ.
www.aeg.com ВНИМАНИЕ! Существует риск повреждения прибора. • • • • • • • • • • Для предупреждения повреждения и изменения цвета эмали: – не помещайте непосредственно на дно прибора посуду и иные предметы. – не наливайте в нагретый прибор воду. – не храните влажную посуду и продукты в приборе после окончания приготовления пищи. – соблюдайте осторожность при установке и извлечении аксессуаров. Изменение цвета эмали или нержавеющей стали не влияет на эффективность работы прибора.
РУССКИЙ 2.5 Внутреннее освещение • • • В приборе используется модуль подсветки или галогеновая лампа, предназначенная специально для бытовых приборов. Не используйте их для освещения дома. ВНИМАНИЕ! Существует опасность поражения электрическим током. • • • Отключите прибор от сети электропитания. Обрежьте кабель электропитания как можно ближе к прибору и утилизируйте его. Удалите защелку дверцы, чтобы дети или домашние животные не оказались заблокированными в приборе. 2.
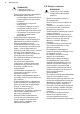
www.aeg.com 3.2 Функциональные элементы варочной поверхности 1 2 145 mm 170 mm 265 mm 140/210 mm 6 3 145 mm 5 1 Конфорка 1200 Вт 2 Выходное отверстие для пара – количество и положение зависит от модели 3 Конфорка 1500 Вт / 2400 Вт 4 Конфорка 1200 Вт 5 Индикация остаточного тепла 6 Конфорка 1000 Вт / 2200 Вт 4 3.3 Принадлежности • • • • Решетка Для кухонной посуды, форм для выпечки, жаркого. Эмалированный противень Для тортов и печенья.
РУССКИЙ 4.3 Изменение времени Текущее время суток нельзя изменить, если используется функция «Продолжительность» или «Окончание» . Нажимайте на до тех пор, пока не замигает индикация текущего времени суток. Порядок установки нового значения времени описан в Главе «Установка текущего времени». 4.4 Утапливаемые ручки Для использования прибора нажмите на ручку выбора режима. Ручка выйдет из утопленного положения. 11 1. Выберите режим и задайте максимальную температуру. 2.
www.aeg.com часовой стрелке в положение . Затем поверните ручку против часовой стрелки до достижения требуемой степени нагрева. 5.3 Индикация остаточного тепла ВНИМАНИЕ! Существует опасность ожога из-за остаточного тепла. Выключение внешнего контура: поверните ручку на отметку «Выкл». Индикатор погаснет. Индикация включается, когда конфорка горячая. 6. ВАРОЧНАЯ ПАНЕЛЬ – УКАЗАНИЯ И РЕКОМЕНДАЦИИ ВНИМАНИЕ! См. Главы, содержащие Сведения по технике безопасности. 6.
РУССКИЙ 13 Мощность нагрева Назначение: Время (мин) Советы 1-2 Загущение, выпаривание: взбитый омлет, запеченные яйца. 10 - 40 Готовьте под крышкой. 2-3 Приготовление риса и мо‐ 25 - 50 лочных блюд на медленном огне, разогрев готовых блюд. Добавьте воды в количестве как минимум вдвое превы‐ шающим количество риса. Молочные блюда время от времени помешивайте. 3-4 Приготовление на пару ово‐ щей, рыбы, мяса. Добавьте несколько столо‐ вых ложек жидкости.
www.aeg.com • углом к стеклянной поверхности и двигайте его по этой поверхности. После того, как прибор полностью остынет, удаляйте: известковые пятна, водные разводы, капли жира, блестящие белесые пятна с металлическим отливом. Варочную панель следует чистить влажной тряпкой с неабразивным моющим средством. • После чистки вытрите варочную панель насухо мягкой тряпкой.
РУССКИЙ Символ 15 Режим духового шкафа Применение Размораживание Данная функция может использоваться для раз‐ мораживания замороженных продуктов, таких как овощи и фрукты. Время размораживания за‐ висит от объема и размеров замороженных про‐ дуктов. Лампа освещения духового шкафа Включение лампы освещения без использова‐ ния каких-либо режимов приготовления. 8.
www.aeg.com • • Для повышения уровня безопасности в верхней части левого и правого краев всех дополнительных принадлежностей духового шкафа имеются небольшие выступы. Выступы также служат защитой от опрокидывания. Высокий ободок по периметру решетки служит для предотвращения соскальзывания кухонной посуды. Установите решетку на телескопические направляющие так, чтобы ее опоры были направлены вниз. Установите эмалированный противень или противень для жарки на телескопические направляющие. 8.
РУССКИЙ 17 9. ДУХОВОЙ ШКАФ - ФУНКЦИИ ЧАСОВ 9.1 Дисплей A B A. Индикаторы режимов B. Дисплей времени C. Индикатор режимов C 9.2 Кнопки Кнопка Описание Цикла МИНУС Установка времени. ЧАСЫ Включение функции часов. ПЛЮС Установка времени. 9.3 Таблица функций часов Функция часов ВРЕМЯ СУТОК Применение Установка, изменение или контроль времени суток. ДЛИТЕЛЬНОСТЬ Установка продолжительности работы прибора. ОКОНЧАНИЕ Установка момента окончания работы прибора.
www.aeg.com 9.5 Установка функции «ОКОНЧАНИЕ» 1. Выберите режим нагрева и задайте температуру духового шкафа. 2. Нажимайте на кнопку до тех пор, пока не замигает символ . 3. Чтобы установить текущее время, нажмите или . . На дисплее отображается 4. По истечении установленного времени замигает и раздастся звуковой сигнал. Прибор отключится автоматически. 5. Для отключения звукового сигнала достаточно нажать любую кнопку. 6.
РУССКИЙ Приведенные в таблицах значения температуры и времени выпекания являются ориентировочными. Они зависят от рецепта, а также от качества и количества используемых ингредиентов. Перед началом приготовления всегда прогревайте пустой духовой шкаф в течение 20 минут при температуре, требуемой по рецепту. • • • • 10.1 Выпечка • Ваш духовой шкаф может отличаться характером приготовления выпечки и жаркого от предыдущего.
www.aeg.com Результат выпекания/ жарки Возможная причина Решение Торт слишком сухой. Слишком низкая темпера‐ тура духового шкафа. При следующем пригото‐ влении немного увеличьте температуру духового шка‐ фа. Торт слишком сухой. Слишком большое время выпекания. При следующем пригото‐ влении немного уменьши‐ те время выпекания. Торт подрумянивается не‐ равномерно. Температура духового шкафа слишком высока, а время выпекания слишком мало.
РУССКИЙ 10.
www.aeg.com Продукты Температура (°C) Время (мин) Положе‐ ние про‐ тивня Печенье из дрожжевого теста 150 - 160 20 - 40 3 Печенье из слоеного теста 170 - 1801) 20 - 30 3 Рулеты 1601) 10 - 35 3 Маленькие пирожные (20 шт. на противень) 1501) 20 - 35 3 Время (мин) Положение противня Багеты с плавленым сыром сверху 160 - 1701) 15 - 30 1 Фаршированные овощи 30- 60 1 Время (мин) Положение противня 1) Предварительно разогрейте духовой шкаф.
РУССКИЙ Продукты Температура (°C) Время (мин) Положение противня 2 положе‐ ния Миндальное печенье 100 - 120 40 - 80 2/4 Печенье из дрожжевого теста 160 - 170 30 - 60 2/4 Печенье из слоеного теста 170 - 1801) 30 - 50 2/4 Рулеты 1801) 25- 40 2/4 Маленькие пирожные (20 шт. на противень) 1501) 20 - 40 2/4 1) Предварительно разогрейте духовой шкаф. 10.
www.aeg.com Продукты Температура (°C) Время (мин) Положе‐ ние про‐ тивня Рождественские коврижки 160 - 1801) 50 - 70 2 Хлеб (ржаной): 1. 2301) 1. Первая часть процесса выпе‐ 2. 160 - 1801) кания. 2. Вторая часть процесса выпека‐ ния. 1. 20 2.
РУССКИЙ 25 Продукты Температура (°C) Время (мин) Положение противня Выпечка с яичным белком, безе 80 - 100 120 - 150 3 Миндальное печенье 120 - 130 30 - 60 3 Печенье из дрожжевого теста 170 - 190 20 - 40 3 Печенье из слоеного теста 190 - 2101) 20 - 30 3 Рулеты 190 - 2101) 10 - 55 3 Маленькие пирожные (20 шт.
www.aeg.com Продукты Температура (°C) Время (мин) Положение противня Яблочный пирог, закрытый 150 - 170 50 - 60 1-2 Овощной пирог 160 - 180 50 - 60 1-2 Пресный хлеб 230 - 2502) 10 - 20 2-3 Открытый слоеный пирог 160 - 1802) 45 - 55 2-3 Эльзасский пирог «Фламмкухен» 230 - 2502) 12 - 20 2-3 Пироги 180 - 2002) 15 - 25 2-3 1) Используйте противень для жарки. 2) Предварительно разогрейте духовой шкаф. 10.7 Жарка • • • • • Для жарки используйте жаростойкую кухонную посуду. См.
РУССКИЙ Продукты Количество Ростбиф или филе: хо‐ на см толщины рошей прожаренности 27 Температура (°C) Время (мин) Положе‐ ние про‐ тивня 200 - 220 10 - 12 1 1) Предварительно разогрейте духовой шкаф.
www.aeg.com Продукты Количество Температу‐ ра (°C) Время (мин) Положе‐ ние про‐ тивня Седло оленя/косули 1,5 кг - 2 кг 210 - 220 35 - 40 1 Окорок оленя/косули 1,5 кг - 2 кг 200 - 210 90 - 120 1 1) Предварительно разогрейте духовой шкаф.
РУССКИЙ Свинина Продукты Количество Температура (°C) Время (мин) Положе‐ ние про‐ тивня Лопатка, ошеек, окорок 1 кг – 1,5 кг 160 - 180 90 - 120 1 Свиная отбивная, свиные ребрышки 1 кг – 1,5 кг 170 - 180 60 - 90 1 Кусочки мяса в форме ломтиков хлеба 750 г – 1 кг 160 - 170 50 - 60 1 Свиные ножки (предвари‐ тельно отваренные) 750 г – 1 кг 150 - 170 90 - 120 1 Продукты Количество Температура Время (°C) (мин) Положе‐ ние про‐ тивня Жареная телятина 1 кг 160 - 180 90 - 120 1 Тел
www.aeg.com 10.10 Гриль: общие рекомендации • • ВНИМАНИЕ! Приготовление на гриле всегда выполняйте при закрытой дверце духового шкафа. • • При использовании гриля всегда выбирайте максимальный уровень мощности. Решетку устанавливайте на уровне, рекомендованном в таблице приготовления на гриле. Всегда устанавливайте на первом уровне сотейник для сбора жира. Готовьте на гриле только плоские куски мяса или рыбы. Размещайте продукты в центре полки. 10.
РУССКИЙ 31 Продукты Количе‐ ство Время раз‐ моражива‐ ния (мин) Время ос‐ таточного размора‐ живания (мин) Комментарии Цыпленок 1 кг 100 - 140 20 - 30 Положите цыпленка на пере‐ вернутое блюдце в большую тарелку. Перевернуть по ис‐ течении половины времени. Мясо 1 кг 100 - 140 20 - 30 Перевернуть по истечении половины времени. Мясо 500 г 90 - 120 20 - 30 Перевернуть по истечении половины времени.
www.aeg.com 11.2 Модели из нержавеющей стали или алюминия Очистку дверцы духового шкафа можно производить только влажной тряпкой или губкой. Протрите ее насухо мягкой тряпкой. Никогда не используйте абразивные средства, металлические губки или средства, содержащие кислоты, т.к. они могут повредить поверхность духового шкафа. Выполняйте чистку панели управления духового шкафа с соблюдением аналогичных предосторожностей. 1 Удерживающие упоры на телескопических направляющих должны быть обращены вперед.
РУССКИЙ Для извлечения дверцы потяните ее наружу сначала с одной стороны, а затем со второй. После окончания чистки установите дверцу духового шкафа на место в обратном порядке. При установке убедитесь, что дверца вставлена на место до щелчка. При необходимости примените силу. 11.5 Снятие и чистка стекол дверцы Стеклянная дверца Вашего прибора может отличаться типом и формой от примеров, приведенных на рисунках. Количество стеклянных панелей также может не совпадать. 1.
www.aeg.com Установка ящика: 2 1 1. Чтобы вставить ящик, установите ящик на направляющие. Удостоверьтесь, что соответствующие элементы конструкции вошли в зацепление с направляющими. 2. Опустите ящик до горизонтального положения и задвиньте внутрь. 2. Приподнимите верхнюю часть ящика и снимите его с направляющих. 12. ПОИСК И УСТРАНЕНИЕ НЕИСПРАВНОСТЕЙ ВНИМАНИЕ! См. Главы, содержащие Сведения по технике безопасности. 12.1 Что делать, если...
РУССКИЙ Неисправность Возможная причина Решение Духовой шкаф не нагре‐ вается. Не установлено текущее время. Установите часы. Духовой шкаф не нагре‐ вается. Не заданы необходимые установки. Убедитесь, что настройки выбраны верно. Лампа не горит. Лампа перегорела. Замените лампу освеще‐ ния. Дисплей показывает «12.00» Имел место сбой энергос‐ набжения. Заново установите теку‐ щее время. Пар и конденсат оседают на продуктах и внутри ка‐ меры духового шкафа.
www.aeg.com 13.2 Место для установки прибора Отдельно стоящий прибор можно устанавливать рядом с предметами мебели, между ними или в углу. B A A Минимальные расстояния Расстояние мм А 2 B 685 13.4 Защита от опрокидывания ПРЕДУПРЕЖДЕНИЕ Установите защиту от опрокидывания, чтобы не допустить падения прибора из-за неверного распределения нагрузки. Защита от опрокидывания действует только при условии правильного выбора места для установки прибора.
РУССКИЙ выберите площадку для установки прибора и его высоту. 2. Место для отверстия на кронштейне защиты от опрокидывания следует выбрать, отступив на 77 мм вниз от верхнего края и на 49 мм - от левого края прибора. См. иллюстрацию. Как следует привинтите его к твердому надежному материалу или прикрепите с помощью соответствующей арматуры к стене. 3. Отверстие для крепления находится слева на задней стороне прибора. См. иллюстрацию.
www.aeg.com состоянии или для растапливания продуктов. 14.2 Справочный листок технических данных духовых шкафов согласно EU 65-66/2014 Наименование поставщика AEG Идентификатор модели 4705RVS-MN 4705RVS-WN Индекс энергоэффективности 100.0 Класс энергопотребления А Потребление электроэнергии при нормальной за‐ грузке в обычном режиме 0.95 кВт·ч/цикл Потребление электроэнергии при нормальной за‐ грузке в режиме принудительной циркуляции воз‐ духа 0.
РУССКИЙ используется вентилятор, чтобы сберечь электроэнергию. Сохранение продуктов теплыми Для использования остаточного тепла для сохранения пищи в теплом 39 состоянии выбирайте максимально низкое значение температуры и сохраняйте блюдо в тепле. 15. ОХРАНА ОКРУЖАЮЩЕЙ СРЕДЫ Материалы с символом следует сдавать на переработку. Положите упаковку в соответствующие контейнеры для сбора вторичного сырья.
867319960-A-492016 www.aeg.