47095VD-W8 47995VD-MN 47995VD-WN USER MANUAL DE Benutzerinformation Herd
www.aeg.com INHALTSVERZEICHNIS 1. SICHERHEITSHINWEISE............................................................................................. 3 2. SICHERHEITSANWEISUNGEN...................................................................................6 3. MONTAGE................................................................................................................... 8 4. GERÄTEBESCHREIBUNG......................................................................................... 11 5.
DEUTSCH 1. 3 SICHERHEITSHINWEISE Lesen Sie vor der Montage und dem Gebrauch des Geräts zuerst die Gebrauchsanleitung. Bei Verletzungen oder Schäden infolge nicht ordnungsgemäßer Montage oder Verwendung des Geräts übernimmt der Hersteller keine Haftung. Bewahren Sie die Anleitung immer an einem sicheren und zugänglichen Ort zum späteren Nachschlagen auf. 1.1 Sicherheit von Kindern und schutzbedürftigen Personen WARNUNG! Erstickungs- und Verletzungsgefahr sowie Gefahr einer dauerhaften Behinderung.
www.aeg.com • • • • • • • • • • • • • • Dieses Gerät muss mit einem Kabel des Typs H05VV-F an die Stromversorgung angeschlossen werden, das der Temperatur der Rückwand standhält. Dieses Gerät ist für den Gebrauch bis zu einer Höhe von 2000 m über dem Meeresspiegel vorgesehen. Dieses Gerät ist nicht für die Verwendung auf Schiffen, Booten oder anderen Wasserfahrzeugen vorgesehen. Installieren Sie das Gerät nicht hinter einer Dekortür, um eine Überhitzung zu vermeiden.
DEUTSCH • • • • • • • • • 5 WARNUNG: Das Gerät und die zugänglichen Geräteteile werden während des Betriebs heiß. Seien Sie vorsichtig und berühren Sie niemals die Heizelemente. Halten Sie Kinder unter 8 Jahren vom Gerät fern, wenn sie nicht ständig beaufsichtigt werden. Verwenden Sie zum Anfassen des Zubehörs und der Töpfe wärmeisolierende Handschuhe. Trennen Sie das Gerät vor Wartungsarbeiten von der Stromversorgung.
www.aeg.com 2. SICHERHEITSANWEISUNGEN 2.1 Montage WARNUNG! Die Montage des Geräts darf nur von einer qualifizierten Fachkraft durchgeführt werden. • Entfernen Sie das gesamte Verpackungsmaterial. • Montieren Sie ein beschädigtes Gerät nicht und benutzen Sie es nicht. • Halten Sie sich an die mitgelieferte Montageanleitung. • Seien Sie beim Umsetzen des Gerätes vorsichtig, da es sehr schwer ist. Tragen Sie stets Sicherheitshandschuhe und festes Schuhwerk. • Ziehen Sie das Gerät nicht am Griff.
DEUTSCH 2.3 Gebrauch WARNUNG! Es besteht Verletzungs- und Verbrennungsgefahr. Stromschlaggefahr. • Dieses Gerät ist ausschließlich zur Verwendung im Haushalt bestimmt. • Nehmen Sie keine technischen Änderungen am Gerät vor. • Die Lüftungsöffnungen dürfen nicht abgedeckt werden. • Lassen Sie das Gerät bei Betrieb nicht unbeaufsichtigt. • Schalten Sie das Gerät nach jedem Gebrauch aus. • Gehen Sie beim Öffnen der Tür vorsichtig vor, wenn das Gerät in Betrieb ist. Es kann heiße Luft austreten.
www.aeg.com 2.4 Reinigung und Pflege WARNUNG! Verletzungs-, Brandgefahr sowie Risiko von Schäden am Gerät. • Schalten Sie vor Wartungsarbeiten immer das Gerät aus. Ziehen Sie den Netzstecker aus der Netzsteckdose. • Vergewissern Sie sich, dass das Gerät abgekühlt ist. Es besteht die Gefahr, dass die Glasscheiben brechen. • Ersetzen Sie die Türglasscheiben umgehend, wenn sie beschädigt sind. Wenden Sie sich an den autorisierten Kundendienst.
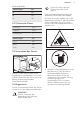
DEUTSCH Mindestabstände Abmessungen mm A 400 B 650 C 150 3.2 Technische Daten Spannung 230 V Frequenz 50 Hz Geräteklasse 1 Abmessungen mm Höhe 858 Breite 500 Tiefe 600 9 Stellen Sie sicher, dass die Fläche hinter dem Gerät glatt ist. Sie müssen den Kippschutz anbringen. Andernfalls könnte das Gerät kippen. Ihr Gerät ist mit dem Symbol, das in der Abbildung ersichtlich ist, gekennzeichnet (sofern vorhanden). Es soll Sie daran erinnern, dass der Kippschutz montiert werden muss. 3.
www.aeg.com Das Gerät wird ohne Netzstecker und Netzkabel geliefert. 80-85 mm WARNUNG! Bevor Sie das Netzkabel anschließen, messen Sie die Spannung zwischen den Phasen des Hausnetzes. Richten Sie sich anschließend nach dem Schaltbild auf der Rückseite des Geräts, um einen ordnungsgemäßen elektrischen Anschluss zu gewährleisten.
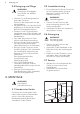
DEUTSCH 4. GERÄTEBESCHREIBUNG 4.1 Gesamtansicht 1 2 3 4 5 6 1 7 8 4 3 1 2 3 4 5 6 11 9 2 1 10 7 8 9 10 11 Kochfeld-Einstellknöpfe Temperaturanzeige/-symbol Temperaturwahlknopf Elektronischer Programmspeicher Backofen-Einstellknopf Kochfeldkontrolllampe/-symbol/anzeige Heizelement Backofenbeleuchtung Ventilator Einhängegitter, herausnehmbar Einschubebenen 4.
www.aeg.com 5. VOR DER ERSTEN INBETRIEBNAHME WARNUNG! Siehe Kapitel Sicherheitshinweise. 5.1 Erste Reinigung Nehmen Sie die Zubehörteile und die herausnehmbaren Einhängegitter aus dem Backofen. Siehe Kapitel „Reinigung und Pflege“. Reinigen Sie den Backofen und die Zubehörteile vor der ersten Inbetriebnahme. Setzen Sie das Zubehör und die herausnehmbaren Einhängegitter wieder in ihrer ursprünglichen Position ein. 5.
DEUTSCH Symbole Funktion Zweikreis-Zone 1-9 Kochstufen Nutzen Sie die Restwärme, um den Energieverbrauch zu senken. Schalten Sie die Kochzone ca. 5-10 Minuten vor Ende des Garvorgangs aus. Drehen Sie den Einstellknopf der ausgewählten Zone auf die gewünschte Kochstufe. Die Kontrolllampe des Kochfelds leuchtet auf. Zum Beenden des Kochvorgangs muss der Einstellknopf in die Stellung Aus gedreht werden.
www.aeg.com Kochstufe Verwendung: Dauer (Min.) Hinweise 1 Warmhalten von gegarten Speisen. Nach Bedarf Legen Sie einen Deckel auf das Kochgeschirr. 1-2 Sauce Hollandaise, Schmelzen von: Butter, Schokolade, Gelatine. 5 - 25 Gelegentlich umrühren. 1-2 Stocken: Lockere Omeletts, gebackene Eier. 10 - 40 Mit Deckel garen. 2-3 Köcheln von Reis und Milchge- 25 - 50 richten, Erhitzen von Fertiggerichten.
DEUTSCH Verschmutzungen das Kochfeld beschädigen. Den speziellen Reinigungsschaber schräg zur Glasfläche ansetzen und über die Oberfläche bewegen. • Folgendes kann nach ausreichender Abkühlung des Kochfelds entfernt werden: Kalk- und Wasserränder, 15 Fettspritzer und metallisch schimmernde Verfärbungen. Reinigen Sie das Kochfeld mit einem feuchten Tuch und nicht scheuernden Reinigungsmittel. Wischen Sie das Kochfeld nach der Reinigung mit einem weichen Tuch trocken. 9.
www.aeg.com Symbol Ofenfunktionen Anwendung Umluft Zum Braten oder zum Braten und Backen von Speisen mit derselben Gartemperatur auf mehreren Ebenen gleichzeitig, ohne dass es zu einer Aromaübertragung kommt. Heißluft Zum Backen auf bis zu 2 Einschubebenen gleichzeitig und zum Dörren.Stellen Sie eine 20 - 40 °C niedrigere Temperatur als bei Ober-/Unterhitze ein. Feuchte Heißluft Diese Funktion ist entwickelt worden, um während des Garvorgangs Energie zu sparen.
DEUTSCH 17 10.2 Tasten Taste Funktion Beschreibung MINUS Einstellen der Zeit. UHR Einstellen einer Uhrfunktion. PLUS Einstellen der Zeit. 10.3 Tabelle der Uhrfunktionen Uhrfunktion Tageszeit Anwendung Zum Einstellen, Ändern oder Abfragen der Uhrzeit. Kurzzeit-Wecker Zum Einstellen einer Countdown-Zeit. Diese Funktion hat keine Auswirkung auf den Gerätebetrieb. Dauer Zum Einstellen der Garzeit für den Backofen. Ende Zum Einstellen der Uhrzeit, zu der der Backofen ausgeschaltet werden soll.
www.aeg.com 10.5 Ausschalten der Uhrfunktionen 1. Drücken Sie so oft , bis die Anzeige für die gewünschte Funktion blinkt. 2. Halten Sie gedrückt. Nach einigen Sekunden wird die Uhrfunktion ausgeschaltet. 11. BACKOFEN - VERWENDUNG DES ZUBEHÖRS WARNUNG! Siehe Kapitel Sicherheitshinweise. 11.1 Einsetzen des Zubehörs Kombirost und tiefes Blech zusammen: Schieben Sie das tiefe Blech zwischen die Führungsstäbe der Einhängegitter und den Kombirost auf die Führungsstäbe darüber.
DEUTSCH 1 cm 19 4. Ziehen Sie das hintere Ende des Auszugs aus dem Einhängegitter. 5. Führen Sie die gleichen Schritte zur Entnahme des zweiten Teleskopauszugs durch. 11.3 Teleskopauszüge – Einsetzen des Zubehörs Die Teleskopauszüge erleichtern das Einsetzen und Herausnehmen der Roste. 3. Drehen Sie den Auszug in die richtige Position. Das Anschlagstück, das sich an einem Ende des Auszugs befindet, muss nach oben weisen. 4. Drücken Sie den Auszug bis zum Anschlag in den Backofen. 5.
www.aeg.com Setzen Sie den Kombirost und das tiefe Blech zusammen auf die Teleskopauszüge. 12. BACKOFEN – HINWEISE UND TIPPS WARNUNG! Siehe Kapitel Sicherheitshinweise. Die Temperaturen und Backzeiten in den Tabellen sind nur Richtwerte. Sie sind abhängig von den Rezepten, der Qualität und der Menge der verwendeten Zutaten. 12.1 Allgemeine Informationen • Das Gerät hat vier Einschubebenen. Die Einschubebenen werden vom Boden des Backofens aus gezählt.
DEUTSCH 12.4 Garen von Fleisch und Fisch • Setzen Sie beim Garen von Speisen mit hohem Fettgehalt ein tiefes Blech ein, damit keine hartnäckigen Flecken im Backofen verbleiben. • Das Fleisch vor dem Anschneiden mindestens 15 Minuten ruhen lassen, damit der Fleischsaft nicht ausläuft. • Um die Rauchentwicklung beim Braten zu vermindern, geben Sie etwas Wasser in das tiefe Blech.
www.aeg.com Gargut Menge (g) Temperatur (°C) Dauer (Min.
DEUTSCH Ebene 23 Gargut Menge (g) Temperatur (°C) Dauer (Min.
www.aeg.com Gargut Menge (g) Temperatur (°C) Dauer (Min.
DEUTSCH Ebene 25 Gargut Menge (g) Temperatur (°C) Dauer (Min.
www.aeg.com Gargut Menge (g) Temperatur (°C) Dauer (Min.
DEUTSCH 27 12.9 Feuchte Heißluft Gargut Temperatur (°C) Dauer (Min.
www.aeg.com Gargut Temperatur (°C) Dauer (Min.
DEUTSCH Gargut Menge (g) Temperatur (°C) Dauer (Min.) Quiche Lor- 1000 210 - 220 20 - 30 Ebene 2 29 Zubehör Backblech raine 1) 1) Backofen 10 - 15 Min. vorheizen. 12.12 Informationen für Prüfinstitute Gargut Funktion Tempera- Zubehör tur (°C) Ebene Dauer (Min.
www.aeg.com 13. BACKOFEN - REINIGUNG UND PFLEGE WARNUNG! Siehe Kapitel Sicherheitshinweise. 13.1 Hinweise zur Reinigung • Feuchten Sie ein weiches Tuch mit warmem Wasser und etwas Reinigungsmittel an, und reinigen Sie damit die Vorderseite des Backofens. • Reinigen Sie die Metalloberflächen mit einem geeigneten Reinigungsmittel. • Reinigen Sie den Innenraum des Backofens nach jedem Gebrauch. Fettansammlungen und Speisereste könnten einen Brand verursachen.
DEUTSCH Heizelement zum ersten Mal herausnehmen, benutzen Sie zum Lösen der Schraube einen Schraubendreher. 31 WARNUNG! Lassen Sie die Backofentür während der Reinigung leicht geöffnet. Öffnen Sie sie ganz, könnte sie aus Versehen schließen und Schäden verursachen. WARNUNG! Verwenden Sie das Gerät nicht ohne die Glasscheiben. 2. Ziehen Sie das Heizelement vorsichtig nach unten. 1. Öffnen Sie die Tür bis zu einem Winkel von ca. 30°. Die Tür bleibt in ihrer Position stehen, wenn sie leicht geöffnet ist.
www.aeg.com 5. Reinigen Sie die Glasscheibe mit Wasser und Spülmittel. Trocknen Sie die Glasscheiben sorgfältig ab. Nach der Reinigung müssen die Backofentür und die Glasscheiben wieder eingebaut werden. Führen Sie die oben aufgeführten Schritte in umgekehrter Reihenfolge durch. Setzen Sie zuerst die kleinere Scheibe ein und dann die größere Scheibe. VORSICHT! Der Aufdruck auf der inneren Glasscheibe muss zur Innenseite der Tür zeigen.
DEUTSCH 33 14. FEHLERSUCHE WARNUNG! Siehe Kapitel Sicherheitshinweise. 14.1 Was tun, wenn ... Störung Mögliche Ursache Abhilfe Das Gerät lässt sich nicht einschalten. Das Gerät ist nicht oder nicht ordnungsgemäß an die Spannungsversorgung angeschlossen. Prüfen Sie, ob das Gerät ordnungsgemäß an die Spannungsversorgung angeschlossen ist. Das Kochfeld kann nicht ein- Die Sicherung ist durchgegeschaltet oder bedient wer- brannt. den. Der Backofen heizt nicht.
www.aeg.com Störung Mögliche Ursache Abhilfe Dampf und Kondenswasser schlagen sich auf den Speisen und im Garraum nieder. Die Speisen standen zu lange im Backofen. Lassen Sie die Speisen nach Beendigung des Gar- oder Backvorgangs nicht länger als 15 - 20 Minuten im Backofen stehen. Der Backofen heizt nicht. Die Uhr ist nicht eingestellt. Stellen Sie die Uhr ein. Der Backofen heizt nicht. Die erforderlichen Einstellungen wurden nicht vorgenommen.
DEUTSCH 35 15. ENERGIEEFFIZIENZ 15.
www.aeg.com Modellidentifikation 47095VD-W8 47995VD-MN 47995VD-WN Energieeffizienzindex 94.
DEUTSCH 37 im Kapitel „Backofen – Täglicher Gebrauch“, Ofenfunktionen. 16. UMWELTTIPPS Recyceln Sie Materialien mit dem Symbol . Entsorgen Sie die Verpackung in den entsprechenden Recyclingbehältern. Recyceln Sie zum Umwelt- und Gesundheitsschutz elektrische und elektronische Geräte. Entsorgen Sie * Geräte mit diesem Symbol nicht mit dem Hausmüll. Bringen Sie das Gerät zu Ihrer örtlichen Sammelstelle oder wenden Sie sich an Ihr Gemeindeamt.
www.aeg.
DEUTSCH 39
867342831-A-382018 www.aeg.