47646GT-WN 47646GT-MN NL Gebruiksaanwijzing FR Notice d'utilisation 2 38
www.aeg.com INHOUD 1. 2. 3. 4. 5. 6. 7. 8. 9. 10. 11. 12. 13. 14. VEILIGHEIDSINFORMATIE . . . . . . . . . . . . . . . . . . . . . . . . . . . . . . . . . . . . . . . . . . . . . . . . . . . . 3 VEILIGHEIDSVOORSCHRIFTEN . . . . . . . . . . . . . . . . . . . . . . . . . . . . . . . . . . . . . . . . . . . . . . . . 5 BESCHRIJVING VAN HET PRODUCT . . . . . . . . . . . . . . . . . . . . . . . . . . . . . . . . . . . . . . . . . . . 8 VOOR HET EERSTE GEBRUIK . . . . . . . . . . . . . . . . . . . . . . . . .
NEDERLANDS 3 1. VEILIGHEIDSINFORMATIE Lees zorgvuldig de meegeleverde instructies voor installatie en gebruik van het apparaat. De fabrikant is niet verantwoordelijk voor letsel en schade veroorzaakt door een foutieve installatie. Bewaar de instructies van het apparaat voor toekomstig gebruik. 1.1 Veiligheid van kinderen en kwetsbare mensen WAARSCHUWING! Gevaar voor verstikking, letsel of permanente invaliditeit.
www.aeg.com • Zonder toezicht koken op een kookplaat met vet of olie kan gevaarlijk zijn en brandgevaar opleveren. • Probeer brand nooit met water te blussen, maar schakel in plaats daarvan het apparaat uit en bedek de vlam, d.w.z. met een deksel of blusdeken. • Bewaar geen voorwerpen op de kookplaten. • Gebruik geen stoomreiniger om het apparaat schoon te maken. • Metalen voorwerpen, zoals messen, vorken, lepels en deksels mogen niet op de kookplaat worden geplaatst, aangezien ze heet kunnen worden.
NEDERLANDS 2. 5 VEILIGHEIDSVOORSCHRIFTEN Dit apparaat is geschikt voor de volgende markten: BE LU • 2.1 Montage WAARSCHUWING! Alleen een erkende installatietechnicus mag het apparaat installeren. • Verwijder alle verpakkingsmaterialen. • Installeer en gebruik geen beschadigd apparaat. • Volg de installatie-instructies op die zijn meegeleverd met het apparaat. • Wees voorzichtig met het verplaatsen van het apparaat, het is zwaar. Draag altijd veiligheidshandschoenen.
www.aeg.com • Zorg ervoor dat er koude luchtcirculatie in het apparaat aanwezig is. • Op het typeplaatje staat informatie over de gastoevoer. • Dit apparaat mag niet aangesloten worden op een inrichting dat producten afvoert voor verbranding. Sluit het apparaat aan volgens de geldende installatieregels. Let op de vereisten voor voldoende ventilatie. 2.2 Gebruik WAARSCHUWING! Gevaar op letsel, brandwonden of elektrische schokken. • Gebruik dit apparaat in een huishoudelijke omgeving.
NEDERLANDS • • • • • • • • – Leg geen aluminiumfolie op de bodem van het apparaat. – plaats geen water direct in het hete apparaat. – haal vochtige schotels en eten uit het apparaat als u klaar bent met koken. – wees voorzichtig bij het verwijderen of bevestigen van accessoires. Verkleuring van het email heeft geen ongewenst effect op de werking van het apparaat. Dit is geen defect dat geldt voor het recht op garantie. Gebruik voor cakes met veel vocht een diep bakblik.
www.aeg.com • Voordat u het lampje vervangt, dient u de stekker van het apparaat uit het stopcontact te halen. • Gebruik alleen lampjes met dezelfde specificaties. • Haal de stekker uit het stopcontact. • Snijd het netsnoer van het apparaat af en gooi dit weg. • Verwijder de deurgreep om te voorkomen dat kinderen en huisdieren opgesloten raken in het apparaat. 2.5 Verwijdering WAARSCHUWING! Gevaar voor letsel of verstikking. 3. BESCHRIJVING VAN HET PRODUCT 3.
NEDERLANDS 3.3 Accessoires • Ovenrek Voor kookgerei, bak- en braadvormen. • Vlakke bakplaat Voor gebak en koekjes. • Braadpan Voor braden en roosteren of als pan om vet op te vangen. 9 • Bewaarlade Onder de ovenruimte bevindt zich een bewaarlade. • Optionele telescopische geleiders Waardoor bakplaten en roosters volledig kunnen worden uitgeschoven. Ze zijn apart te bestellen. 4. VOOR HET EERSTE GEBRUIK WAARSCHUWING! Zie de veiligheidshoofdstukken.
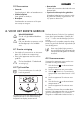
www.aeg.com 5. KOOKPLAAT - DAGELIJKS GEBRUIK WAARSCHUWING! Zie de veiligheidshoofdstukken. A 5.1 De branders aansteken B WAARSCHUWING! Ga voorzichtig te werk bij het gebruik van branders (open vuur) in de keuken. De fabrikant kan niet aansprakelijk gesteld worden in geval van onjuist gebruik van de vlam. De brander steeds aansteken alvorens het kookgerei erop te plaatsen. 1. Druk de knop helemaal in en draai hem naar de maximale stand .
NEDERLANDS 11 WAARSCHUWING! Draai de vlam altijd lager of schakel de brander uit voordat u de pan van de brander haalt. 6. KOOKPLAAT - HANDIGE AANWIJZINGEN EN TIPS 6.1 Energiebesparing • Doe indien mogelijk altijd een deksel op het kookgerei. • Wanneer de vloeistof begint te koken, draait u de vlam omlaag, totdat de vloeistof zachtjes pruttelt. WAARSCHUWING! Gebruik pannen met een doorsnede die geschikt is voor de afmeting van de brander. Gebruik geen pannen op de kookplaat die de randen overschrijden.
www.aeg.com • Ga zeer voorzichtig te werk bij het vervangen van de pannendrager, dit om schade aan het oppervlak van de kookplaat te vermijden. Droog het apparaat na reiniging af met een zachte doek. 8. OVEN - DAGELIJKS GEBRUIK WAARSCHUWING! Zie de veiligheidshoofdstukken. 8.1 Het apparaat aan- en uitzetten 1. Zet de functieknop van de oven op een ovenfunctie. 2. Zet de temperatuurknop op de gewenste temperatuur. Het temperatuurlampje gaat aan zolang de temperatuur in het apparaat stijgt. 3.
NEDERLANDS Ovenfunctie Applicatie bereiding met hete lucht Licht koken Circulatiegrill Voor het braden of braden en bakken van gerechten waarvoor dezelfde bereidingstemperatuur nodig is, op meer dan één roosterhoogte, zonder dat er smaken worden overgebracht van het ene naar het andere gerecht. Verlaag als u deze functie gebruikt de oventemperatuur met 20 - 40 °C van de standaardtemperatuur die u gebruikt voor Boven + onderwarmte.
www.aeg.com Klokfunctie Kookwekker dur End Applicatie Om de tijd af te tellen (1 min - 23 uur 59 minuten). Als de ingestelde tijd is verstreken, klinkt er een geluidssignaal. Deze functie heeft geen invloed op de werking van de oven. Bereidingsduur Instellen hoe lang de oven moet worden gebruikt (1 min - 10 uur). Eindtijd Hier stelt u de tijd in wanneer de oven moet worden uitgeschakeld (1 min - 10 uur).
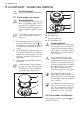
NEDERLANDS 15 ring is het geluidssignaal weer ingesteld op het standaardgeluid. 10. OVEN - GEBRUIK VAN DE ACCESSOIRES WAARSCHUWING! Zie de veiligheidshoofdstukken. 10.1 De bakplaat plaatsen Plaats de bakplaat in het midden van de oven, tussen de voor- en achterwand. Dit zorgt ervoor dat de warmte zich voor en achter de bakplaat kan verspreiden. Zorg dat de bakplaat zoals op de afbeelding wordt geplaatst, met het hellend oppervlak achteraan.
www.aeg.com Ovenrooster en diepe bakplaat samen plaatsen Leg het ovenrooster op de diepe bakplaat. Duw de diepe braadpan in de geleidestangen van een van de ovenniveaus. 10.3 Telescopische geleiders 1. Trek de telescopische geleiders rechts en links naar buiten. 2. Plaats het ovenrooster op de telescopische geleiders en duw ze voorzichtig in het apparaat. Zorg dat u de telescopische geleiders helemaal naar achteren schuift, voordat u de ovendeur sluit.
NEDERLANDS 17 LET OP! Reinig de telescopische geleiders niet in de afwasautomaat. Maak de telescopische geleiders niet vet. 11. OVEN - HANDIGE AANWIJZINGEN EN TIPS LET OP! Gebruik voor cakes met veel vocht een diep bakblik. Vruchtensappen kunnen het emaille beschadigen. • Het apparaat heeft vier inzetniveaus. Tel de inzetniveaus vanaf de bodem van het apparaat. • U kunt op 2 niveaus tegelijk gerechten bereiden. Plaats de roosters op niveau 1 en 3.
www.aeg.
NEDERLANDS Gerecht Type bakplaat en steunhoogte 19 Voorverwarmen (minuten) Temperatuur (°C) Bereidingstijd (minuten) Boerenbrood (750 + 750 g) 2 ronde aluminium bakplaten (diameter: 20 cm) op niveau 1 18 3) 180 - 200 60 - 70 Roemeense biscuittaart (600 + 600 g) 2 ronde aluminium bakplaten (lengte: 25 cm) op niveau 2 10 160 - 170 40 - 50 Roemeense biscuittaart traditioneel (600 + 600 g) 2 ronde aluminium bakplaten (lengte: 20 cm) op niveau 2 - 160 - 170 30 - 40 Gistbroodjes (800 g) ema
www.aeg.
NEDERLANDS Gerecht Type bakplaat en steunhoogte Voorverwarmen (minuten) Temperatuur (°C) Bereidingstijd (minuten) Gevulde gistcake (1200 g) emailen bakplaat op niveau 2 20 - 30 150 - 160 20 - 30 Pizza (1000 + 1000 g) emailen bakplaat op niveau 1 en 3 - 180 - 200 30 - 40 Pizza (1000 g) emailen bakplaat op niveau 2 - 190 - 200 25 - 35 Cheesecake (2600 g) emailen bakplaat op niveau 1 - 160 - 170 40 - 50 Zwitserse appelflan (1900 g) emailen bakplaat op niveau 2 10 - 15 180 - 200 30
www.aeg.
NEDERLANDS Gerecht Type bakplaat en steunhoogte Voorver- HuishoudeBereidingswarmen lijk tijd (minuten) (minuten) (°C) Platte cake (1000 + 1.000 g) emailen bakplaat op niveau 1 en 3 10 140 - 150 45 - 55 Platte cake (1000 + 1000 + 1.
www.aeg.
NEDERLANDS 25 11.
www.aeg.com 11.9 Pizza-functie Voorverwarmen (minuten) Huishoudelijk (°C) Bereidingstijd (minuten) - 170 - 180 50 - 60 Hele kip (1.400 niveau 2 g) - 165 - 175 55 - 65 Halve kip (1.
NEDERLANDS 27 12.1 Verwijderen van de inschuifrails 1 2 Installeer de inschuifrails in omgekeerde volgorde. U kunt de inschuifrails verwijderen om de zijwanden te reinigen. 1. Trek de inschuifrail bij de voorkant uit de zijwand. 2. Trek de geleider bij de achterkant uit de zijwand en verwijder deze. terne glasplaat verwijderen om ze schoon te maken. De afgeronde uiteinden van de inschuifrails moeten naar voren wijzen.
www.aeg.com 2. Til de hendels op de twee scharnieren omhoog en draai ze. 3. Sluit de ovendeur in de eerste openingsstand (halfopen). Trek hem daarna naar voren en haal de deur uit zijn zitting. 4. Leg de deur op een zachte doek op een stabiele ondergrond. 5. Maak het vergrendelingssysteem open om de interne glasplaat te verwijderen.
NEDERLANDS 29 6. Draai de twee bevestigingen 90° en verwijder ze uit hun houders. 7. Til de glasplaat voorzichtig op (stap 1) en verwijder het glazen paneel (stap 2). Reinig de glasplaat met een sopje. Droog de glasplaat voorzichtig af. 90° 8. 1 2 De deur en de glasplaten terugplaatsen Als u de glasplaat en de ovendeur heeft schoongemaakt, plaatst u ze terug. Voer bovenstaande stappen uit in de omgekeerde volgorde. De bedrukte zijde moet naar de binnenkant van de deur gericht zijn.
www.aeg.com 2. 3. Til de lade langzaam op. Trek de lade volledig uit. De lade installeren Voer de bovenstaande stappen in omgekeerde volgorde uit om de lade te installeren. WAARSCHUWING! Bewaar geen ontvlambare dingen in de lade (bijv. schoonmaakmiddelen, plastic zakken, ovenhandschoenen, papier, reinigingssprays, enz). Als u de oven gebruikt, kan de lade heet worden. Er kan brand ontstaan. 12.4 Ovenlampje WAARSCHUWING! Wees voorzichtig bij het vervangen van het ovenlampje.
NEDERLANDS Probleem Mogelijke oorzaak 31 Oplossing De vlam gaat meteen na de ontsteking uit. Het thermokoppel is niet Houd, na het ontsteken voldoende opgewarmd. van de vlam, de knop circa 5 sec. ingedrukt. De gasring brandt onregelmatig. De branderkroon is verstopt met etensresten. Het apparaat werkt hele- De zekering in de zekemaal niet. ringkast is doorgebrand. Controleer of de hoofdsproeier niet verstopt is en of de branderkroon schoon is. Controleer de zekering.
www.aeg.com 14.1 Locatie van het apparaat Afmetingen B A Breedte 600 mm Diepte 600 mm Totaal elektrisch vermogen 3035 W Spanning 230 V Frequentie 50 Hz Gascategorie II2E+3+ Gastoevoer G20/G25 (2E+) 20/25 mbar G30/G31 (3+) 28-30/37 mbar U kunt uw vrijstaand apparaat met kasten aan een of twee zijden en in de hoek plaatsen.
NEDERLANDS Brander Driekronenbrander Normale kracht Halve kracht kW kW 1,85 0,43 2,00 Type gas Druk Injectordiameter Gebruik mbar mm g/h Aardgas G25 25 0,96 - 0,43 Butaan G30 28 30 0,71 145,43 2,00 0,43 Propaan G31 37 0,71 142,83 4,00 1,80 Aardgas G20 20 1,46 - 3,80 1,70 Aardgas G25 25 1,46 - 4,00 1,80 Butaan G30 28 30 1,01 290,85 4,00 1,80 Propaan G31 37 1,01 285,65 14.
www.aeg.com A B 3. C E D A) Gasaansluitingspunt (er is slechts één B) C) D) E) punt geschikt voor het apparaat) Pakking Instelbare aansluiting Houder voor de aardgaspijp LPG leidinghouder Het toestel is ingesteld op standaard gas. Als u de instelling wilt wijzigen, kiest u de bijbehorende pijphouder uit de lijst. Gebruik altijd de pakkingafdichting. 14.5 Aan verschillende types gas aanpassen WAARSCHUWING! Laat alleen een bevoegd persoon de afstelling aan verschillende types gas uitvoeren.
NEDERLANDS 35 14.9 Anti-kantelbescherming WAARSCHUWING! U moet de anti-kantelbescherming installeren. Monteer de anti-kantelbescherming zodat het apparaat niet valt als het incorrect wordt geladen. WAARSCHUWING! Uw apparaat is vorozien van het symbool weergegeven in de afbeelding (indien van toepassing) om u te herinneren aan de montage van de anti-kantelbescherming. Zorg dat u de anti-kantelbescherming op de correcte hoogte installeert.
www.aeg.com 110-115 mm 232- 237 mm De anti-kantelbescherming installeren 1. Stel de correcte hoogte in en bepaal waar op het apparaat u de anti-kantelbescherming gaat plaatsen. 2. Zorg ervoor dat het oppervlak achter het apparaat glad is. 3. Installeer de anti-kantelbescherming 232 - 237 mm onder het bovenvlak van het apparaat en 110 - 115 mm van de zijkant van het apparaat in de ronde opening op een steun (zie afb.).
NEDERLANDS in de buurt of neem contact op met de gemeente.
www.aeg.com SOMMAIRE 1. 2. 3. 4. 5. 6. 7. 8. 9. 10. 11. 12. 13. 14. CONSIGNES DE SÉCURITÉ . . . . . . . . . . . . . . . . . . . . . . . . . . . . . . . . . . . . . . . . . . . . . . . . . . INSTRUCTIONS DE SÉCURITÉ . . . . . . . . . . . . . . . . . . . . . . . . . . . . . . . . . . . . . . . . . . . . . . . . DESCRIPTION DE L'APPAREIL . . . . . . . . . . . . . . . . . . . . . . . . . . . . . . . . . . . . . . . . . . . . . . . . AVANT LA PREMIÈRE UTILISATION . . . . . . . . . . . . . . . . . . . . . .
FRANÇAIS 39 1. CONSIGNES DE SÉCURITÉ Avant d'installer et d'utiliser cet appareil, lisez soigneusement les instructions fournies. Le fabricant ne peut être tenu pour responsable des dommages et blessures liés à une mauvaise installation ou utilisation. Conservez toujours cette notice avec votre appareil pour vous y référer ultérieurement. 1.1 Sécurité des enfants et des personnes vulnérables AVERTISSEMENT Risque d'asphyxie, de blessure ou d'invalidité permanente.
www.aeg.com • Ne faites pas fonctionner l'appareil avec un minuteur externe ou un système de commande à distance. • Il peut être dangereux de laisser chauffer de la graisse ou de l'huile sans surveillance sur une table de cuisson car cela pourrait provoquer un incendie. • N'essayez jamais d'éteindre un feu avec de l'eau. Mettez à l'arrêt l'appareil puis couvrez les flammes, par exemple avec un couvercle ou une couverture ignifuge. • N'entreposez rien sur les surfaces de cuisson.
FRANÇAIS 2. 41 INSTRUCTIONS DE SÉCURITÉ Cet appareil est adapté aux marchés suivants : BE LU 2.1 Installation AVERTISSEMENT L'appareil doit être installé uniquement par un professionnel qualifié. • Retirez l'intégralité de l'emballage. • N'installez pas et ne branchez pas un appareil endommagé. • Suivez scrupuleusement les instructions d'installation fournies avec l'appareil. • Soyez toujours vigilants lorsque vous déplacez l'appareil car il est lourd. Portez toujours des gants de sécurité.
www.aeg.com • Les informations relatives à l'alimentation en gaz se trouvent sur la plaque signalétique. • Cet appareil n'est pas raccordé à un dispositif d'évacuation des produits de combustion. Veillez à brancher l'appareil en conformité avec les réglementations d'installation en vigueur. Veillez à respecter les exigences en matière d'aération. 2.2 Utilisation AVERTISSEMENT Risque de blessures, de brûlures ou d'électrocution. • Utilisez cet appareil dans un environnement domestique.
FRANÇAIS d'alcool et d'air facilement inflammable peut éventuellement se former. AVERTISSEMENT Risque d'endommagement de l'appareil. • Pour éviter tout endommagement ou décoloration de l'émail : – ne posez pas de plats allant au four ni aucun autre objet directement sur le fond de l'appareil. – ne placez jamais de feuilles d'aluminium directement sur le fond de l'appareil. – ne versez jamais d'eau directement dans l'appareil lorsqu'il est chaud.
www.aeg.com pas de produits abrasifs, de tampons à récurer, de solvants ou d'objets métalliques. • Si vous utilisez un spray pour four, suivez les consignes de sécurité figurant sur l'emballage. • N'utilisez aucun produit détergent pour nettoyer l'émail catalytique (le cas échéant). • Ne lavez pas les brûleurs au lave-vaisselle. • Avant de changer l'ampoule, débranchez l'appareil de la prise secteur. • N'utilisez que des ampoules ayant les mêmes spécifications. 2.
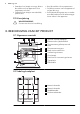
FRANÇAIS 45 3.2 Description de la table de cuisson 1 2 1 Brûleur semi-rapide 2 Brûleur semi-rapide 3 Brûleur auxiliaire 4 Brûleur à triple couronne 4 3 3.3 Accessoires • Grille Permet de poser des plats (rôtis, gratins) et des moules à gâteau/pâtisserie. • Plateau multi-usages Pour la cuisson de gâteaux et de biscuits/gâteaux secs. • Lèchefrite Pour cuire et griller ou à utiliser comme lèchefrite pour recueillir la graisse. • Tiroir de rangement Le tiroir de rangement se trouve sous le four.
www.aeg.com Appuyez sur la touche Sélection. Le symbole d'activation du minuteur s'allume. Réglez l'heure du jour à l'aide de la touche « + » ou « - ». Au bout d'environ 5 secondes, le clignotement s'arrête et l'écran indique l'heure réglée. Pour modifier l'heure, aucune fonction automatique (Durée ou Fin) ne doit être activée en même temps. 4.3 Préchauffage Préchauffez le four à vide afin de faire brûler les résidus de graisse. 1. Sélectionnez la fonction température maximale. et la 2.
FRANÇAIS AVERTISSEMENT Si le brûleur ne s'allume pas au bout de 10 secondes, relâchez la manette et tournez-la jusqu'à la position Arrêt. Attendez une minute, puis essayez à nouveau d'allumer le brûleur. Vous pouvez allumer le brûleur sans appareil électrique (par exemple, en cas de coupure d'électricité dans la cuisine). Pour cela, approchez la flamme du brûleur, enfoncez la manette pendant 10 secondes et tournezla jusqu'à la position d'arrivée de gaz maximale.
www.aeg.com AVERTISSEMENT Pour des raisons de sécurité, ne nettoyez pas l'appareil avec des appareils à vapeur ou à haute pression. AVERTISSEMENT N'utilisez aucun nettoyant abrasif, acide ni paille de fer. Vous risqueriez d'endommager l'appareil. Les rayures ou les taches sombres sur la surface n'ont aucune incidence sur le fonctionnement de l'appareil. • Vous pouvez retirer les supports de casserole pour nettoyer facilement la table de cuisson.
FRANÇAIS 49 AVERTISSEMENT Le thermostat de sécurité ne fonctionne que si le thermostat du four ne fonctionne pas correctement. Lorsque cela se produit, la température du four est très élevée et peut brûler tous les plats. Vous devez appeler immédiatement le service après-vente pour remplacer le thermostat du four. 8.3 Fonctions du four Fonction du four Position ARRÊT Utilisation L'appareil est éteint.
www.aeg.com Fonction du four Décongélation Utilisation Pour décongeler des aliments surgelés. Le thermostat doit être sur la position Arrêt. 9. FOUR - FONCTIONS DE L'HORLOGE 9.1 Programmateur électronique 1 2 3 4 1 Indicateur de durée et de fin 2 Affichage du temps 3 Indicateur actif du minuteur 4 Indicateur du minuteur 5 Touche « + » 6 Touche de sélection 7 Touche « - » 7 6 5 Fonction de l'horloge Minuteur Utilisation Pour régler un décompte (de 1 minute à 23 heures 59 minutes).
FRANÇAIS 51 9.2 Réglage des fonctions de l'horloge 1. Appuyez plusieurs fois sur la touche Sélection jusqu'à ce que le voyant de fonction approprié clignote. 2. Pour régler les fonctions Minuteur , Durée dur ou Fin End, utilisez la touche « + » ou « - ». Le symbole de la fonction correspondante s'allume. Pour les fonctions Durée et Fin, A s'allume également. Dès que la durée s'est écoulée, le voyant de la fonction clignote et un signal sonore retentit pendant 2 minutes.
www.aeg.com 10.1 Insertion de la plaque de cuisson Placez la plaque au centre de la cavité du four, entre la paroi avant et la paroi arrière, afin de garantir une circulation de la chaleur devant et derrière la plaque. Assurez-vous que la plaque est dans la même position que sur l'image, avec le bord incliné vers le fond. AVERTISSEMENT Ne poussez pas la plaque jusqu'à la paroi arrière de la cavité du four, cela empêcherait la chaleur de circuler autour de la plaque.
FRANÇAIS 53 10.3 Rails télescopiques 1. Tirez sur les rails télescopiques de droite et de gauche pour les sortir. 2. Placez la grille métallique sur les rails télescopiques et poussez-les dans l'appareil. Assurez-vous d'avoir poussé complètement les rails télescopiques dans l'appareil avant de fermer la porte du four. °C °C Grâce aux rails télescopiques, les grilles du four peuvent être insérées et retirées plus facilement.
www.aeg.com • De l'humidité peut se déposer dans l'enceinte de l'appareil ou sur les vitres de la porte. Ce phénomène est normal. Veillez à reculer un peu lorsque vous ouvrez la porte du four en fonctionnement. Pour diminuer la condensation, faites fonctionner l'appareil 10 minutes avant d'enfourner vos aliments. • Essuyez la vapeur avant et après l'utilisation de l'appareil.
FRANÇAIS Plat Type de plaque et niveau d'enfournement Temps de préchauffage (min) Température (°C) Temps de cuisson (min) 10 160 - 170 25 - 30 Génoise allégée (350 g) 1 plaque ronde aluminée (diamètre : 26 cm) au niveau 1 Gâteau couronne (1 500 g) plaque émaillée au niveau 2 - 160 - 170 45 - 551) Poulet, entier (1 350 g) grille au niveau 2, plaque au niveau 1 - 200 - 220 60 - 70 Poulet, moitié (1 300 g) grille au niveau 3, plaque au niveau 1 - 190 - 210 30 - 35 Côtelettes de porc (
www.aeg.
FRANÇAIS Plat Type de plateau et niveau d'enfournement 57 Temps de préchauffage (en minutes) Température (°C) Temps de cuisson (en minutes) Brioche aux pommes (2 000 g) plaque émaillée au niveau 3 - 170 - 180 40 - 50 Tourte aux pommes (1 200 + 1 200 g) 2 plaques rondes aluminées (diamètre : 20 cm) au niveau 2 - 165 - 175 50 - 60 Petits gâteaux plaque émail(500 g) lée au niveau 2 10 150 - 160 20 - 30 Petits gâteaux plaques (500 + 500 g) émaillées aux niveaux 1 et 3 10 150 - 160 30 - 4
www.aeg.
FRANÇAIS Type de plateau et niveau d'enfournement 59 Temps de préchauffage (en minutes) Température (°C) Temps de cuisson (en minutes) Meringue (400 plaques + 400 + 400 g) émaillées aux niveaux 1, 2 et 4 1) - 115 - 125 55 - 65 Crumble (1 500 g) plaque émaillée au niveau 3 - 160 - 170 25 - 35 Génoise (600 g) plaque émaillée au niveau 2 10 150 - 160 25 - 35 Gâteau au beurre (600 + 600 g) plaques émaillées aux niveaux 1 et 3 10 160 - 170 25 - 35 Plat 1) Lorsque le gâteau du niveau 4 e
www.aeg.
FRANÇAIS Plat Type de plaque et niveau d'enfournement Quiche lorrai- 1 plaque ronde (diane (1 000 g) mètre : 26 cm) au niveau 2 Temps de préchauffage (en minutes) Température (°C) Temps de cuisson (en minutes) 15 210 - 230 35 - 45 Pain paysan (750 + 750 g) 2 plaques rondes aluminées (diamètre : 20 cm) au niveau 3 15 3) 180 - 190 50 - 60 Génoise roumaine (600 + 600 g) 2 plaques rondes aluminées (diamètre : 25 cm) au niveau 2 10 150 - 170 40 - 50 - 160 - 170 30 - 40 Génoise rou- 2 plaqu
www.aeg.com 11.
FRANÇAIS 63 11.
www.aeg.com 12.1 Retrait des supports de grille 1 2 Réinstallez les supports de grille en répétant cette procédure dans l'ordre inverse. Les supports de grille sont amovibles pour permettre le nettoyage des parois du four. 1. Écartez l'avant du support de grille de la paroi latérale. 2. Écartez l'arrière du support de grille de la paroi latérale et retirez-le. porte du four ainsi que le panneau de verre intérieur afin de le nettoyer.
FRANÇAIS 65 2. Soulevez et faites tourner les leviers sur les 2 charnières. 3. Fermez la porte du four jusqu'à la première position d'ouverture (miparcours). Tirez ensuite la porte vers l'avant et retirez-la de son logement. 4. Déposez la porte sur une surface stable recouverte d'un tissu doux. 5. Désengagez le système de verrouillage afin de retirer le panneau de verre intérieur.
www.aeg.com 6. Faites pivoter les deux fixations de 90° et retirez-les de leurs logements. 7. Soulevez doucement (étape 1), puis sortez (étape 2) le panneau de verre. Nettoyez le panneau de verre à l'eau savonneuse. Séchez soigneusement le panneau de verre. 90° 8. 1 2 Réinstallation de la porte et du panneau de verre Une fois le nettoyage terminé, remettez en place le panneau de verre et la porte du four. Répétez les étapes ci-dessus dans l'ordre inverse.
FRANÇAIS 2. 3. Soulevez lentement le tiroir. Sortez complètement le tiroir. Installation du tiroir Pour réinstaller le tiroir, suivez les étapes ci-dessus dans l'ordre inverse. AVERTISSEMENT Ne stockez pas d'objets inflammables (matériel de nettoyage, sacs en plastique, gants de cuisine, papier ou aérosols de nettoyage) dans le tiroir. Lors de l'utilisation du four, le tiroir devient très chaud. Risque d'incendie. 12.
www.aeg.com Cause possible Solution La flamme s'éteint immédiatement après l'allumage. Probème Le thermocouple n'est pas suffisamment chauffé. Après avoir allumé la flamme, continuez à appuyez sur le bouton pendant environ 5 secondes. Les flammes sont irrégulières. La couronne du brûleur est bouchée par des résidus d'aliments. Vérifiez que l'injecteur n'est pas bouché et qu'il n'y pas de particules alimentaires dans la couronne. L'appareil ne fonctionne pas du tout.
FRANÇAIS 14.1 Emplacement de l'appareil Dimensions B A 69 Largeur 600 mm Profondeur 600 mm Puissance électrique totale 3035 W Tension 230 V Fréquence 50 Hz Catégorie de gaz Alimentation en gaz II2E+3+ G20/G25 (2E+) 20/25 mbar G30/G31 (3+) 28-30/37 mbar Vous pouvez installer votre appareil avec des placards d'un côté, des deux côtés ou dans un coin. Diamètres de by-pass Distances minimales Dimensions mm A 690 B 150 Brûleur Ø by-pass en 1/100 mm.
www.aeg.com Brûleur Puissance normale kW kW mbar mm g/h Brûleur semi-rapide 2,00 0,43 Gaz naturel G20 20 0,96 - 1,85 0,43 Gaz naturel G25 25 0,96 - 2,00 0,43 Butane G30 28 30 0,71 145,43 2,00 0,43 Propane G31 37 0,71 142,83 4,00 1,80 Gaz naturel G20 20 1,46 - 3,80 1,70 Gaz naturel G25 25 1,46 - 4,00 1,80 Butane G30 28 30 1,01 290,85 4,00 1,80 Propane G31 37 1,01 285,65 Brûleur à triple couronne Puissance réduite Type de gaz 14.
FRANÇAIS La rampe d'arrivée de gaz est située à l'arrière du bandeau de commande. AVERTISSEMENT Avant de remplacer les injecteurs, assurez-vous que les manettes de gaz sont bien en position Arrêt et débranchez l'appareil de la prise secteur. Laissez l'appareil refroidir complètement. Veillez à les manipuler avec précaution pour éviter tout risque de blessure. AVERTISSEMENT Avant tout raccordement au gaz, débranchez l'appareil électriquement ou déconnectez le fusible dans la boîte à fusible.
www.aeg.com • Si vous passez du gaz naturel au gaz liquéfié, serrez au maximum la vis de réglage. • Si vous passez du gaz liquéfié au gaz naturel, desserrez la vis de réglage d'environ un quart de tour. de l'appareil de niveau avec les autres surfaces environnantes. AVERTISSEMENT Assurez-vous que la flamme ne s'éteint pas lorsque vous tournez rapidement la manette de la position maximale à la position minimale. 14.
FRANÇAIS 110-115 mm 232- 237 mm 73 Installation de la protection anti-bascule 1. Réglez la hauteur et l'emplacement de l'appareil avant de commencer à fixer la protection anti-bascule. 2. Vérifiez que la surface derrière l'appareil est lisse. 3. Installez la protection anti-bascule 232 - 237 mm en dessous de la surface supérieure de l'appareil et à 110 115 mm du côté de l'appareil, dans l'orifice circulaire situé sur un support. Vissez-la dans un matériau solide ou utilisez un renfort adapté (mur). 4.
www.aeg.com les ordures ménagères. Emmenez un tel produit dans votre centre local de recyclage ou contactez vos services municipaux.
FRANÇAIS 75
892959379-A-182013 www.aeg.