FR Notice d'utilisation Cuisinière 49076IW-MN
www.aeg.com TABLE DES MATIÈRES 1. CONSIGNES DE SÉCURITÉ........................................................................................... 3 2. INSTRUCTIONS DE SÉCURITÉ...................................................................................... 5 3. DESCRIPTION DE L'APPAREIL...................................................................................... 8 4. AVANT LA PREMIÈRE UTILISATION............................................................................. 9 5.
FRANÇAIS 1. 3 CONSIGNES DE SÉCURITÉ Avant d'installer et d'utiliser cet appareil, lisez soigneusement les instructions fournies. Le fabricant ne peut être tenu pour responsable des dommages et blessures liés à une mauvaise installation ou utilisation. Conservez toujours cette notice avec votre appareil pour vous y référer ultérieurement. 1.1 Sécurité des enfants et des personnes vulnérables AVERTISSEMENT! Risque d'asphyxie, de blessure ou d'invalidité permanente.
www.aeg.com • • • • • • • • • • • • • Il peut être dangereux de laisser chauffer de la graisse ou de l'huile sans surveillance sur une table de cuisson car cela pourrait provoquer un incendie. N'essayez jamais d'éteindre un feu avec de l'eau. Éteignez l'appareil puis couvrez les flammes, par exemple avec un couvercle ou une couverture ignifuge. N'entreposez rien sur les surfaces de cuisson. N'utilisez pas de nettoyeur vapeur pour nettoyer l'appareil.
FRANÇAIS • • • 5 Soyez prudent lorsque vous manipulez le tiroir de rangement. Il peut devenir chaud. Pour retirer les supports de grille, tirez d'abord sur l'avant de ceux-ci, puis sur l'arrière, pour les écarter des parois latérales. Réinstallez les supports de grille en répétant cette procédure dans l'ordre inverse. Les moyens de déconnexion doivent être incorporés dans le câblage fixé conformément aux réglementations relatives aux câblages. 2. INSTRUCTIONS DE SÉCURITÉ 2.
www.aeg.com • Si la prise de courant est lâche, ne branchez pas la fiche d'alimentation secteur. • Ne tirez jamais sur le câble d'alimentation électrique pour débrancher l'appareil. Tirez toujours sur la fiche. • N'utilisez que des systèmes d'isolation appropriés : des coupecircuits, des fusibles (les fusibles à visser doivent être retirés du support), des disjoncteurs différentiels et des contacteurs. • L'installation électrique doit être équipée d'un dispositif d'isolement à coupure omnipolaire.
FRANÇAIS • • • • • • • • l'appareil. Il ne s'agit pas d'un défaut dans le cadre de la garantie. Utilisez un plat à rôtir pour obtenir des gâteaux moelleux. Les jus de fruits causent des taches qui peuvent être permanentes. Ne laissez pas de récipients chauds sur le bandeau de commande. Ne laissez pas le contenu des récipients de cuisson s'évaporer. Prenez soin de ne pas laisser tomber d'objets ou de récipients sur l'appareil. Sa surface risque d'être endommagée.
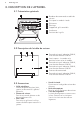
www.aeg.com 3. DESCRIPTION DE L'APPAREIL 3.1 Présentation générale 1 7 1 Bandeau de commande et table de cuisson 2 Prise pour la sonde à viande 3 Résistance 4 Éclairage 5 Support de grille amovible 6 Ventilateur 7 Positions de la grille 2 3 4 5 5 4 3 2 1 6 3.
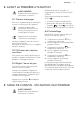
FRANÇAIS 9 4. AVANT LA PREMIÈRE UTILISATION AVERTISSEMENT! Reportez-vous aux chapitres concernant la sécurité. l'heure 4.1 Premier nettoyage Retirez les supports de grille amovibles et tous les accessoires de l'appareil. La porte est dotée d'un système de fermeture lente. N'essayez pas de forcer sur la porte pour la fermer. Reportez-vous au chapitre « Entretien et nettoyage ». Nettoyez l'appareil avant de l'utiliser pour la première fois. Remettez les accessoires et les supports de grille en place. 4.
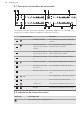
www.aeg.com 5.1 Description du bandeau de commande 1 2 11 10 3 4 9 8 5 7 6 Les touches sensitives permettent de faire fonctionner l'appareil. Les affichages, les voyants et les signaux sonores indiquent les fonctions activées. Touche sensitive MARCHE/ARRÊT Pour allumer et éteindre la table de cuisson. Touches verrouil. / Dispositif de sécurité enfants Pour verrouiller ou déverrouiller le bandeau de commande.
FRANÇAIS Affichage 11 Description du La zone de cuisson est activée. - La fonction STOP+GO est activée. La fonction Démarrage automatique de la cuisson est activée. Fonction Booster est activée. + chiffre Une anomalie de fonctionnement s'est produite. / OptiHeat Control (Voyant de chaleur résiduelle à trois niveaux) : continuer la cuisson / maintien au chaud / chaleur résiduelle. / La fonction Touches verrouil. /Dispositif de sécurité enfants est activée.
www.aeg.com • 8 — 9 — 4 heures • 10 — 14 — 1.5 heures recommandons de le placer vers la zone de cuisson arrière. 5.6 Niveau de cuisson 5.9 Démarrage automatique de la cuisson Pour régler ou modifier le niveau de cuisson : Appuyez sur le niveau de cuisson souhaité sur le bandeau de sélection, ou déplacez votre doigt sur le bandeau de sélection jusqu'à atteindre le niveau de cuisson souhaité. Cette fonction vous permet d'atteindre le niveau de cuisson sélectionné en un temps plus court.
FRANÇAIS Pour sélectionner la zone de cuisson : appuyez sur à plusieurs reprises jusqu'à ce que l'indicateur de la zone de cuisson correspondante s'affiche. Pour activer la fonction : appuyez sur la du minuteur pour régler la touche durée (de 00 - 99 minutes). Lorsque le voyant de la zone de cuisson commence à clignoter lentement, le décompte commence. Pour voir le temps restant : sélectionnez la zone de cuisson à l'aide de . Le voyant de la zone de cuisson clignote rapidement.
www.aeg.com 5.13 Touches verrouil. cuisson en appuyant sur Vous pouvez verrouiller le bandeau de commande pendant que les zones de cuisson fonctionnent. Vous éviterez ainsi une modification accidentelle du réglage du niveau de cuisson. Appuyez sur pendant 4 secondes. Réglez le niveau de cuisson dans les 10 secondes qui suivent. Vous pouvez utiliser la table de cuisson. Lorsque vous Réglez d'abord le niveau de cuisson. Pour activer la fonction : appuyez sur . s'affiche pendant 4 secondes.
FRANÇAIS 6.1 Ustensiles de cuisson Sur les zones de cuisson à induction, un champ électromagnétique puissant chauffe les récipients très rapidement. Utilisez des récipients adaptés aux zones de cuisson à induction. 15 Zone de cuisson Diamètre minimal du récipient (mm) Avant droite 125 Avant gauche 125 6.3 Bruits pendant le fonctionnement Matériaux des ustensiles de cuisson Si vous entendez : • adaptés : fonte, acier, acier émaillé, acier inoxydable, fond multicouche (homologué par le fabricant).
www.aeg.com de cuisson n'est pas linéaire. Lorsque vous augmentez le niveau de cuisson, l'augmentation énergétique de la zone de cuisson n'est pas proportionnelle. Cela signifie que la zone de cuisson utilisée à un niveau de cuisson moyen utilise moins de la moitié de sa puissance. Niveau de cuisson Utilisation : Les données du tableau sont fournies à titre indicatif uniquement. Durée (min) Conseils Conserver les aliments cuits au au bechaud. soin Placez un couvercle sur le récipient.
FRANÇAIS 17 7. TABLE DE CUISSON - ENTRETIEN ET NETTOYAGE contenant du sucre. Sinon, la saleté pourrait endommager la table de cuisson. Tenez le racloir spécial incliné sur la surface vitrée et faites glisser la lame du racloir pour enlever les salissures. • Une fois que la table de cuisson a suffisamment refroidi, enlevez : traces de calcaire et d'eau, projections de graisse, décolorations métalliques luisantes. Nettoyez la table de cuisson à l'aide d'un chiffon humide et d'un peu de détergent.
www.aeg.com Touche sensitive Fonction Description Touche Down/Up Pour parcourir le menu et régler une fonction du four. 4 Sonde de température à cœur Pour activer la fonction Core temperature. 5 Sélection de la fonction Return/ Clock Pour remonter d'un niveau dans le menu. Pour régler les fonctions de l'horloge. Increase/Decrease Pour régler l'heure et la température. 3 6 / / 8.2 Voyants à l'écran.
FRANÇAIS H Nom Description du Voyants de fonction de l'horloge Affiche la fonction de l'horloge active. 19 8.3 Fonctions du four Symbole Fonction du four Utilisation Air chaud Pour faire cuire sur 2 niveaux en même temps et pour déshydrater des aliments.Diminuez les températures de 20 à 40 °C par rapport à la Convection naturelle. Convection nature- Pour cuire et rôtir des aliments sur 1 seul niveau.
www.aeg.com 8.5 Réglage d'une fonction du four Vous pouvez modifier la fonction du four durant son fonctionnement. Appuyez sur la touche ou pour régler une fonction du four. L'affichage indique la température recommandée. Si vous ne modifiez pas cette température dans les 5 secondes, l'appareil commence à chauffer. 8.6 Modification de la température du four Appuyez sur la touche ou pour modifier la température. Lorsque l'appareil atteint la température réglée, un signal sonore retentit. 8.
FRANÇAIS L'arrêt automatique du four ne fonctionne pas avec la fonction Duration ou End. 8.13 Utilisation de la sonde à viande La sonde à viande permet de mesurer la température à cœur de la viande. ATTENTION! N'utilisez que la sonde à viande fournie avec l'appareil ou des pièces de rechange d'origine. 1. Introduisez la pointe de la sonde à viande au cœur de la viande.
www.aeg.com métallique entre les rails se trouvant juste au-dessus. • Tous les accessoires sont dotés de petites indentations en haut, à droite et à gauche, afin d'augmenter la sécurité. Les indentations sont également des dispositifs anti-bascule. • Le rebord élevé de la grille est un dispositif complémentaire pour empêcher les ustensiles de cuisine de glisser. 8.
FRANÇAIS 23 9. FOUR - FONCTIONS DE L'HORLOGE 9.1 Tableau des fonctions de l'horloge Fonction de l'horloge Utilisation Heure du jour Pour régler, modifier ou vérifier l'heure. Minuteur Pour régler un décompte. Cette fonction est sans effet sur le fonctionnement de l'appareil. Durée Pour régler la durée de cuisson du four. Fin Pour régler l'heure à laquelle le four doit s'éteindre. et un signal retentit pendant 2 minutes. L'appareil se met à l'arrêt.
www.aeg.com 10. FOUR - CONSEILS AVERTISSEMENT! Reportez-vous aux chapitres concernant la sécurité. La température et les temps de cuisson indiqués sont fournis uniquement à titre indicatif. Ils varient en fonction des recettes ainsi que de la qualité et de la quantité des ingrédients utilisés. 10.1 Cuisson • Votre four peut cuire les aliments d'une manière complètement différente de celle de votre ancien appareil. Adaptez vos réglages habituels (température, temps de cuisson, etc.
FRANÇAIS 25 Résultats Cause possible Solution Le gâteau est trop sec. Température de cuisson trop basse. Réglez une température de cuisson supérieure la prochaine fois. Le gâteau est trop sec. Durée de cuisson trop longue. Réglez une durée de cuisson inférieure la prochaine fois. La coloration du gâteau n'est pas homogène. Température du four trop él- Diminuez la température du evée et durée de cuisson four et allongez le temps de trop courte. cuisson.
www.aeg.
FRANÇAIS Mets Température (°C) Durée (min) Niveau Pain au blé complet 180 - 200 35 - 45 1-2 Pain de seigle, en sachet 275 chauffage 1 - cuisson 190 55 - 65 1 Baguettes 220 - 230 15 - 30 3-4 Crêpe 170 - 180 50 - 60 2-3 Gâteau en plat 170 - 180 35 - 45 3-4 Gâteaux de Savoie 170 - 180 40 - 50 1-2 Gâteau à étages, roulé 200 - 225 8 - 12 3-4 Meringues 100 90 - 120 3-4 Bases en meringue 100 90 - 120 3-4 - chauffage four éteint 25 3-4 Biscuits/Gâteaux secs 160 - 18
www.aeg.com Mets Température (°C) Durée (min) Niveau Pizza maison (pâte fine) 200 - 2301) 15 - 20 1-2 Pizza surgelée 200 15 - 20 1-2 Tartes maison - précuisson, roulées 215 - 225 35 - 45 3-4 Tartes maison - cuisson finale 215 - 225 35 - 45 3-4 Tartes surgelées 200 15 - 25 3-4 1) Préchauffer le four. 10.7 Viande • Utilisez des plats résistant à la chaleur pour le rôtissage (reportez-vous aux instructions du fabricant).
FRANÇAIS 29 Veau Mets Température (°C) Durée (min / kg) Niveau Filet de bœuf 1) 160 60 - 70 2-3 1) Autre. Après le rôtissage, la viande peut être dorée sous le gril ou à l'aide des résistances inférieure et supérieure à 250 °C. Si vous utilisez la sonde à viande, retirez-la avant de griller la viande.
www.aeg.com Mets Température (°C) Durée (min / kg) Niveau Rumsteak - brunissement 225 10 au total 2-3 Rumsteak - rôtissage 160 50 - 60 2-3 Rôti de bœuf 180 90 - 120 1-3 1) Autre. Après le rôtissage, la viande peut être dorée sous le gril ou à l'aide des résistances inférieure et supérieure à 250 °C. Si vous utilisez la sonde à viande, retirez-la avant de griller la viande. Veau Mets Température (°C) Durée (min / kg) Niveau Filet de bœuf 1) 180 60 - 70 2-3 1) Autre.
FRANÇAIS 31 10.10 Dorer Viande de bœuf Mets Température (°C) Durée en miNiveau nutes par kg de viande Rumsteak - brunissement 200 10 au total 2-3 Rumsteak - rôtissage 150 50 - 60 2-3 Rôti de bœuf 160 90 - 120 1-2 Mets Température (°C) Durée (min / kg) Niveau Filet de bœuf1) 160 60 - 70 2-3 Veau 1) Autre. Après le rôtissage, la viande peut être dorée sous le gril ou à l'aide des résistances inférieure et supérieure à 250 °C.
www.aeg.com Mets Température (°C) Durée (min / kg) Niveau Blanc de dinde 175 70 - 80 2-3 1) Autre. Après le rôtissage, la viande peut être dorée sous le gril ou à l'aide des résistances inférieure et supérieure à 250 °C. Si vous utilisez la sonde à viande, retirez-la avant de griller la viande. 10.
FRANÇAIS 10.12 Cuisson à basse température Utilisez cette fonction pour cuire des morceaux de viande tendres et maigres ainsi que pour le poisson. Un signal retentit lorsque le four atteint la température préréglée. La température du four descend alors automatiquement pour poursuivre la cuisson. métallique. Placez la plaque audessous pour récupérer la graisse. 3.
www.aeg.com Mets Quantité Filet de porc, en tranches Température Temps de préchauff(°C) age (min) 2,5 cm d'épais- 120 seur 10.13 Gril en général Bleu À point - 35 - 45 Niveau 2 • Préchauffez toujours le four à vide pendant 5 minutes avec les fonctions du gril. AVERTISSEMENT! Lorsque vous utilisez le gril, laissez toujours la porte du four fermée. • Réglez toujours le gril à la température la plus élevée. • Placez la grille au niveau recommandé dans le tableau de gril.
FRANÇAIS 35 Mets Quantité Durée de dé- Décongéla- Commentaires congélation tion com(min) plémentaire (min) Poulet 1 kg 100 - 140 20 - 30 Placez la volaille sur une soucoupe retournée, posée sur une grande assiette. Retournez à la moitié du temps de décongélation. Viande 1 kg 100 - 140 20 - 30 Retournez à la moitié du temps de décongélation. Viande 500 g 90 - 120 20 - 30 Retournez à la moitié du temps de décongélation.
www.aeg.com 11.3 Retrait des supports de gradins 11.4 Retrait de la porte du four Pour nettoyer le four, retirez les supports de grille. Pour faciliter le nettoyage, démontez la porte du four. 1. Écartez l'avant du support de grille de la paroi latérale. 1 2 2. Écartez l'arrière du support de grille de la paroi latérale et retirez le support. 2 1 Les tiges de retenue des rails télescopiques doivent pointer vers l'avant.
FRANÇAIS Éclairage arrière Le diffuseur en verre de l'ampoule se trouve à l'arrière de la cavité du four. 2 B 1 2. Retirez le support de la porte en le tirant vers l'avant. 3. Saisissez un panneau de verre à la fois par son bord supérieur et dégagez-le du guide en le soulevant. 1. Retirez le diffuseur en verre de l'ampoule en le tournant vers la gauche. 2. Nettoyez le diffuseur en verre. 3. Remplacez l'ampoule par une ampoule adéquate résistant à une température de 300 °C.
www.aeg.com 11.7 Retrait du tiroir Insertion du tiroir. AVERTISSEMENT! Lorsque le four fonctionne, de la chaleur peut s'accumuler dans le tiroir. N'y rangez pas de produits inflammables (tels que des produits nettoyants, des sacs en plastique, des gants de cuisine, du papier, des aérosols de nettoyage, etc.). 1. Pour introduire le tiroir, posez-le sur les glissières. Assurez-vous que les prises s'engagent correctement dans les glissières. 2. Baissez le tiroir en position horizontale et poussez-le.
FRANÇAIS 39 Problème Cause probable Solution Vous ne pouvez pas mettre en fonctionnement la table de cuisson. Vous avez appuyé sur plusieurs touches sensitives en même temps. N'appuyez que sur une seule touche sensitive à la fois. Vous ne pouvez pas mettre en fonctionnement la table de cuisson. La fonction STOP+GO est activée. Reportez-vous au chapitre « Table de cuisson - Utilisation quotidienne ». Vous ne pouvez pas mettre en fonctionnement la table de cuisson.
www.aeg.com Problème Cause probable Solution apparaît sur l'affichage de la table de cuisson. Le récipient n'est pas adapté. Utilisez un récipient adapté. Reportez-vous au chapitre « Table de cuisson - Conseils ». apparaît sur l'affichage de la table de cuisson. Le diamètre du fond du récipient de cuisson est trop petit pour la zone. Utilisez un récipient de dimensions appropriées. Reportez-vous au chapitre « Table de cuisson - Conseils ». apparaît sur l'affichage de la table de cuisson.
FRANÇAIS 12.2 Informations de maintenance Si vous ne trouvez pas de solution au problème, veuillez contacter votre revendeur ou le service après-vente. 41 signalétique. La plaque signalétique se trouve sur le cadre avant de la cavité de l'appareil. Ne retirez pas la plaque signalétique de l'appareil. Les informations à fournir au service après-vente figurent sur la plaque Nous vous recommandons de noter ces informations ici : Modèle (MOD.) .........................................
www.aeg.com 13.4 La protection anti-bascule ATTENTION! Installez la protection antibascule pour empêcher que l'appareil ne tombe avec des charges inappropriées. La protection anti-bascule ne fonctionne que si l'appareil est installé dans un lieu adapté. Votre appareil dispose des symboles illustrés sur les images (si applicable) afin de vous rappeler d'installer la protection anti-bascule. supérieure de l'appareil et à 49 mm du côté gauche de l'appareil, dans l'orifice circulaire situé sur un support.
FRANÇAIS 43 14. EN MATIÈRE DE PROTECTION DE L'ENVIRONNEMENT Recyclez les matériaux portant le électroniques. Ne jetez pas les appareils symbole . Déposez les emballages dans les conteneurs prévus à cet effet. Contribuez à la protection de l'environnement et à votre sécurité, recyclez vos produits électriques et portant le symbole avec les ordures ménagères. Emmenez un tel produit dans votre centre local de recyclage ou contactez vos services municipaux.
867307346-A-262014 www.aeg.