49106IU-MN EN User manual
www.aeg.com CONTENTS 1. 2. 3. 4. 5. 6. 7. 8. 9. 10. 11. 12. 13. 14. 15. SAFETY INFORMATION . . . . . . . . . . . . . . . . . . . . . . . . . . . . . . . . . . . . . . . . . . . . . . . . . . . . . . 3 SAFETY INSTRUCTIONS . . . . . . . . . . . . . . . . . . . . . . . . . . . . . . . . . . . . . . . . . . . . . . . . . . . . . . 4 PRODUCT DESCRIPTION . . . . . . . . . . . . . . . . . . . . . . . . . . . . . . . . . . . . . . . . . . . . . . . . . . . . . 7 BEFORE FIRST USE . . . . . . . . . . . . . . . .
ENGLISH 3 1. SAFETY INFORMATION Before the installation and use of the appliance, carefully read the supplied instructions. The manufacturer is not responsible if an incorrect installation and use causes injuries and damages. Always keep the instructions with the appliance for future reference. 1.1 Children and vulnerable people safety WARNING! Risk of suffocation, injury or permanent disability.
www.aeg.com • Never try to extinguish a fire with water, but switch off the appliance and then cover flame e.g. with a lid or a fire blanket. • Do not store items on the cooking surfaces. • Do not use a steam cleaner to clean the appliance. • Metallic objects such as knives, forks, spoons and lids should not be placed on the hob surface since they can get hot.
ENGLISH • Make sure that the appliance is installed below and adjacent safe structures. • The sides of the appliance must stay adjacent to appliances or to units with the same height. • Do not install the appliance on a platform. • Do not install the appliance adjacent to a door or under a window. This prevents hot cookware to fall from the appliance when the door or the window is opened. WARNING! Make sure to install a stabilizing means in order to prevent tipping of the appliance.
www.aeg.com • Do not use the appliance as a work surface or as a storage surface. • If the surface of the appliance is cracked, disconnect immediately the appliance from the power supply. This to prevent an electrical shock. • Users with a pacemaker must keep a distance of minimum 30 cm from the induction cooking zones when the appliance is in operation. WARNING! Risk of fire or explosion. • Fats and oil when heated can release flammable vapours.
ENGLISH 7 • Do not clean the catalytic enamel (if applicable) with any kind of detergent. • Only use lamps with the same specifications. 2.4 Internal light 2.5 Disposal • The type of light bulb or halogen lamp used for this appliance, is only for household appliances. Do not use it for house lighting. WARNING! Risk of electrical shock. • Before replacing the lamp, disconnect the appliance from the power supply. WARNING! Risk of injury or suffocation. • Disconnect the appliance from the mains supply.
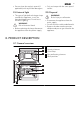
www.aeg.com 3.2 Cooking surface layout 1 2 3 1 Induction cooking zone 1400 W, with 145 mm 180 mm the Power function 2500 W 2 Steam outlet 3 Induction cooking zone 1800 W, with 180 mm 210 mm the Power function 2800 W 4 Induction cooking zone 1800 W, with the Power function 2800 W 5 Control panel 6 Induction cooking zone 2300 W, with the Power function 3200 W 6 5 4 3.3 Accessories • Oven shelf For cookware, cake tins, roasts. • Deep roasting pan To bake and roast or as a pan to collect fat.
ENGLISH 9 1. When you connect the appliance to the electrical supply or after a power cut, the indicator for the Time function flashes. Press the + or - button to set the correct time. After approximately five seconds, the flashing stops and the display shows the time of day you set. Set the function and the maximum temperature. 2. Let the appliance operate for one hour. 3. Set the function and the maximum temperature. 4. Let the appliance operate for ten minutes.
www.aeg.com 5 6 Sensor field Function The timer display To show the time in minutes. To increase or decrease the heat setting. / 7 To activate the Power function. 8 To increase or decrease the time. / 9 To select the cooking zone. 10 To activate and deactivate the STOP +GO function. 5.2 Heat setting display Display Description The cooking zone is deactivated. - The cooking zone operates. The STOP+GO / Keep warm function operates.
ENGLISH The indicator of the cooking zone flashes slowly. The timer starts to count down. 11 10 9 8 7 6 5 4 3 2 1 0 11 1 2 3 4 5 6 7 8 9 4. To see the remaining time, touch again and again until the indicator for the necessary cooking zone flashes quickly. The display shows the remaining time. When the set time ends, 00 flashes and an acoustic signal sounds. The cooking zone deactivates. 5. Touch to stop the signal.
www.aeg.com 3. To deactivate this function, touch . The display shows the heat setting that you set before. When you deactivate the appliance, the function is deactivated. 5.12 Residual heat indicator The residual heat indicator comes on when a cooking zone is hot. WARNING! There is a risk of burns from residual heat. When you activate the appliance, the display shows SAFE . The lock function locks or unlocks the oven interface at the same time. 5.
ENGLISH 6.1 Cookware for induction cooking zones In induction cooking, a powerful electromagnetic field almost instantly generates heat inside the cookware. Cookware material • Correct: cast iron, steel, enamelled steel, stainless steel, a multi-layer bottom (marked as correct by the manufacturer). • Incorrect: aluminium, copper, brass, glass, ceramic, porcelain. Cookware is correct for an induction hob if: • Water boils very quickly on a zone set to the highest heat setting.
www.aeg.com Heat setting Use to: Time Hints 2-3 Simmer rice and milkbased dishes, heating up readycooked meals 25-50 min Add at least twice as much liquid as rice, stir milk dishes part way through 3-4 Steam vegetables, fish, meat 20-45 min Add a few tablespoons of liquid 4-5 Steam potatoes 20-60 min Use max.
ENGLISH 15 8.1 Control panel 1 7 6 Number Button Function 1 – Display 5 3 2 Description Shows current settings of the oven. Setting buttons 2 4 To set the value for the temperature and time. 3 Selection/ Clock function To set a clock function. button 4 Rapid heat-up To activate the rapid heat-up function 5 Oven function To set an oven function or programme. selection 6 Oven selection 7 On/Off To switch between top and main oven. To set the oven on or off. 8.
www.aeg.com Number Name Description 3 Lamp/Defrost indicator Shows the Lamp/Defrost function is active. 4 Heat indicator Shows the heat setting. 5 Temperature/Clock indicator Shows the temperature and the time in minutes. 6 Keep warm indicator Shows that keep warm function is active. 7 Cooking time/End time/Period of operation Shows the time setting for clock functions. 8 Clock function indicator To set the clock function and minute minder.
ENGLISH Oven function 17 Application Thermal Grill To roast larger joints of meat or poultry on one shelf position. To brown. Dual Circuit Grill To grill flat food in large quantities. To toast bread. Keep Warm To keep food warm. Drying To dry food. Defrost To defrost frozen food. Light To light up the oven interior. 8.3 Activating and deactivating the oven 8.6 Changing the oven temperature Press the on/off button deactivate the oven. Use to activate or 8.4 Selecting an oven 1.
www.aeg.com 1. 2. Set an oven function. Use the Rapid heat-up button . When the oven has the set temperature, the bars of the heat indicator come up and an acoustic signal sounds. The oven continues to heat with the set oven function and temperature. 3. Put the food in the oven. 8.10 Cooling fan When the appliance operates, the cooling fan activates automatically to keep the surfaces of the appliance cool.
ENGLISH 8.14 Grilling set The grilling set includes the roasting pan grid and the deep roasting pan. 19 You can use the roasting pan grid in two positions: turned up or down. To roast larger pieces of meat or poultry on one level: 1. Put the roasting pan grid in the deep roasting pan. The supports of the roasting pan grid must point up. 2. Put the deep roasting pan in the appliance and on the necessary shelf level. To grill flat dishes in large quantities and to toast: 1.
www.aeg.com 3. Use or to set the necessary time. When the time is completed, an acoustic signal sounds for 2 minutes, and “00.00” and the related function indicator flash. The appliance deactivates. 4. Press a button to stop the acoustic signal. With Minute Minder , you must activate the oven to set the clock function. With Duration and End , the oven deactivates automatically. You must set the oven function and the temperature first before you can set the clock function. Activating Heat+Hold 1.
ENGLISH • Cakes and pastries at different heights do not always brown equally at first. If this occurs, do not change the tem- 21 perature setting. The differences equalize during the baking procedure.
www.aeg.
ENGLISH Food Shelf Position Temperature [°C] Approx Cook Time (mins) Vegetables: Roast Potatos 2 180 - 190 60 - 90 Yorkshire Pudding Large 2 220 - 210 25 - 40 Yorkshire Pudding Individual 2 210 - 220 15 - 25 Roasting Meat, Poultry 2 23 See roasting chart 10.6 Main oven 10.
www.aeg.
ENGLISH 25 10.9 Pizza Setting Food Shelf Position Temperature Approx. Cook Time (min) Apple Pie 2 160 - 180 50 - 60 Plate Tart 2 180 - 200 25 - 50 Pizza, frozen 3 Pizza, home made 2 Follow manufacturer`s instructions 200 - 230 15 - 25 Quiches/Tarts 2 180 - 200 30 - 50 10.10 Roasting Roasting dishes • Use heat-resistant ovenware to roast (please read the instructions of the manufacturer).
www.aeg.com 10.13 Grilling Always use the grilling function with maximum temperature setting Always grill with the oven door closed Always pre-heat the empty oven with the grill functions for 5 minutes. • Set the shelf in the shelf level as recommended in the grilling table. • Always set the pan to collect the fat into the first shelf level. • Grill only flat pieces of meat or fish. • Use the deep roasting pan in the middle or the top shelf level of the top oven.
ENGLISH 10.17 Thermal Grilling Roasting Food Shelf Position Quantity [kg] Temperature [°C] Time (min) 180 - 230 150 - 180 Beef: Pot roast 3 Beef: Topside beef or filler rare 3 per cm of thickness 190 - 200 5-6 Beef: Topside beef or filler medium 3 per cm of thickness 180 - 190 6-8 Beef: Topside beef or filler well done 3 per cm of thickness 170 - 180 8 - 10 Pork: Shoulder, neck, ham 2 1-1.5 160 - 180 90 - 120 Pork: Pork chop 2 1-1.5 160 - 180 60 - 90 Pork: Meatloaf 2 0.
www.aeg.com 10.18 Defrosting • Put the food out of the packaging and set it on a plate on the oven shelf. • Do not cover with a plate or bowl. This can extend the time to defrost very much. • Put the oven shelf in the first shelf level from the bottom. Type of food Shel f Time in minutes Final defrosting mins Comments Chicken, 1000 g 2 120-140 20-30 Place the chicken on an upturned saucer on a larger plate. Turn half way through. Meat, 1000g 2 100-140 20-30 Turn half way through.
ENGLISH • Set the oven temperature to 250 °C and let the oven operate for 1 hour. • Clean the oven cavity with a soft and damp sponge. WARNING! Do not attempt to clean the catalytic surface with oven sprays, abrasive cleaners, soap or other cleaning agents. This will damage the catalytic surface. 29 Discolouration of the catalytic surface has no effect on the catalytic properties. 11.2 Shelf supports You can remove the shelf supports to clean the side walls. Removing the shelf supports 1 1.
www.aeg.com 1 2 Removing the glass: 1. Open the door. 2. Push the door trim at both sides to release the clips. Refer to the picture. 3. Pull the door trim to the front to remove it. 4. Remove the glass panels. 1 To install panels, do the above steps in the opposite sequence. 11.4 Main oven 11.5 Cleaning the door glass panels The door glass on your product can be different in type and shape from the example you see in the diagram. The number of glasses can also be different. Removing the glass: 1.
ENGLISH • Remove the fuses in the fuse box or deactivate the circuit breaker. 2. 3. Put a cloth on the bottom of the oven to prevent damage to the oven light and glass cover. Replacing the oven lamp You can find the lamp glass cover at the back of the cavity. Turn the lamp glass cover counterclockwise to remove it. 1. 31 Clean the glass cover. Replace the oven lamp with an applicable 300 °C heat-resistant oven lamp. Use the same oven lamp type. 4. Install the glass cover. 12.
www.aeg.
ENGLISH Dimensions Depth Minimum distances 600 mm Top oven capacity 40 l Main oven capacity 74 l 13.2 Location of the appliance You can install your freestanding appliance with cabinets on one or two sides and in the corner. B A A Dimension mm A 2 B 685 13.3 Levelling Use small feet on the bottom of appliance to set the appliance top surface level with other surfaces.
www.aeg.com 13.4 The anti-tilt protection WARNING! You must install the anti-tilt protection (A+B). If you do not install it, the appliance can tilt. B Before you install the anti-tilt protection, adjust the appliance to the correct height. 50 mm 77 mm A 13.5 Electrical installation The manufacturer is not responsible if you do not follow the safety precautions from the chapter "Safety information". This appliance is supplied without a main plug or a main cable.
ENGLISH Make sure that the cover is securely fastened. 35 To open the cover of terminal board obey the procedure in opposite sequence. 13.7 Terminal board Make sure that the links are fitted as shown. Do not remove blanking plates. L L N N N 14. GB IE GREAT BRITAIN & IRELAND - GUARANTEE/ CUSTOMER SERVICE 14.
www.aeg.com date. Please note a valid purchase receipt or guarantee documentation is required for in guarantee service calls. Customer Care Department, Tel: (Calls may be recorded for training purposes) Customer Care.Please contact our Customer Care Department: Electrolux Major Appliances, Addington Way, Luton, Bedfordshire, LU4 9QQ or visit our website at www.electrolux.co.
ENGLISH 37 Belgique/België/Belgien +32 2 7162444 Raketstraat 40, 1130 Brussel/ Bruxelles Česká Republika +420 261 302 261 Budějovická 3, Praha 4, 140 21 Danmark +45 70 11 74 00 Strevelinsvej 38-40, 7000 Fredericia Deutschland +49 180 32 26 622 Fürther Str. 246, 90429 Nürnberg Eesti +37 2 66 50 030 Pärnu mnt. 153, 11624 Tallinn España +34 902 11 63 88 Carretera M-300, Km. 29,900 Alcalá de Henares Madrid France 08 92 68 24 33 (0.34€/min) www.electrolux.
www.aeg.com Slovenija +38 61 24 25 731 Gerbičeva ulica 110, 1000 Ljubl‐ jana Slovensko +421 2 32 14 13 34-5 Electrolux Slovakia s.r.o.
ENGLISH 39
892957451-B-272013 www.aeg.