
User's Manual


When you connect the appliance to the
electrical supply or after a power cut, the
indicator for the Time function flashes.
Press the + or - button to set the correct
time.
After approximately five seconds, the
flashing stops and the display shows the
time of day you set.
You can only change the time
if :
• The child safety device is not
on.
• None of the clock functions
Duration
or End is set.
• No oven function is set.
4.4 Preheating
Preheat the empty appliance to burn off
the remaining grease.
1.
Set the function and the maxi-
mum temperature.
2.
Let the appliance operate for one
hour.
3.
Set the function and the maxi-
mum temperature.
4.
Let the appliance operate for ten mi-
nutes.
5.
Set the function and the maxi-
mum temperature.
6.
Let the appliance operate for ten mi-
nutes.
Accessories can become hotter than
usually. The appliance can emit an odour
and smoke. This is normal. Make sure
that the airflow is sufficient.
5. HOB - DAILY USE
WARNING!
Refer to the Safety chapters.
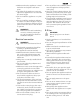
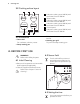
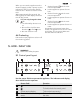
5.1 Control panel layout
1 2 3 4 5 6 7
8910
Use the sensor fields to operate the appliance. The indicators and display
show which function operates.
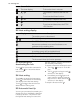
Sensor field Function
1
To activate and deactivate the hob.
2
To lock/unlock the control panel.
3
A heat setting display To show the heat setting.
4
Timer indicators of cooking
zones
To show for which cooking zone you set
the time.
ENGLISH 9